This is not my wishlist – these are just things I have suggested on my TikTok page! Yes these are affiliate links – if you don’t want to click that’s up to you!
10″ Heavy Duty Wrap it Storage Straps (instead of a belt!)
These are the items included in the Game Design kit I have my students buy for my Introduction to Game Design class at the Cleveland Institute of Art. I charge them $10 per kit, it costs us more like $20 per kit (we underwrite out of the department budget). To be at all cost effective you should purchase enough to assemble 10 kits. Without shipping 10 kits would cost around $350. The following links are the exact items I purchase, they are affiliate links, so if you do end up purchasing anything, I thank you for your support. Everything is from Amazon except for the last item which is from the GameCrafter.
If you have previously unsubscribed to a Walgreens advertisement and have recently started seeing emails from them again. Please reach out to their customer service and social media platforms, loudly and often. Tell them Jared sent you.
As someone who has had regular access to email since the late 1980s, yes that makes me an old GenXer (not a boomer) and I understand this technology well.
I am inundated with email. As a member of the media I am subscribed voluntarily (automatically) to every mailing list from every company at every trade show and conference I attend. This is in fact legal. And as long as the emails have proper headers, proper footers, and a working opt-out link, I have no problem with email marketing.
That being said, I am buried in email. Buried! So many companies (and colleagues) format their email so poorly that I cannot rely on SPAM filters. I even have to route emails that would regularly get caught by SPAM filters back into my inbox.
A few months ago, I sat down to purge my 13,000+ unread emails in my inbox. This is a grueling process. Sometimes it’s easy. You find an email from a company that you don’t engage with – you unsubscribe – then you search for all the emails they have sent you. In a moment you can eliminate 5, 10, even 50 emails from one company at a time.
As I often use my phone to check email and this is more of a desktop task, I often have to table my cleanup activities until I have a nice block of time.
During the last purge, I remember thinking to myself that while I do indeed shop at Walgreens (for literally one item) that their advertisements never do me any good. So I unsubscribed and deleted all the old Walgreens emails. This was more than 10 days ago.
Last week, after several weeks of having no emails from Walgreens, I started receiving emails again. It was very curious. One on Sunday, then one on Monday, and the Monday one was even more curious as the title was “Return to Walgreens”. At first I took the message as simply to come back and shop but after 3 of those emails – and one very peculiar email with the subject “[untitled]” the subject changed to “Let’s reconnect.”
Now I’m not just sitting here and accruing SPAM emails from Walgreens. Confused by the new emails I read the fine print:
You are receiving this email because xxx@gmail.com is signed up to receive Walgreens communications. If you no longer wish to receive these emails, please click here. We’re always here if you’d like to come back.
Well first, it’s wrong. I didn’t sign up. I had been signed up in the past but having removed myself from your mailing list I should have been moved to a blacklist of emails that they cannot send marketing materials to anymore.
Some of my followers on TikTok were afraid that this wasn’t really from Walgreens but a bizarre phishing exercise. As mentioned at the start, I’m GenX, we invented phishing. The email was from walgreens@eml.walgreens.com and the reply field was to support@e.walgreens.com.
The link was a legit link BUT the link took me to a webpage that returned the following message:
It’s a shame to see you go! Would you like to fine-tune your inbox instead? Opt-out of select subscriptions to see fewer, more relevant emails in your inbox. (a warning graphic) There are no subscriptions associated with xxx@gmail.com.Manage your email subscriptions. (with no link).
This is bad.
Walgreens is emailing me, well after I have unsubscribed, falsely indicating why I was receiving the email, and then linking me to an opt-out link that reports that I am not subscribed so is therefore invalid. All of this is in violation of SPAM laws both federal and state.
So I reached out to Walgreens customer service.
I also filed a case with the FTC. If I suspected how bad these emails were going to be I would have waited and filed a more complete version. My interactions with customer service have been staggeringly bad.
The first reply was as follows:
Thank you for contacting Walgreens.com customer service. This is in response to your e-mail regarding unsubscribing.
Apologies for sending another e-mail but I needed to confirm this information with you. May I ask you to provide the following information so that I may mark your e-mail address from manual removal?
Name:
Phone number:
Zip code:
Thank you for allowing me to assist you. Have a good day.
First, they reframed my complaint about receiving SPAM as somehow simply having a difficulty in unsubscribing. I had never resubscribed. So my difficulty in unsubscribing could more easily be stated as Walgreens not abiding by their own black list.
Second, they asked for personal information. Now I understand this isn’t a lot of information, in fact most people could find those 3 items about me without much difficulty. But the idea that they wouldn’t or couldn’t help – without getting more information than just my email address is absurd. And why would I volunteer any more information to a company that is currently abusing the information that they have of mine. I declined.
The response to my declining was insane:
Thank you for your response. I do understand your frustration, however I must explain.
Apologies, Under the Federal Health Insurance Portability and Accountability Act of 1996 (HIPAA), we are required by law to verify certain information before accessing your account . This includes modifying, disclosing, or altering any information or settings on your account. If this information is not verified, we have no way to confirm your identity.
If you do not want to verify your information you can block the following marketing address in your e-mail client to stop messages going forward: walgreens@e.walgreens.com. This is in compliance with the Federal CAN-SPAM act of 2003 by providing an alternative method of opting out for customers who do not wish to verify or confirm the account information.
I am sorry for any inconvenience caused, but we are unable to go against Federal regulations to comply with a request and it is expected that a member wishing to opt out confirm enough information so that we can assist you. You can confirm the information or use the option above to stop the e-mails going forward, as either will solve the issue for you.
Thank you for your patience and understanding. Have a good day.
We at walgreens.com look forward to assisting you.
This is absolute bullshit.
For them to hide behind HIPAA while violating the CAN-SPAM act is not just shameful but it is terrifying. Are their marketing emails tied to HIPAA data? Is their assertion that their possession of data protected by HIPAA somehow elevates these marketing emails so that they are exempt from the CAN-SPAM act? Again, their attempt to reframe my filing of a complaint and grievance into something transactional is terrible. And it’s scary.
At no time were either of these customer service people seem concerned or alerted to the fact that I was complaining that an email on their federally mandated blacklist was being sent emails. If their email system is violating one federal law how do we know it isn’t violating any others? If I did have sensitive data at Walgreens I would now be VERY concerned that their databases are combined and that something is amiss. Somehow an email was sent to an email that was, or should be, in a database, that says never email. How could this happen? Is this human error? A technical glitch? A data breach? And to what extent is it happening and can it happen? Am I the only one? Or am I the only one who thought to complain?
The second part of the email where they tell me that by telling me to block their emails they are complying with federal law by giving me an alternative way of opting out is despicable. Not only is this one of the most idiotic things I have ever read, but clearly it’s a boilerplate that someone told them to cut and paste. It’s an actual policy to tell someone that to be in compliance with federal spam laws is to simply tell people if they don’t want anymore spam to just not read it. After all, that’s all an email block is, it’s a filter. It’s like telling me if I don’t want to get mugged I shouldn’t walk down the street in their neighborhood.
I explained how both of these responses were bullshit and how they keep attempting to reframe my complaint into something that it isn’t. Surprisingly I got another response:
Thank you for contacting Walgreens.com customer service. This is in response to your e-mail regarding unsubscribing.
I apologize for any inconvenience. I was unable to locate an online account using your email address, so I was able to manually opt you out of further emails. Please allow 10 business days for the emails to completely stop showing up.
Thanks for your patience and understanding. Have a great day.
None of that makes any sense! So their HIPAA policy isn’t a policy after all? They peaked under the hood and saw it was all clear? This person read my email and it made sense to him that the second person didn’t? How was he manually able to opt me out of further emails if I was already opted out of getting emails? There is nothing here that indicates that this is true and that anything will change.
As for waiting 10 days. That’s also bullshit. Federal spam laws give them a 10 day grace period when I opt-out – that’s true. But I am not opting out! I am complaining that they are ignoring the blacklist! They don’t get a free pass and another 10 days for that!
Walgreens should know better. Walgreens is begging me to come to them with sensitive medical information about myself and at the same time being careless with my data.
Many of you probably think this sounds petty. And if you view it as simply 9 unwanted emails in my inbox you would be right.
But it is more than that. It’s bullying, it’s bad customer service, it’s bad data management, its flagrant abuse of their blacklist for profit.
I suspect someone in marketing is using the blacklist as a tool for a marketing campaign. And even if it is a 3rd party company, the law states that Walgreens is responsible. The fines could be as great as $42k per email, liabilities here could be in the millions. Customer service is so busy trying to reframe my complaint and push me away they aren’t even protecting Walgreens! They appear to be servicing no one.
Do I expect Walgreen to pay me $8 in damages for every SPAM email they send me? (That’s the most you get in Ohio per email). Well I hope so! Hell that’s $72 so far. But if we look at it another way, right now it would be about $40 per week. If Walgreens wants to send me advertisements for $40 per week they are welcome to! But I still won’t do any extra shopping there, which is why I unsubscribed from the emails in the first place.
I’m not worried about SPAM from a random pornographer, I’m worried about companies who think the laws only apply to the random pornographers. Let’s tell them otherwise.
Walgreens – what is going on?
If you have previously unsubscribed to a Walgreens advertisement and have recently started seeing emails from them again. Please reach out to their customer service and social media platforms, loudly and often. Tell them Jared sent you.
The Aesthetic Approach to Virtual Reality is the technique taught in the 12 project Introduction to Augmented and Virtual reality course taught by Jared Bendis MFA at the Cleveland Institute of Art in the Game Design department.
Project 1: 3D Photography
Objective
Create 3D Stereoscopic Photographs both as Anaglyph Red/Cyan as well as side by side.
To create hand shoot and stitch a panorama (as best as possible). The panorama should be high quality JPG of a 2:1 aspect ration equirectangular projection that can be used as a sky box in future projects (even though only some of the full sphere will be completely by this limited panorama).
To create a scene in Unity that is as if the viewer was standing inside a snowglobe and looking out. The only navigation is panning and rotating the head. The scene will use the stone art model, the cleaned up scan of the head, and the panorama as a skybox. Other models and animations can be included as desired.
When I was a kid I was fascinated by records. My mom had records. They even had my initials on them – JB. It turns out back in the 60s you would put initials on your records so you could get them back when you went to parties. My father’s initials were also JB. I love my Peter, Paul, and Mary records! In fact I listed to them today!
As I got older I would purchase more here and there: Half-Price Books, flea markets, garage sales etc.
One day I got a phone call. A friend’s mother was going into a nursing home, would I want her records. Sure! A strange variety of 78s, 33s, and 45s.
I love my singles collection. At one point I had this giant trough of 45s. Like 10 feet. I would get a lot of those at the Goodwill or other thrift stores.
One time I was at a used appliance store and there was a box of records sitting in the corner. The guy sold me the entire box for $20. It was all Kiss, Megadeath, and Led Zeppelin!
Then one day the weirdest thing happened. I was at the local library’s annual book sale and flipping through their records. $1 each. I told them that $1 each is OK but nothing beats the thrill of buying a box for $20 and coming home to some real treasures. The lady asked for my name and phone number. Weird. The next day she called and told me that the deal was acceptable. What deal? $20. $20 for what? For everything. It turns out that the library was no longer lending records and for $20 the entire collection was mine. I grabbed a buddy and a truck and suddenly I was buried in records.
Then another friend’s mother went into a nursing home, then another friend’s father died. And sight unseen people are just dropping off these collections at my house.
6 months later the library called and told me to come with another $20. I though I had all your records. They get donations, and after their semi-annual sale the rest was mine. It was a LOT! 6 months later they called again. Only a car-full but they didn’t want the $20. 6 months later I told them to stop!
During this time I’ve moved twice. And it was up to over 80 crates of records. My basement is all Kallax furniture but I have NO idea what I have.
I promised myself – no more records until they got sorted.
Well… I was at a friends house. Little old lady. She wanted some of her records digitized. In the collection I saw some real treasures. We agreed on a trade. I got the collection as long as I digitized from her list. Deal. But no more! I’ve been good since! Really!
And I mean it! During this time I got rid of almost all of my audio cassettes – I had over 700, video cassettes – I had over 1,000 – 8-track tapes – I had over 600. I kept a few here and there but I’ve been making room.
So where am I at now?
I go cube by cube sorting out the ones I know I don’t want. For sure – not going to listen to. I am keeping my eye out for anything of value though. If I suspect it could be worth something I do a quick eBay check or Discogs. If one is selling for $20 or less – it goes in the discard pile. Right now I am only culling, if I second guess a record – I keep it. This is only the for sure NOs!
My niece Olivia has become a record collector, which is good because I am sure once I weed out the bad stuff there will be dupes of a LOT of good stuff and some stuff that she will want but I won’t – like maybe all that Megadeath.
The collection is VAST. I know I have a bunch of Yiddish humor records from the 40s. And tons of 78s. The 78s are crazy old.
A couple of years ago I had a flood. The records were fine but the mediation crew that packed them up and moved them so that the room could be re-done did a terrible job. Smashed a bunch of records. They ended up paying me like $800 for some old 78s. I will do the 78s last because their might be some value there.
My friends all want to come over and see the collection but it isn’t a collection yet – it’s a warehouse.
I did find ONE valuable record so far. The Offs First Record has a nice street value so I put it up on eBay. I also found a Star Wars book and record I’m selling on Facebook Marketplace. I really don’t want to be in the record selling business. I want to listen and enjoy!
Oh, and I’m making a pile of all the Disney records. They aren’t worth a lot but someone will want the whole lot I am sure.
So originally I was going to sell them locally in batches on Facebook marketplace or to friends. I’m not interested in cleaning, grading, mailing, and waiting to get rid of these records. But no one was interested.
Then my friend Andrew called to make me a deal. He will go though the discards and take what he wants for free – but then he will load my truck, follow me to half price books, and unload. He also reminded me that between the broken 78s and the eBay record I’ve already made $1,000 off the collection so anything else is really gravy. And he’s right!
Half price books gave me $1.10 for a truck load. I’m thrilled. And Andrew for some great records. Can’t wait to do it again! Second load was work 25 cents – I think it’s because they hate me.
As someone who has been online since the mid 1980s, I often think about the amount of data I have generated. In terms of the absolute number of files though – the bulk of it has to be in email.
When I first got online I would visit various bulletin board systems (BBS), each with their own phone number and special system that I would dial into with a phone line and a modem. If I thought something was worth saving I would copy it into a running “plain text” log file I had created. In fact I still have many of these files even today. They are weird bits of scraps of humor or contact information or even emails or instant messages from days gone by. Even then I knew that there was no archiving from a BBS so what I saved was up to me. Not that I was even thinking about archiving, just saving a scrap here or there.
My real Internet experience started with the Cleveland Freenet and more commercial services like American Online (AOL) and Compuserve that really put the BBS out of business. People use AOL like a punchline these days, much like they do a flip-phone. But at the time they were cutting edge – it is only when you cling to things after their day is done that they become humorous. (Anybody need an install CD?)
Freenet had their own email system but as it was related to Case Western Reserve University (CWRU) you soon realized how client – server things were becoming. Even with AOL you could choose to have your local software create copies of all of your emails on the local drive.
The first email I saved in my CWRU email was a Happy Birthday message from one of my fraternity brothers. Dates 1/26/1990 it says – Happy 18th birthday.
From that day forward, unless it was absolute SPAM, I would endeavor to keep all of my email. The problem is that over the years I had many email accounts. By this point I had ditched Compuserve but I had an active presence on AOL (with multiple accounts – because we all did). I had my CWRU email account and my main email account was from a little company called Earthlink. Over the years they bought and sold other companies and I still have that email address (and pay a nominal monthly fee). Of course I also had a Yahoo account and as time passed I also moved to Google. I never was one for Prodigy and while I had a Hotmail email address I never used it. Ameritech was my Internet Service Provider and they gave me an ameritech.net ID but that also eventually rolled back into Yahoo.
So lets summarize: CWRU email, AOL, Yahoo, Earthlink, and Google.
Yeah that’s about right.
Now Earthlink was your standard email service. If you left too much on the server you would get into trouble so I had to use a client side program like Eudora or Thunderbird or Outlook Express. I always avoided using regular Outlook as I knew it would create these monster data files that would get corrupted.
Once I used an email client I would configure it so that it would check as much as possible – so CWRU, Earthlink, and even Yahoo would all be in one place. At various times I tried to get it to interact with AOL but the AOL client was for a while superior (for accessing AOL).
I was very fearful of the cloud. I didn’t want to bifurcate my experiences or my datasets. When webmail first came out I would use it – but I would always run home and my sure that my archive would get a copy of everything. Changing computers was the worst as I would need to make sure I didn’t lose things along the way.
I was pretty good at sorting – not great – but I would sort friends and projects and things and especially mailing lists.
As I moved from client to client I would sometimes lose attachments. When I moved from Eudora to Outlook Express, all of my attachments became a folder and those files lived elsewhere on my system. I didn’t lose the files but they were no longer part of the emails themselves.
Outlook Express was interesting as it would create smaller blocks of data and the more I filtered the more blocks I would get. Smaller blocks are of course safer.
AOL would allow me to move around mail and mailboxes in a similar way. All roads led to my CWRU email and my Earthlink account. And as I stopped using AOL, the question was: how do I keep that data?
Eventually I found a third party software that allowed me to port the old AOL email into Outlook Express. That was really the end of my using AOL. I’m sure I still can log in but if you are trying to reach me there – good luck.
On a side note, I kept AOL running longer than expected because I setup my original Apple ID as an AOL ID. This was not jaredjared@aol.com it was literally JUST jaredjared. So much got tangled by Apple and AOL in that system and many things got messed up and I had to repeat a lot of purchases and setup new Apple IDs. At one time both jaredjared and jaredjared@aol.com were valid Apple IDs. Oy – the good old days. Every so often a remnant of that pops up on an old Apple device.
Slowly I am trying to put all my eggs in one basket, and its a local basket. Again this was days before cloud backup so I was making sure that on a regular basis I was saving these files on hard drives. And the data was getting bigger and bigger.
I was also trying different email clients. Which sorts better, which filters better, which forwards better? And with every different client was the delicate process of uplifting thousands of emails in hundreds of folders. These packages were never ready for me.
When the cloud hit – I was skeptical. I might like putting all of my eggs in one basket but I want it to be MY basket. Is Google gonna stick around? How will I protect my data?
When Outlook Express was killed, Microsoft moved to Windows Live Mail. At first I was going to go back to Eudora or Thunderbird, but then I discovered that Windows Live Mail stored all of the email in sorted folders of individual .EML files. EML files are plain text! So now I wouldn’t have to worry about large file corruption and I was in a standards based file format. Hooray!
Oh – but by now I have over 100,000 individual EML files. Windows hates thousands of little files. Also jump ahead a few years – so do cloud backup services.
At this point the university had moved our email into the Google environment and I was feeling better about Google. My primary email had been narrowed down to my CWRU email and my Google account and my forever linked to various things Earthlink account.
So why not do something idiotic? Instead of relying on the cloud – I tried downloading it. I’m not a complete idiot, I used webmail like everyone else, I just on a regular basis would try to make a download of the online mail to have all my data in a single place.
But these email clients are terrible. They don’t like big data dumps and they don’t search and sort very well. So anytime I tried to find an old email I would have to rely on a third party hard drive indexing system that had read in all of the plain text EML files. This is not efficient!
For the most part my email life can be divided into Pre and Post “The Cloud”. And it’s a pretty close division of around 15 years on either side.
I know I know. Who needs to read old email from the 1990s. Trust me – its more than just nostalgia – though some of it is nostalgia – some of my active freelance projects actually date to the mid 1980s!
The pandemic (of 2020) has given me a lot of time to play catch-up on certain work activities that I never do and a big one of them is file management. I’ve worked at the same job for over 25 years and have 10+ terabytes of data. (The organization of which is another blog article and yes it is all backed up in the cloud).
In my hunting through old folders I found some of those BBS log files. Stories, jokes, instant messages, emails and phone numbers from people long gone (and often without area codes).
And then I found my EML hoard.
With Windows Live Mail long dead, I would just open them via searching and the indexing client. When I changed computers last year I didn’t renew the indexing service which means the data was just sitting there.
I wonder.
What email client could I get that would allow me to search and sort them? I’m not going to add any more email. My AOL is dead, my Yahoo is dead, and my Earthlink forwards to my Google.
Don’t laugh.
Mozilla Thunderbird to the rescue. Not only is it an active software package but people have authored all sorts of plugins for it.
So I set it up with no account (local only) and imported my old folders.
It didn’t take long for the 198,000 emails to load (my memory was that is was more like a quarter million but hey whatever).
Look at that I can see ALL my old email.
And then I had a really stupid thought.
Instead of trying to download from Google, could I send all of my email UP INTO the cloud?
Could I upload my hoard into Gmail and reunify my 30 years of email?
Kids, don’t try this at home.
It is in fact possible to have Thunderbird attach to your Google email. In fact if I wanted to I could download my entire Gmail account locally (which one day I might do). And then I made a folder in my Gmail called ZZZ and started dragging over the local folders into it.
You have to be careful. It is a slow process and if it “times out” I find it is best to rename the folder that died and to start again. I don’t delete the old folder because in Google they are really labels and not folders and you might have created unexpected connections. I would rather deal with duplicates than loss.
Many years ago two of my bosses were arguing about a project I was working on and who was supposed to pay for what when. In the middle of their finger pointing I pulled out emails from 8 months prior that resolved the situation. Both of them were shocked and said “Who keeps email for that long?” “I do.” “Why?” “Because of situations like this!”
I’m not that crazy anymore. When the email tells me there are snacks in the break-room, I delete it. I unsubscribe from unwanted lists and go back and delete things that just aren’t needed. I still have a hoard but its a better curated hoard.
I also have 12,000 unread emails in my inbox. I’m getting to those. That’s another blog entry. I’m getting there – every days I’m getting there.
But today I can say my email is all in one place.
Happy 18th birthday Jared.
As I write this I am 2 months away from my 49th birthday.
When working with students and student media projects they always run into the same issue and ask the same question: Where can I get media for my project?
Now in many student situations this isn’t an issue. In the “closed environment” of term papers and face to face PowerPoint presentations we can safely fall back on fair-use to allow the inclusion of almost anything. We are pretty much safe to “violate copyright” when incorporating contextual and needed media into our face to face academic work. Though personally I don’t allow my students to use watermarked imagery in their presentations and papers not because of copyright but because it is just tacky.
However in this article I am talking about the more produced output. Projects where students are creating items for distribution such as videos, comic books, and games (video and analog). Please remember that video is inherently a distributed medium – it is designed to be shown! There is no such thing as private video (our celebrities have taught us that). In all of these situations I am very firm that we should not even attempt to fall into a fair use category and be as “legit” as possible. But where can I find stuff that I can use?
1) Original Materials.
Go out and shoot. You have a camera – I know you do. It’s on your phone. You need a picture of a bird – go shoot a picture of a bird!
At Case Western Reserve we require that anyone who is the subject of an image (or audio or video) sign a Media Release Waiver. I remind my students to not go too crazy here – if there is someone in the background don’t worry about them – worry about the subject of the photograph. This is actually more of a courtesy though than a legality – the reality of photography law is that if you are in a public place you pretty much can’t stop people from taking your photograph. I like my legal situations to be in align with my ethics so I always ask permission before I take someone’s photograph and usually let them know what I plan to do with it.
Sound effects are also VERY fun to create on your own. Don’t discount your own creativity.
Music wise you have to be very careful because even if it is YOU playing – it still can’t be someone else’s song. And even if the composition is in the Public Domain the arrangement might not be!
2) The Public Domain.
Contrary to what my students think – the “Public Domain” is not a place but a legal status. They think the “Public Domain” means you found it in the public (i.e. online). The Public Domain is when an item has no copyright associated with it – it is the intellectual property of no one – and therefore usable by everyone one.
Legally – these items do not even require citation! In student projects I require them to include a citation as an ethical courtesy (and sometimes it is good for your own clarification) but the reality is that the Public Domain is the Public Domain.
So how does an item achieve this status? Well some items are un-copyrightable (at least by US law).
The list of ingredients in a recipe, formulas or compounds (it’s the description and explanation that can be copyrighted)
Facts – lists of information such as calendars, rules, telephone directories
Blank forms
Items created by the Federal Government
Federal Government
The Federal Government is great because so many archives online have been created by your tax dollars!
You still have to be careful though:
Other people may have rights in the works, such as publicity or privacy rights.
You cannot use U.S. government trademarks or the logos of U.S. government agencies without permission.
You cannot use a U.S. government work in a way that implies endorsement by a U.S. government agency, official, or employee.
Works prepared for the U.S. government by independent contractors may be protected by copyright, which may be owned by the independent contractor or by the U.S. government.
Not all information that appears on U.S. government websites is considered to be a U.S. government work.
The U.S. government work designation does not apply to works of U.S. state and local governments. Works of state and local governments may be protected by copyright.
Copyright laws differ internationally.
An example is the Department of Energy which has posted tons of materials on Flickr (more on Flickr in a moment).
Another example is this recording of Bach’s Air on the G string performed by the United States Air Force Band and in the Public Domain as it was the output of Federal employees.
NASA has a treasure trove of materials and also explains very clearly what you shouldn’t do with them – basically don’t be a jerk.
Nice People
Some people are just nice and when they take their pictures they “release” them into the public domain. They give them away to everyone! Again no acknowledgements or citations are needed in their usage. They are truly just free!
Everything on ClipSafari.com is in the Public Domain – EVERYTHING – they tried to step up after things went weird at OpenClipart.org
Copyright Expired
This is my favorite category but it can also be a little confusing.
In modern copyright law – the moment you CREATE a thing – you own it – the copyright is yours. Notice the moment you create it – it has to be real, fixed, tangible, not just an idea.
For my dancer friends remember to video your choreography to protect it!
But that wasn’t always the case! While Cornell has an amazing Guide to the Public Domain – I want to point out my 3 favorite Public Domain scenarios:
on Jan 1, 2020 – Public domain was anything published prior to 1925 (so everything IN 1924) this is a rolling date so:
2021 we get all of 1925, 2022 – 1926, 2023 – 1927, etc…
Anything published between the magic year above (so 1925 in 2020) and 1977 without a copyright notice (because the rules at that time required you to say it or you didn’t get it! A great story is about the film Night of the Living Dead)
Anything published between the magic year above (so 1925 in 2020) and 1963 but the copyright wasn’t renewed.
Let me explain this last one. Between “the magic year” and 1963 you had to not just file and post a copyright notice but the copyright was only good for 28 years and then you had to renew it for another 28 years. If you didn’t renew it then it went into the Public Domain. For books, Stanford has a database of the Copyright Renewals for this period which is helpful in finding out of if a book is still in copyright or has fallen into the Public Domain.
There are many many other categories (see the above Cornell link) but these are the easiest three that I use when looking for resources.
Copies of 2D Works in the Public Domain
One of the most controversial items on my list (and not 100% defensible) stems from the lawsuit Bridgeman Art Library v. Corel Corp. the basic outcome of this lawsuit is that “Photographic reproductions of visual works in the public domain were not copyrightable because the reproductions involved no originality.”
In simpler terms – if an item is in the public domain – all photographs or reproductions of that item are in the public domain – because a straight reproduction has no originality.
This of course excludes 3 dimensional works where each photograph can be considered unique.
But in the world of paintings and drawings it pretty much means that if a painting is in the public domain ANY picture of that painting is in the public domain. So I can get my image off the Internet, a museum website, or even a text book.
Now don’t quote me – use your own common sense here. Bridgeman v. Corel is a legal precedent – that’s it. It’s a good one and it’s used a lot – but if you get sued you are on your own.
Interesting enough most museums charge an arm and a leg to use a photograph of one of their (Public Domain) paintings in a book. And they can do this because they have the keys to the castle – they have the access to the high res scans and you don’t (and the contract you sign with them is binding)! I know many faculty members who pay these outrageous publications fees out of fear of reprisals!
And again – this applies to 2D works only. Every picture of a 3D work is unique! (Well for now at least).
3) Properly Licensed Media
This last category is easier than you think. If you want to use something – just get permission. And in fact some people are so nice they even give you permission before you ask!
Flickr
A good place to find properly licensed media is on the photo and video sharing site Flickr.
So let’s say we were looking for pictures of kittens.
Before we go on, we should ask ourselves some basic questions.
COMMERCIAL: Is this project considered commercial? i.e. am I going to use it in a way were I can make money? Think about this carefully. If it is for a board or video game the answer is always YES (eventually). For videos or websites, will you be having advertisements or hope to profit from it? It is better to assume that your project is commercial now then to come back later and have to find replacement images. YOU have to make the call – so Commercial YES or Commercial NO?
DERIVATIVE: Do I need to modify the image to use it? The answer for my projects is always ALWAYS – YES. I am going to edit, cut it out, mix it up, incorporate it into something else. So I need to remember I am creating a derivative work from it. If I was just putting a picture of a kitten on my website without modification then I would NOT be modifying it – but for most projects I am working on the answer is YES.
SHARE-ALIKE: Am I willing to share the image that I modified under the same terms in which it was shared with me. Think about this? This can mean the single image but it could also mean the entire project (depending on how it is built). For myself and for my students I always advise NO. Not because I am not nice but because I don’t want to add a level of complexity to what I do.
So in summary – I assume all of my projects are Commercial, that I am creating Derivatives from the media I use, and that I will NOT Share-Alike.
When you look at each picture on Flickr it will tell you what type of license restriction it comes with.
Jared’s Guide to License Restrictions:
License Name
Should I use it in my project?
All Rights Reserved
No
Public Domain Work
YES
Public Domain Dedication (CC0)
YES
Attribution
YES (but include the name of the author and indicate changes were made.)
Attribution-ShareAlike
No
Attribution-NoDerivs
No
Attribution-NonCommercial
No
Attribution-NonCommercial-ShareAlike
No
Attribution-NonCommercial-NoDerivs
No
United States government work
YES (Probably)
No known copyright restrictions
YES (Probably)
With Flickr I usually jump to the advanced search and start with the license of Commercial Use Allowed.
As I am avoiding the Share-Alike License I keep an eye out and avoid this icon:
To be legal I just need to indicate several things:
Kitten by Jennifer C. via Flickr used unmodified
That’s it! I don’t need the URL or anything fancy – I just did what I was supposed to do – attribution.
Wikimedia Commons
Wikimedia Commons (where all the media for Wikipedia lives) works pretty much the same way Flickr does – take your time and learn to read the licenses.
Incompetech
For royalty music I tend to go to Kevin MacLeod’s site Incompetech.com
He posts his rules very clearly – and in exchange for a simple credit he pretty much allows for everything.
If I wanted to use the work called Shaving Mirror I would just have to include the following text in the credits section:
Shaving Mirror Kevin MacLeod (incompetech.com)
Licensed under Creative Commons: By Attribution 3.0 License
http://creativecommons.org/licenses/by/3.0/
Please note I said the Credits Section – there is no requirement that you put the attribution right THERE at THAT moment. It’s OK to put the credits at the end!
Sound Bible
For sound effects, a lot of my students like to go to SoundBible.com.
Just because someone put the image online and said it was Public Domain or Creative Commons doesn’t mean it is!
A student of mine once found a picture of Mickey Mouse posted to Flickr with a Creative Commons license – common sense tells us otherwise.
You can find some stupid things on OpenClipArt as well.
Don’t be tacky!
If the image has a logo or watermark or something identifiable that you don’t like. Just move on and find something else. Fighting with an image in that way is combative, tacky, and a waste of positive energy.
Copyright is not the only thing that matters!
Trademarks can pretty much live forever. If the company keeps the trademark alive it can live beyond what a copyright does so just because it is old doesn’t mean you can use it.
Re-encode your sound effects!
Whenever working with sound effects be sure to open them up, edit them, adjust the volume, and encode them to YOUR specifications. I can’t tell you how many times a student has used a sound file “as-is” and found some strange incompatibility. Take control of your media and be the last person who touched it.
Be Clever!
If you need a picture of the Pacific Ocean you probably can use one of the Atlantic Ocean. Think more broadly about what you are looking for and you will start becoming a better searcher!
Ask!
I have on more than one occasion found someone willing to let me use an image or animation in my project because I told them what I wanted to do and asked them nicely.
Don’t be cheap!
Over the years I have purchased sound effects, music, and images because the quality was right, the price was right, and time = money. Also you would be surprised at how many good ideas you will find by going through the commercial sites (which tend to be a touch more organized). Some sites I use include:
This is a text supplement to a video you can find here:
1) Turn on Maya Render Layers – This is ONLY done one time. Once this is done your Maya will stay this way.
Windows > Settings/Preferences > Preferences
Rendering – Preferred Render Setup System – Legacy Render Layers
Restart Maya (Again you only need to do this once).
2) Load your file!
3) Make sure your file is lit properly. Lighting is needed for the composited image.
3) Adjust the zoom and rotation of your camera until you are happy.
4) In your render settings, set the resolution to something high (such as 3000×3000) also make sure that Alpha Channel (mask) is checked!
5) Render your camera. Make sure the image looks good. This is the base image you will be colorizing later so repeat until you are happy.
6) Save the image as a PNG file. We need to use PNG so that the non-image area is transparent and not black (even though it looks black on the screen).
7) Go back to the render settings and set to something low (such as 600×600) this makes the next steps go faster.
8) Choose the Channel Box / Layer Editor Tab on the right side of the screen.
9) Choose the Render Tab (Which you have because of step 1) (At the bottom on the right)
10) Select all of your objects. Select > All
11) Create New Layer from Selected Objects (this is the last icon when the Render Tab is selected)
12) Rename it something nice that you will remember.
13) Right click the new layer and select Attributes
14) In the Attributes Panel, click the Tab of the layer you just made.
15) Click the Presets button and choose Luminance Depth
16) Look for the slider marked Out Color. Click the little arrow button thingy at the far right end of it.
17) Right click on the Old Min and choose Break Connection
18) Right click on the Old Max and choose Break Connection
19) Render to see what you have. Keep the Render window open.
20) Adjust the Old Max number until you the image starts to get clipped (in the far) with black.
21) Repeat until there is no black in the rendered part of the image.
22) Adjust the Old Min number until you the image starts to get clipped (in the near) with white.
23) Repeat until there is only a touch of pure white in the rendered part of the image.
24) Set the resolution back to 3000×3000
25) Render the image
26) Save the new image as a PNG
27) You now have the original rendered image and the z-map image, both as PNG files.
So, here I am doing another 3D tutorial. It turns out that as time passes it gets easier and easier.
Of course you have to know how to shoot a good stereoscopic pair, but let’s assume you’ve done that. You have used a 3D camera or have taken 2 images about 3″ apart that have no motion in them, and now you want to view them with your favorite pair of red/cyan glasses. (I like the ProView from Berezin).
So here are my source files:
Note – all images in this tutorial are clickable to the source files.
My right picture:
My left picture:
The images above link to the source files if you want to play with them yourselves. Since there are people in the shots we know I used a 3D camera (and didn’t ask everyone at the opening at the Met to stand perfectly still).
First I go to Photoshop and open both images.
Then, starting with the Right image.
Select > All [This selects the entire picture]
Edit > Copy [This puts it into the clipboard]
Navigate to the Left image.
Edit > Paste [This creates a new layer from the contents of the clipboard]
Navigate to the Right image.
File > Close [This closes the right image]
Yes there are keyboard shortcuts, and yes you may use them, but this is a tutorial so I am taking it nice and slow.
If you look in the layers panel you will see you have two layers:
Layer 1 – which has the contents of the Right image.
Background – which is the locked background layer and has the contents of the Left image.
We need to do several things.
Double click on the words “Layer 1” and rename it “Right” (You must be on the words or you will open the Layer Style menu by mistake).
Since we don’t want the Background layer to be a “locked” background layer we need to convert it into a normal layer.
Double Click on the Background layer and it will prompt you to name a new layer.
Basically this converts your locked background layer into a regular layer and allowing you to rename it at the same time.
Voila, now you have two unlocked layers. Right on top, Left on bottom.
This should literally take a minute.
Now we need to make it anaglyph. I know about 20 ways to do this and I recently learned one that is so easy I feel stupid. Yes there are tools and software for alignment and things but I needed to write up a tutorial for my VR students and I don’t want them using those yet!
Personally, I prefer the grayscale anaglyphs. Unless you know your colors really well, you can get very weird vibrations.
So go to each layer and click Image > Adjustments > Desaturate. Remember you have to do this for BOTH layers!
Now this next part is where it gets funny.
Double click on the blank space after the name Right in the Layers menu. This brings up the Layers Style menu.
Or click Layer > Layer Style > Blending Options…
Right in the center of the dialog box, under Advanced Blending, uncheckthe channel marked R (for Red).
And click OK.
You would think you would need to go to the Left image and uncheck the G and B channels but you don’t. (Unless the Left is on top in which case you don’t have to do the right).
Now you have an anaglyph image but it needs adjusted.
Select the Right layer, and then using the move tool, move it around. Ideally you should only have to move it right and left but nothing is ever perfect.
As you adjust you will notice that sometimes the red and cyan on an area seem to go away and that part becomes solid grayscale. This is the plane of the screen. Anything behind it goes into the screen, anything in front of it pops out of the screen.
Now you have to be careful.
If you set the closest item to be the plane of the screen. The back part of the picture might have too much separation and be hard to view. If you make the back the plane of the screen you will mess everything up because nothing should pop out of the screen that much – it is called violating the stereo window.
You want to find the sweet spot.
When you do. I would do two things.
Save your project as a PSD file so you can keep adjusting later.
Save > As your image as a JPG file so you can share with your friends!
PS You will need to open and crop the JPG file to get rid of the parts that didn’t have overlap. Look for it.
Here is the image aligned at the nearest point:
Here is the image aligned at a far point: (This is bad and hard to view)
Here is the image going set to about 2/3 into the screen and 1/3 out:
I built an arcade cabinet! Woo hoo! You want one too, right? You could go to your local pinball shop and pickup a prefab multicade or something like that or go online and order something that ships to you all put together. But if it isn’t already put together – the moment you start delving into the arena of “kit”, you are building something. Once you are consider building you might want to take control over what you are making.
Disclaimer: This post is dated 5/28/2018 and the information is current – here & now. Time will pass, prices will change. Also, I have no affiliation with ANY of the companies listed nor am I getting any affiliate kick-backs. If you want to say thank you just email me, showing me what you built and say “Thank you!” And if you REALLY wanna say thank you my PayPal email is jaredjared@earthlink.net or Venmo me @jaredx2 .
Last fall I was commissioned to design a custom video game and I built my cabinet for this art installation. For previous art projects, I custom built installations using parts from XGaming. They have a USB control board as well as buttons and switches that make it really easy to map to a keyboard. The rest is just carpentry and figuring out how to incorporate the monitor.
However each art installation became its own machine. And after I build them I have to destroy them (they take a lot of space and only get used a few times). This time I wanted to create something a little more universal . Something that I could run off of a computer but that would also be fun to own and play when not running the art installation. And because I am greedy I wanted it to be able to do everything that I possibly could imagine!
The first decision I was going to have to make was which of the three major configurations was I going to go for: standup, cocktail, or bar style. Most people dream of the standup arcade cabinet because it looks cool. It is big and sexy. But I had a few other considerations. The first was portability – I was going to need to move it! I also wanted people to be able to gather around it and watch. This would be easier with the bar style or the cocktail style. I decided on the cocktail style because it is completely stand alone, i.e. it doesn’t sit on a table like a bar style, and it also affords multiple type of game play. I also love the idea of how inviting and casual the unit is. It whispers… come sit and play me. One thing to note though is that glass top cocktail arcade cabinets do not like overhead lights – they can reflect.
I started to look at the various cabinets online for reference and I soon realized that certain elements of the construction would be out of my control. I wanted a glass top table and a bezel-less LCD display and these would become limiting factors. I also realized when I started to design “the box” that there were way too many other things to consider and that maybe for version 1 I would modify a kit so that in the future for version 2 I could build the box from scratch. This of course is strictly for the carpentry aspects, as the guts I would have to “assemble” from a variety of sources.
During my research I found several people that sold kits. But each company only sold a part of what I wanted. And then I found Holland Computers. They sold EVERYTHING – well almost everything – but much more than any other company that sold parts online. And then I discovered that they were local – 45 minutes away! I could just go and get what I wanted without waiting! I could even make mistakes and go back again!
The goal was to build a cocktail style arcade cabinet that had the most utility possible. This included 4/8 way joysticks, trackballs, multiple buttons, multiple player (side by side or head to head), video pinball, and the capacity to use a computer and/or a dedicated gaming box.
This was going to involve a lot of questions and a lot of compromise. Oh, and it would cost about $2,000. A full breakdown is at the end of this article.
4-way or 8-way joysticks?
Old school games like PacMan use a 4-way joystick. That means up, down, right, and left but NO diagonals. With a 4-way joystick not only do the diagonals not trigger, but you physically can’t move the joystick that way. When we talk about how a game feels we sometimes overlook the subtlety of the physical mechanisms we are playing with. However some games like Street Fighter need the diagonals – hence the term 8-way joystick. 8-way games are impossible to play on 4-way joysticks and 4-ways games feel horrible on 8-way joysticks.
Some joysticks are configurable inside the machine – so they can be set to 4-way or 8-way. But then I found the Mag-Stik-Plus Arcade Joystick. This joystick has a neat feature in which you can pull and twist and change it from a 4-way to an 8-way and back again without opening the machine. It is pretty cool. There are a million things to look for in a joystick, some people talk about the springs and the handle etc. I am building a fairly casual machine that will have the broadest utility and this solved most of my problems.
To trackball or not to trackball?
My favorite arcade game is Tempest. It a unicorn of arcade games. It uses a vector based display and a spinner – a spinner! There really aren’t that many games that ever used a spinner and it would be impractical to incorporate into my arcade machine. OK, that distraction aside, my next favorite game is Centipede and that uses a trackball. While not many games use a trackball I wasn’t willing to give up Centipede (and Tempest isn’t bad with a trackball). I was determined to include a trackball. I would love a nice big one but I was going to settle for a smaller one.
Which Layout?
This part was killing me. There really is no “standard” layout for an arcade machine. How many buttons and how are they arranged? It is easiest to start with the “knowns” or constants. I am building a cocktail style table. This means the controller will be for one person and the screen will be in portrait mode. This also means that a second player will sit across from player one and have their own controller. Interestingly enough this type of 2 player configuration (where the players sit across from each other) is NOT known as head to head.
I was going to add the side controller unit which would allow to players to sit side by side – this is called “head to head” because the players can play the game at the same time. In this configuration the screen is landscape.
The side by side or “head to head” unit is the easiest to make decisions about. Landscape multiplayer games tend to use 8 way joysticks and have a lot of buttons. The standard configuration is a joystick on the left and 6 buttons on the right (as well as a player 1 and player 2 start button). Personally I wanted head to head just to play competitive Tetris!
However, for the individual controller Holland Computers has two different configurations.
The first has a hole on the left for a joystick and 4 holes on the right for 3 buttons and a start button.
The other has a hole on the left for a joystick and 7 holes on the right for 6 buttons and a start button.
While either of these would have been fine – I wanted more. I wanted to squeeze in a trackball. Now let’s review for a moment. In classic arcade games you control the joystick with your left hand and you control the buttons with your right. I always find this interesting because you would think that since most people are right hand dominant that you would need more control on the joystick than the buttons but not so. Here are several classic examples all with the joystick on the left and the buttons on the right:
Centipede however is reversed. You control the trackball with your right hand and fire with your left:
You would think that would mean I would want the joystick on the left, the buttons in the middle, and the trackball on the right. But I love symmetry and that configuration would KILL me! I wanted the trackball in the middle. With the joystick on the left and the buttons on the right it would be easy to ignore the trackball in the middle. But how was I going to fire when playing Centipede and others? Video Pinball to the rescue! Video Pinball you ask? Well, if I incorporate flipper buttons on the sides then I could use configure the left flipper as button 1 and the right flipper as button 2 and be able to use the trackball and fire from the side flipper which should feel good (and does).
So that was the final decision. Joystick on the left, trackball in the center, 3 buttons on the right, with left and right flipper buttons. I could put a start button on the front which would be out of the way. The head to head panel would have a joystick on the left and 6 buttons on the right for each player and start buttons also on the front as.
It all starts with this kit
This is the cocktail table kit that they sell at Holland Computers and would be the base for my project. The base kit is only $360, but don’t let that fool you – by the time I was done I spent over $2,000. Again, at the end of the post I have a complete breakdown of parts and pricing. I did return several times to Holland Computers for more stuff, hopefully my experience will make your experiences better.
For the rest of this article I will post all the pictures at a medium resolution and have them clickable for a full size image.
Unboxing
The basic kit is 3/4″ particle board covered in melamine. The melamine is a nice coating but will chip something awful – so you have to be careful when cutting or drilling. Some of the edges have been pre-routed for T-molding. There are screws holes and bored holes for the furniture cams. I purchased several extra boards – the tops and sides of the controllers – since I knew I might make a mistake (and I did!). I also purchased a replacement “C-panel” which was pre-drilled and cut for the “head to head” unit. This is not an item they have on their website and while it saved me from having to drill the holes and cut the opening they forget the bore holes for the cams and I had to do those myself.
And this is most of the stuff (not all) that was going to go into the unit. Notice those giant bundles of cables. These are JAMMA cables and is the standard that the internals of this machine are being built to. JAMMA is the Japan Amusement Machine and Marketing Association and have established a series of connection standards that allows you to swap out the main board of a machine and have everything else work pretty much the same. I will get to the “brain” of this machine a little later in this article. Because I was doing 2 players and a “head to head” I purchased a 3 way JAMMA connector – this is a lot of wires. The JAMMA connector is a blade type connector (like the card inside of a computer) and I purchased an extension cable because it would be easier to plug and unplug cables from each other than to mess with the hardware directly. I also purchased an extra JAMMA cable so I could cut it up and use for spare wires and connectors.
But I am jumping ahead. You can’t do the wiring until you have the box designed and built.
Designing the Controller
The kit comes with the controller predrilled for the joystick and 4 buttons. I instead started with a blank.
Some things to know about drilling into melamine coated particle board. Practice on a scrap first! Also tape the surfaces (front and back) to keep the chipping to a minimum. All of the holes for the buttons and for the joysticks are 1 1/8″ and I use a flat blade bore. Spend good money on this and go very very slowly. There aren’t that many holes to drill – be patient!
I arranged everything the way I thought I wanted it to look. On the left is the the joystick with the stick removed (that’s a pencil in the hole). On the right are the nuts for the buttons which helps to make sure that the spacing is enough. And in the center is the trackball unit – without the metal mounting plate. I centered everything both horizontally and vertically – this would turn out to be a HUGE MISTAKE!
The joystick and trackball both have drawings online – though neither was to scale. I was able to scale them and make printouts so that I could use them to lay out the controller.
The mount for the trackball uses four drilled holes and a cut out square. Luckily the cut out area has a lot of room for play – so it didn’t need to be “perfect”. After drilling the correct size holes I drilled starter holes in the corners of the cut-out area and then used a jigsaw to cut the rest of the opening.
I covered both sides of the panel with painter’s tape to keep the melamine from chipping too badly. Before you cut, be sure you have the wood panel oriented properly. Which is top? Which is bottom? Which is front? Which is back? How the trackball gets mounted is pretty interesting!
Looks good right? Well, it isn’t – but let’s get back to that.
I also drilled the holes for the side buttons i.e. flippers.
Even though I taped the board the melamine still chipped. Chipped so bad you could see it around the buttons (and yes 1 1/8″ is the right size). I used some black enamel (i.e. nail polish) to seal the chipping and cover up the damage. It might look obvious here, but you can barely see it in the finished unit.
Now it’s time to assemble the boards using the cams. And that’s when I realized I screwed up. I didn’t take into account the front overhang. The metal posts for the trackball mounting plate would go right through the front board – which doesn’t work! 🙁 Luckily I purchased some extra blanks – and printed out some extra templates – and had more blue tape.
This time I centered the trackball left to right but pushed the mounting plate the the very EDGE of the board (away from me). The board in the picture on the left is there just to keep things flush.
Re-cut and re-drilled (on a new board) it was still going to be a tight fit. After screwing the mounting plate into place the nuts would till hit the front panel. But now there was enough clearance that I could partially bore or chisel to make room for the nuts to be covered but not go through the front board.
The trackball gets screwed into the mounting plate.
And I drill into the front boards for the start buttons.
Tada! Now it all fits. 1 joystick, 1 trackball, 3 game buttons, 2 side flipper buttons (a repeat of buttons 1 and 2), and a front start button. And then do it all again for player 2!
The Head to Head Controller
The head to head kit was already pre-drilled so it was just a matter of putting it all together. There were extra front button holes so I used button caps.
Stereo Speakers
Most arcade units have one single speaker. I wanted to put stereo in (or even dual mono) so that for Player 1 or Player 2 or Head2Head it would sound good.
I decided where the speaker would go. Taped the spot (both sides), drilled a pilot and then cut the holes.
Both panels cut!
The speaker gets screwed in from the back and the grill gets screwed in from the front. The grill comes with plugs to cover the screw holes.
The Coin Door
I originally was going to put in 2 doors. One would be the coin slot door and the other for access. I quickly realized that the access door wouldn’t be big enough to do actual maintenance. The kit assumes that you will build this pretty much one time and uses one of the boards as an access panel that gets screwed into place. But this is particle board and this would never work as a long term solution for me to repeatedly go inside the box. As the coin door and the access door were the same size, I used the access door for layout even though it never actually got installed (yeah extra parts). Once again I found the drawing online and printed it to scale. With my box having three controller units I opted to put the coin door on the 4th side. I also had decided this was going to be the side I would access the unit from.
Particle board is hard to cut and luckily there was still some (but not a lot of room) to wiggle. Again I started with a drill and then used a jigsaw.
It was a very tight fit and I had to go back a few times to get it to fully fit into place. Once the hole was large enough I used the coin door instead of the access door.
The Rest of the Box
At this point it is just about following directions. And using the furniture cams I was able to attach the two sides (with the freshly cut speaker holes and mounted speakers) to the side panel. This side panel in the kit comes as a solid piece but I was able to purchase (in person because it isn’t on the website yet) a pre-cut “C” side panel that had the opening and drill holes for the head to head controller (but mistakenly not with the bored holes for the cams). I then attached the bottom board. The problem with furniture cams is that they tend to offer strength in one direction. For instance the bottom of the box is great if you push DOWN on it but any force from below pops out the cams. The reasons this is important will be clear in a moment.
The fourth wall is made of three smaller boards. The lowest board is for power and venting. The vents are already cut as is the hole for the power switch. The power switch also has the power cable and screws into place. The fan is a 110volt AC exhaust fan. This is an AC (not a DC) fan so the direction of the flow is indicated on the fan itself. Make sure you find screws that can make it through the entire fan and into the wood.
The top panel has three holes in it. Two of the holes are more momentary buttons – “test” and “service”. The third hole is for a volume control knob – but I have a different solution for volume.
The Bottom of the Box
According to the kit instructions the box just sits on the floor. As all the edges get covered with a plastic T-molding this is generally a fine solution. But I need to move this box and it might be indoors and it might be outdoors so I need something a little more flexible and decided to customize a solution. Regretfully, I ended up customizing it three times – i.e. I made a mistake or two.
First, I screwed wood blocks into the corners. Not only did this provide reinforcement but it also prevented the bottom board to pop when pressure was put from below. I used heavy duty leg levelers, I drilled the center hole so that the center post would have room in either direction. With 4 legs the unit was raised and flat – but way to heavy.
In my next iteration I used two heavy duty leg levelers and two swivel casters. This was better but then the unit would slide around too freely.
In my final version I added some more wood (as spacers) and used four heavy duty leg levelers and two swivel casters. The legs were set just beyond the casters so that with just a tilt of the unit it could me moved like a dolly but otherwise be completely stable.
I also cut another hole in one corner for cables. While my overall intention is that everything could be self contained inside the box – I thought it could be nice to be able to run the cables to a laptop or computer sitting outside of the box.
The Access Panel
So instead of screwing the access panel into place, I decided to use hinges. Of course I wanted it to look nice so I used a router table to add grooves for the hinges to hide in.
Because the panel is designed to push into place (and not hinge into place) the panel was slightly too large for the opening. I used the router table again to take off a small amount of the panel to give it clearance. I later painted this edge (more black nail polish) so it wouldn’t be noticeable.
Open and closed!
To help keep the unit closed I added magnets and a strike plate on the inside and a locking hasp on the outside.
Probably my favorite goof up was the shelf. It is the exact width of the box. Which would slide into place except I already mounted the speakers. The shelf is actually in my unit but it did require that I take something apart. My advice: Put the shelf in while you are adding the sides!
Other than the controllers there is only one panel left – the top panel. I just placed it on top to see what it would look like. I am nowhere near ready to install it. But at this point but it looks so cool!
The tragic part of all of this is that technically I just have a giant and fairly sturdy box.
Power
So I started with the power supply. The rocker switch I installed on the back of the box has a standard 3 prong cable going into it from the outside. On the inside is another power cable that runs the AC to the power supply. In the picture the 3 cables on the left with the blue tips are from the internal power cable.
I knew I wanted an outlet inside the box. Since there was already power running inside I took a power strip and cut off the end. I then crimped on hook ends and attached them at the screw post. Learn your ground, neutral, and hot colors. Green is ground, white is neutral, black is hot.
The power supply puts out multiple voltages – namely 5 volts and 12 volts. There is an adjustment switch on it and before you hook anything into it you need to tune the voltages to be as close as possible to 5 and 12 volts. I already owned a nice meter but this was the first time I got to use it.
The internal AC power cable also has a split that goes to the LCD monitor’s power brick. Several other items run to the power supply. The fan goes to the AC side of the power supply but the audio amplifier is DC.
The Brains
The heart of a JAMMA box is this connector. The basic idea is that the arcade cabinet uses a standard wiring that terminates in this standard JAMMA connector. With this connection, a variety of boards can plug in and be played. For example the above is a JAMMA board from a Space Invaders & QIX arcade machine. In the classic sense – everything comes in and out of the JAMMA board, power, controls, audio, and even display (remember most old video games are CGA or EGA). However, I was going to use more specialized JAMMA boards and didn’t need to worry about audio or video.
These are the JAMMA boards that I use. The one on the left is a USB to JAMMA card that allows a computer to access all of the buttons. The one on the right is a GameElf “1162-in-one” JAMMA board. This board (which is really a box) has 1162 built in arcade games and is designed to work with cocktail style machines. This means it can play games vertically, flipped vertically (player 2), and horizontally. I got my GameElf 1162 from Holland Computers but it looks like they aren’t selling it anymore. You can still find it online from other places. Unlike a traditional arcade cabinet I am using an LCD display and an audio amplifier both of which bypass the JAMMA connections.
Let’s look at the other 3 sides of the GameElf 1162. On one side it has an SD card which contains all the games. From what I have read online – don’t touch the SD card! Note: Not every connector on the box is used. On one side is a 1/8″ audio output jack with a volume control and the other has a VGA connector for video. There is a USB port for a certain type of game controller – but that’s not the type of box I am building! Next to the VGA connector is the connector for the trackballs.
The 2″ trackball comes with it’s own cable.
To plug the trackballs into the GameElf you need a separate JAMMA Trackball Interface Wiring Harness. This is specifically for 2″ trackballs and for the 138-in-1, 412-in-1, 485-in-1, 619-in-1, & 1162-in-1 GameElf boards. What is nice about this cable is that it allows the cable coming from the GameElf to meet the cables coming from the trackballs with a quick connection in the middle. When it comes to connections I would rather unplug cable from cable than cable from hardware – which is why I purchased a JAMMA extension cable for the JAMMA boards.
For the computer, you can only hook up one trackball. I purchased an Opti-Wiz Trackball and Spinner Interface. This is a USB board that allows you to plug (if you know the wiring – follow the diagrams) an analog trackball into a computer. I also purchased the Opti-Wiz 4-pin Molex connector for the unit so I wouldn’t have to solder onto the board. Since I want to be able to swap the trackball between this USB board and the GameElf, I need a quick connect / disconnect. I purchased an extra JAMMA Trackball Interface Wiring Harness (for the part that interfaces with the trackball – I cut away the other end) and wired it into the Opti-Wiz 4-pin Molex connector.
Now I have a quick connect for the GameElf and also a quick connect for the Opti-Wiz. Again this is only for player 1’s trackball.
The JAMMA Connector
I am going to show the JAMMA connector again. If you build an arcade cabinet you are going to spend a lot of time looking at this. It is well documented online and because mine is technically a “3-way” (because it it is a cocktail cabinet with a head to head controller) it has almost twice the number of connections.
So many cables. First thing I did was organize and label!
Not only did I organize and label, I taped the cables down to my workbench.
Once I realized that several of the cables didn’t apply to this box, I cut them off and capped them.
I tried to avoid soldering as long as possible. Because of the “flippers” / side buttons I would need to double those connectors. Luckily I had purchased an extra JAMMA cable to use for parts.
First I attached the power cables and then the momentary switches.
Now everything is about the switches – even the joysticks. The unique connection is the middle one and the top (farthest from the switch) is the common ground.
First the unique connections – everything is color coded. Then the common grounds.
Even though everything is still outside the box, I needed to start testing! Let’s fire it up!
It’s alive! I would like to say at this point everything was perfect. But I had to figure out how to get into the system setup and change it to default to be into vertical mode and then I had to see which connections didn’t get wired right. Some things just didn’t work. I had to wiggle and solder until everything worked.
Ms. PacMan! Centipede! Looks right, sounds right, if only the controller were attached to the box already.
The GameElf mounted in the box under the head to head unit.
The Controllers
Now comes the dance! You have to get all the cables threaded INTO the machine properly and also use the furniture cams to keep things solid.
It is so nice once everything is in!
From above! Even though it looks a mess I am using zip ties all along the way to keep things together and tidy.
The Audio
Originally I ran the audio from the amplifier into each of the speakers. This left me with two problems. The first is that the volume would be inside the box and the second was that there was a hole for a volume knob it came pre-drilled. Most potentiometers are for mono audio and are for the pre-amplified signal. I wanted a stereo volume control for the amplified signal heading to the speakers. Oh, and I wanted to get rid of the hole.
I found an in-wall speaker volume control for amplified stereo signals at Home Depot. I then cut the hole for it over the other hole.
This of course meant that all audio roads would lead to and from this point – which means a lot more cables. I had to carefully run the audio cables around the inside of the box. I wanted to make sure they wouldn’t dangle or be in the way when the access door was open. Other than a little bit of cable management the worse part of this was just figuring out which type of technology I wanted to use.
The Coin Door
For the coin door, first I installed the lock.
Then I installed the cables. The coin is just another switch (just like the buttons and the joysticks).
The coin mechanism is adjustable to either work for quarters or for tokens. I set mine for tokens. You also need to make sure you know where the coins are going! I have a small cardboard box that fits perfectly under the coin door. The guys at Holland Computers suggested a plastic fish bowl (they even sold me one) but the way I built my box it didn’t fit.
The Monitor
Now it’s time to finish the carpentry! One last set of furniture cams.
The top gets attached.
The monitor edges are very sharp! Be careful! The monitor gets dropped into place and then screwed into place.
The plastic bezel makes everything look neat.
Tada. It is almost done. The bezel is a lot darker than it looks in the picture, that’s just a trick of lighting.
One more addition! I added chains to the access door to prevent it from putting too much stress on the hinge by trying to over open.
Finishing Touches
I can’t believe I made it to finishing touches. This entire project has been so much work. Every time I thought I was done. I wasn’t.
Now for the T-molding. You can choose from a variety of colors. It comes with a blue but I wanted my color contrasts to be in the player 1 vs player 2 colors of red vs. blue so I opted for a black trim. Remember because I purchased the head to head controller kit I need another 4 feet of molding. For the most part you just use a rubber mallet and tap it into place. Notice that I am doing this before I add my glass top.
When you need to turn the T-molding you make little cuts or even wedge out some of the plastic. It is an art form but you soon get the hang of it. A good sharp razor is handy!
Curving in the other direction can also be a challenge. Again more careful cutting and hammering.
With all the trim in place the box looks so nice! I won’t lie, the T-molding took a long time to install and I was nervous the entire time. Plan where you want your seams.
Now to add the spacers for the glass.
The kit comes with an acrylic top. There was no way I was going to spend all this time and effort and use something that cheap. I opted for a glass top. It comes either clear or a smoked. I love the smoked. The darker glass hides the monitor better and makes the graphics pop even more!
The glass is attached with clips that get screwed in from below. Notice how they go over the T-molding, another reason the T-molding goes first.
Another finishing touch are these stools that Holland Computers sells. I needed a stool that would be small, adjustable in height, and also roll around. These little guys are perfect.
Is it done?
Even with all the very careful cable management, zip ties, etc., it looks like a mess in there. It’s actually better than it looks. On the right is the power supply which is screwed into place. On the left is the audio amplifier (which is also screwed into place), the GameElf is mounted on the far wall. The little black box left of center is a KVM switch (that has a small black one button wired remote which I have come out the hole) that allows me to switch the audio and video between the GameElf and the Computer. To switch the trackball I have to connect and disconnect the white wire in the upper left of the picture). The JAMMA connector that gets either the USB or GameElf are the cables right in the center. For the most part I leave the GameElf plugged in. For those of you who think this is a mess, you should open up a pinball machine sometime.
Here it is again.
Why is my trackball so sluggish? Wait, is that blood?
I said the monitor was sharp and I wasn’t kidding!
Programming for the Box
Getting my laptop to play nice wasn’t always easy. To make sure that everything worked the way it should I made my desktop image a square that was centered to the background. This way when I tried different video modes I could see not just did it fill the screen properly but was it distorting my image.
When I custom write software I map everything to keyboard commands and then use JoyToKey to map my joystick to the keyboard. Makes my life a lot easier.
It’s Done!
Here it is! In this configuration it is running off of a laptop which I stuck inside the box and is running a game that I designed. It even requires tokens to run. The funny thing about the coin operation is that it is just another button so you basically write software that requires you to press a certain key before your game is active.
You could see people really getting into it as both player and observer.
That’s me in the blue shirt coaching people a little.
What do I need to build one?
Time, money, space, some tools, supplies, and all the parts.
Time & Space
Do not discount the amount of time and space you need to do this. I was highly motivated to finish because I had a deadline and a project at the end of this. Sitting it front of boxes and boxes of cables and parts can be fun or overwhelming.
Tools
Obviously you need some basic tools and the ability to use them. I am sure I will miss a tool or two along the way but…
Screwdrivers. Especially a very short handled Philips to get in there and turn those furniture cams.
Power Drill and bits. You will need a variety of bits. To start the cuts you will need a bit big enough to get your jigsaw blade in. I needed to be able to drill pilot holes and holes large enough for the legs posts to screw beyond. You will also need the 1 1/8″ flat spade for cutting the button holes. Don’t get cheap you want that spade bit sharp. I also got a 2″ and a 3″ hole cutter for the speaker hole and for the access hole. If you need to make a hole for a cam then you will need a Forstner style bit (and a drill press or a jig if you care about it working right).
Jigsaw. You need to be able to cut openings for the coin door and for the trackball. Oh, and for the volume control.
Rubber Mallet. This is to get the T-Molding into place.
Razor Blade. To cut the T-molding.
Multi-Meter. To tune the voltage of your power supply.
Soldering Iron & Solder. To fix, add, and join cables as needed.
Crimper and ends. I didn’t demonstrate this that often but especially for the power connectors where I used the fork connectors or the buttons which use the spade connectors. It is nice to have a kit. While most of them were “solderless” I ended up still soldering a lot.
Router Table. I used this to set my hinges into the wood. I also used it to take just a touch off the panel to make it fit better – though this could be done with a table saw. I love my router and router table. If you don’t have one you should get one and also learn to use it as they can eat wood really fast.
Shop-vac. You are going to make a mess. Vacuum as you go!
Supplies
Screws, heavy duty painters take (for the cutting), solder, electrical tape, some bits of 2×4 (which I used for the corners), cable ties, cable lockdowns. I am sure there are other little things like cleaning supplies everyone is a little different in how they work. Oh and again – screws.
That’s it – and the part list.
With the exception of the part list, this is my story! Thanks to Holland Computers for letting me be a pain in their ass for about a week. It was funny they were like “just build the kit” and I was like “but I want this and this and this”. They were so sure I wouldn’t fit that trackball in or get it to work with a computer.
People ask what version 2 will look like. I am not ready to build version 2. I am happy with the guts of this machine. I like the buttons and the joystick and my GameElf (which of course doesn’t have every game I want but it has over 1,000 games). I haven’t tried configuring a MAME engine for it or running the entire thing off a Raspberry Pi which I might try at some point.
The big question is what would the box look like not made out of particle board. I’ve thought about laser cutting and building something new but in the end it would be close in size and shape so I am not there yet!
Disclaimer: Again! This post is dated 5/28/2018 and the information is current – here & now. Time will pass, prices will change. Also, I have no affiliation with ANY of the companies listed nor am I getting any affiliate kick-backs. If you want to say thank you just email me, showing me what you built and say “Thank you!” And if you REALLY wanna say thank you my PayPal email is jaredjared@earthlink.net or Venmo me @jaredx2 .
First, a quick shout out to Dr. Charlie Harper. I knew about photogrammetry before I met Charlie, but I never knew how to make it work right. His thorough understanding of the process, his ongoing assistance, and his offhand comments about looking backwards into previous data-sets made this project possible. (Apparently he approves of this endorsement and would like to see it on all article introductions.)
A look back in time.
In 2005, my boss at Case Western Reserve University sold me half time to the Cleveland Museum of Art as their Virtual Reality Specialist. For 2 years I had a lot of fun working on cultural objects. While at the Museum I produced a stereoscopic art film about a piece of art (alas in SD), an experimental HD stereoscopic rig, an autostereoscopic visualization (3D without the glasses) of a French table fountain, and a hologram. An honest to goodness hologram – produced by a holographer from turntable data taken in 1/3 degree increments. Again – I had a lot of fun.
Jump ahead to 2010. My former boss at the Cleveland Museum of Art, Len Steinbach, contacted me about a freelance project. The Musée des Beaux-Arts de Dijon was about to start renovations and it was suggested that since the alabaster sculptures that surround the tombs of the Dukes of Burgundy would have to be de-installed, that the sculptures might go on tour. Before they were to go on tour they wanted to produce a high-tech VR gallery of the mourners and I was hired to create VR photo objects of the sculptures. Even though the sculptures would tour the US, for various reasons it was easier to fly me (and my gear) to France and do the shoot in the museum itself (which was the Duke’s castle!).
This was a very precision shoot. Each mourner was shot under studio lighting which was coordinated by their in-house photographer François Jay (who was awesome). This is turntable photography and each mourner was shot in 5 degree increments from 5 different views (above, below, and 3 head on). This resulted in 360 21MP photos in camera raw for each mourner. 39 mourners * 360 photos = 14,000+ photos (in 3 days).
The photos were turned into a series of interactive objects. You could spin, zoom, change views, even view them in anaglyph (red/blue) 3D. The objects were all put together in an amazing website designed by Rory Matthews. You could navigate around the cloisters and even download any view in full/high resolution (for non-profit use). (Which is what makes the rest of my story kosher).
As projects go I am very proud. Yes, a lot of it is in Adobe Flash, but back then you really had no choice.
This project was VERY well received. The tour was amazing (I even got to go to the opening at the Met in New York) and everyone who reviewed the project loved both the physical and the digital aspects of it. I presented on it several times and Len even wrote an article about it for Curator: The Museum Journal.
Now the sad story.
I don’t know who to blame (and blaming anyone wouldn’t help anyways) but the digital side of things were not well cared for. Almost everyone I worked with on the project was a freelancer (myself included) and so a lot of things got lost in the shuffle of “who was supposed to do what” after the fact. Len, had purchased several domain names: mourners.org, mourners.com, themourners.com, some variants in French etc. It is exactly what you are supposed to do – it makes it easier to find. The problem is that no one (of the many organizations) renewed the domain names and one by one each domain name was lost (snatched/stolen) until all that was left was mourners.org. After I found out it had been lost, I contacted the owners of mourners.com and they tried to sell it to me for $50,000. This means most of the articles online about the project are now pointing to bad URLs (specifically themourners.org). Thankfully, mourners.org is still online.
And then someone moved servers. We don’t know how or why but when the website was moved from one server to another it broke. Rory was freelance, I was freelance. We offered to help but everyone said they would take care of it themselves – and 8 years later it is still broken. It is a big disappointment. That’s why I keep a working sample of one mourner on my site.
OK – enough sad stuff. These remarks are not meant to embarrass or shame anyone. This isn’t news. The ArtStor link is public, the missing URLs are public, the broken website is public. In reality it was just a perfect storm of institutional bad timing and bad luck. I would love to see the data brought back to its full glory and if the resources or the institutional desire to make this happen are brought to bear I am standing by!
Luckily, I have all the data and as long as I am working on non-profit research projects I am allowed to play (again it says so on the website).
So it is 2018 and I am working on some experiments with Charlie in photogrammetry and he asks me if I have any older data sets of sculptural things that might be good to test with? And I was like – DO I?
I started with Mourner 44 because it is a simpler model. Nothing too crazy sticking out or around. I only used 3 of the 5 data sets because 5 degrees around the center should be enough that I wouldn’t need the extra 2 orbits around the center that we used for the stereoscopic version.
It’s a long process. It takes a while for that many photos to load and process. A day for the rough alignment, a week for the high resolution model. This is intensive stuff and it is NOT automatic.
I could have loaded the 3 datasets in different chunks but I opted to do them all at once.
If you do it right then you will see the cameras positioned where they were in space. If you are moving around an item it will align both the foreground and the background, so before you move on you want to get rid of that background data so you are working on the object not the object AND the room. Since I was using a turntable I had to make sure that the software didn’t align to the background. When that happens all of the cameras show up at the same spot – the model turns into noise – and you get a perfect model of the wall behind you!
Luckily we had the proper lighting and backdrops and the software distributed the cameras perfectly around the object.
At this point I needed to remove the outlier data. Charlie came in and showed me how to keep the reliable vs. the unreliable points mathematically. This is something I would never have done on my own as it felt like I was throwing away data. I wasn’t – I was throwing away noise. I then hand removed the big strays, the chunks of points outside of my model or at the fringes of my model. It’s tedious but straightforward. The last selection I did was by color where I was able to select data points that didn’t “look” like my sculpture and trim them away as well.
With this new cleaned up data I was able to tweak my camera alignment and then ask it to create a “dense cloud” – there are of course parameters (thank you Charlie). This took a week. My computer is top of the line, crazy video card, crazy memory card, tons of ram, SSD drive. A week!
It looks like a 3d model but it isn’t – it is just a very dense data cloud.
The “dense cloud” is then converted into a mesh, decisions of course are made into how to deal with holes and more parameters. This only took several hours.
This mesh can viewed as a surface with or without color.
But if you want it to look awesome – you have to build a texture – more time – more parameters.
With it, I can load the model, rotate scale, fix errors in the mesh, and all sorts of things.
The first thing I did was to stand it straight and then create a box and subtract it from the base to make sure I had a flat bottom.
I export this model as an STL and I am ready to print.
The first one I made was going to be small (just a few inches) – actual size is 16″ tall!
While Netfabb prepares my models but I use Simplify3D to prepare the object for my 3D printer: https://www.simplify3d.com/
Simplify3D allows me precise control of everything you can imagine, supports, infill, temperate(s), raft etc. It makes all the difference in getting the most out of your 3D printer.
I print on a FlahForge Creator Pro. It is a dual extruder unit but the wood filament is a pretty good support and breaks way nicely.
Small cute and effective.
Voila!
I was going to print a bigger one on an industrial printer at thinkBox (The University’s Center for Innovation) but solid it would have been thousands of dollars and even hollow it was going to be between $500 and $900. (Netfabb can the hollow model / shell for you which is cool).
Instead I opted to print it on my own 3D printer in 4 sections and then glue, fill, and paint.
The head took 8.5 hours and 37m of filament, the torso – 18 hours and 80m, the legs 13.5 hours and 58m, and the feet 17.5 hours and 75m. This used a honeycomb infill.
Total for this model: 57.5 hours and 250m of filament (which is around $40).
There was some pullaway at one corner of the base, so each piece isn’t as flush to the others as I would have hoped. I used a wood glue and some wood fill to create the solid model.
I then primed and painted it with acrylic.
Voila & Voila!
Last year as a retirement present for a friend and coworker, my boss asked me to 3D print a bust of JS Bach. I thought I could do something more artistic and instead sliced the model into thin sheets which I laser cut and assembled. (I did all of this at thinkBox).
I now own a laser cutter at home and decided I wanted to do this process again. The cutter is a Glowforge and it is amazing: https://glowforge.com/
First, I to decide on the materials I am going to use. The thinner the slices the higher the “resolution” of the final model – but the more you have to cut. I found a very inexpensive 2.6mm wood veneer at home depot. I had them cut it into 19.5″ wide strips which is all I need because the laser cutter has a pass through.
In Netfabb I scale the model to the right size and then slice it to the correct thickness.
Before I do that I add (well subtract) from the model two 1/4″ by 1/4″ rectangular prisms (not shown in the previous image). These small square holes are placed to run strategically through the entire model as close to the top as possible – but not all the way. I later use 1/4″ square steel rods as an armature to align and hold it together through these holes.
From Netfabb I export a zip file of DXF files. Each DXF file I then load in Adobe Illustrator. When the file is imported it asks how to scale it: 25.4 units = 1 inch keeps everything scaled properly from Netfabb to Illustrator (which is mm to inches).
I arrange the shapes into sheets (as large as the Glowforge bed) as many as I could cram on (and in order). With the Bach I engraved numbers on each slice. This took hours to add and added hours to the cut. Instead I just quickly wrote on each slice with a pen as it came off the laser cutter.
Many cuts later….
It is very spongy. I pushed down on the slices to figure out the most amount of metal I would need and still be most of the way up the head. I then marked it, removed all of the wood slices from the metal, and cut the metal with a Dremel.
I also laser cut a base with deep holes cut into it to hold the metal armature.
I then put the cut end into the base (so I wouldn’t have to worry about burrs) and then stacked it back up – gluing along the way – touch a touch of wood glue).
Cleaning the edges of the wood can be tricky. Some use acetone or alcohol. I often use fast orange hand cleaner. For this model I used a little steel brush and some fast orange wipes because I planned on painting it. I wanted something closer in color to the original. Also from experience I knew I couldn’t get the entire thing FLAT FLAT unless I clamped and cleaned up the squeezed out glue non-stop. Instead the paint would fill some gaps for me just like with the 3D printed version seen here unpainted.
Painted the laser cut slices and the 3D print.
Now I have 3 copies. Voila, Voila, & Voila!
I had an idea about doing a clear version. But instead of tightly arranging the slices on the laser cutter I was going to create a rectangle around each slice. This would allow me to cut 2 at once, both a positive and a negative shape. In Netfabb I subtracted my model from a larger rectangular prism (creating a giant hollow) and sliced it thinner (to match my clear plexi – I used the good optically clear plexi $$). I didn’t add the alignment holes because I didn’t want a bar to be visible running inside.
This took a lot of plexi. Home Depot doesn’t cut your giant sheets of plexi for you. I did find however that per square foot it was cheaper to buy the 48×36″ sheets instead of the 48×96″ sheets.
Also, all I needed to do was to cut each 48″x36″ sheet in half and I would have 48″x18″ which I can run through the cutter. Lots of scoring and snapping later and I was ready to laser cut.
The model assembled beautifully. I made a few mistakes in illustrator – I printed a few extra slices and then later shuffled a few and had to reprint the head – but in plexi everything was gorgeous.
Now I would have to align everything permanently. I created a jig which I could lay on top of each slice (both outside and inside still together) and then added 2 dots with a black sharpie so I could align them later. I used the same spot the metal bars went through.
In my initial tests it looked like both the glue and the sharpie wouldn’t be visible.
It took an hour or so to mark all 175 sheets.
However at certain angles you can see a blue line running through the plexi (which is still cool). I should have used 4 pinholes.
I was going to weld each sheet using acrylic weld but I am allergic to a lot of chemicals and instead opted to use a super glue gel. (The aftermath of which was me being deathly ill for 2 days anyways). The gluing went well, you can’t see it from the side. But several slices weren’t as flat as they needed to be and the adhesive just wouldn’t work. For those few spots I used a clear epoxy (more death for me) and that explains the duller lines you see on some of the slices because – they just don’t lay as flat.
The negative space model is amazing. But I am afraid to glue it, so for now it is just a careful stack. I created 5 sides of plexi which I used scotch tape to hold as a sort of box until the weather turns nice enough outside to play with the acrylic weld.
Next time I am going to cut things out of a circle!
So 5 copies in 3 materials!
But wait there is more!
And in a future post I will discuss how we got the object to work in augmented reality with HP Reveal, augmented reality again with the Microsoft Hololens, back on the web using HTML5, and a few other interesting output techniques!
Hope you enjoyed.
One last note: Take this all with a grain of salt. This is just how I do it – or did it – this time. I am sure there are better ways – there are always better ways and I appreciate learning new things as I go.
I haven’t posted one of these in a while. However, every time I run into a problem were I find myself scribbling page after page of equations and numbers I think – maybe this is a blog entry someone might find useful!
At Case Western Reserve University we have (hidden away) an Atiz BookDrive Mark 2 book scanner.
It really isn’t a scanner but a very nice dual camera system, with really good lights, a great book cradle, and a fabulous platen which hold the pages down without any reflection of the lights. It even has a hardware switch where you can shoot just by lifting up and down the platen (after of course you turn the page). I can scan and 300 page book in about 30 minutes! This is a very good tool.
We purchased our unit with twin Canon T5i cameras (these are 18MP each) with 50mm prime lenses for regular books and 35mm prime lenses for larger books.
Operating the unit is pretty straight forward you just need to make sure that you have everything setup properly first (lot’s of things get locked down: exposure, shutter speed, aperture, white balance, sensitivity etc.)
I do NOT lock down the focus because the book will move slightly as the pages turn and also the book gets thicker and thinner depending on where you are in the book.
So why this post?
Well the boss turned to me the other day and asked me to scan a very rare book and asked me specifically for an output of 600DPI.
The specifications were set by the organization that we plan on sending the scans to.
Normally when I work with rare books I am asked to just shoot a page or two and it is done from a photographic point of view i.e. shoot the object as an artifact.
Or, if I want a really good scan of a book I often use our Plustek A300 book edge scanner – that will give me 600-800 DPI without a problem and also give me VERY flat pages. However it involves a lot of handling of the book and, while the scans are great, it is less than ideal for something very delicate unless you want to move in slow motion.
So back to the boss. Can I scan the book at 600DPI?
Well that’s not really the question. Since I am not scanning the book but photographing it – the question is – will the resulting digital image amount to 600DPI? And if not – what do I have?
I could run fancy math (and will in a moment) but since I have the scanner I figured it would just be easier to actually run a test. I photographed a target I made of 1″ squares.
No – I am not going to show you a picture the target – because it is just 1″ squares.
The T5i is an 18MP camera with a resolution of 5184 x 3456.
With my “default” setup the 50mm lens could see about 14.9″ x 9.9″ so 5184/14.9 = 348
3456/9.9 = 349 or about 350DPI.
Not even close.
Now don’t get me wrong – for most of the jobs that I do this is fine. At 300+ DPI the text is perfect and I can see enough of the halftone pattern to correct the images. I would love more but it hasn’t been pressing. That is until today!
What can I do?
Change my lenses
Change my sensor
Change my camera type altogether!
Change my Lenses:
If I get longer lenses (that zoom in more) I would increase my DPI but also decrease my effective scanning area.
The 60mm is the largest PRIME lens I can get which would only get me to 420DPI, a 15-85mm zoom (locked at 85mm) would give me 595DPI (and let’s just call that 600DPI) but my problem now is that the size that it can photograph is MUCH smaller than most books.
Change my Sensor:
Right now I am using a Canon T5i if I upgraded to a Canon T6i (for $800 each) I would get a resolution of 24MP (6000 x 4000) instead – meaning:
Closer but still not really getting to 600DPI at a decent scan area. Assuming the 60mm lens would work it could cost $2,400 just to get to a little under 500DPI (and the scanning area might still not be right).
Change my Camera Type:
Both the T5i and the T6i are crop sensor DSLRs. What about going full frame?
Now I will work backwards. The question I can ask is:
Assuming I like the scan area of 14.9″ x 9.9″ – what resolution camera would I need to get 600DPI?
Well that’s easy. 15×600=9,000 10×600=6,000. 9,000 x 6,000 = 54MP. I
would need a 54MP camera! Oy! Well at least I can jump to the top of the line and skip the 30MP cameras.
The Canon EOS 5DS is a 50MP camera with a resolution of 8688 x 5792. Interestingly enough it is the same price ($3,500 each) as the 5D Mark IV which is only 30MP.
But with a full frame (not cropped sensor) all my math changes again – and not for the better as the lenses become wider angle – in fact the 50mm lens now covers 24.1″ x 16.1″ at 360DPI.
The trick here is that once you start getting into this range of camera the lenses also get expensive. You can get an 85mm lens for $400 or the fancy “L” series for $1,800 – reading through reviews I picked something in between! The 75mm lens above is a zoom lens that can lock at 75mm. Also I checked and the good news is that our prime 50mm and 35mm are compatible with the full frame sensor (though I would clearly never use the 35mm lens for anything).
So for right around $8,500 I can upgrade my kit to allow for 600DPI scanning… considering WHAT I am scanning this is actually reasonable.
A few years ago I gave a presentation at the NMC entitled:
Your Video Projects Suck,
But That’s OK ’cause So Do Your Papers:
Moderating Student Expectations
When Teaching New Media
In the presentation I outlined key aspects of film production for students who are working solo on their first project in an academic setting. These aren’t meant to be ‘the rules of film-making’ but instead parameters in which students should work (and faculty should hold them to) to help achieve a level of success and also to stay moral, ethical, and legal. This page also serves as the notes and demonstration page when I give my talk on the Culture of Video.
Aesthetic Considerations
1. What are you making?
2. What are the ingredients?
3. Do you have a checklist?
4. What does your environment look like?
5. What do your participants look like?
6. Who is your audience?
7. Who are you?
8. Do you know your content?
9. Is it informative or is it vain?
10. Funny is hard!
11. Editing is hard!
12. I will not talk about what I didn’t use or do.
Ethics – I agree that:
1. Everyone will understand what we are doing before filming.
2. I will seek permission before filming – no one (or place) will ever get ambushed.
3. Everyone will sign a release form before filming.
4. I will not plagiarize.
5. It is more than a question of fair-use – it is a question of originality.
6. All media will either be original, royalty free, or in the public domain.
7. I understand that my own original recording of someone else’s song is still a copyright violation.
8. I will use royalty-free stock materials only as stock & filler.
9. You have to know the rules before you can claim you are breaking them.
10. I will have a goal and purpose.
11. I will give credit where credit is due.
12. I will own what I have created.
Technical Considerations
1. Always use a tripod
2. If using tripod – turn off the image stabilization!
3. Never use the zoom
4. Beware of back lighting
5. Never work with children or animals
6. Turn off technology that is not in use
7. Get a second take
8. No crawling or rolling text
9. No panning or zooming images
10. Images must fill the screen – no black bars – (so shoot landscape and give yourself room to crop)!
11. You talk too fast – you talk too slow; figure out which and fix it.
12. My video will stand on its own – with no added introduction or defense.


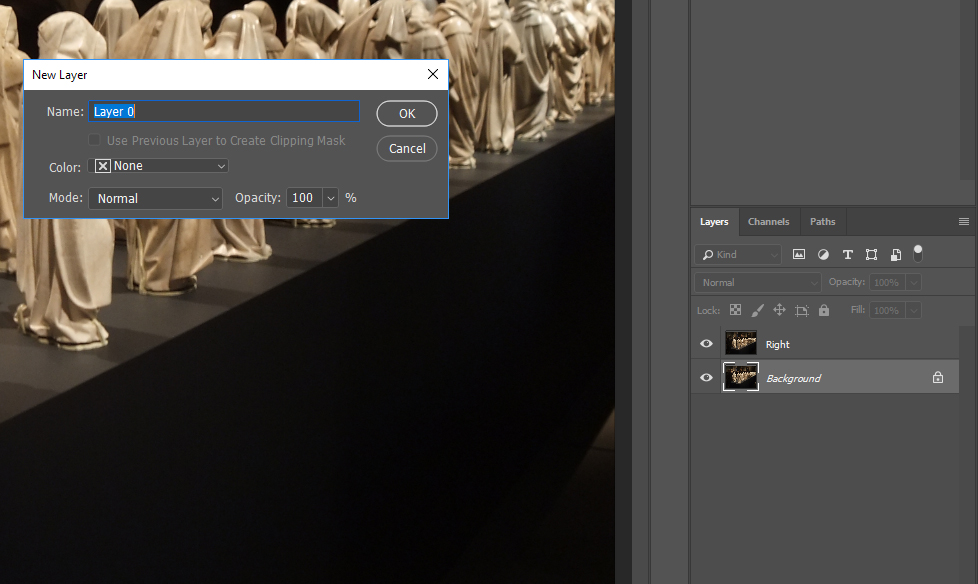
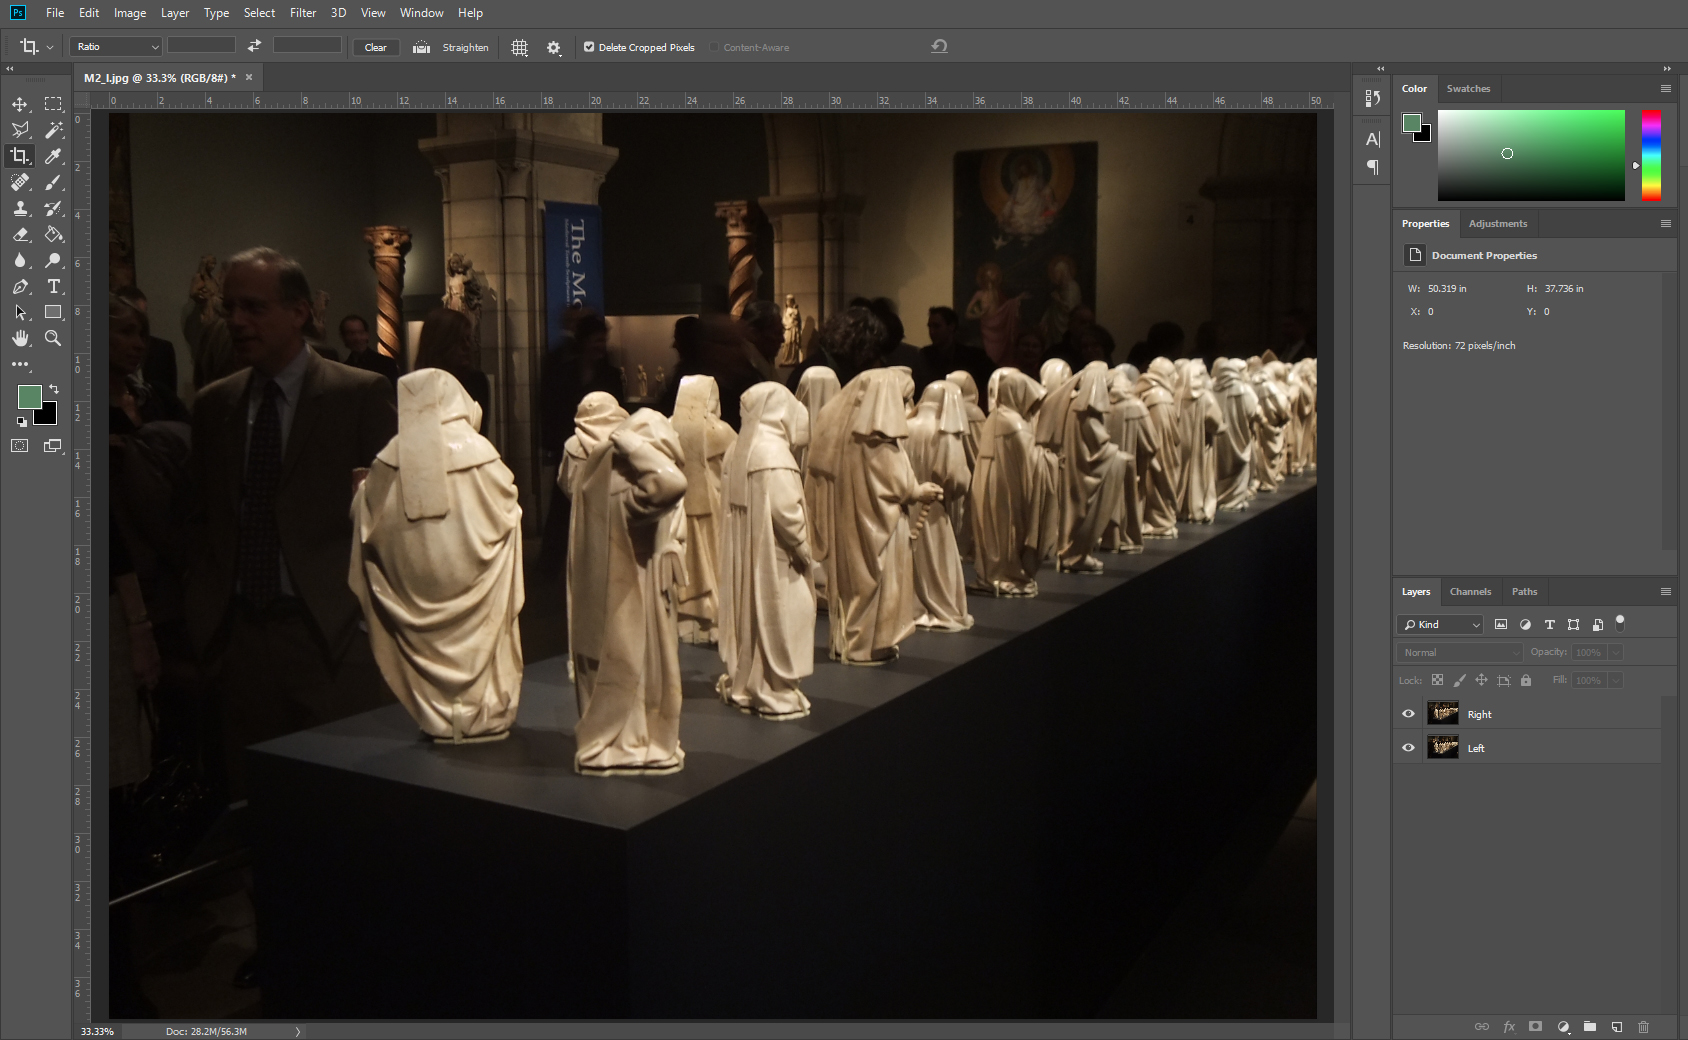
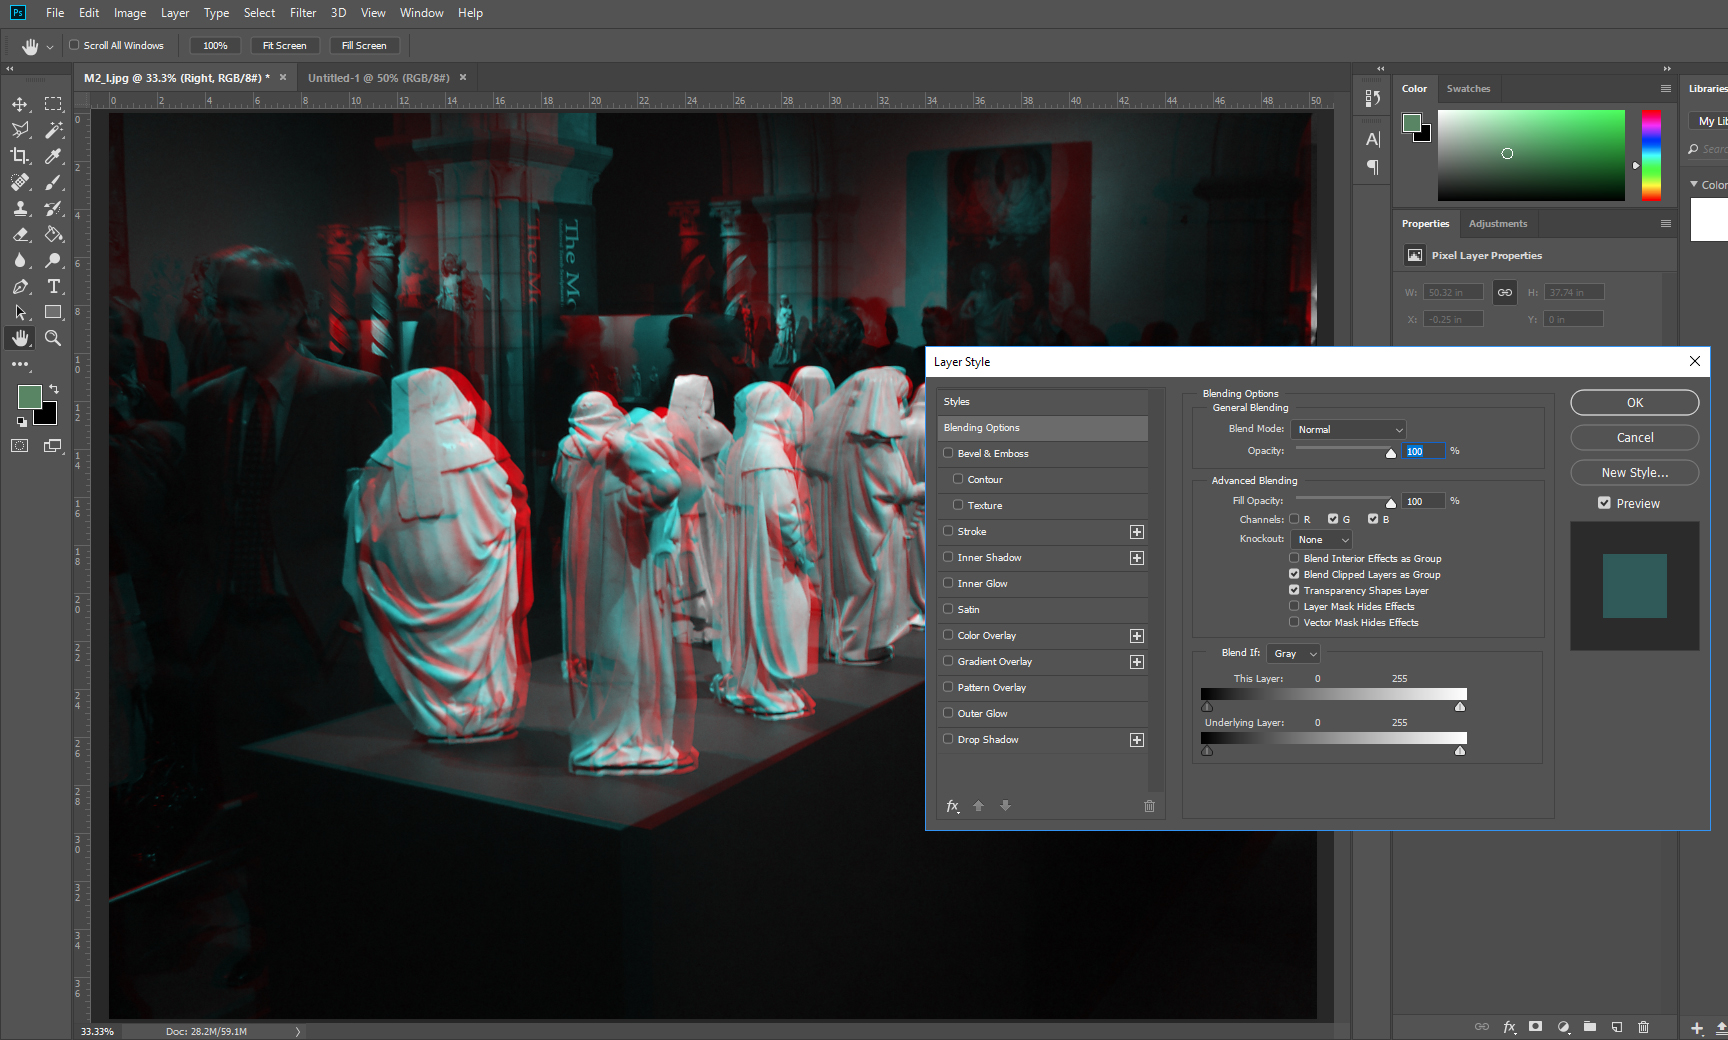


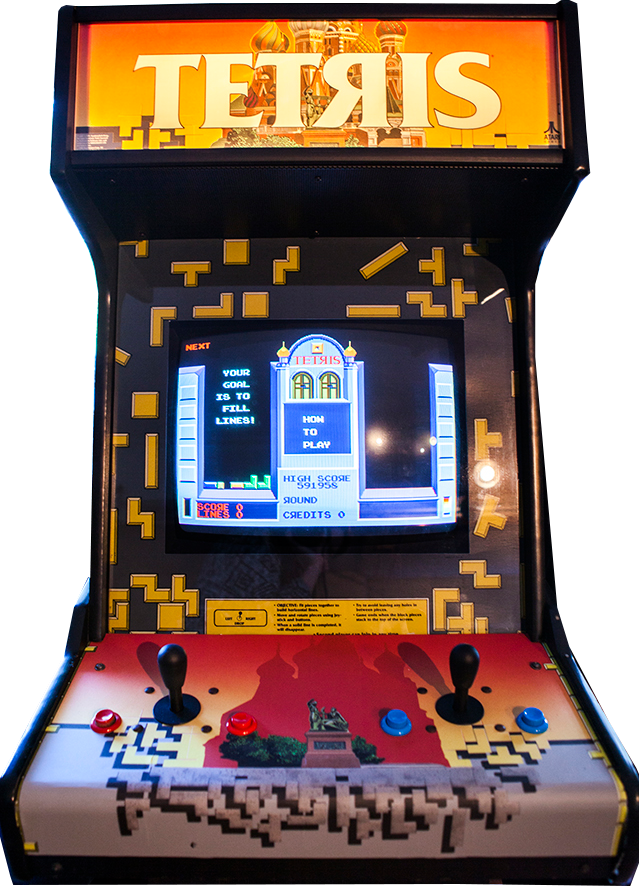


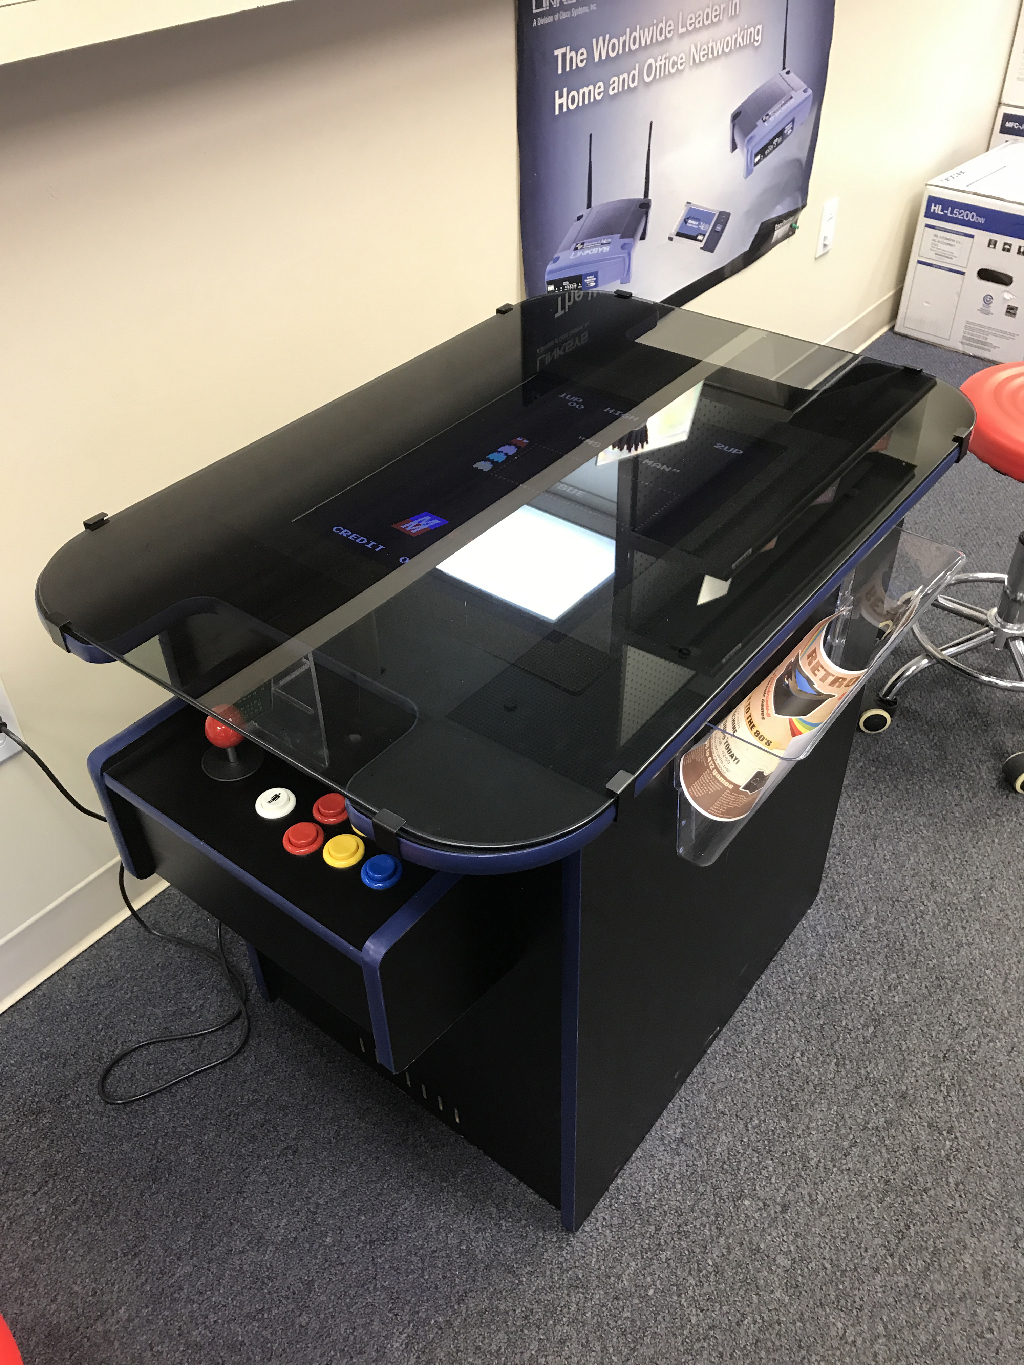
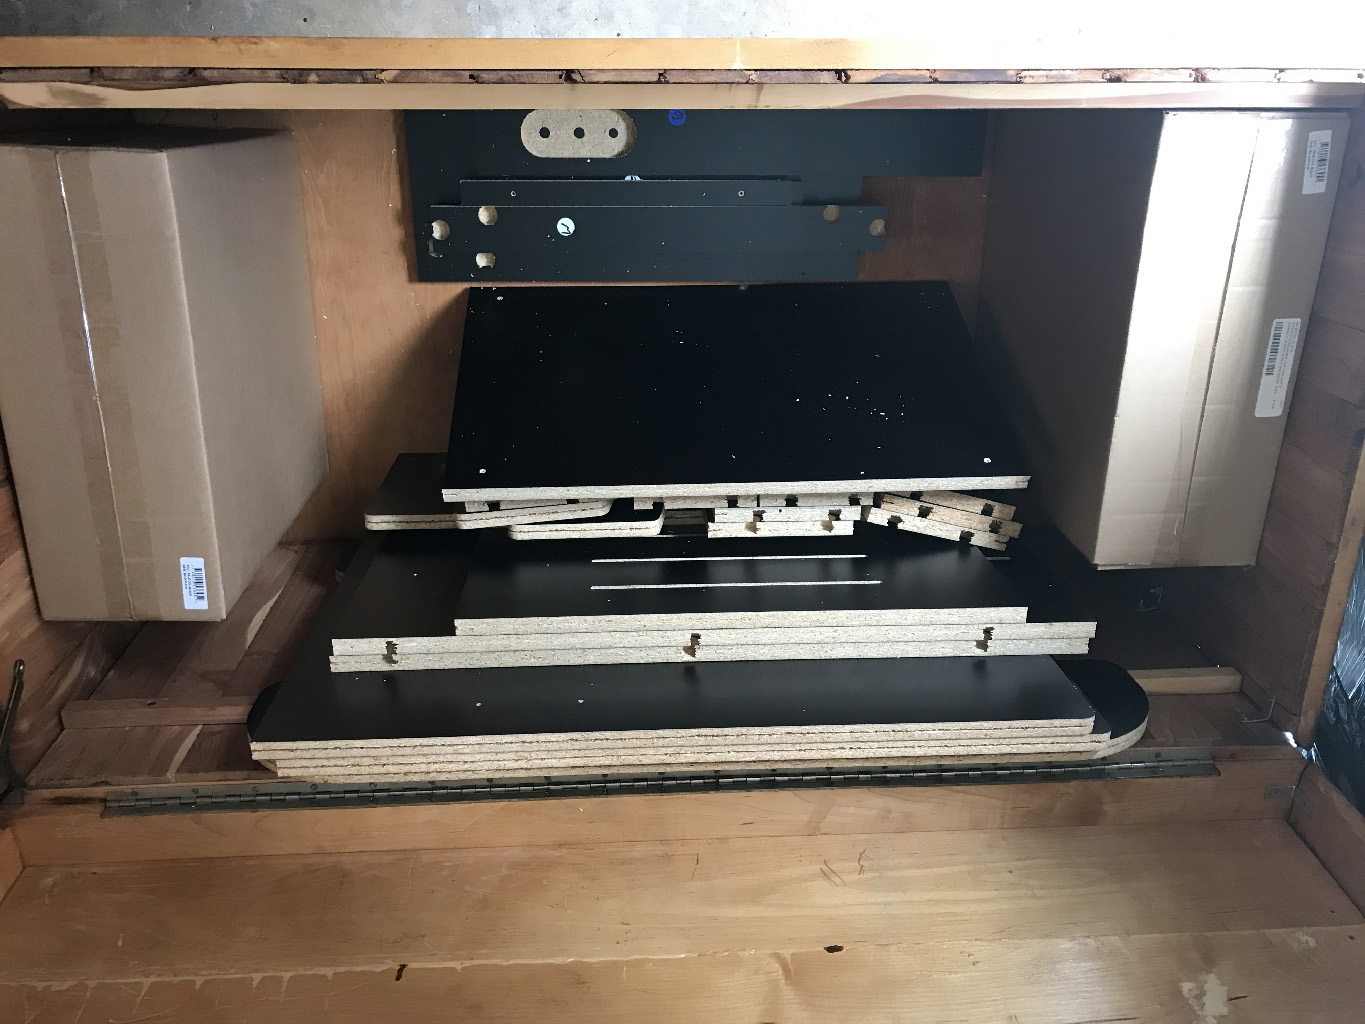


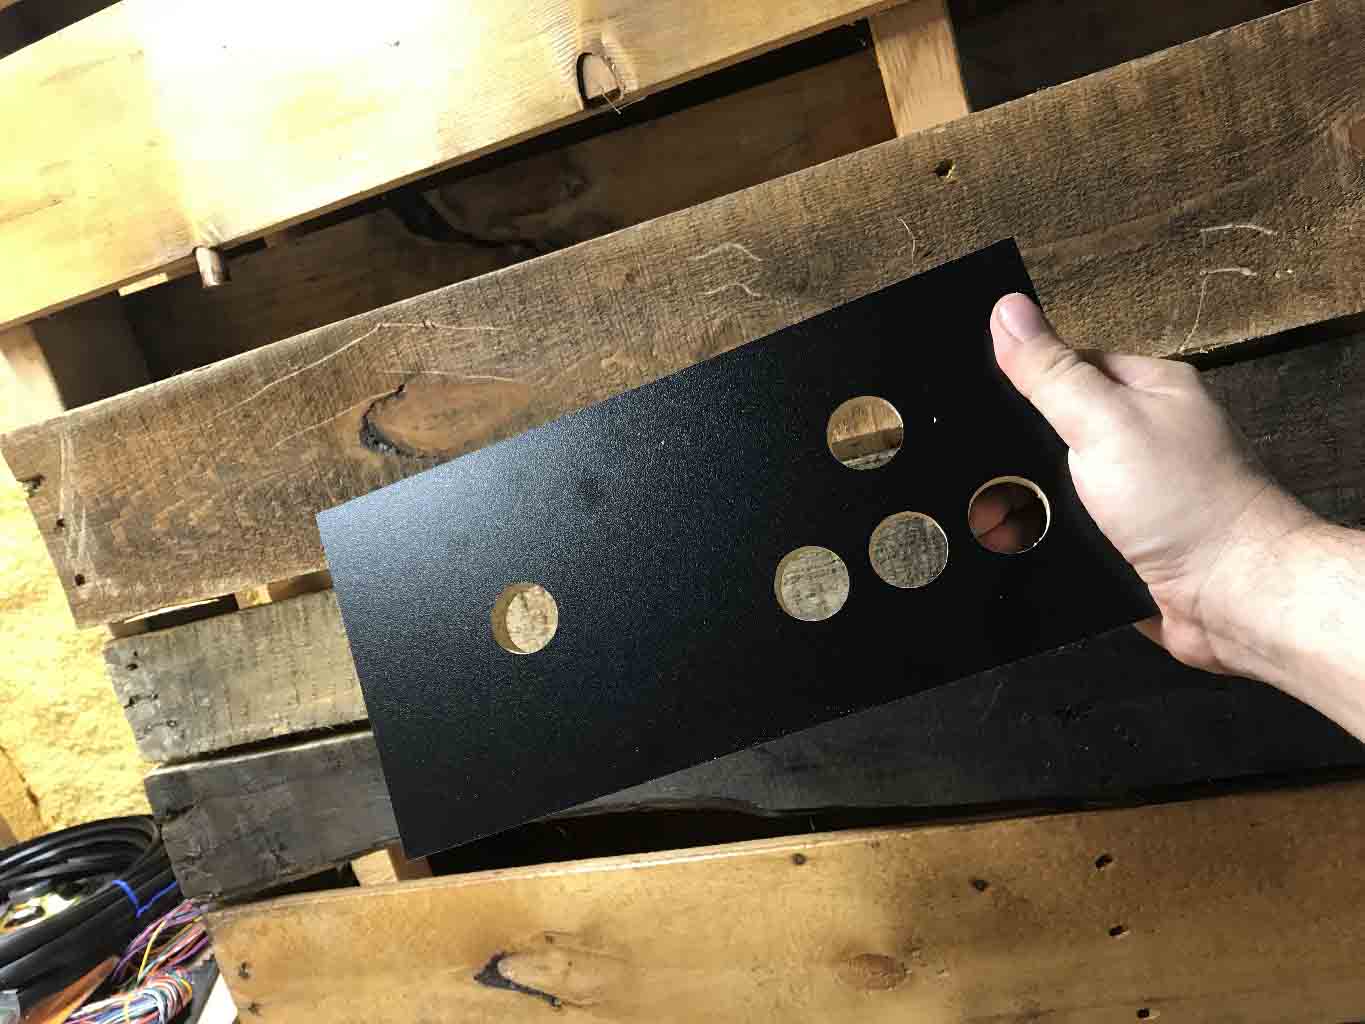
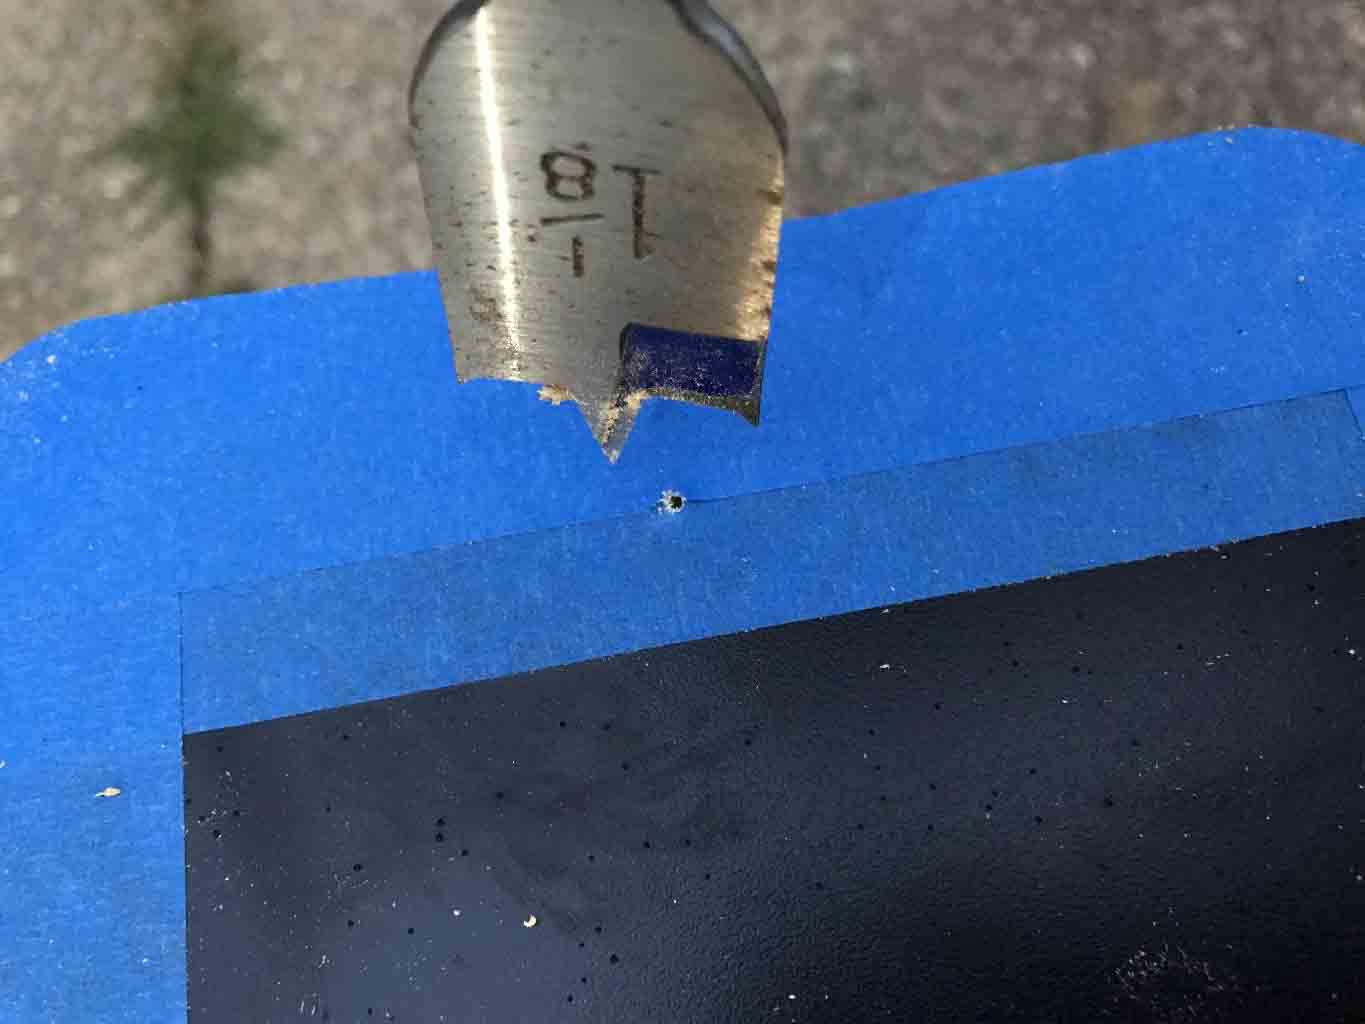

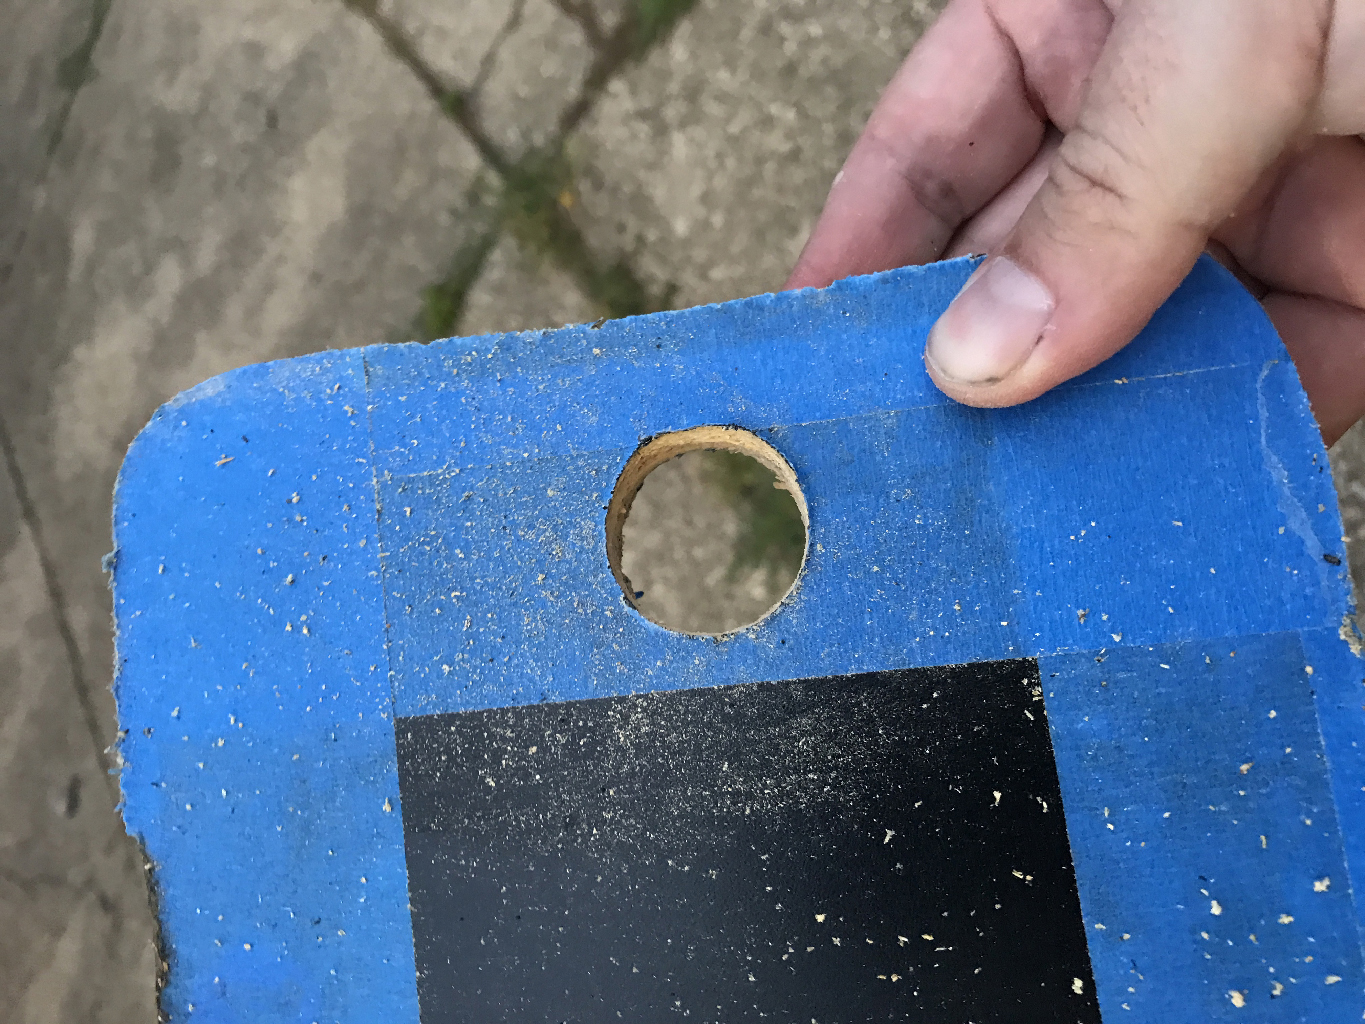
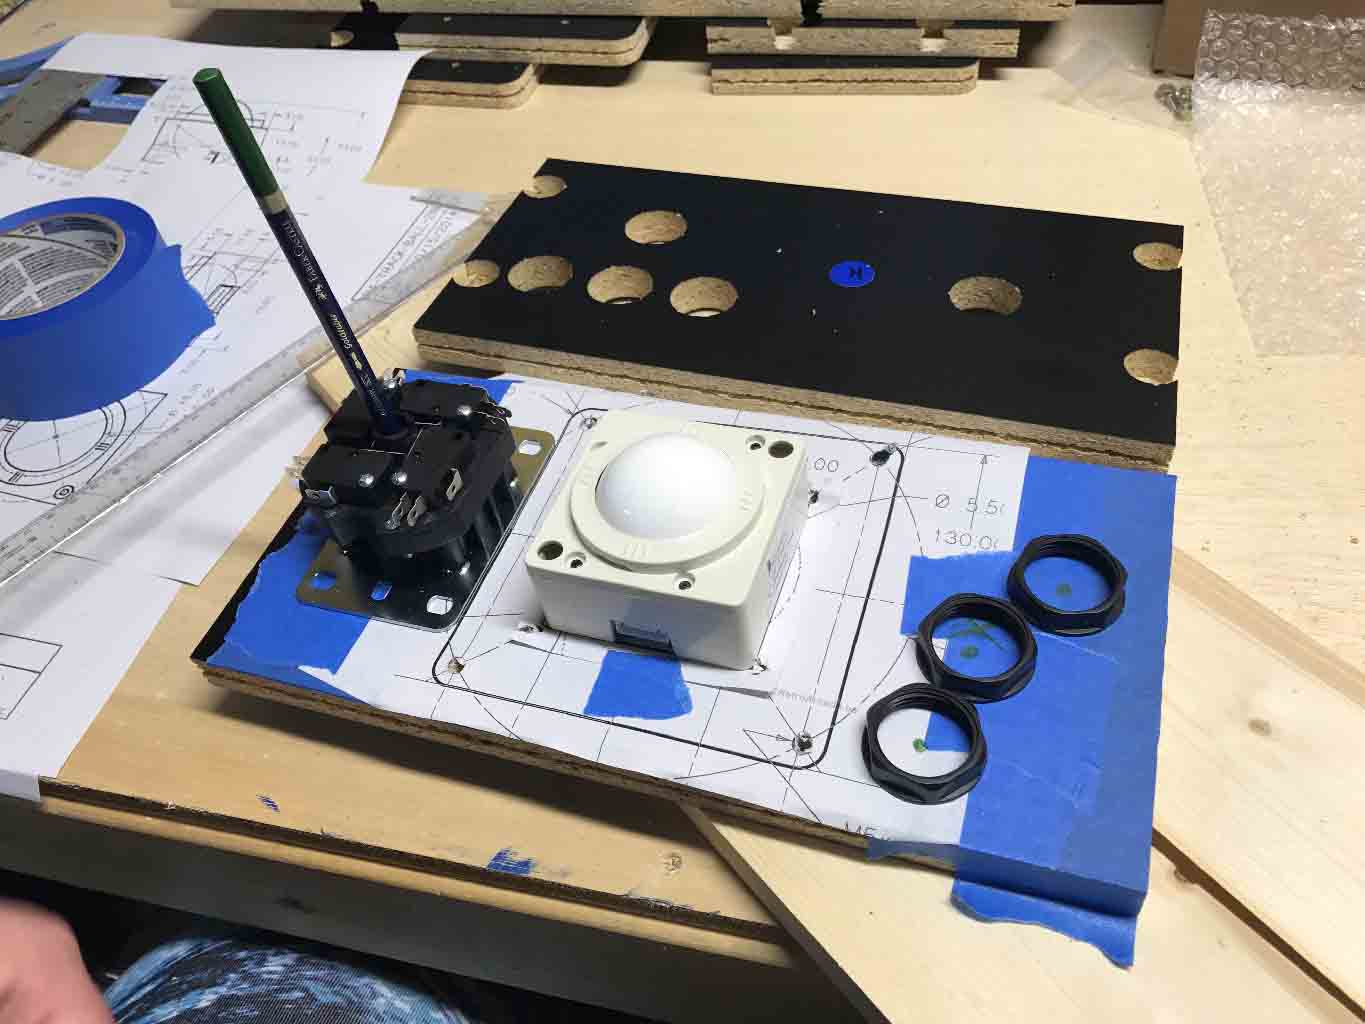
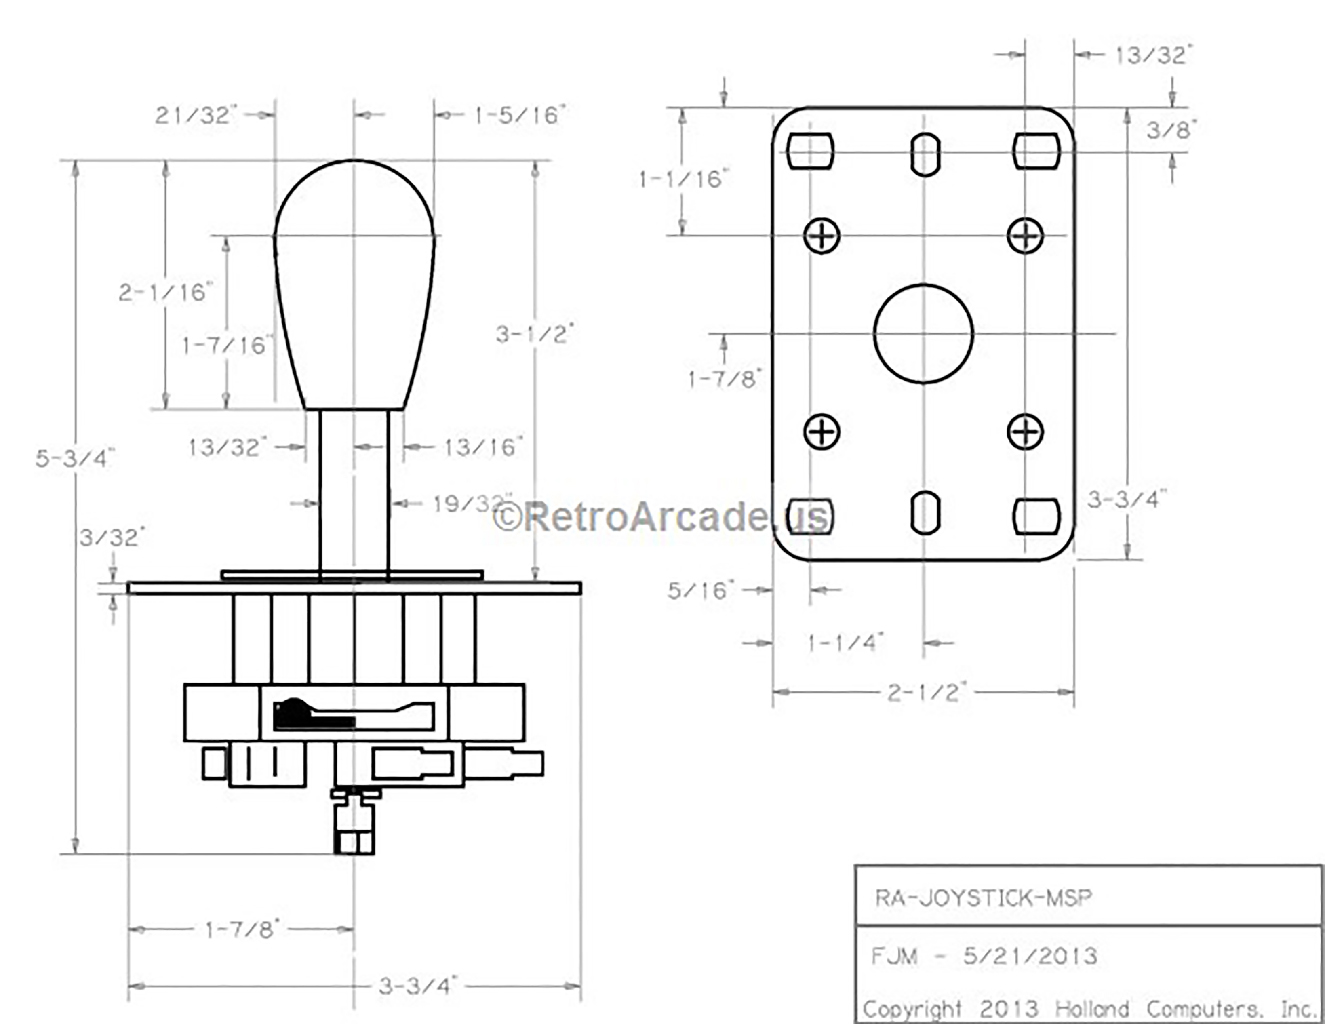
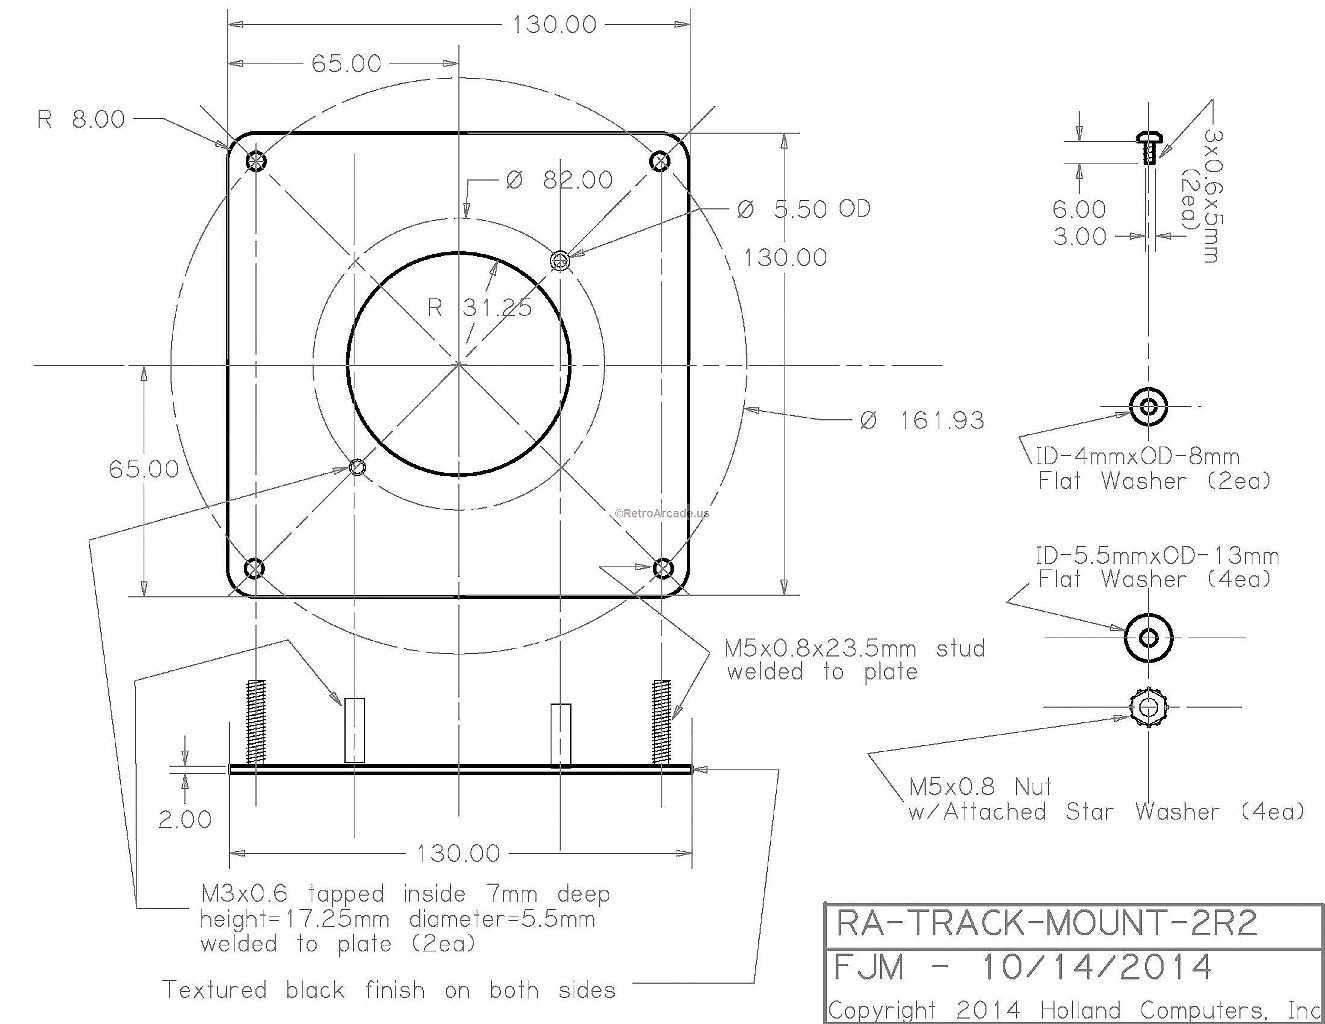
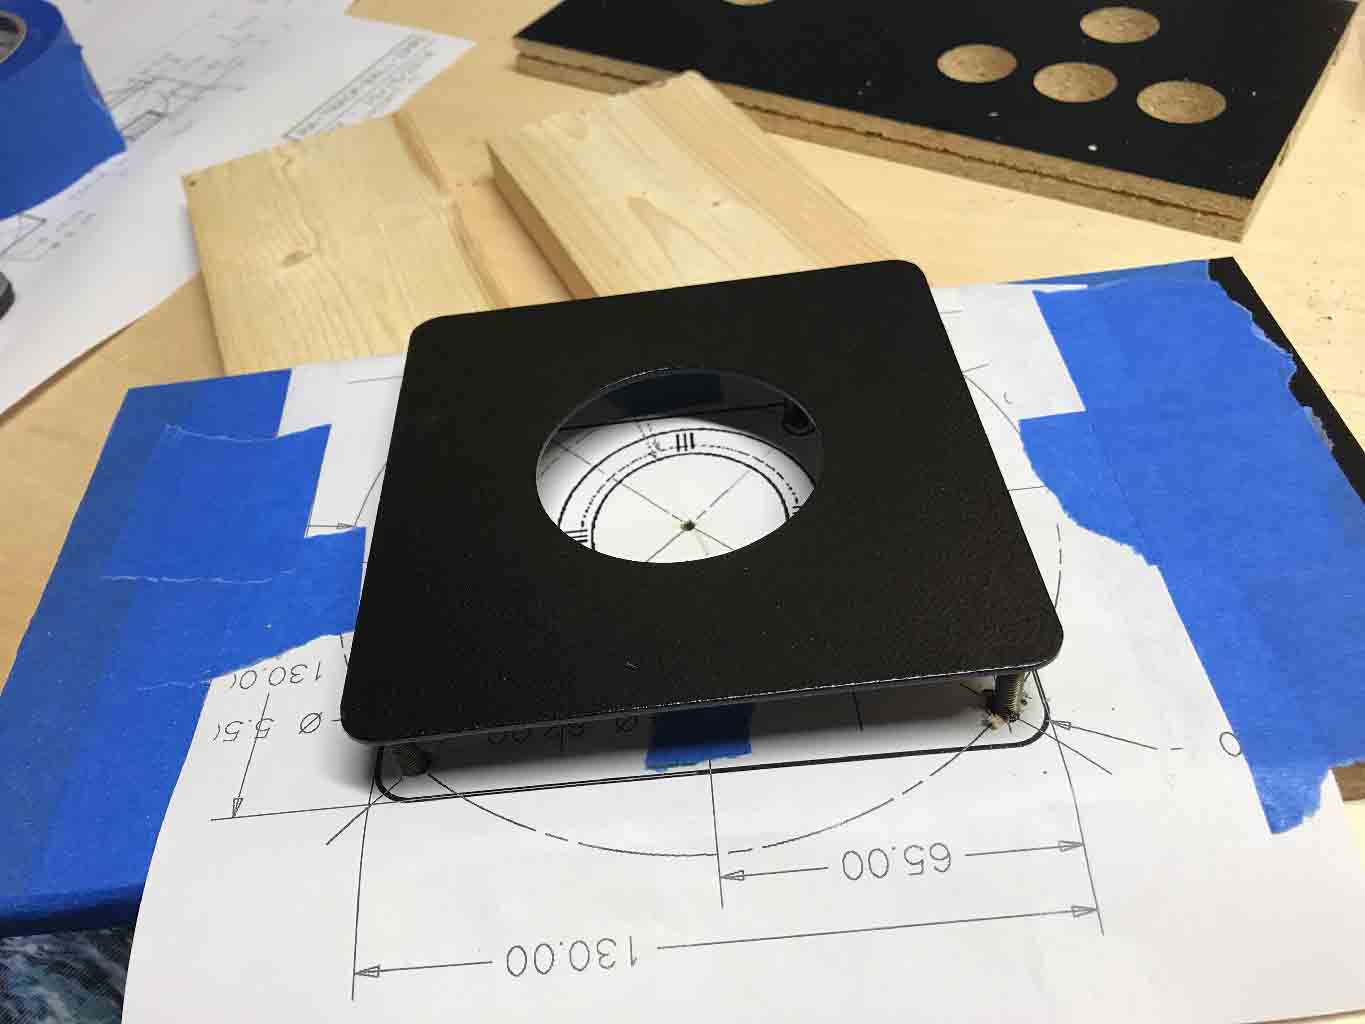
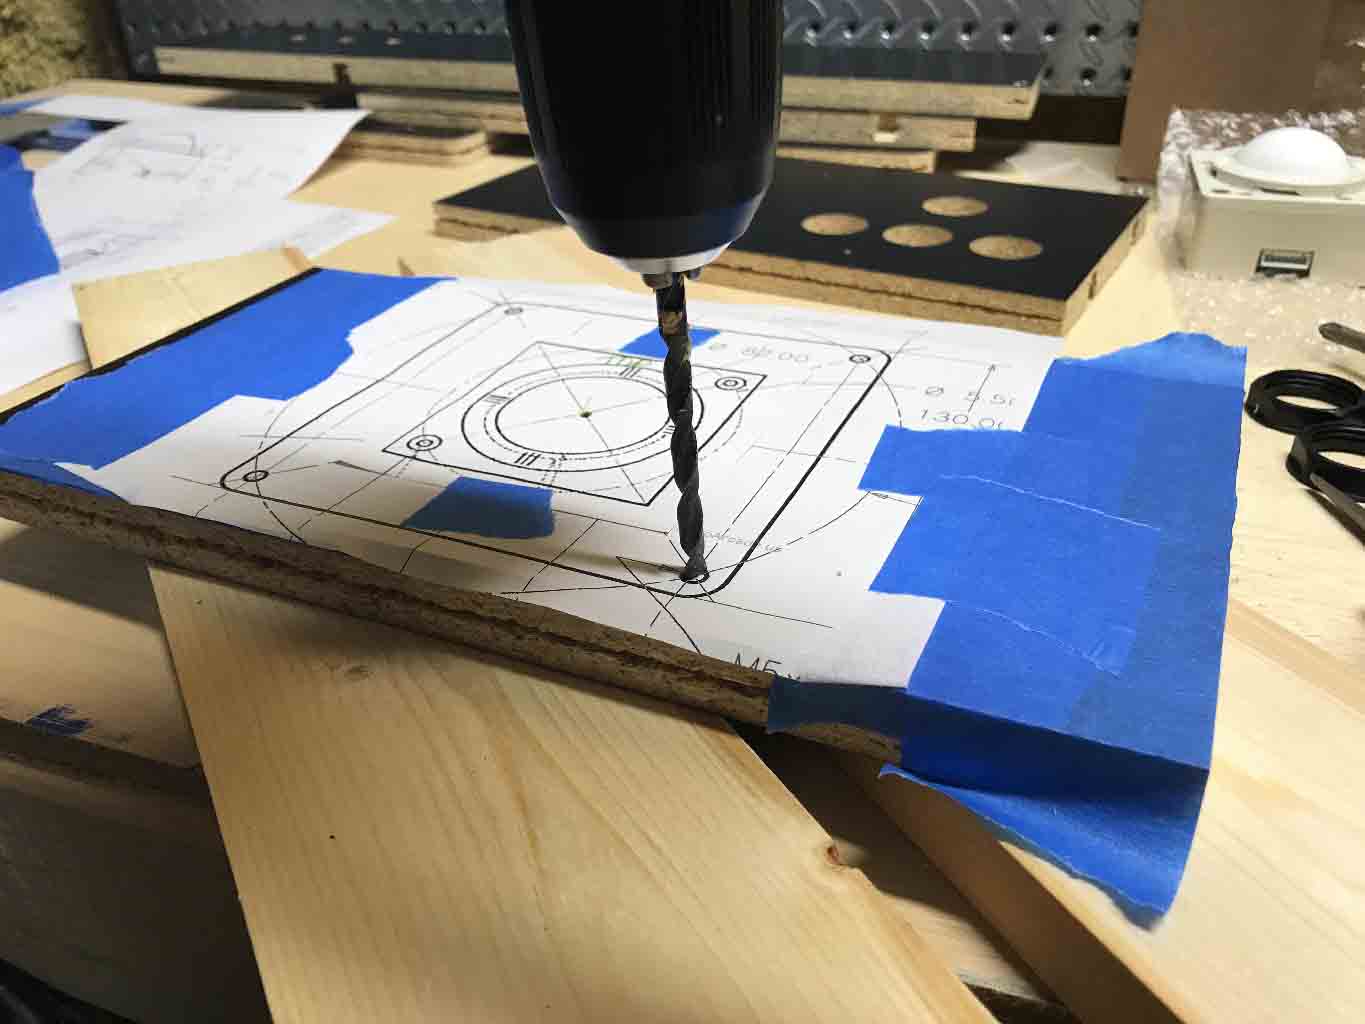
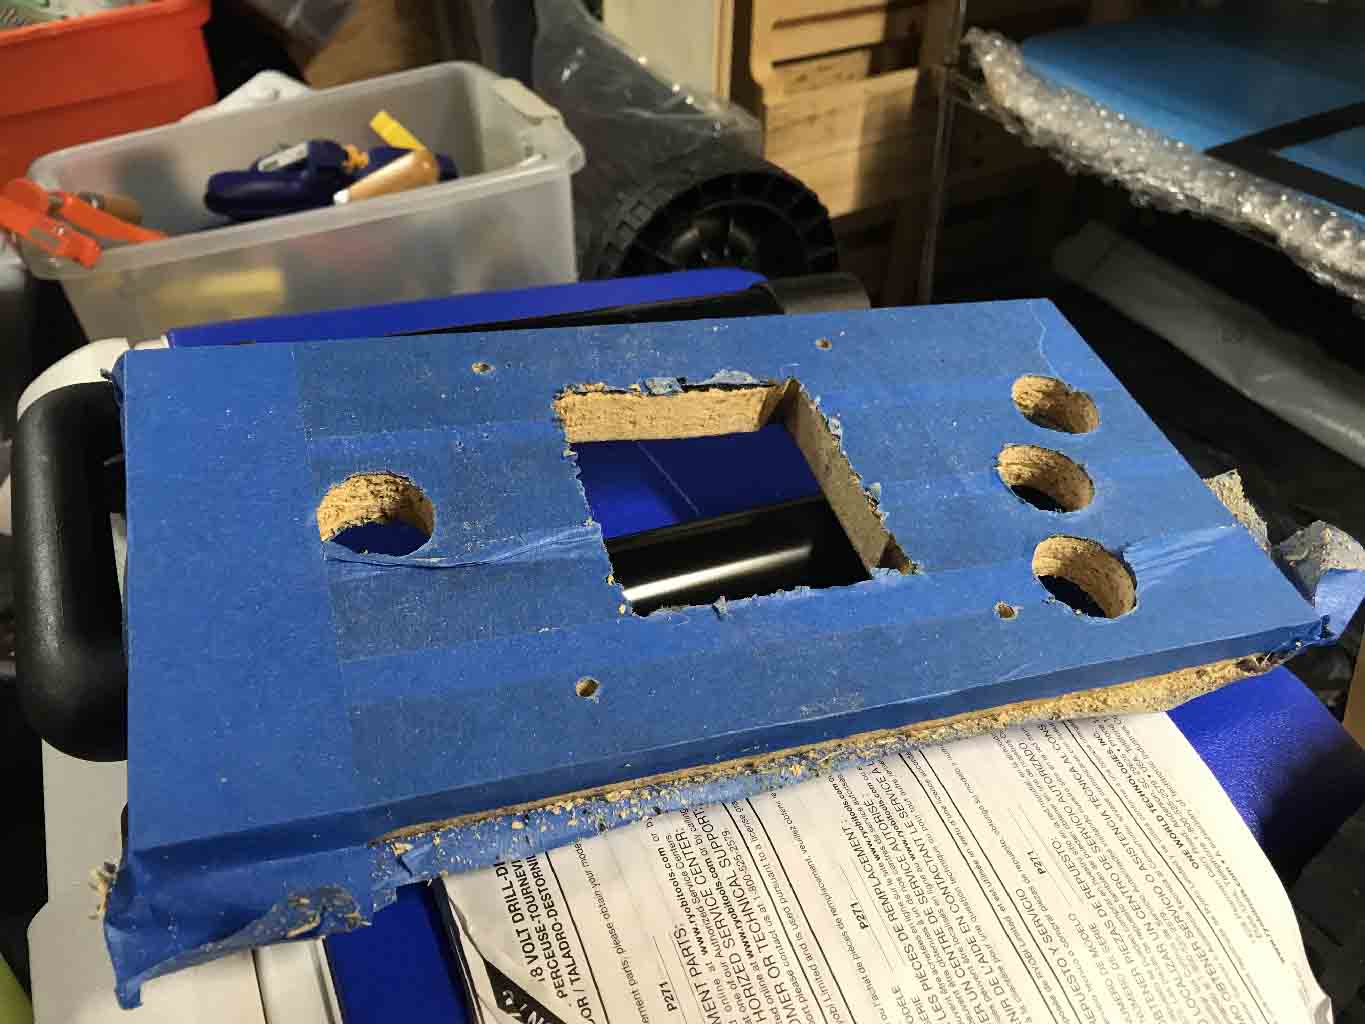
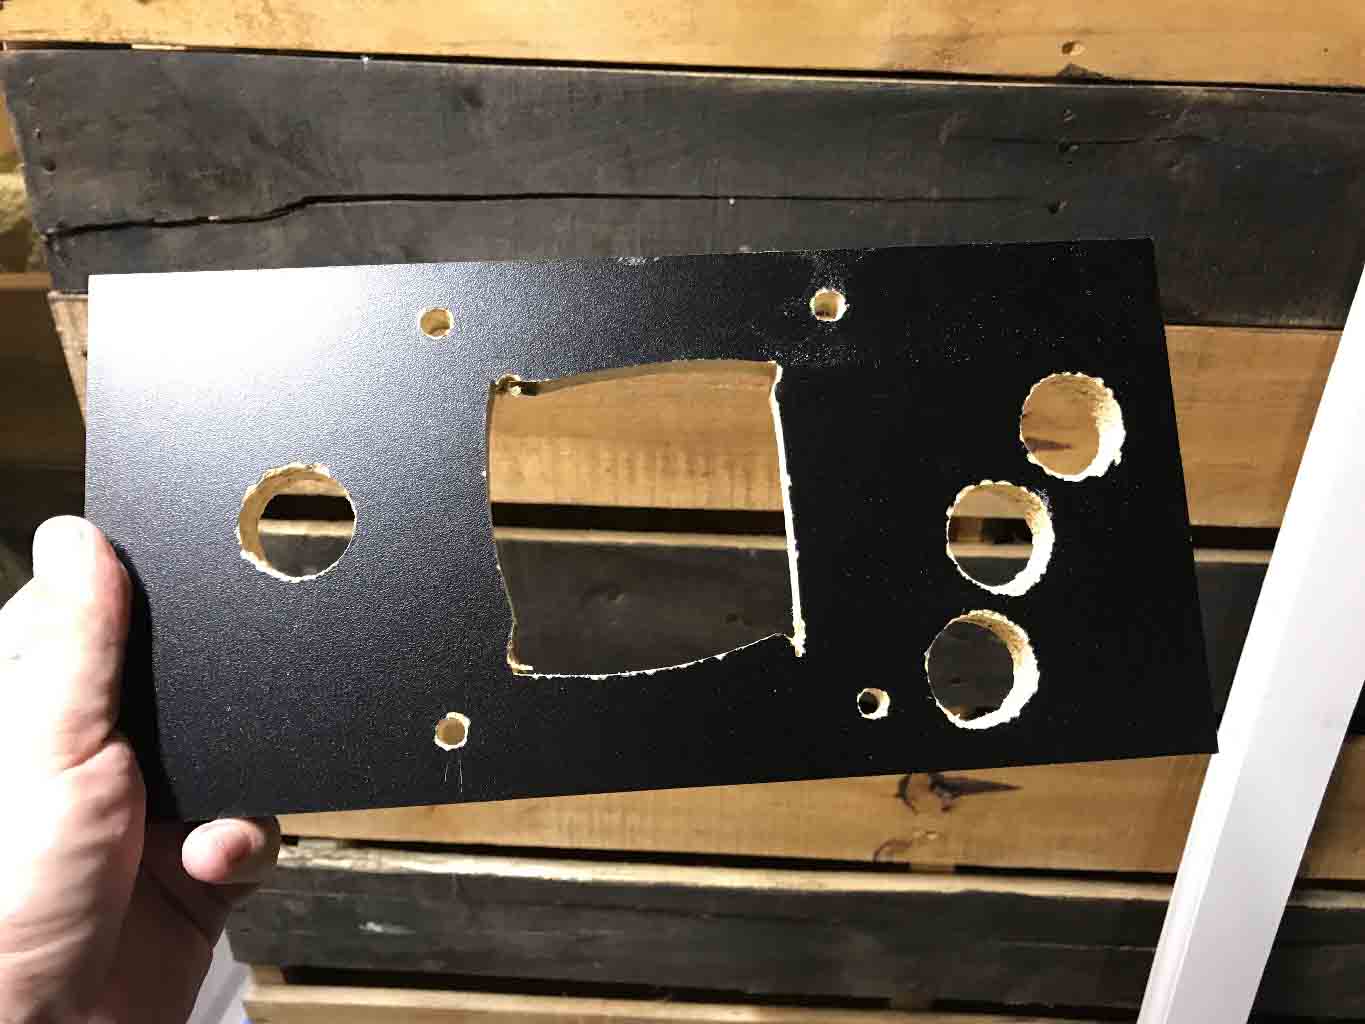

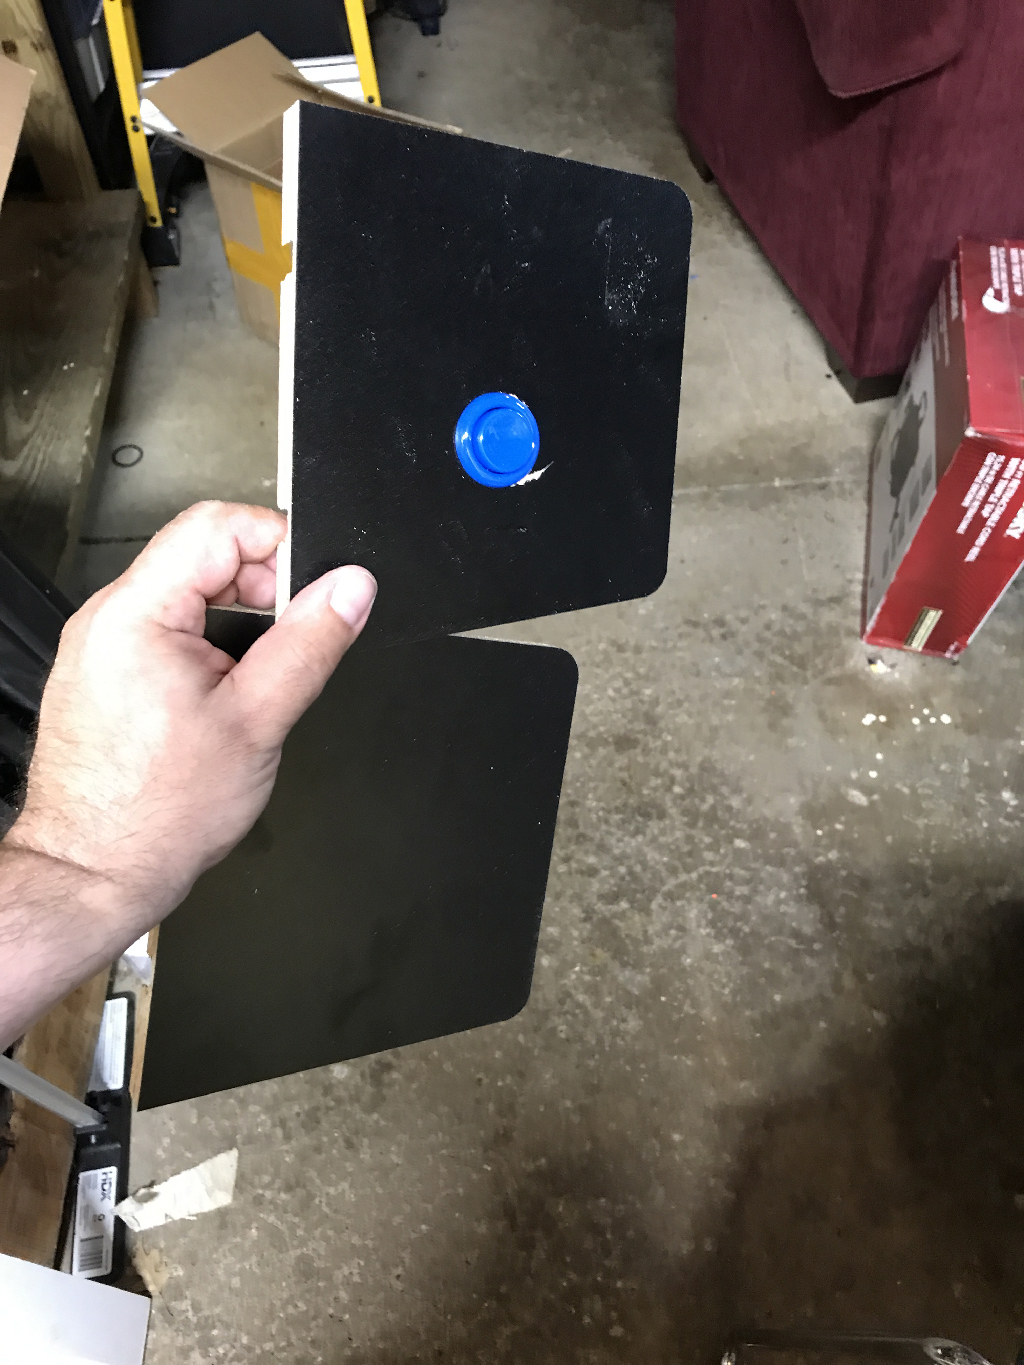
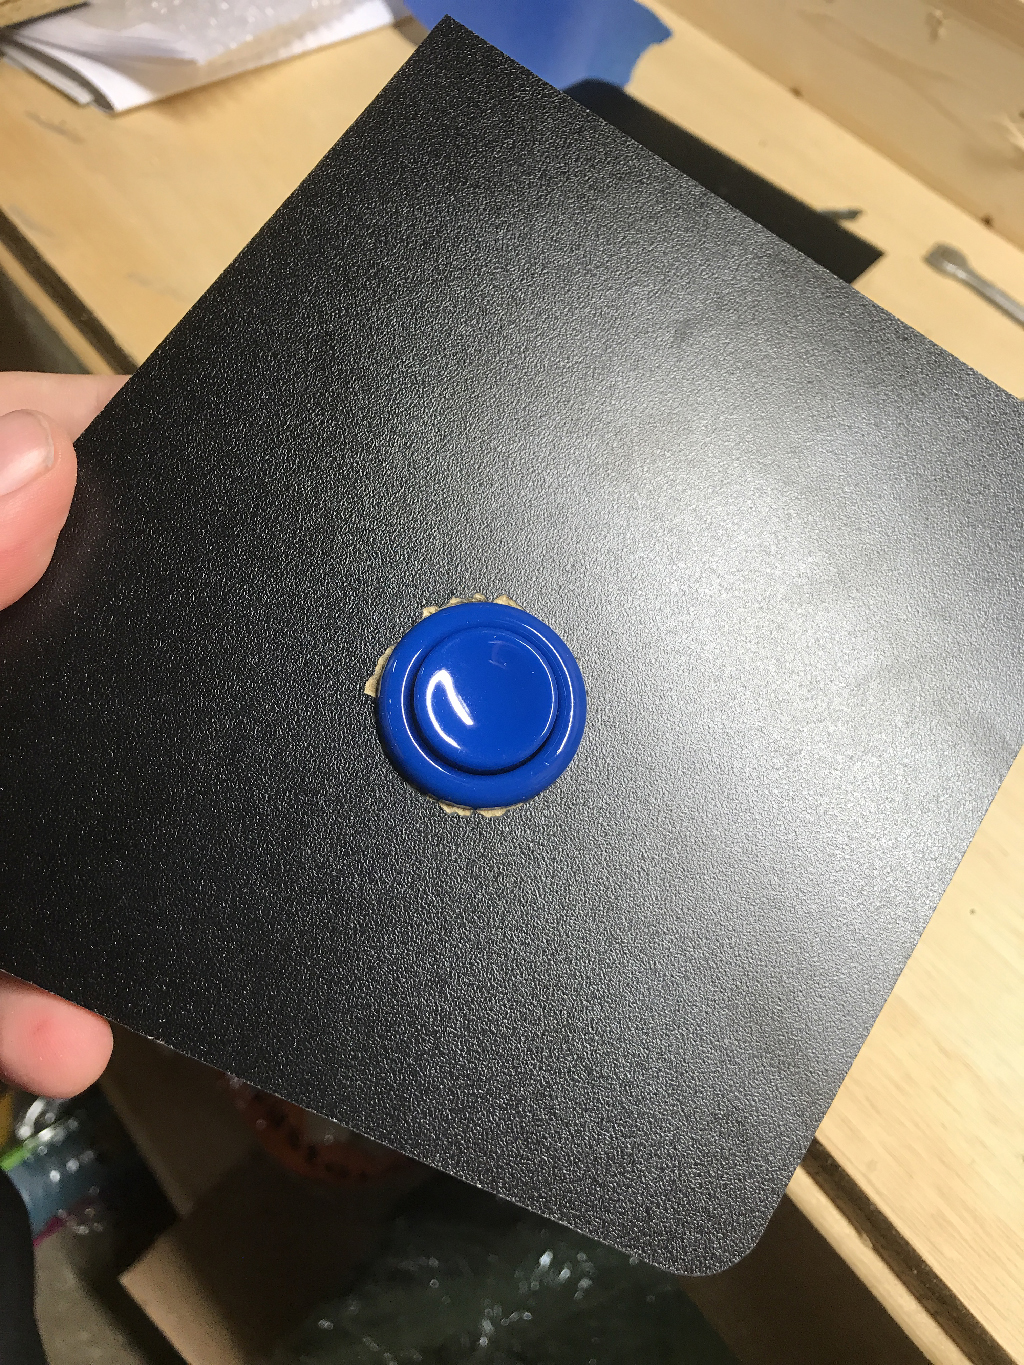

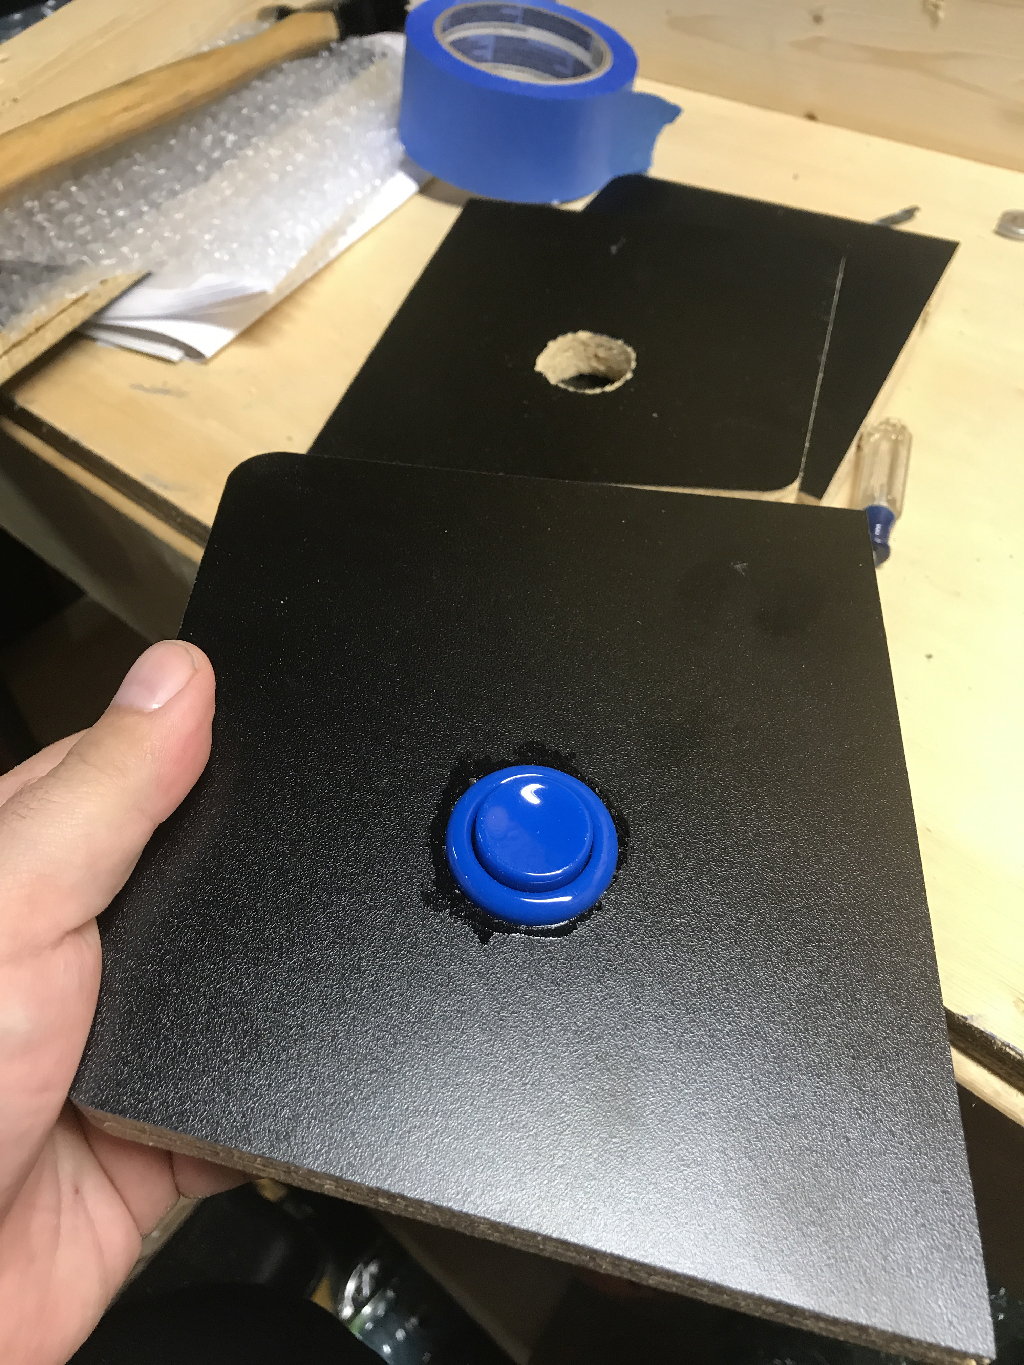

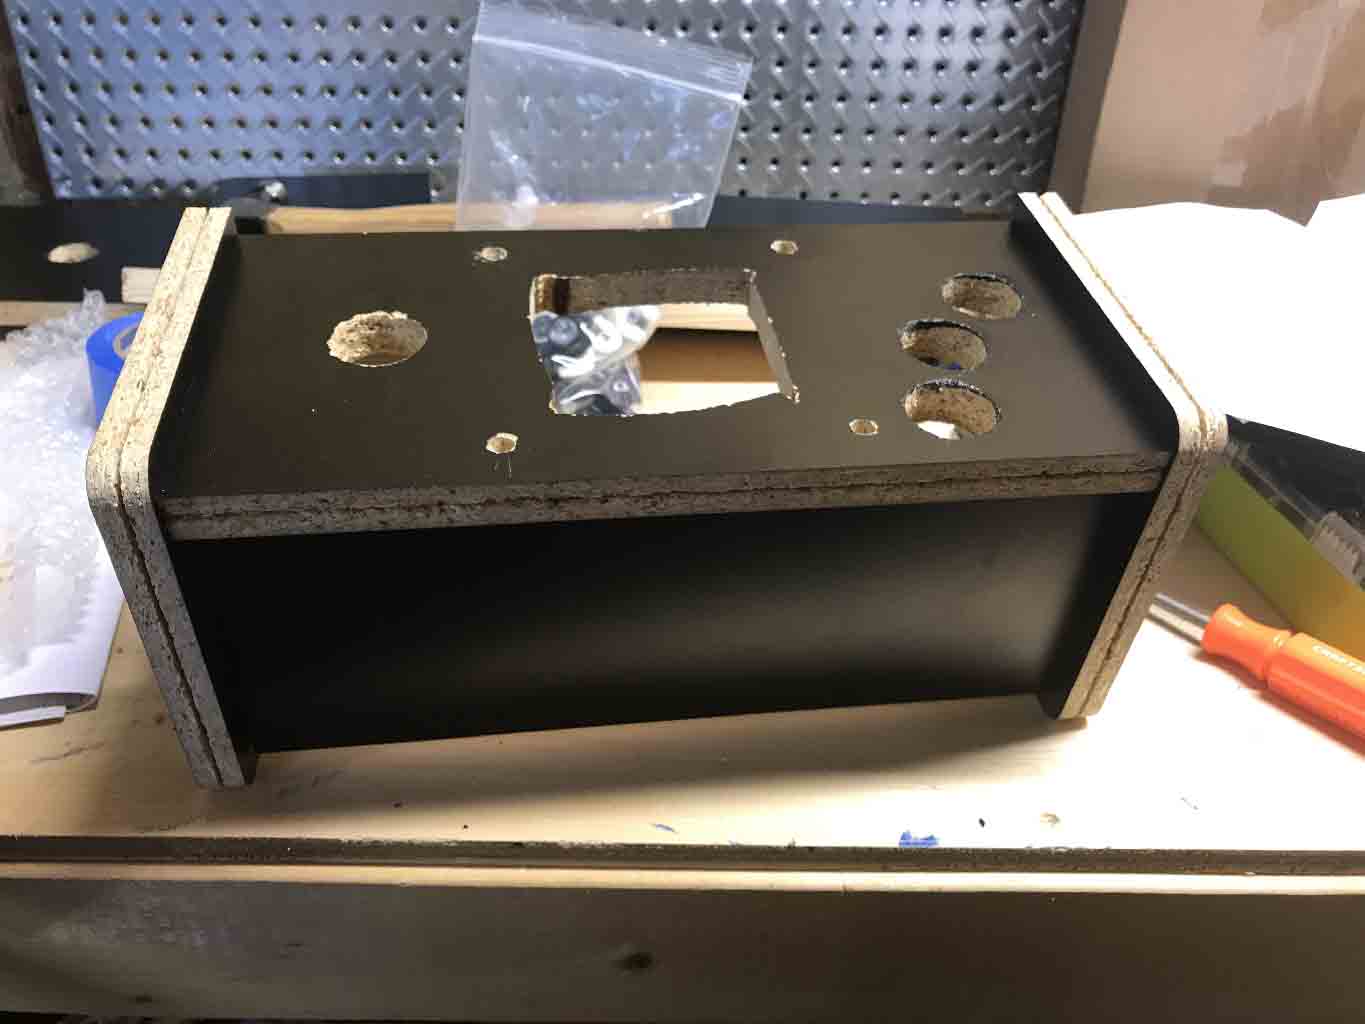
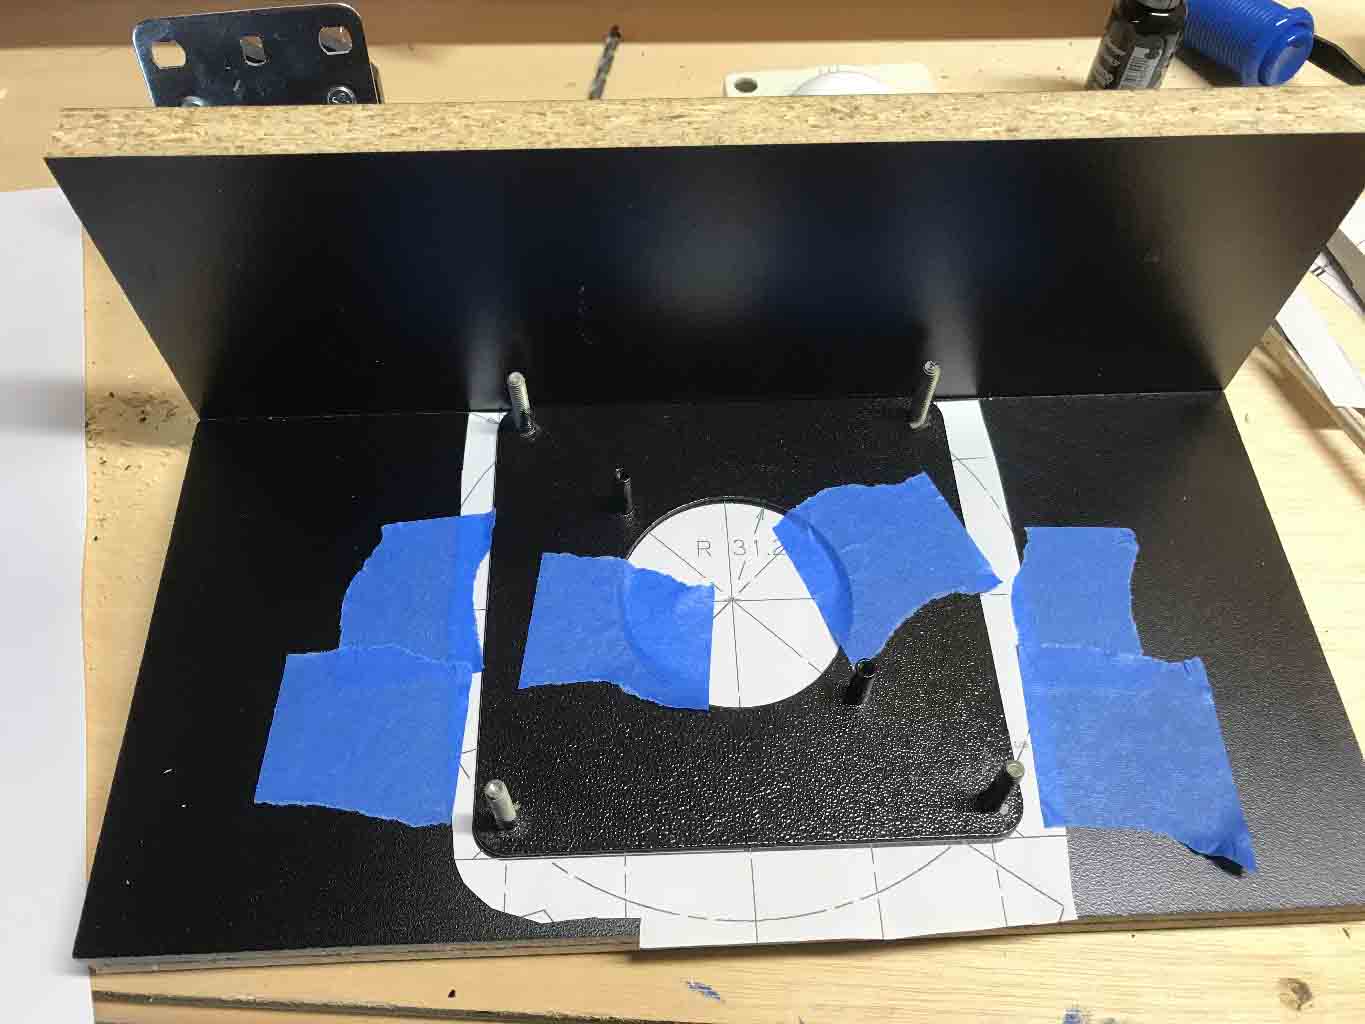
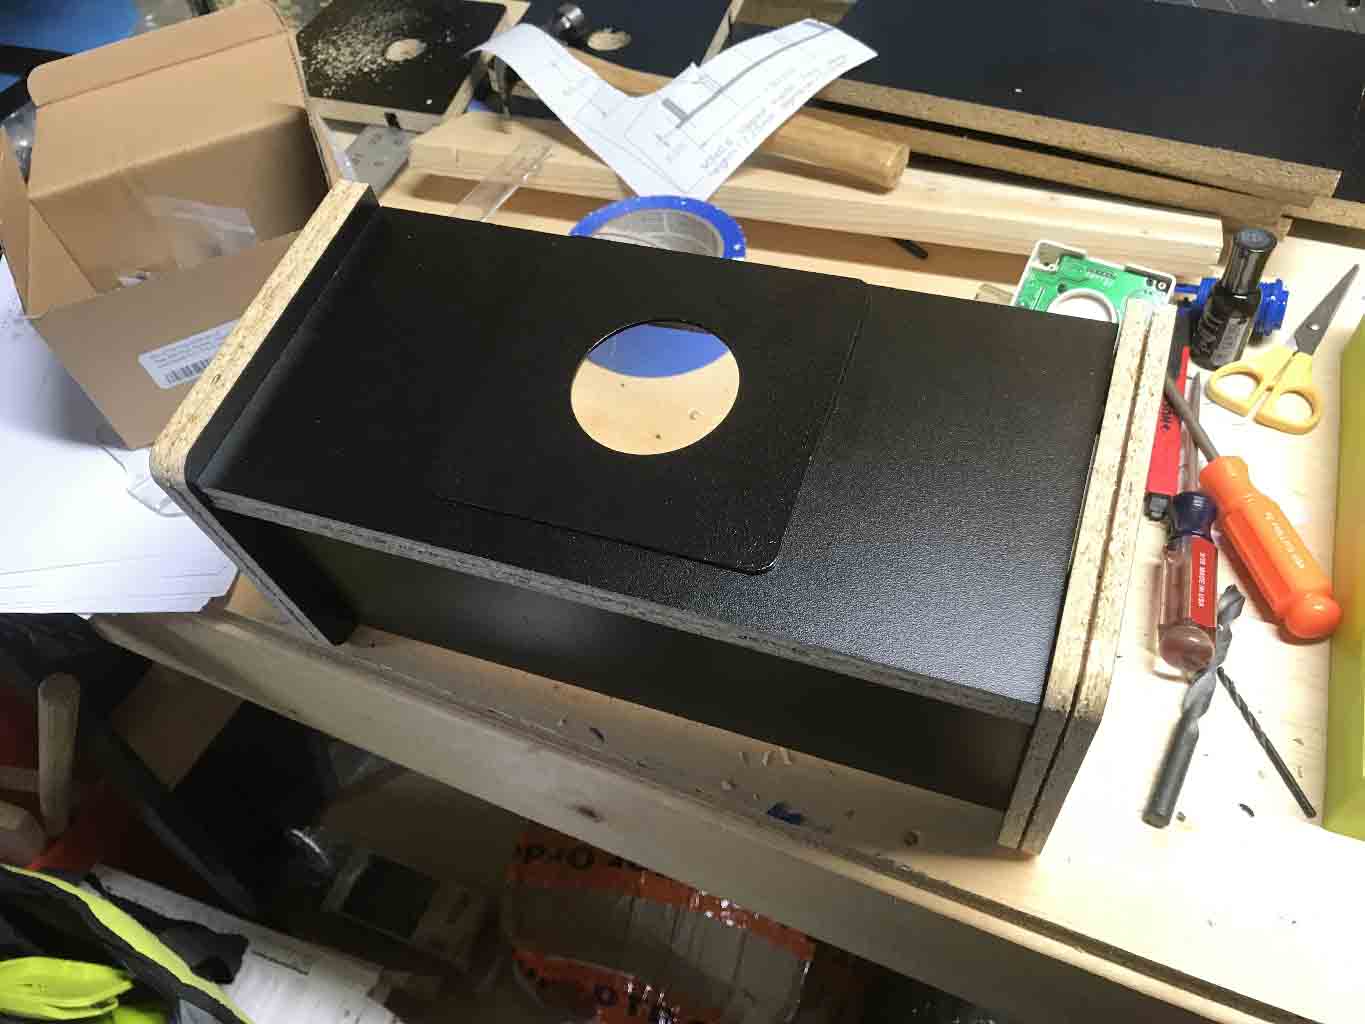
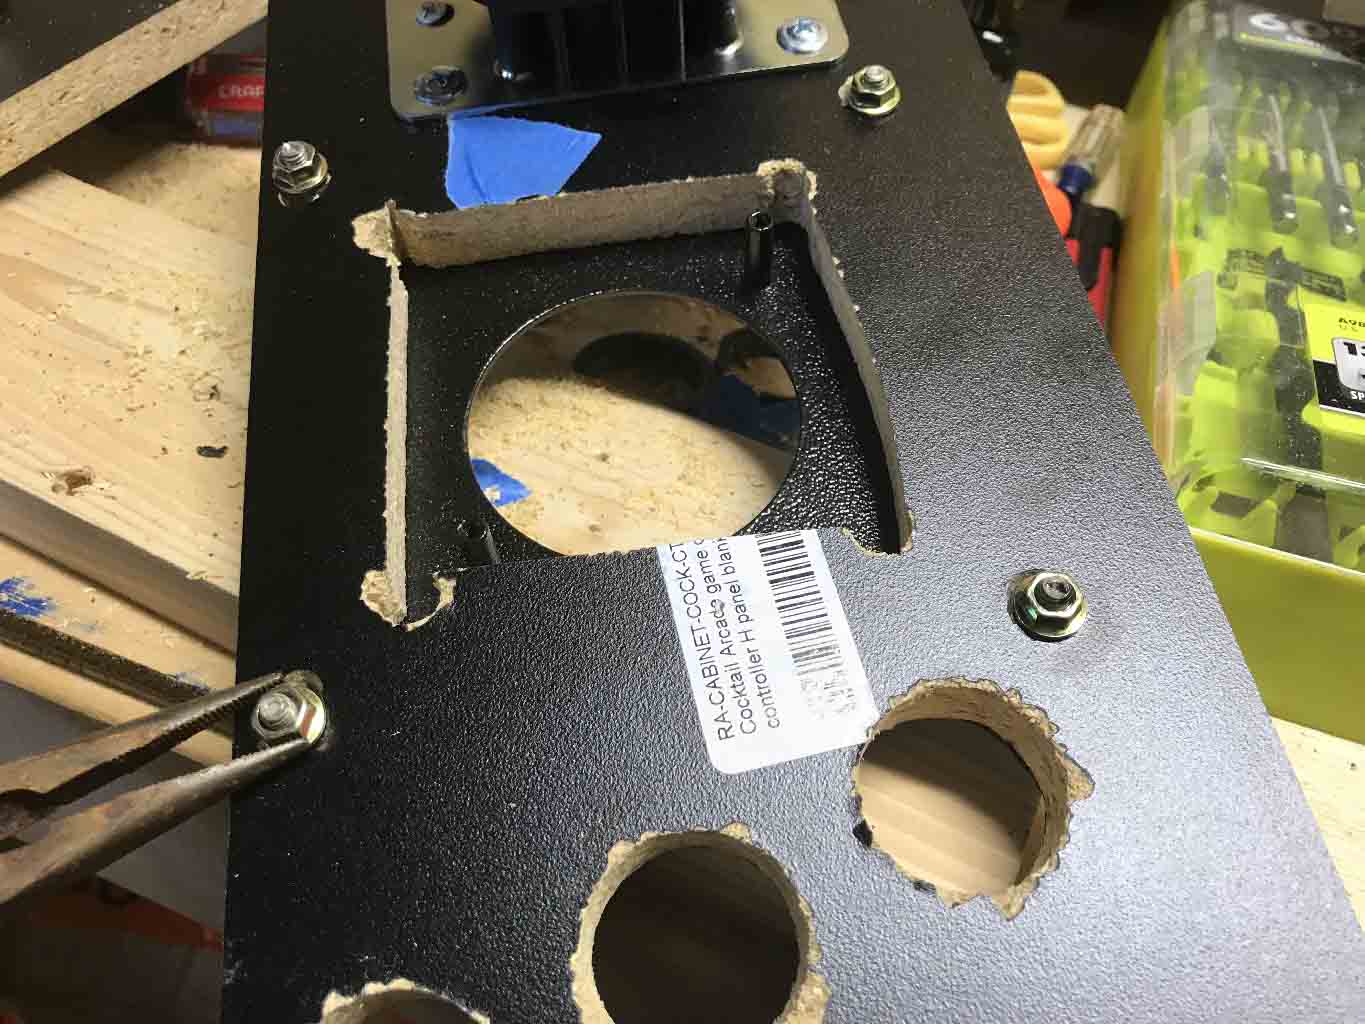
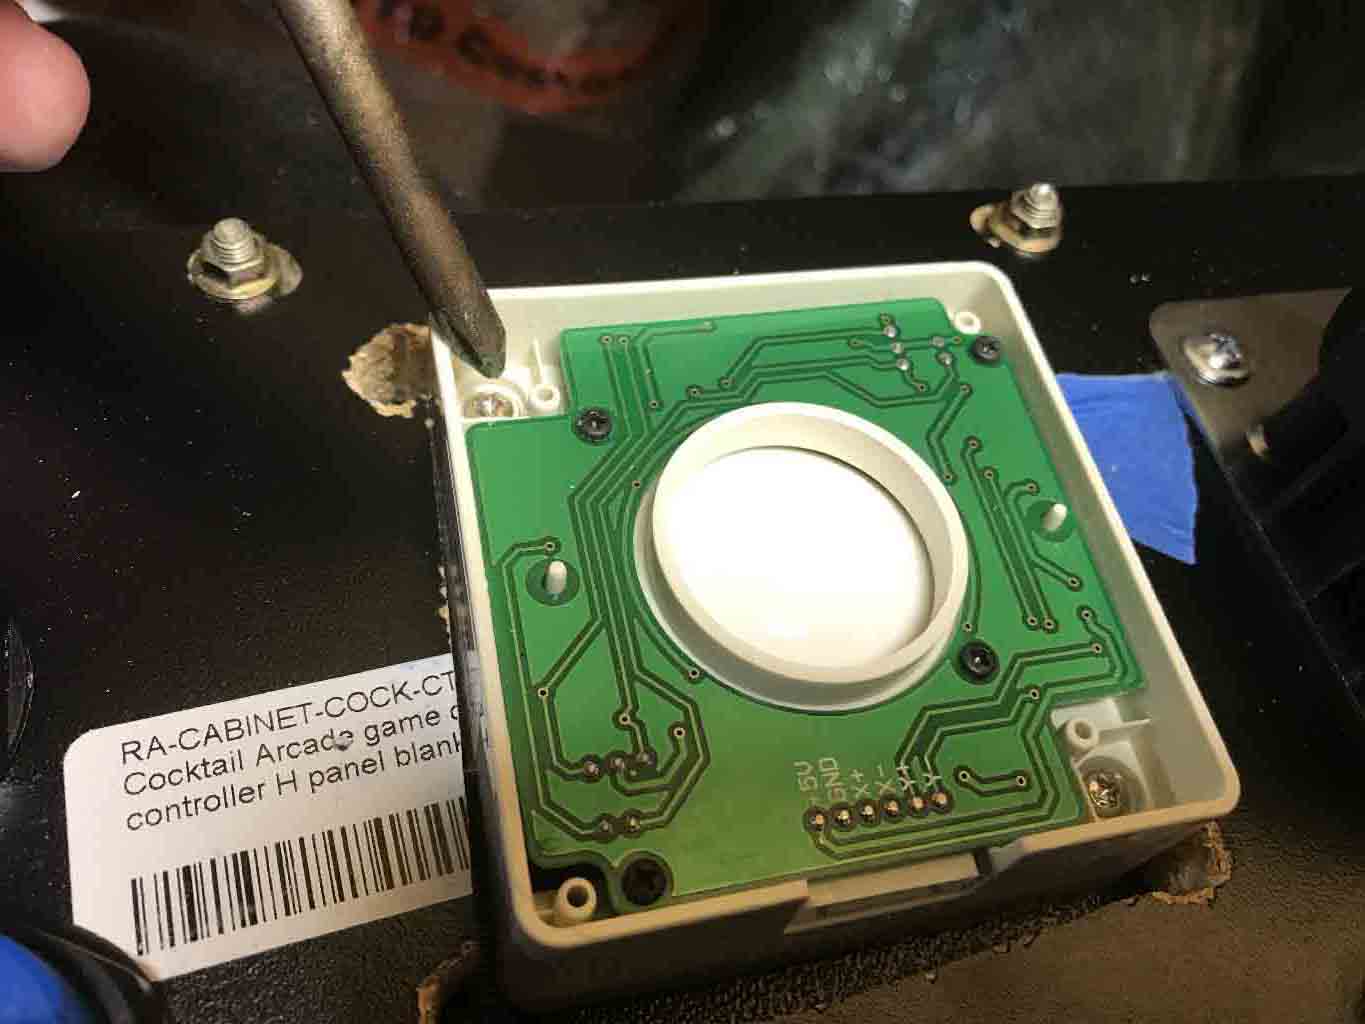

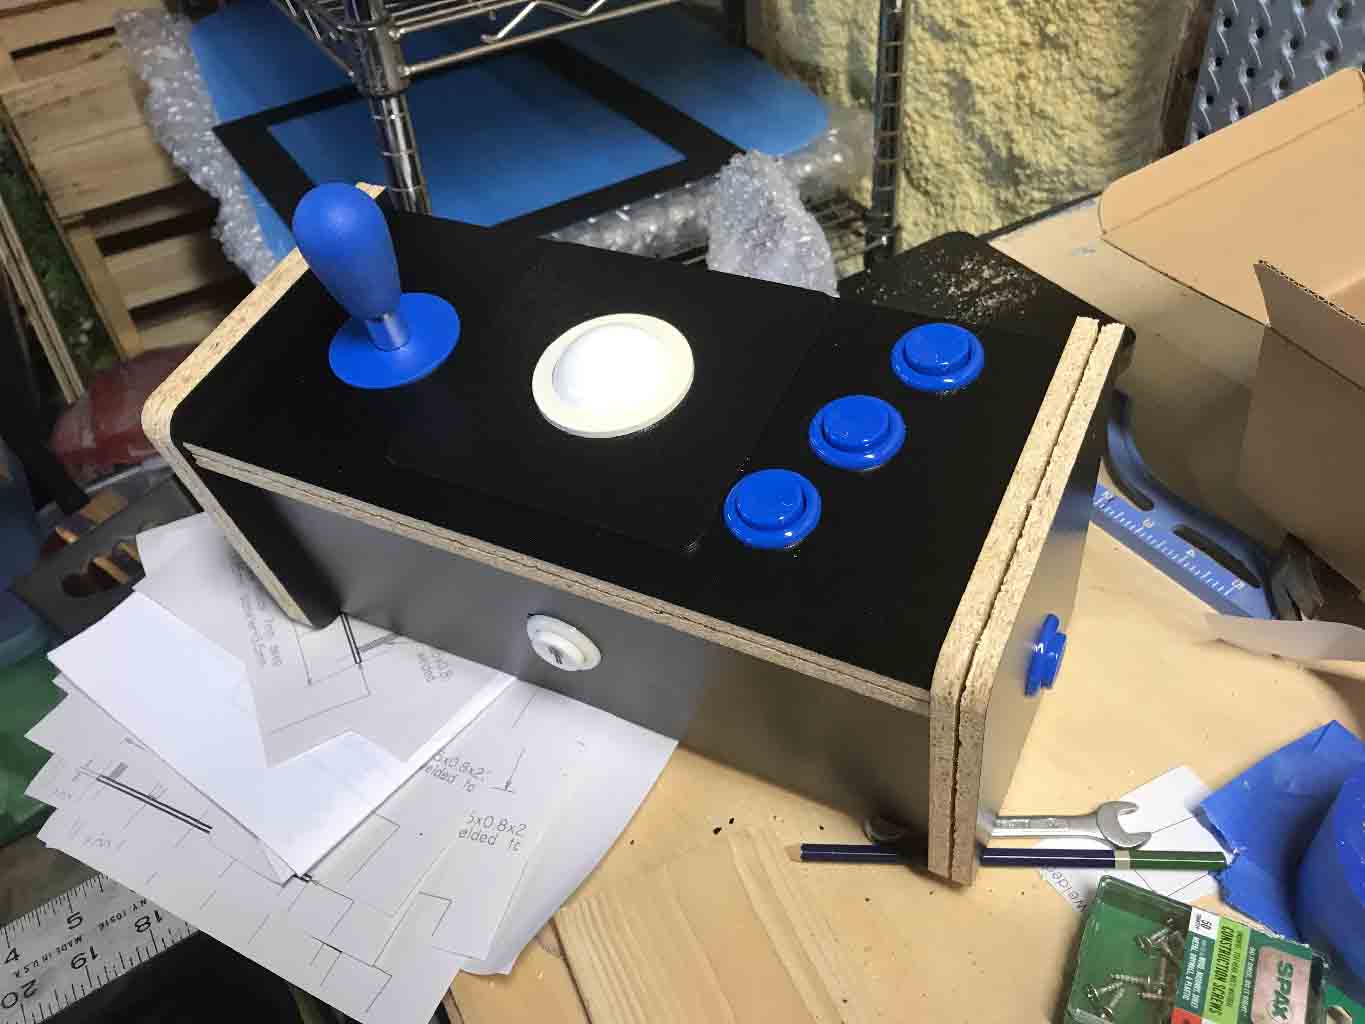
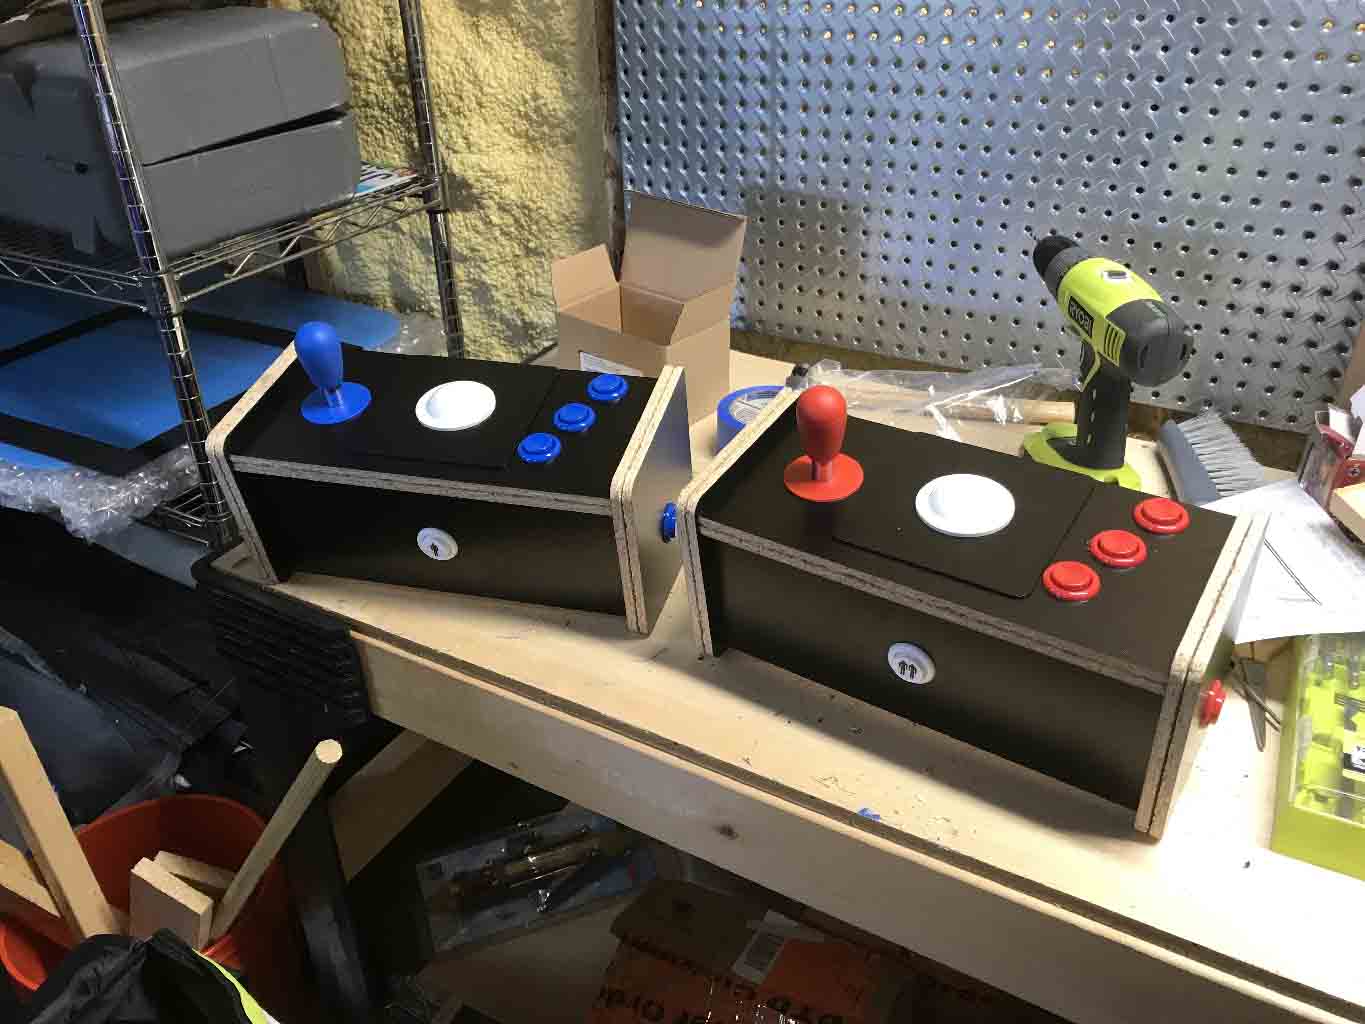


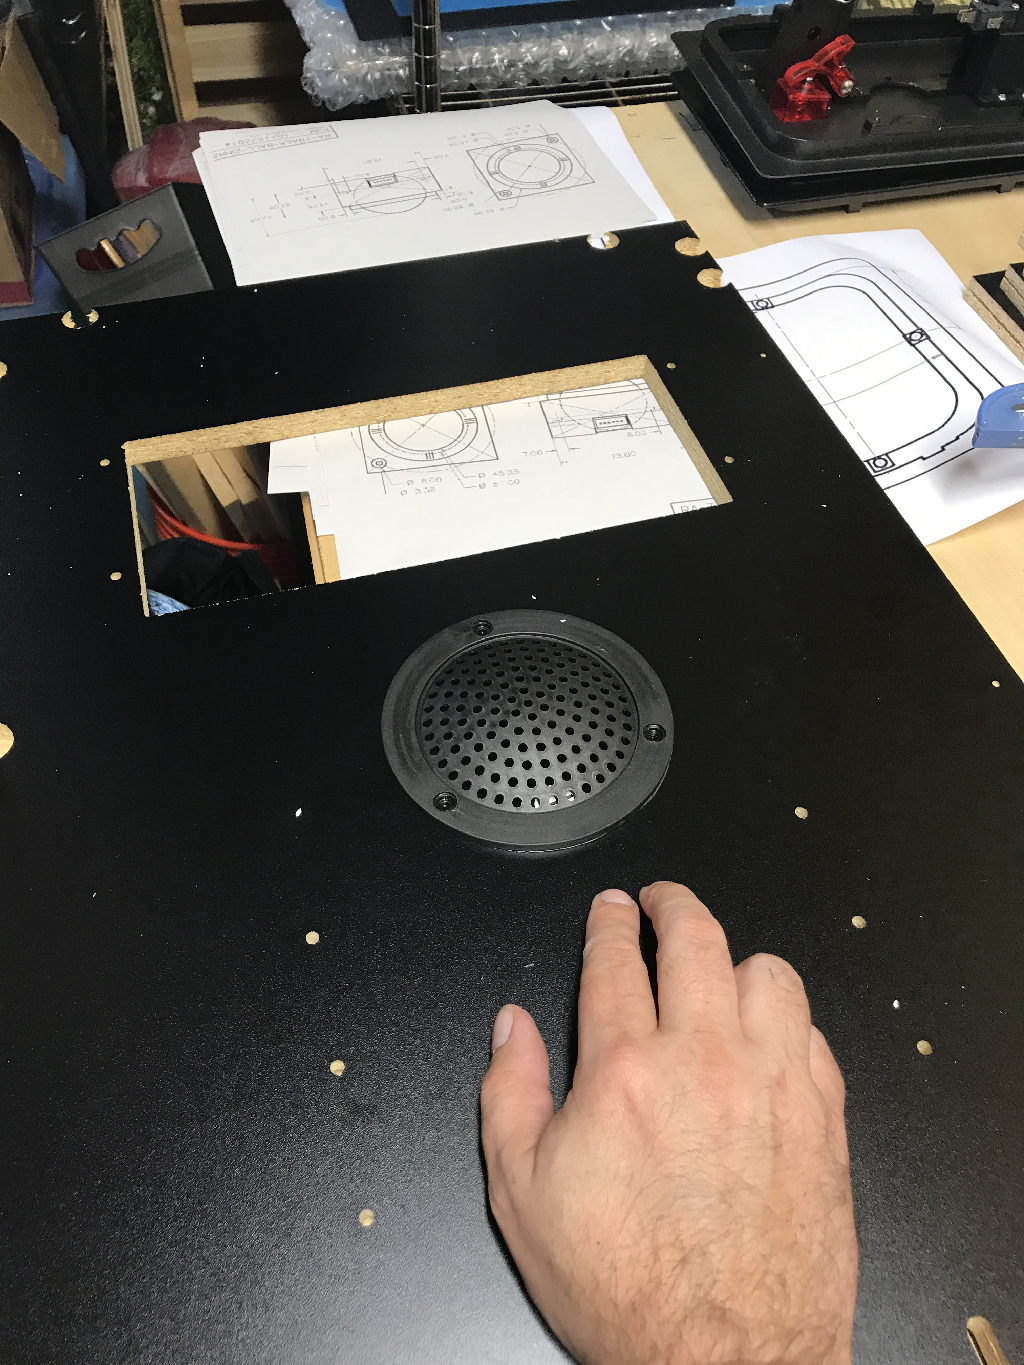
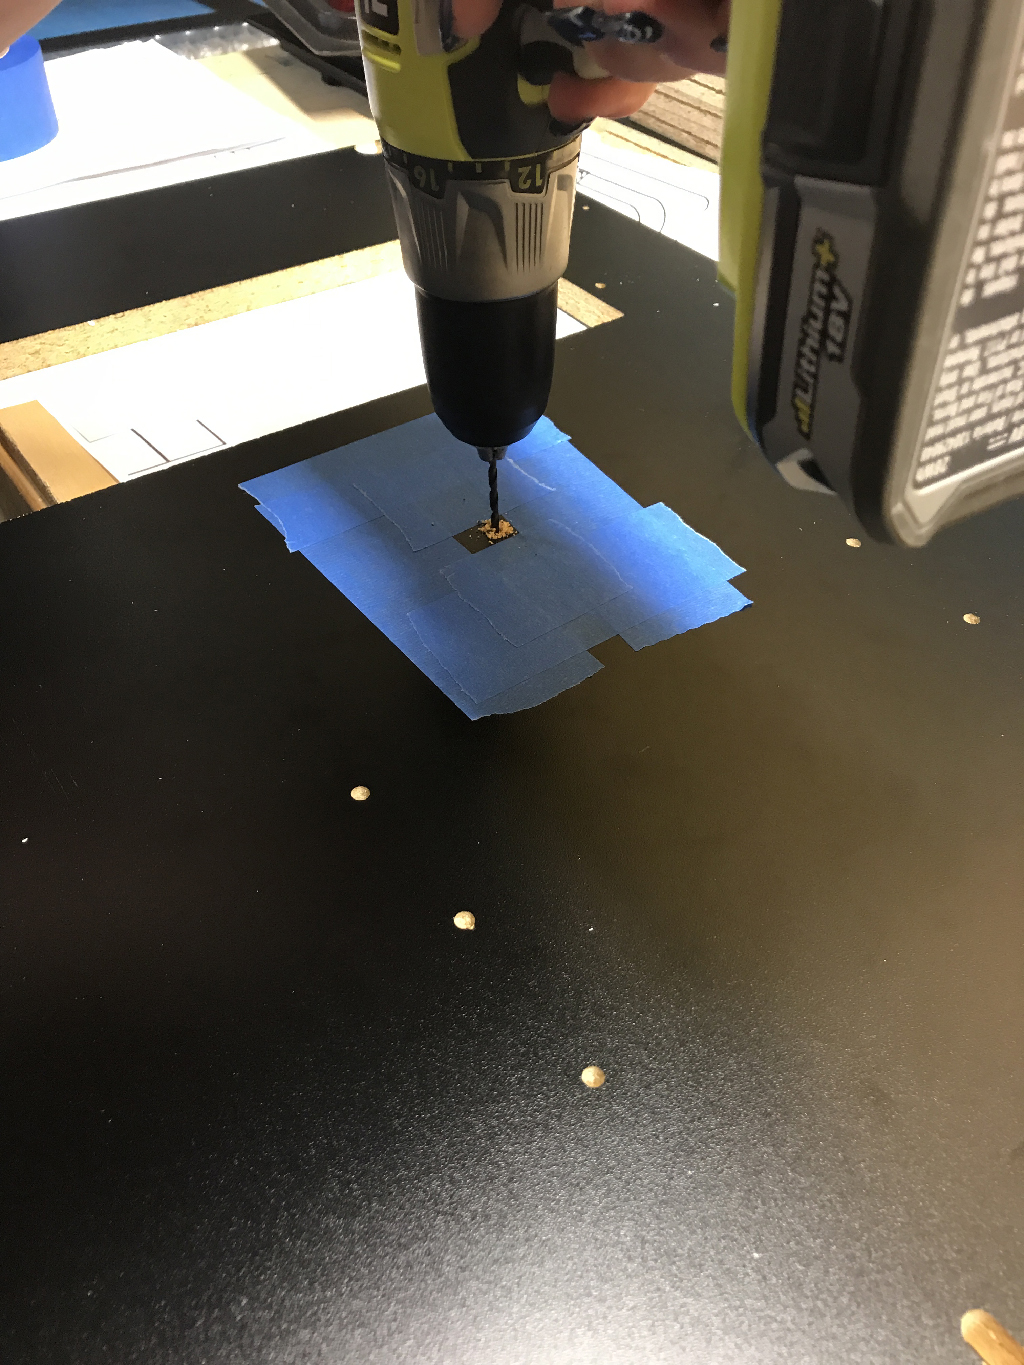
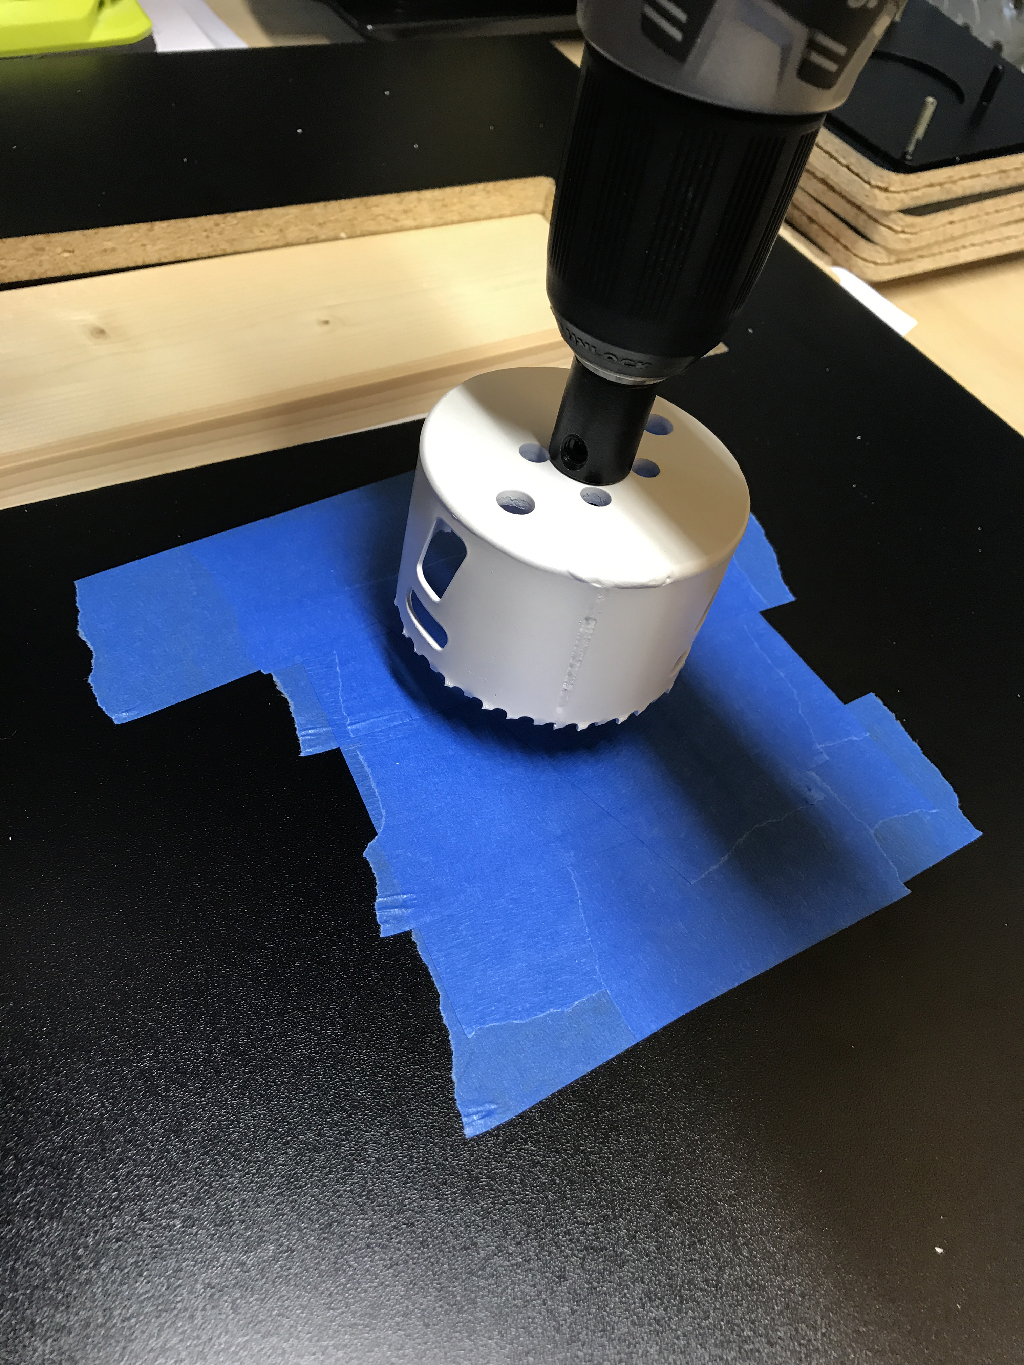
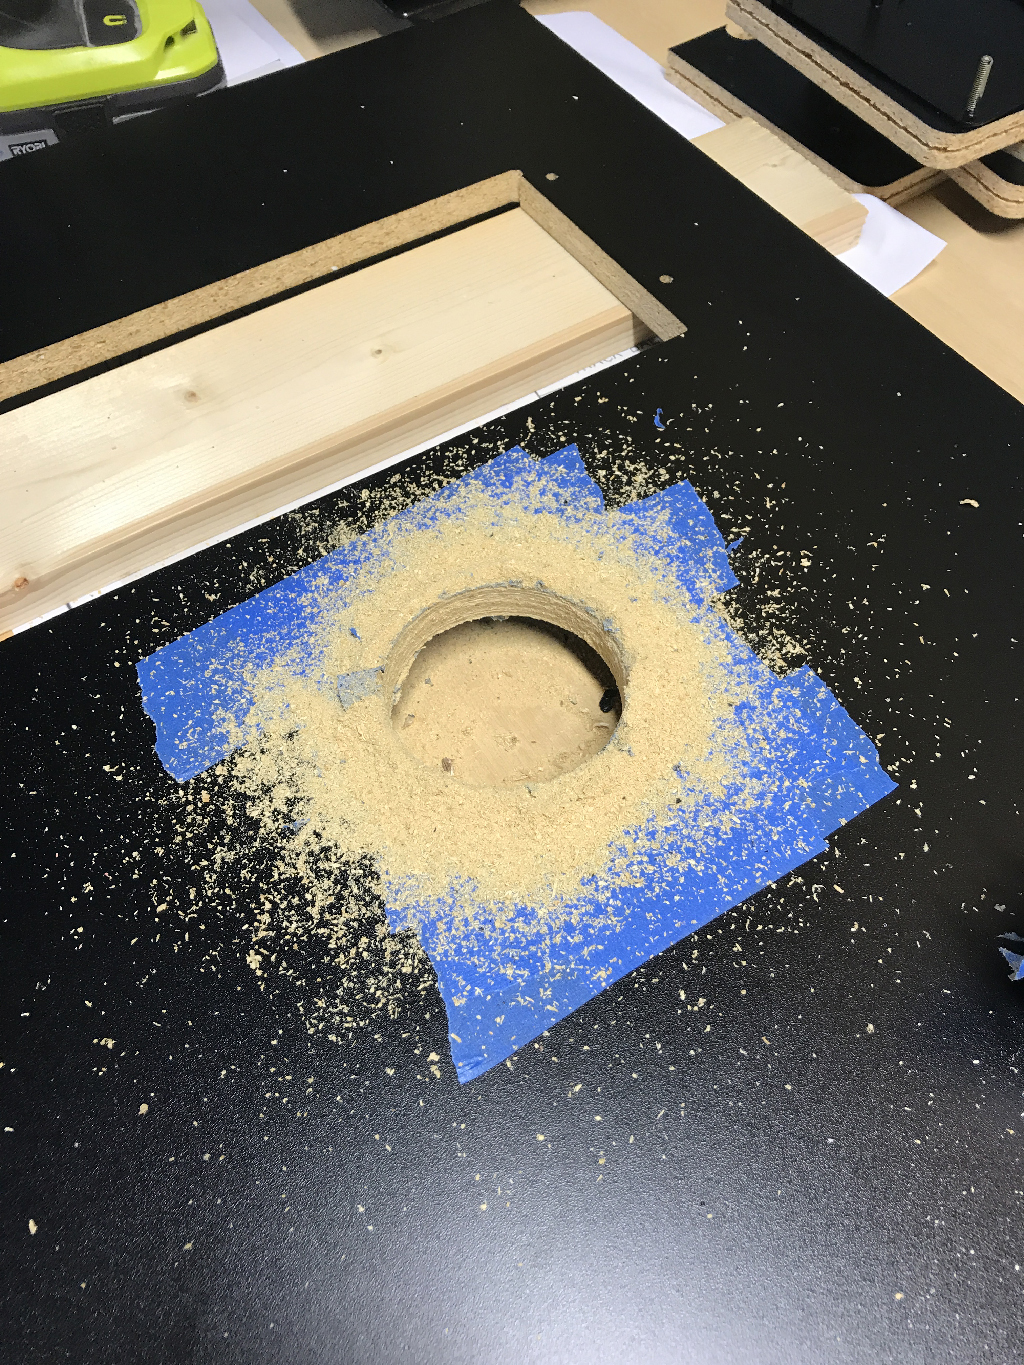
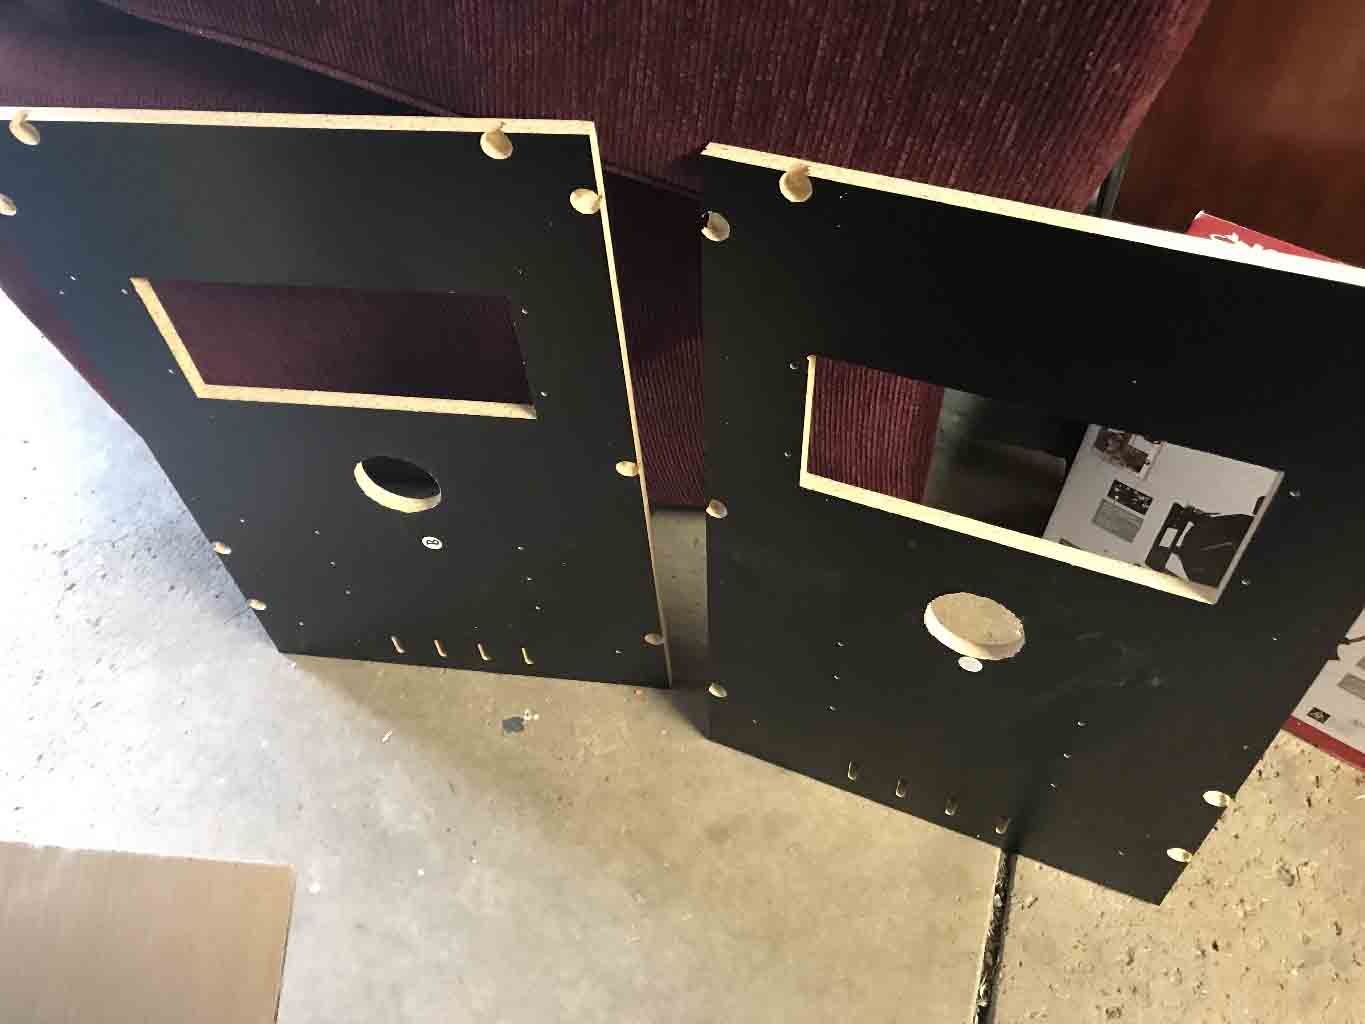
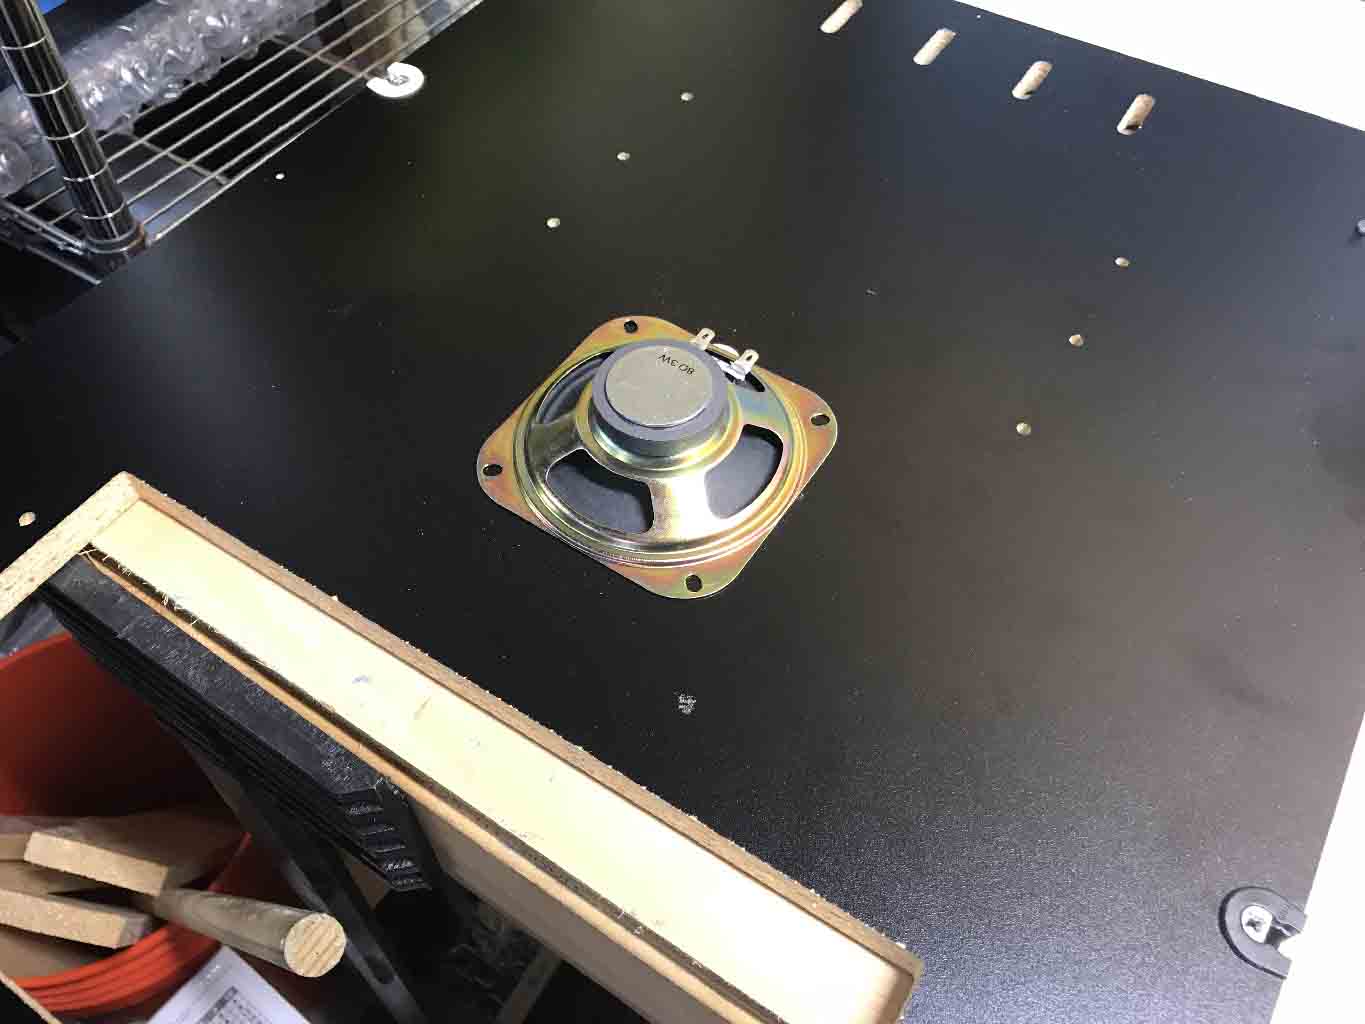

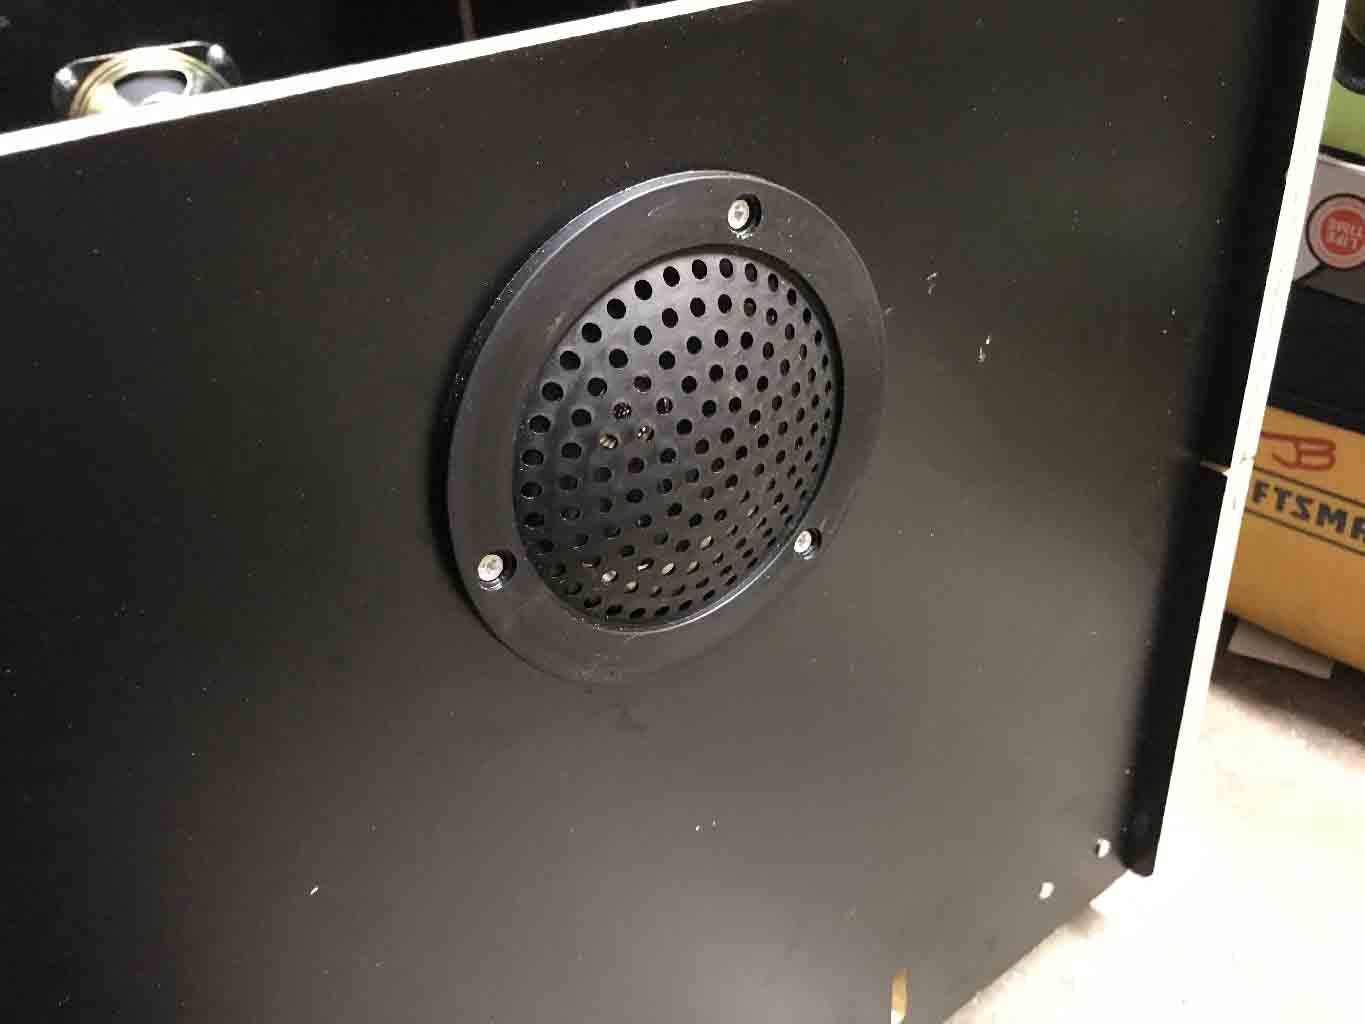

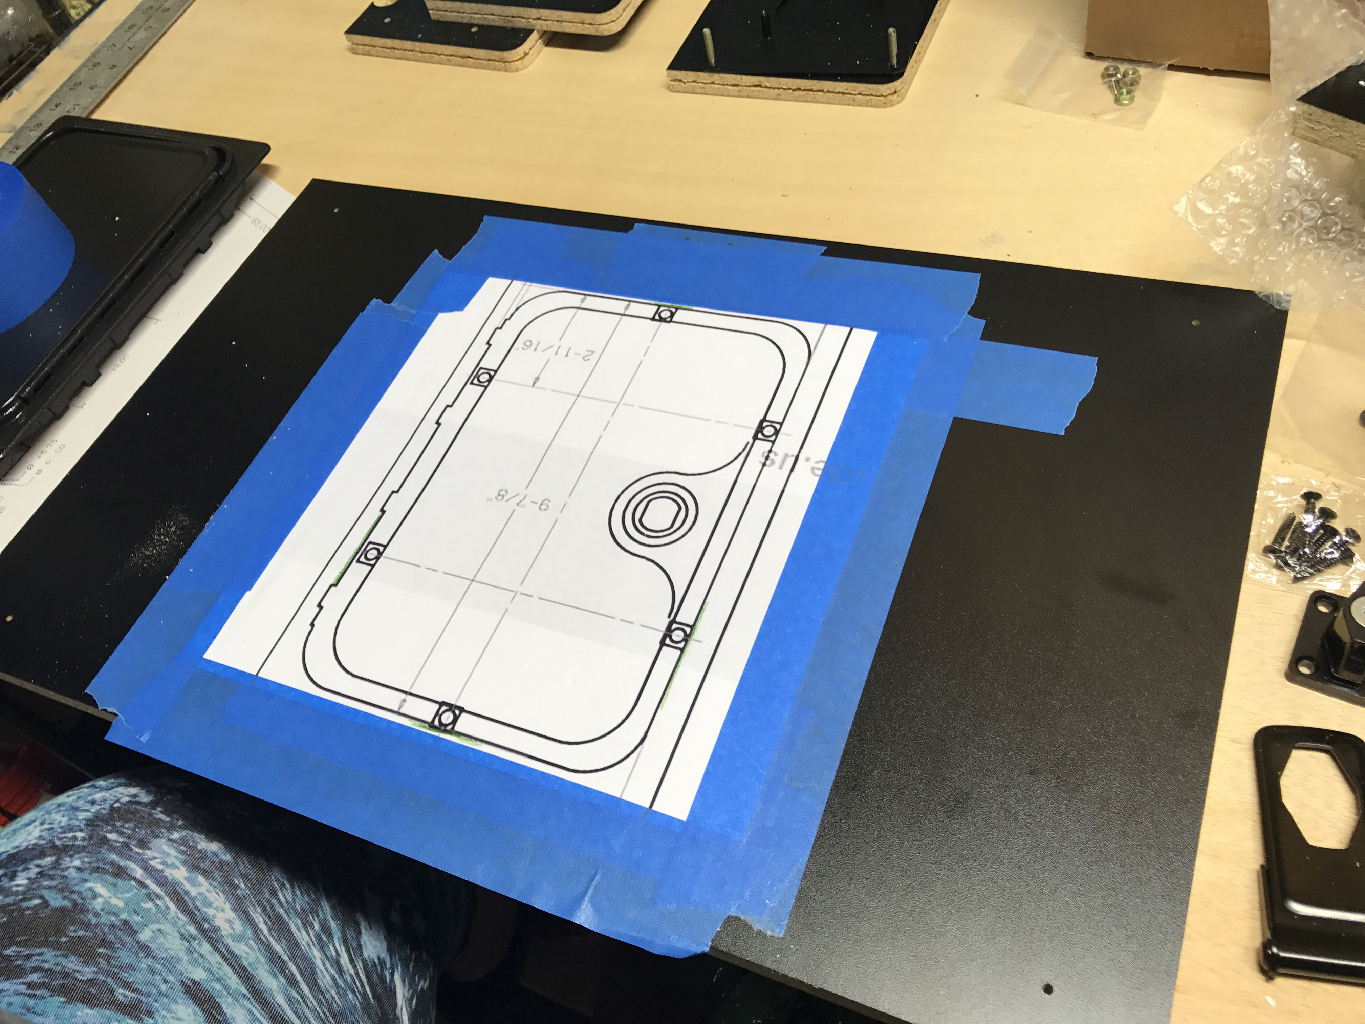
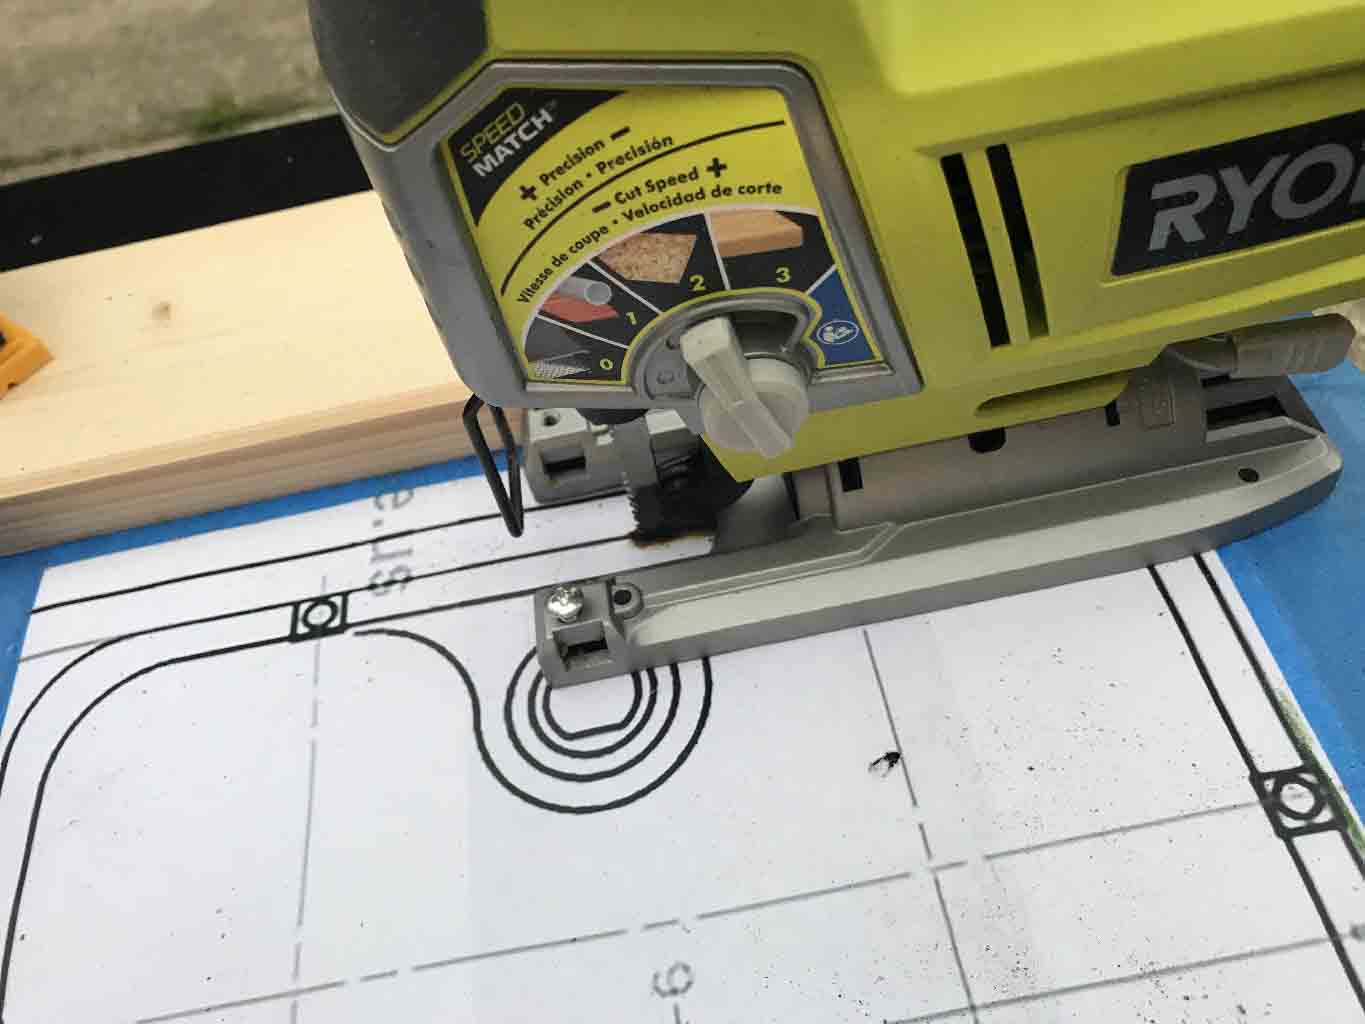
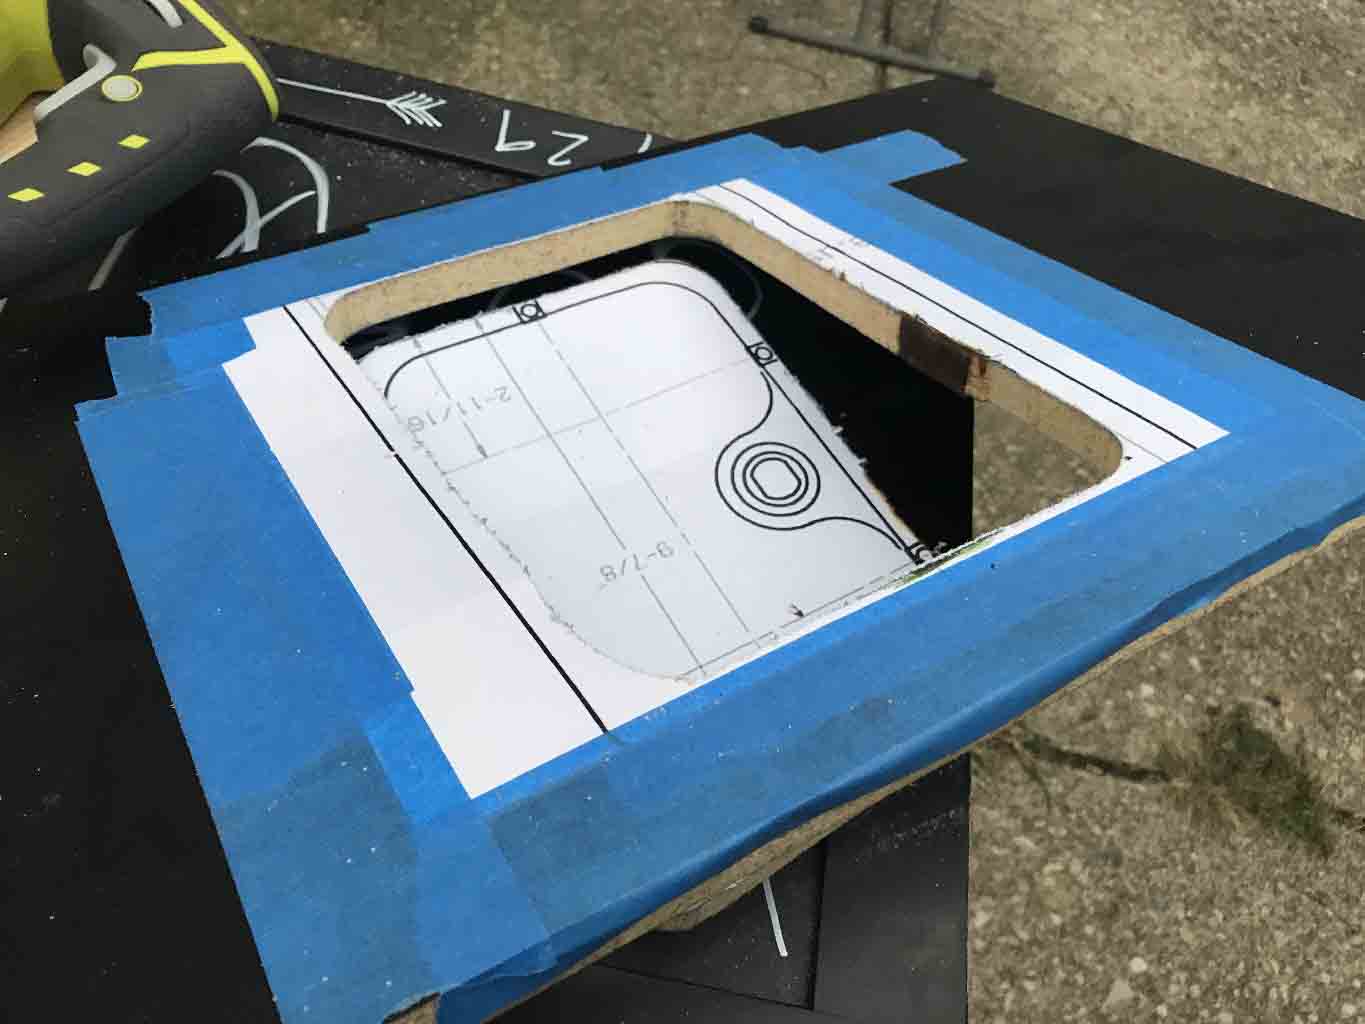
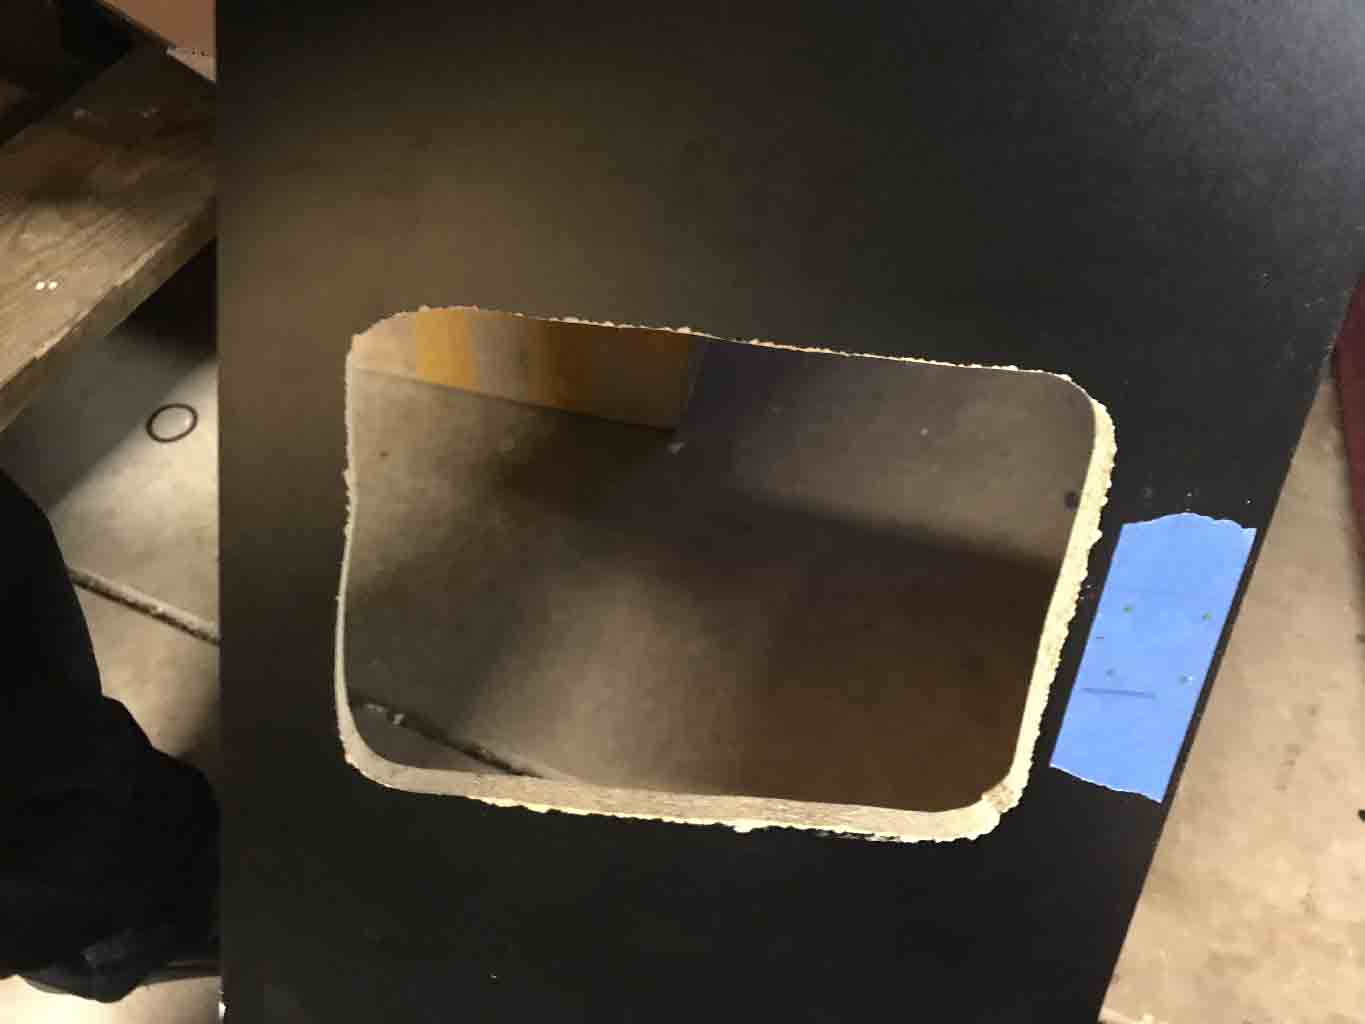
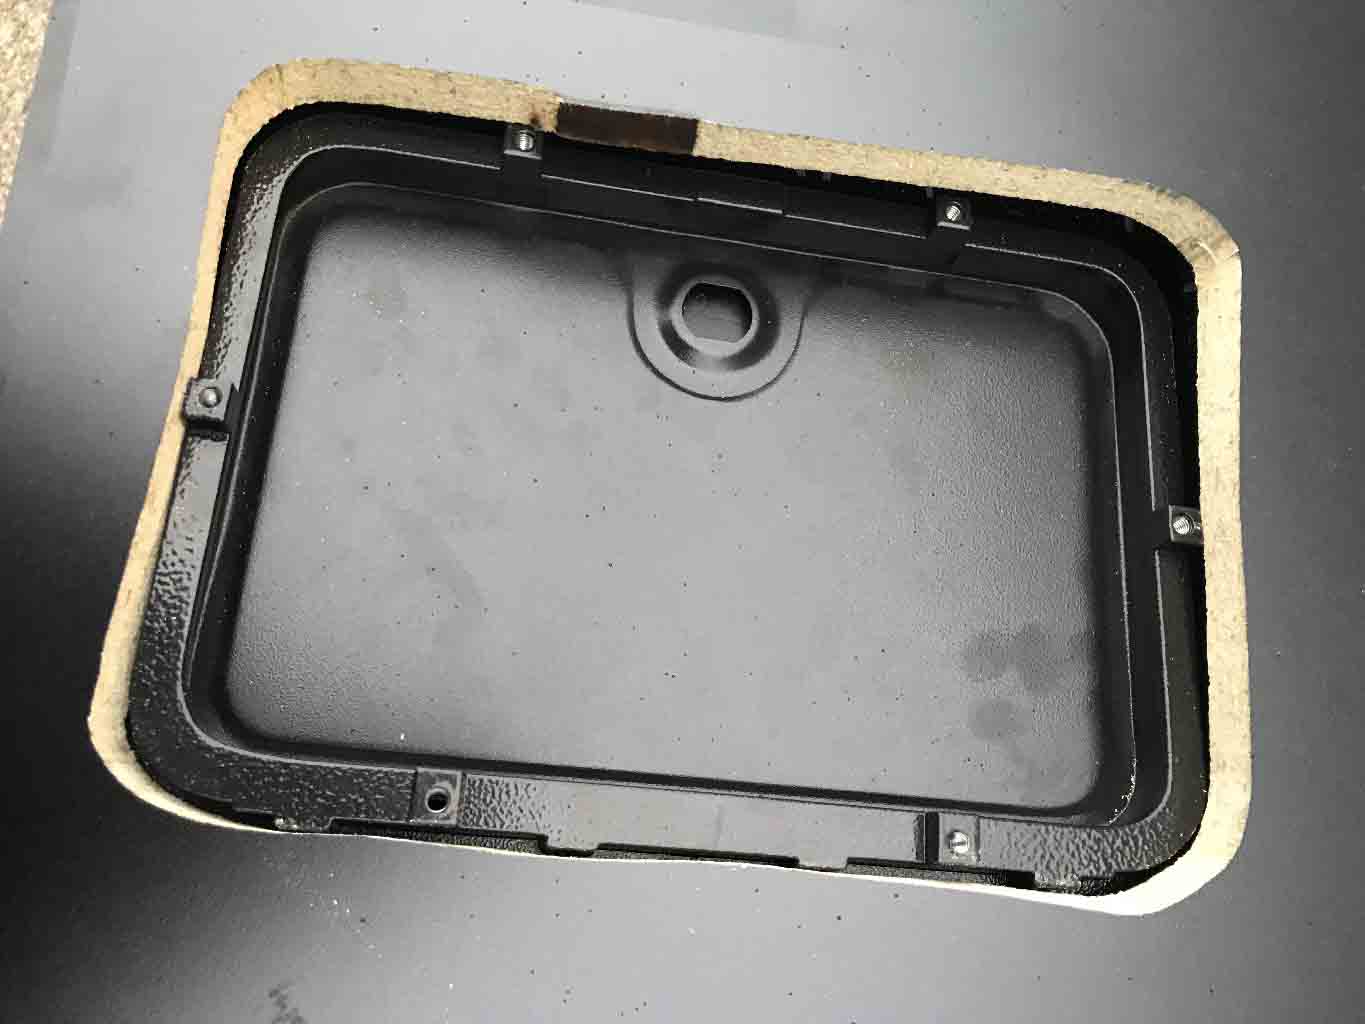
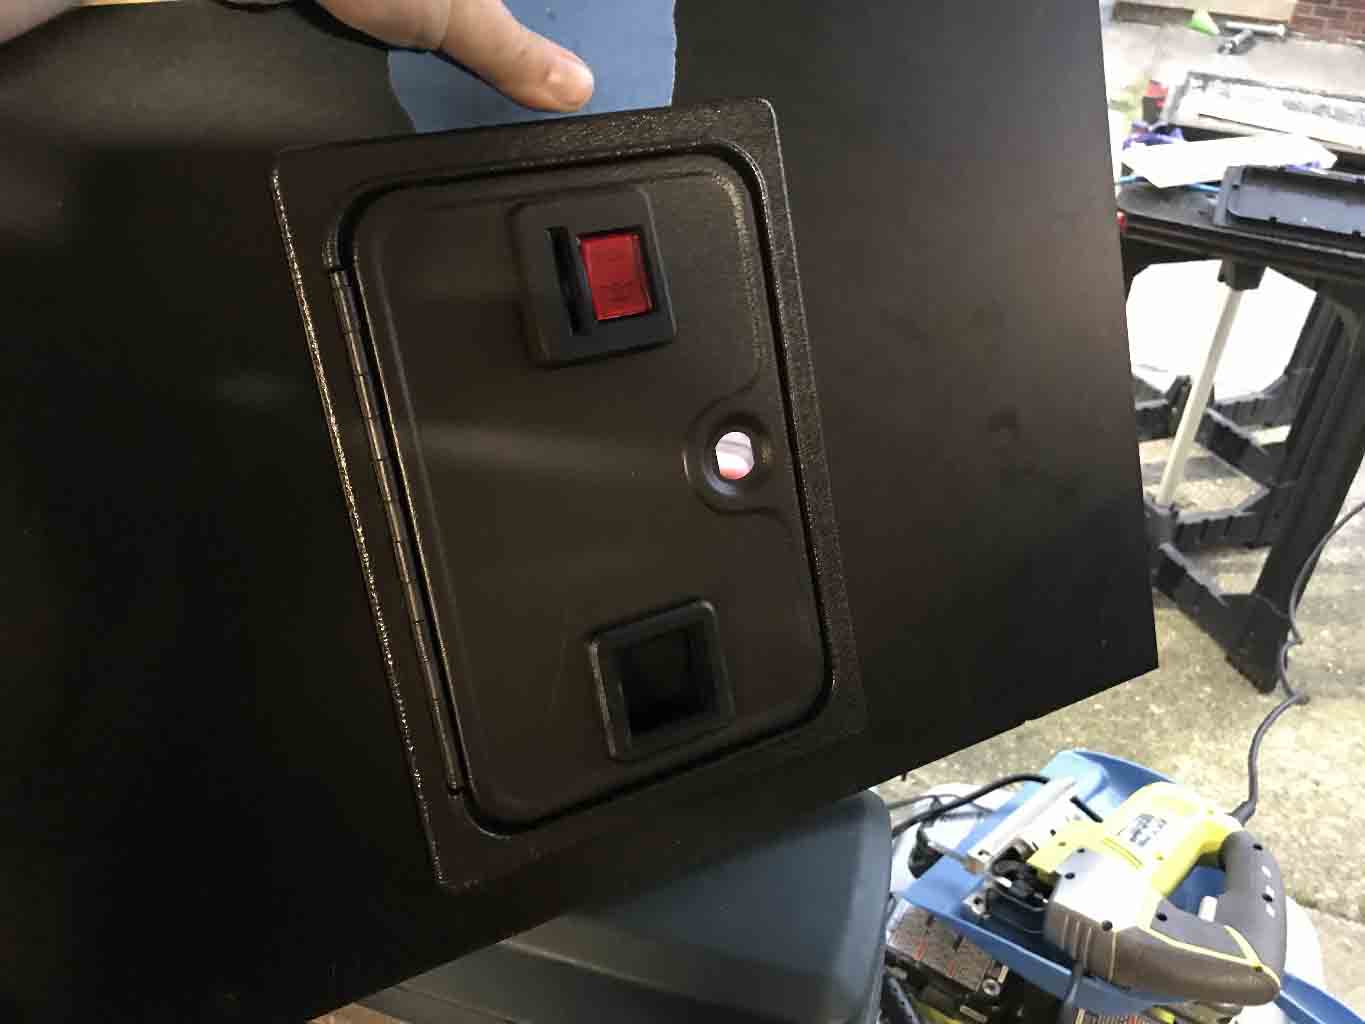

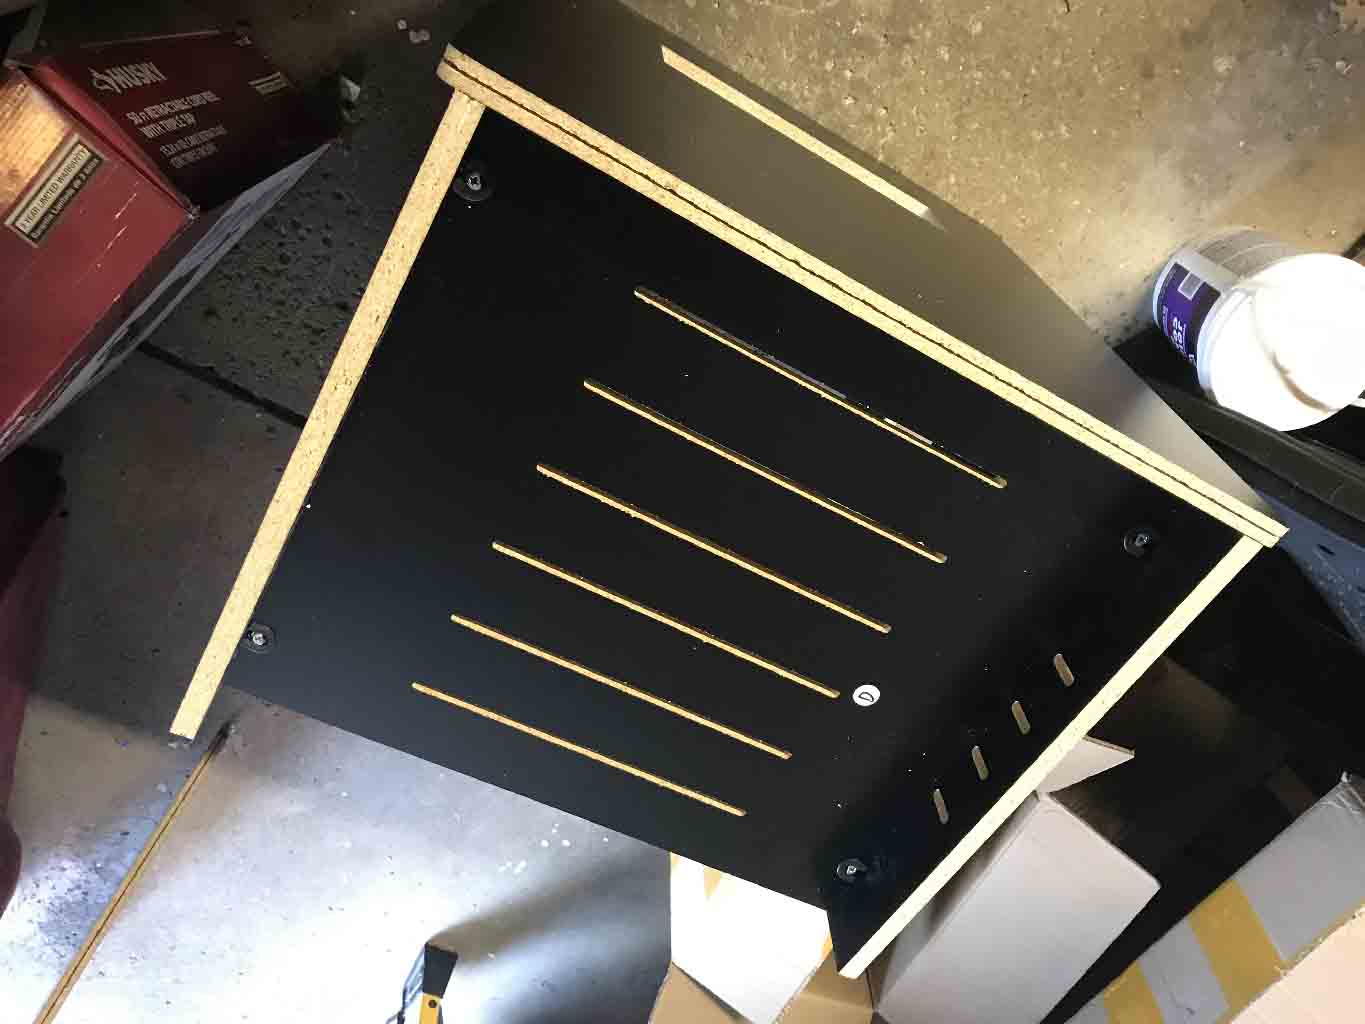


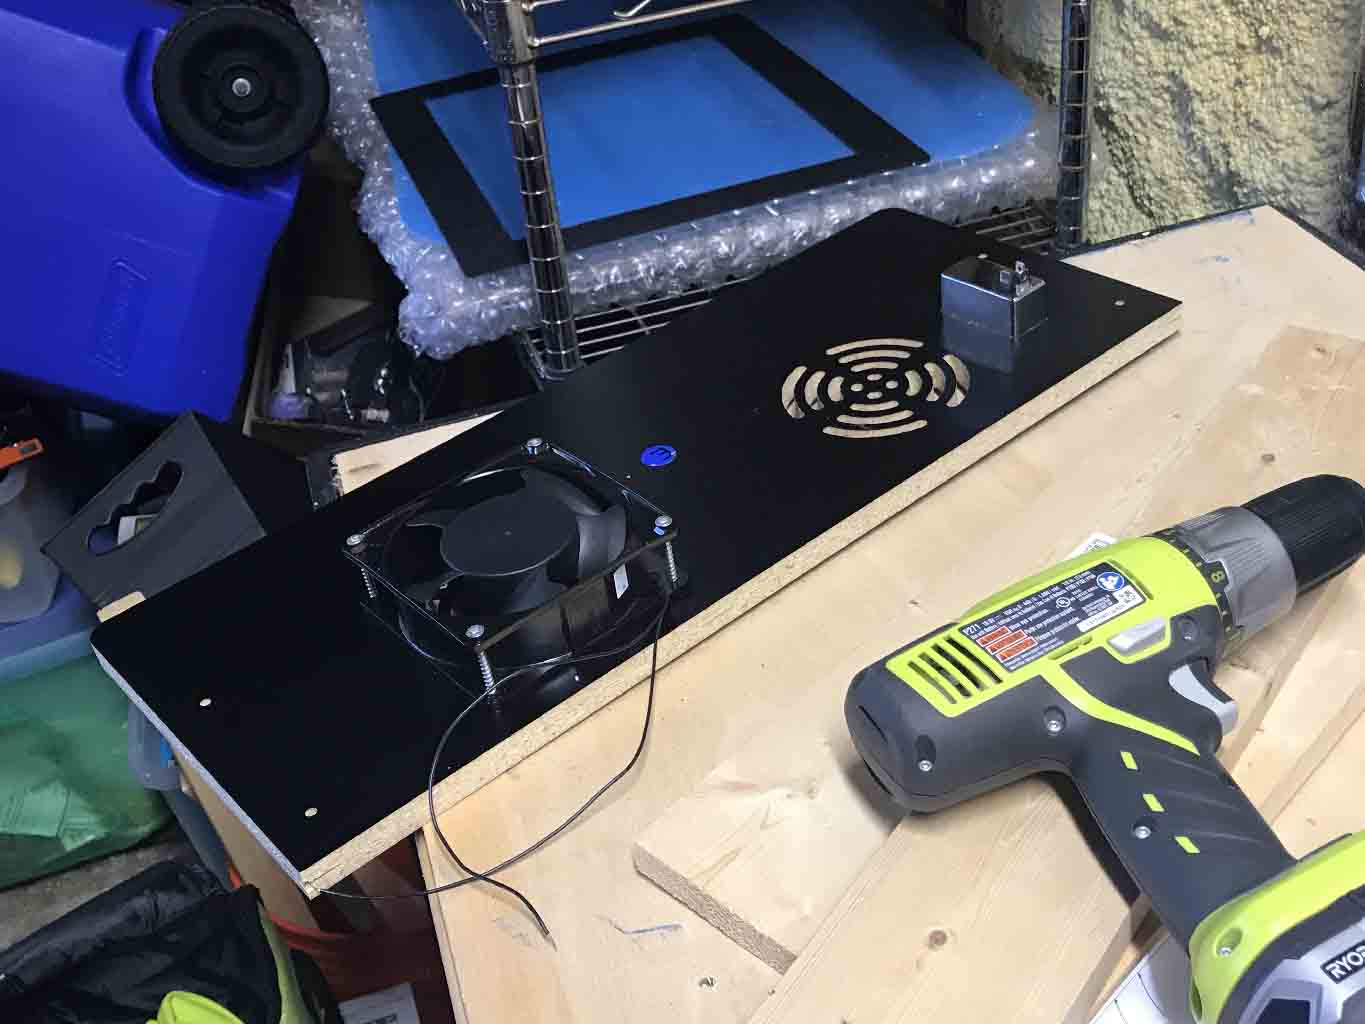

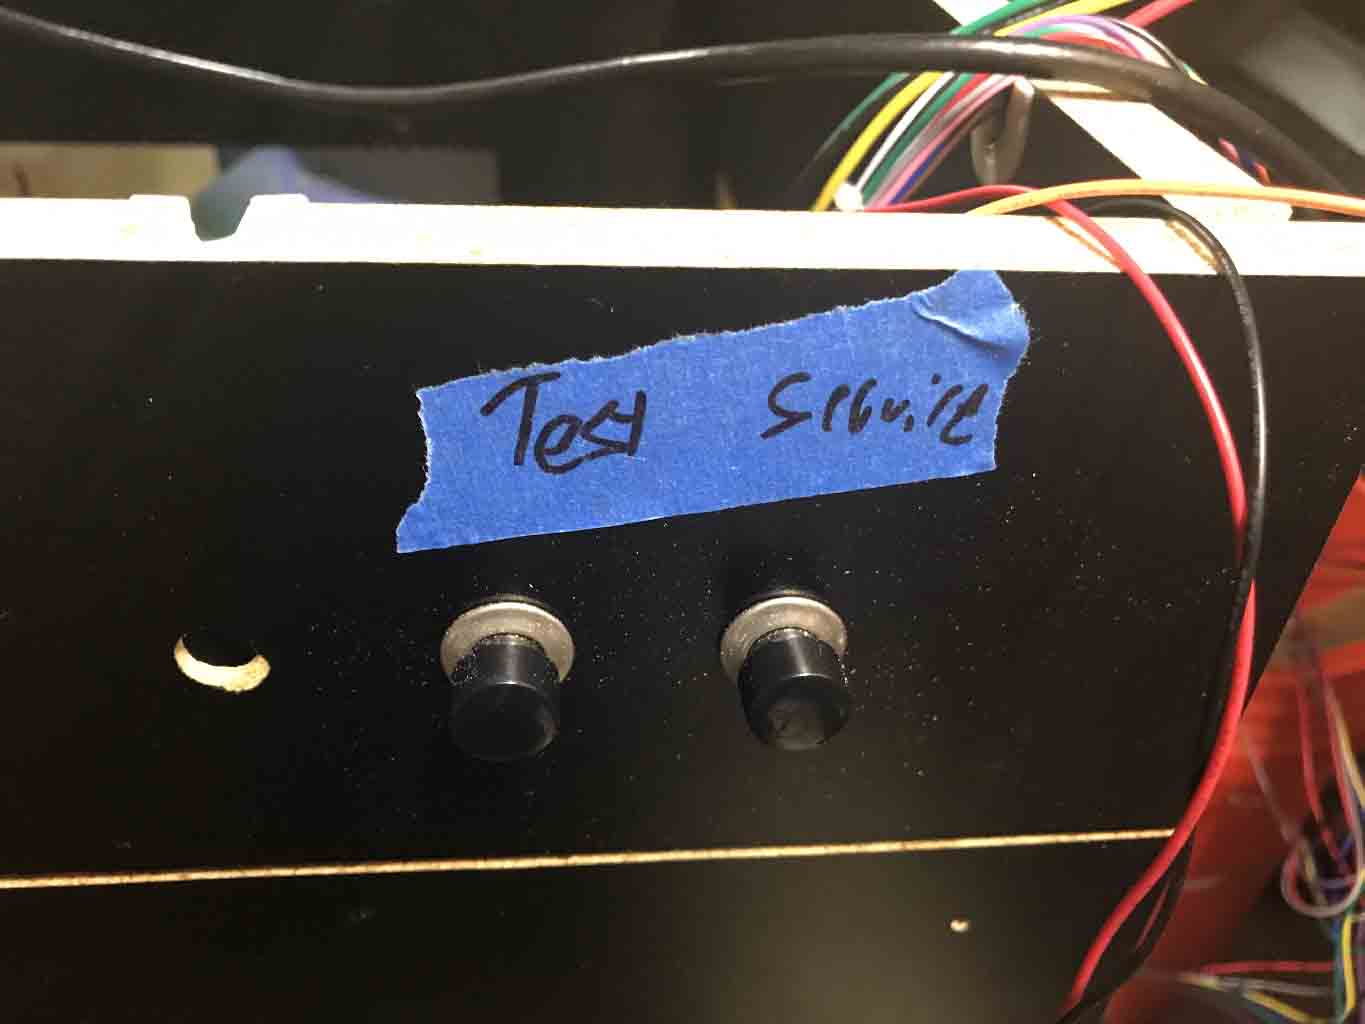

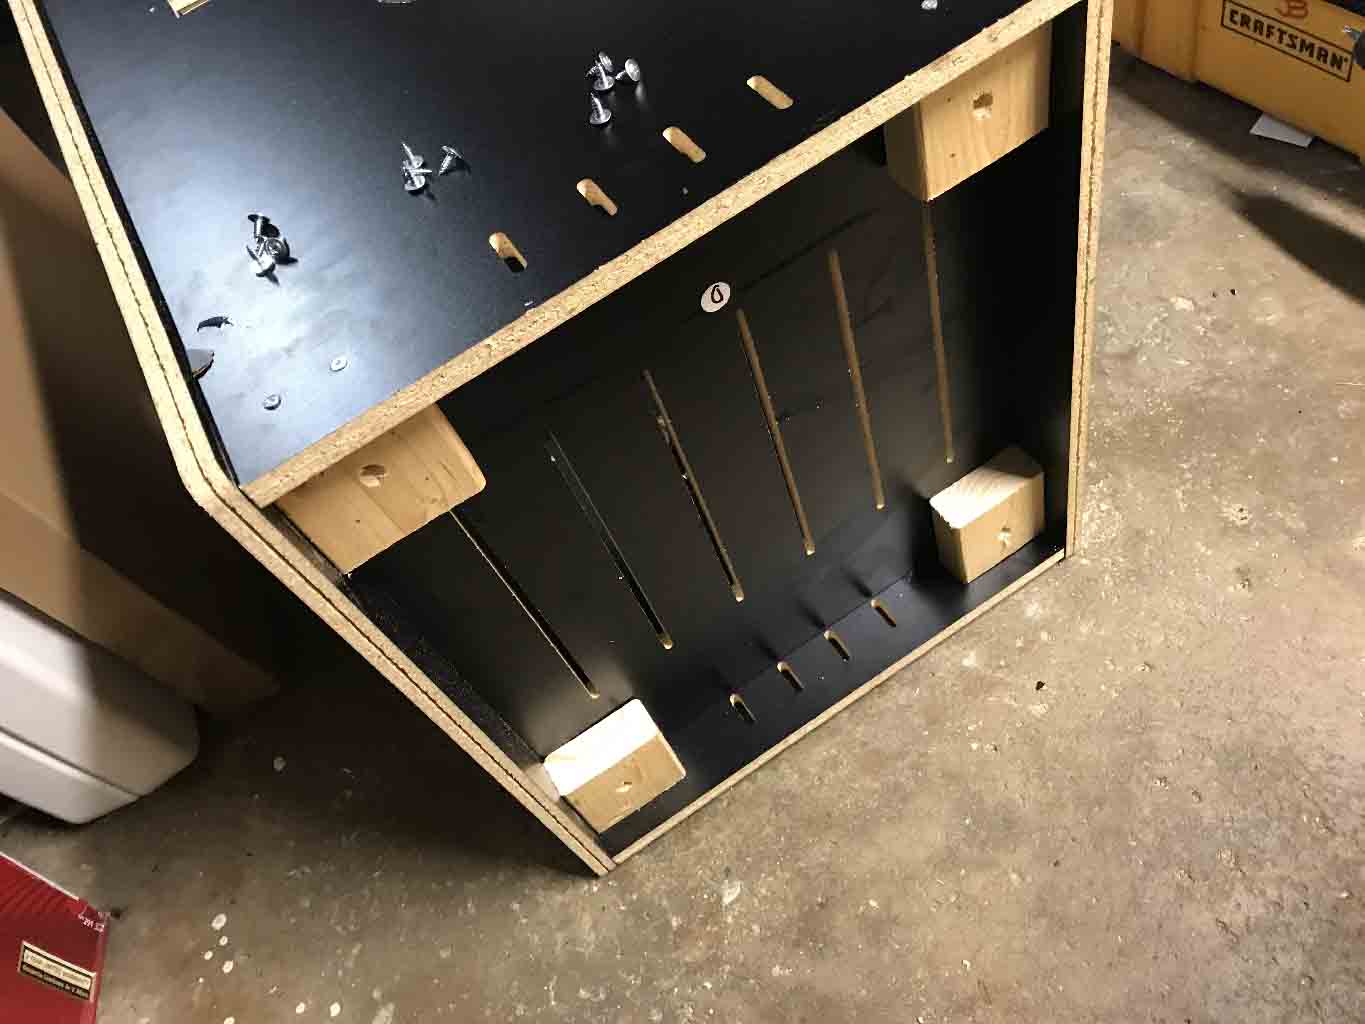
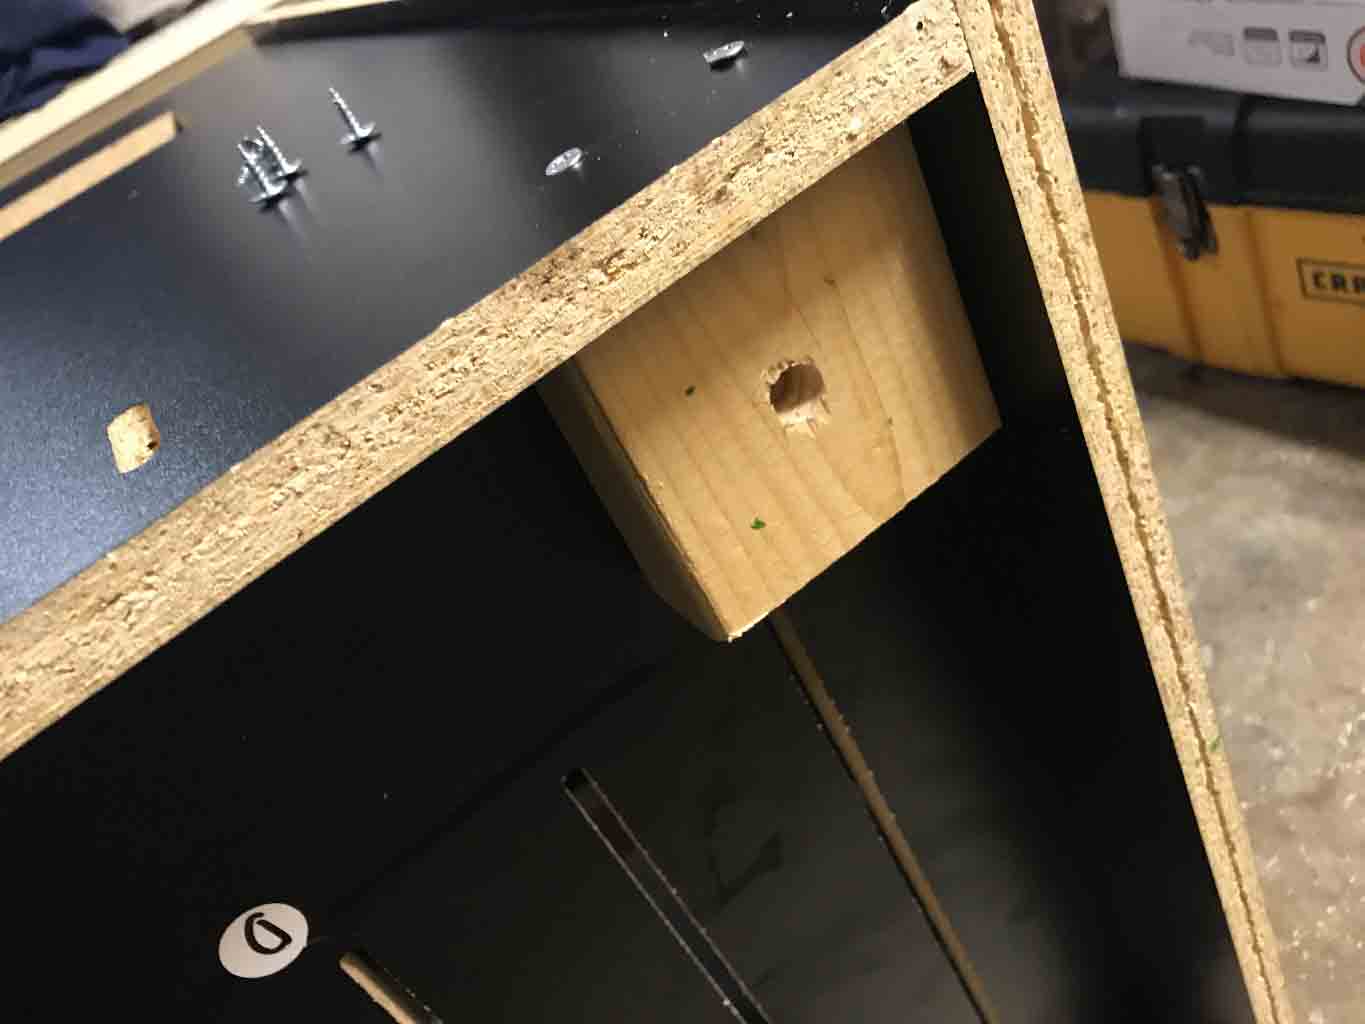
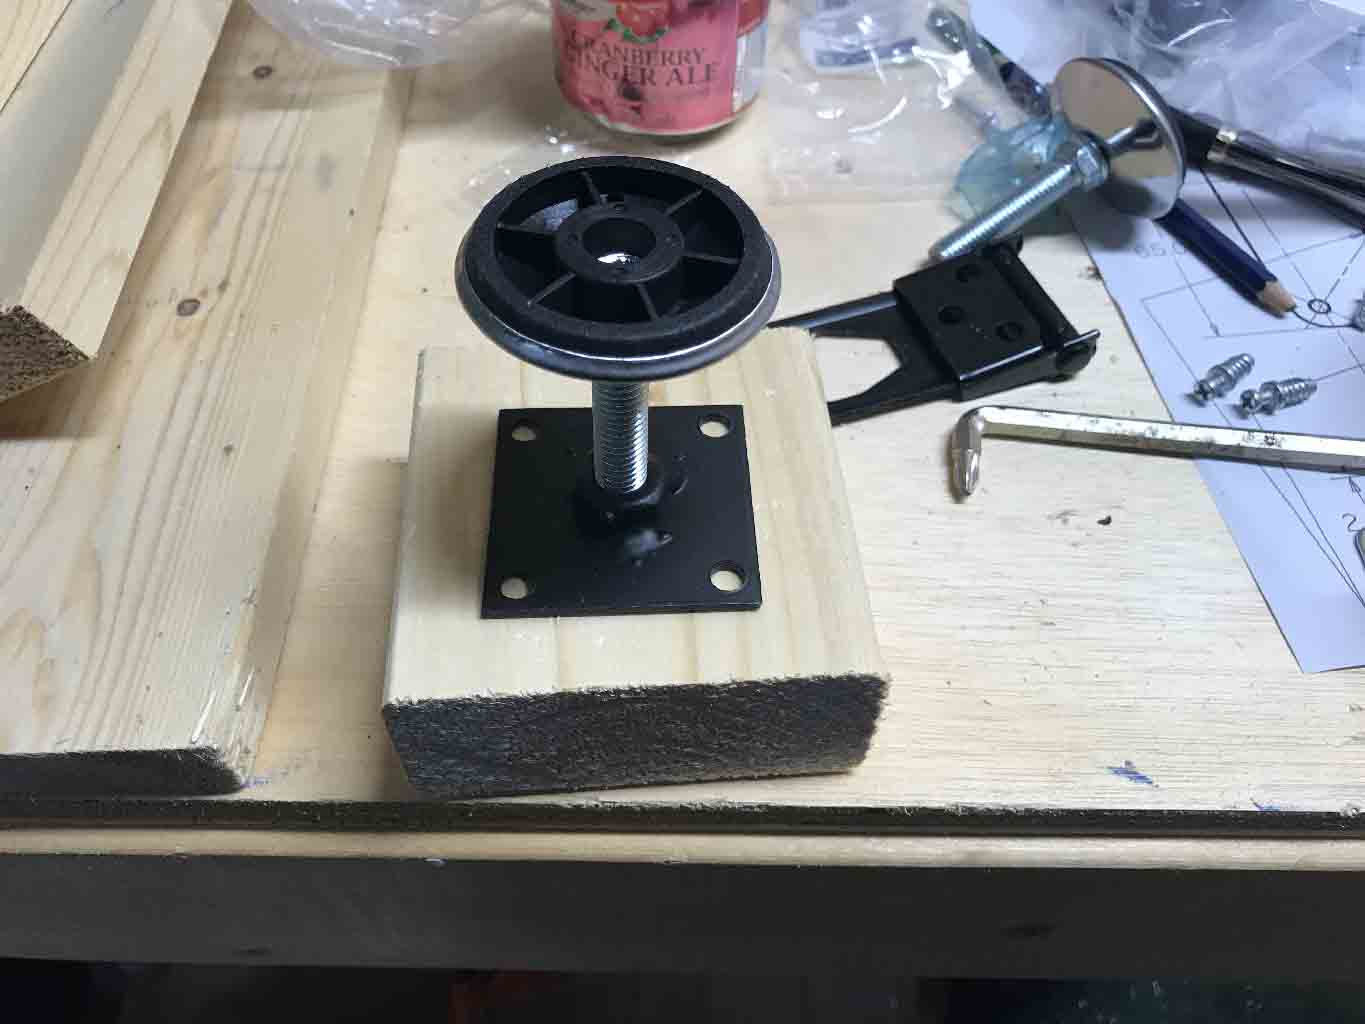
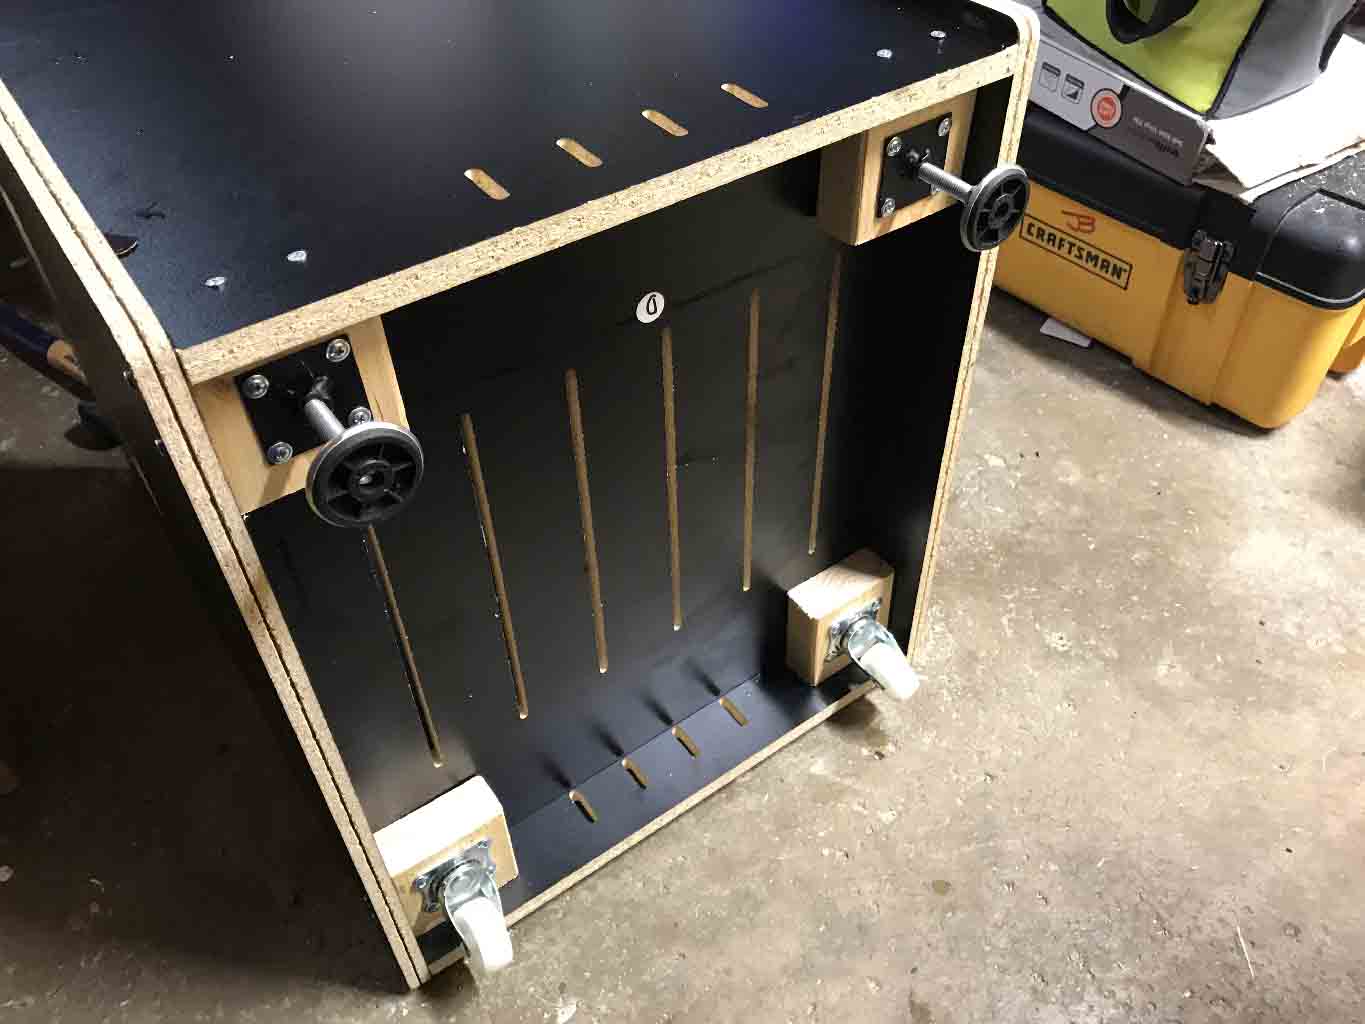
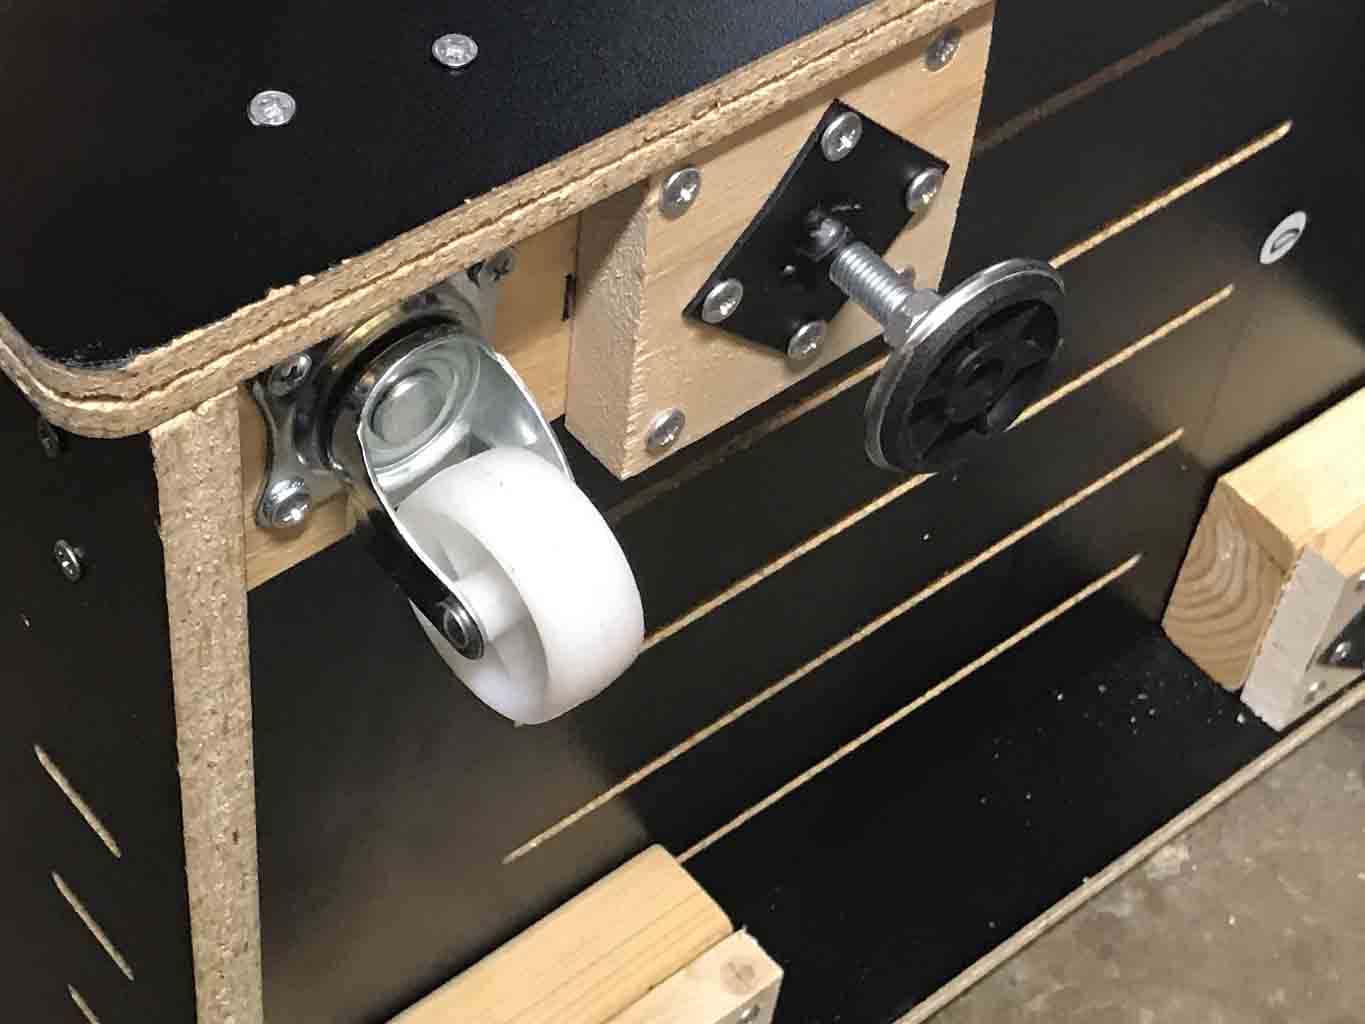
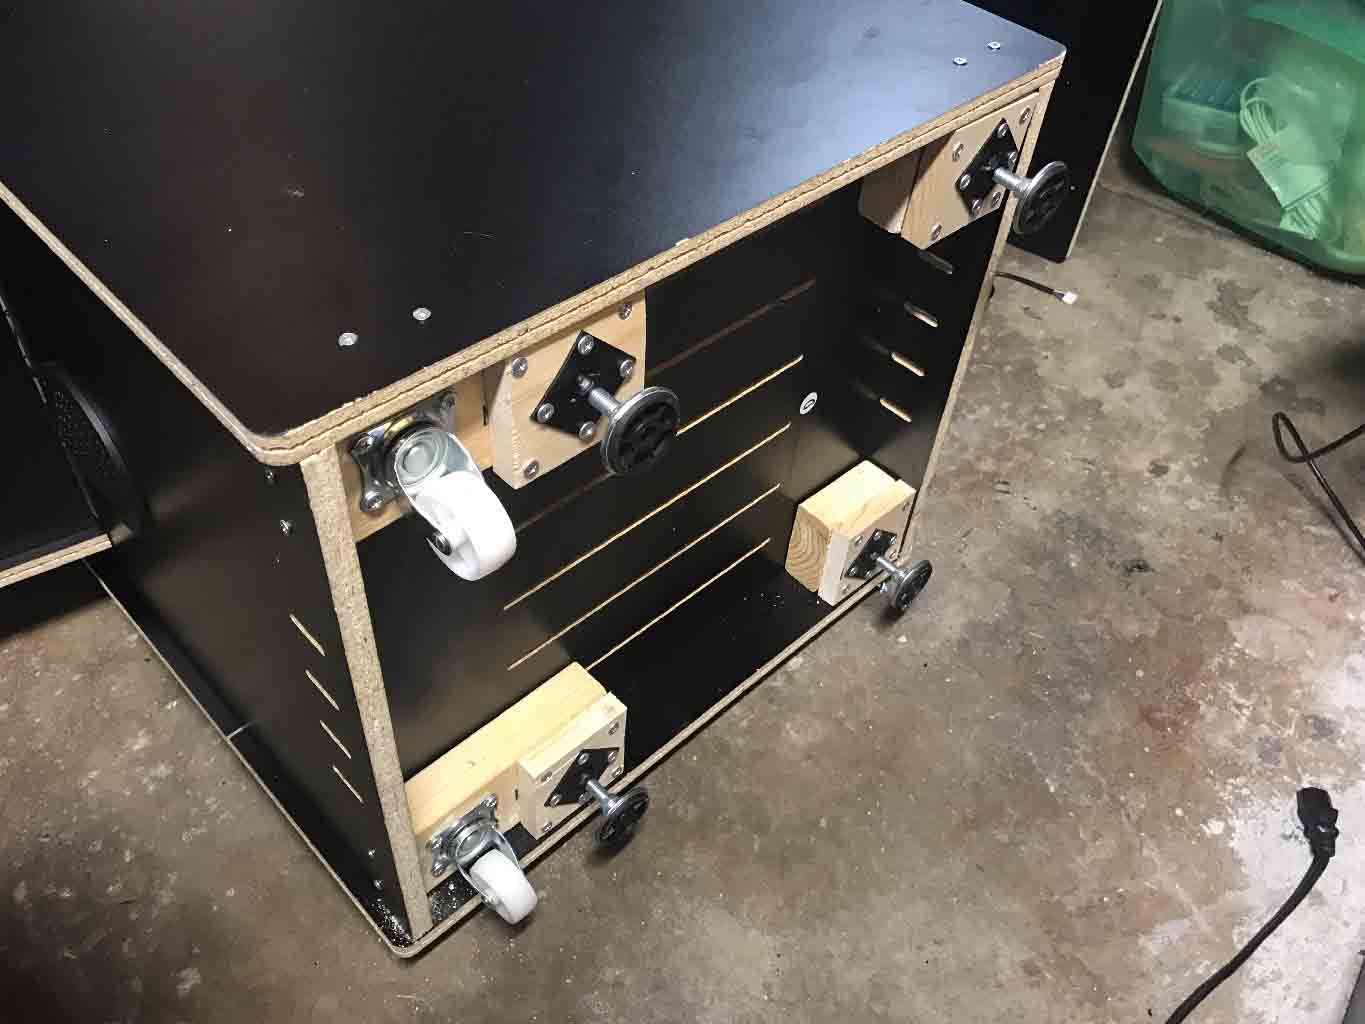
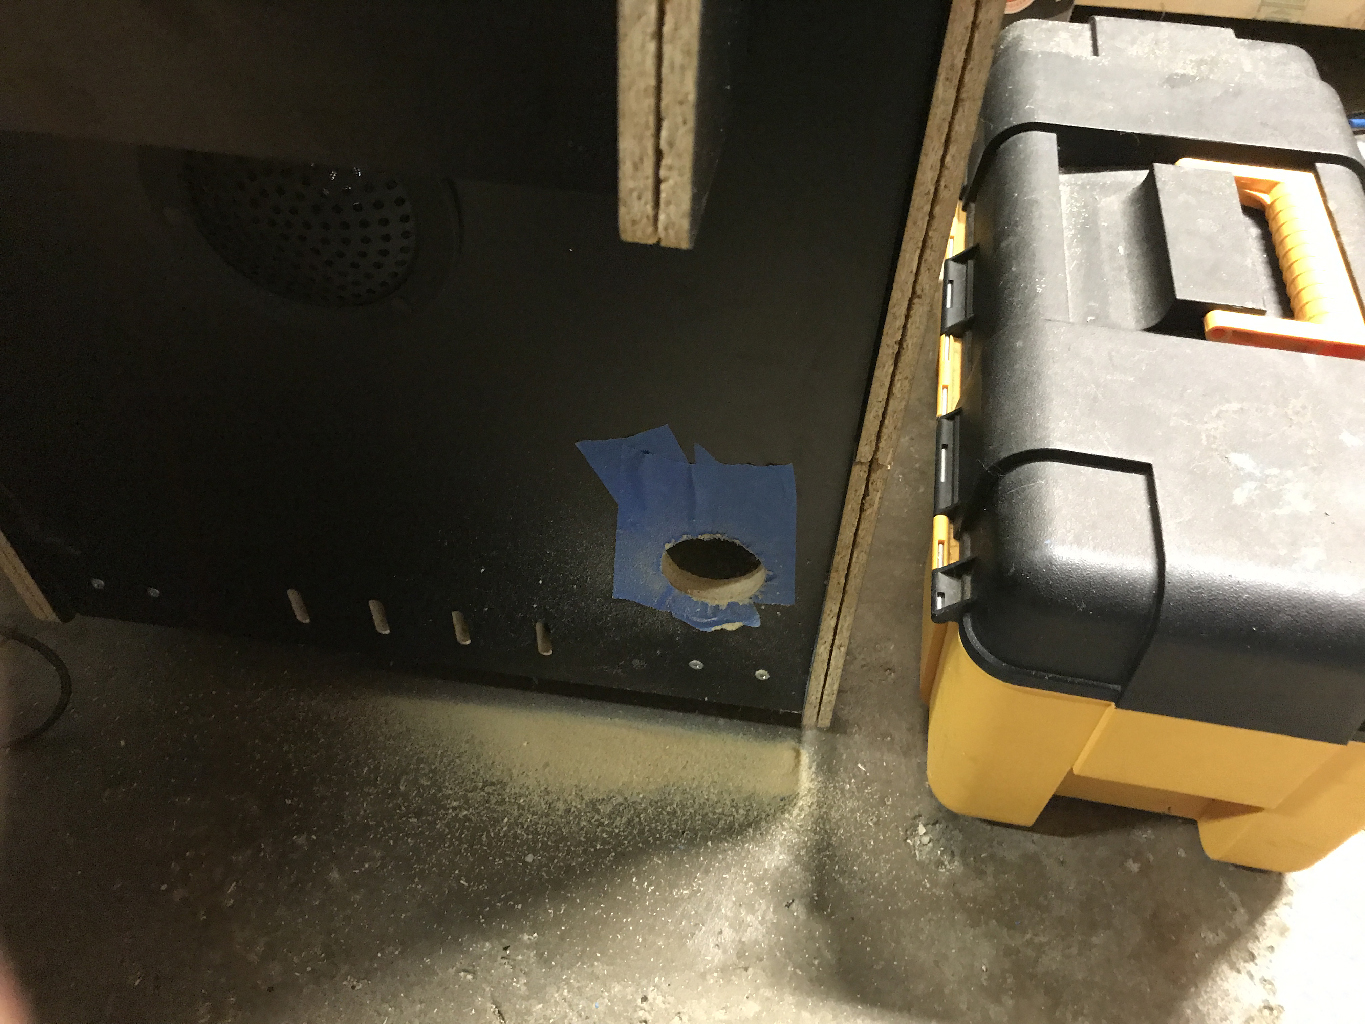
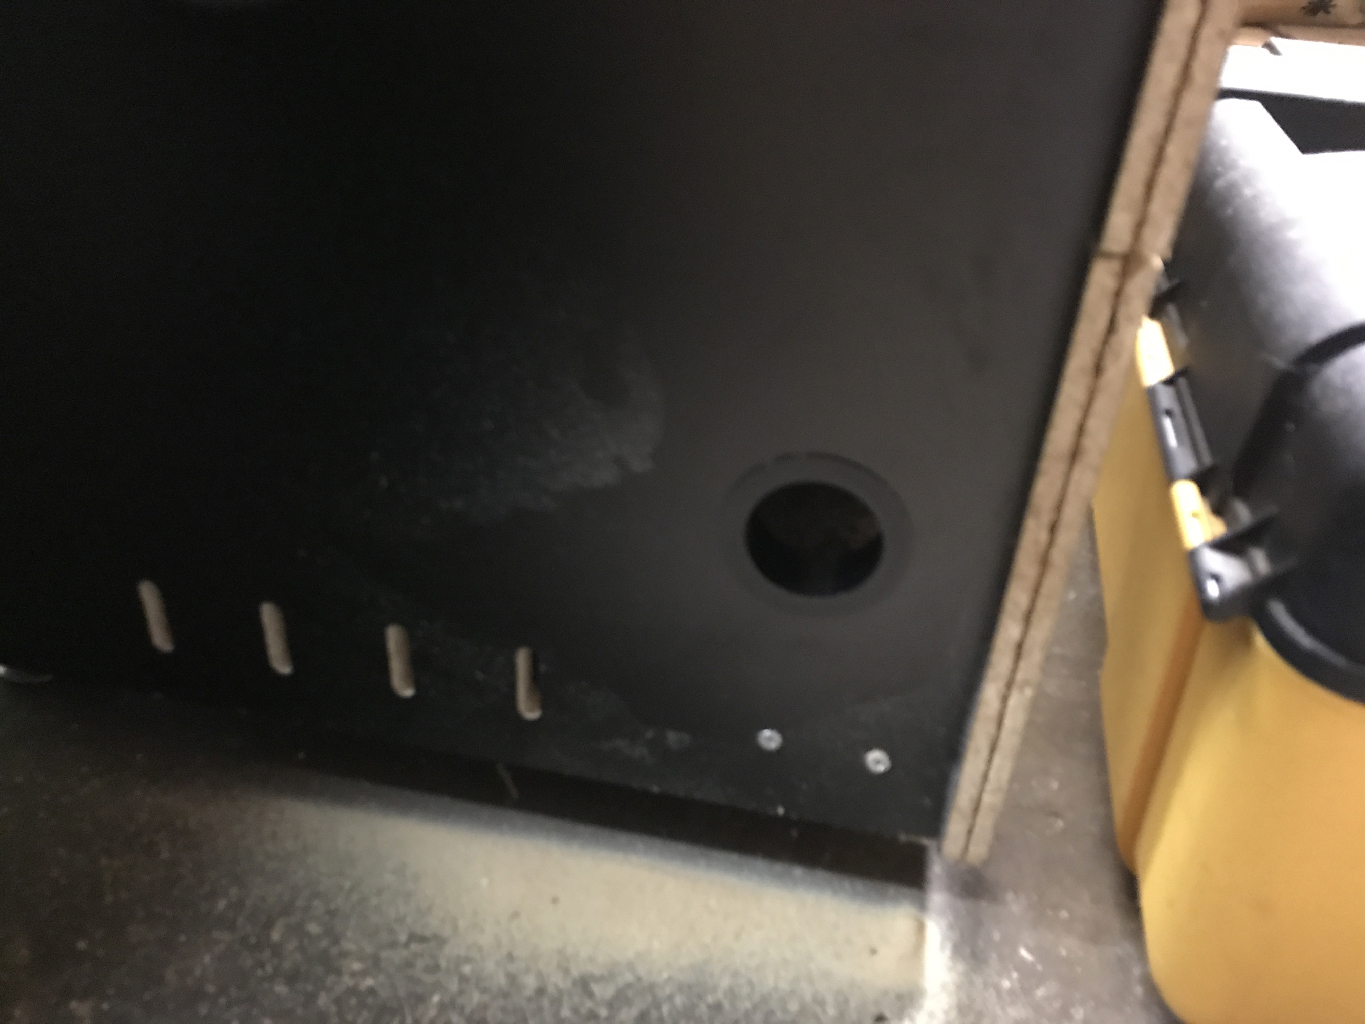
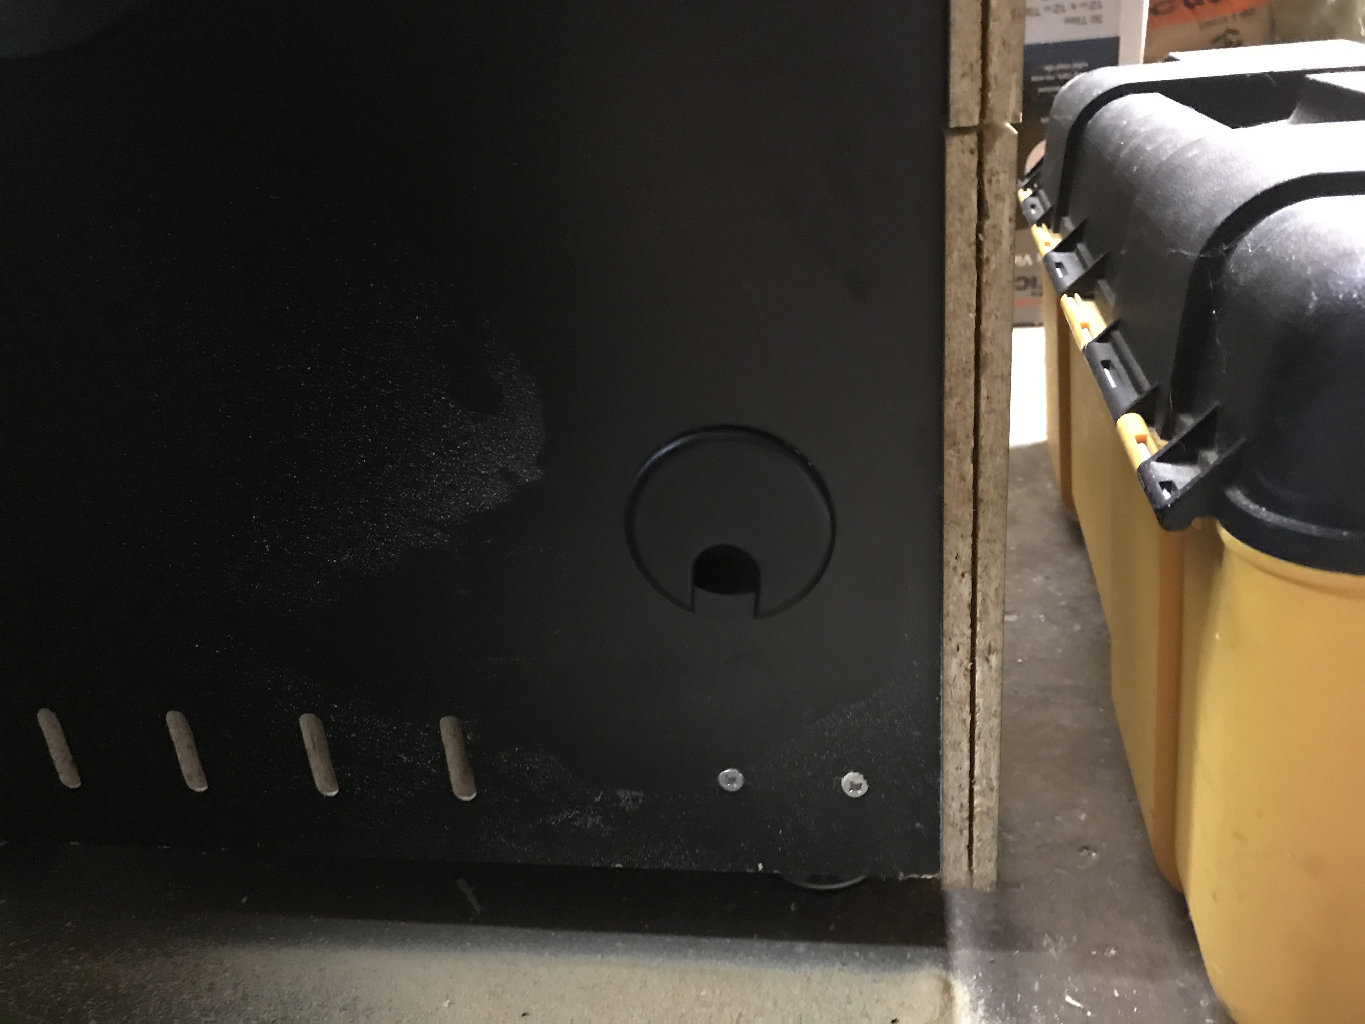
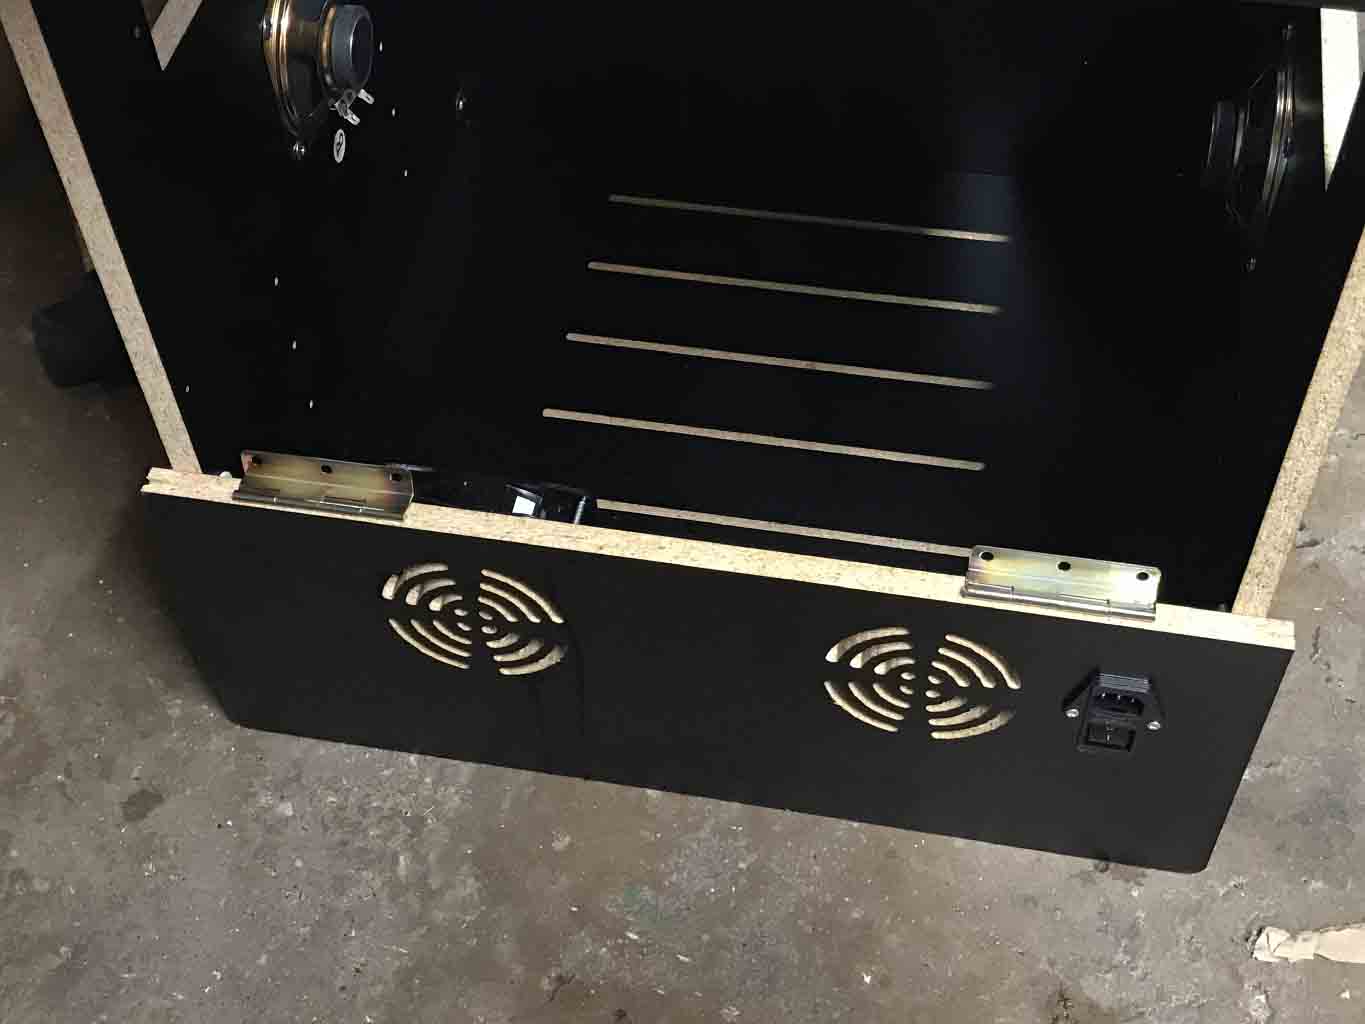
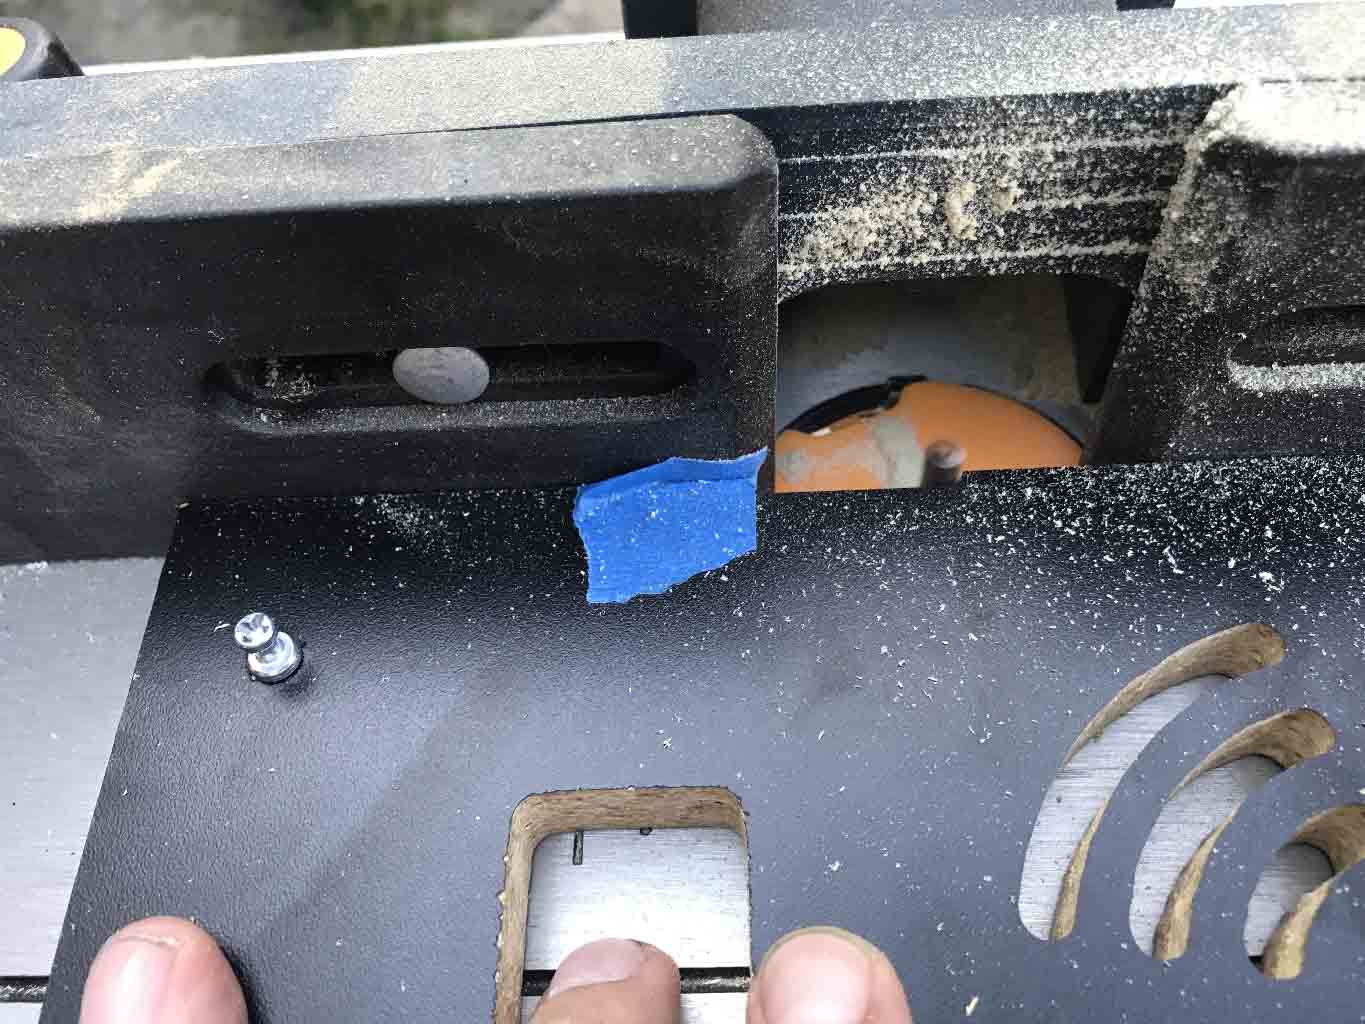
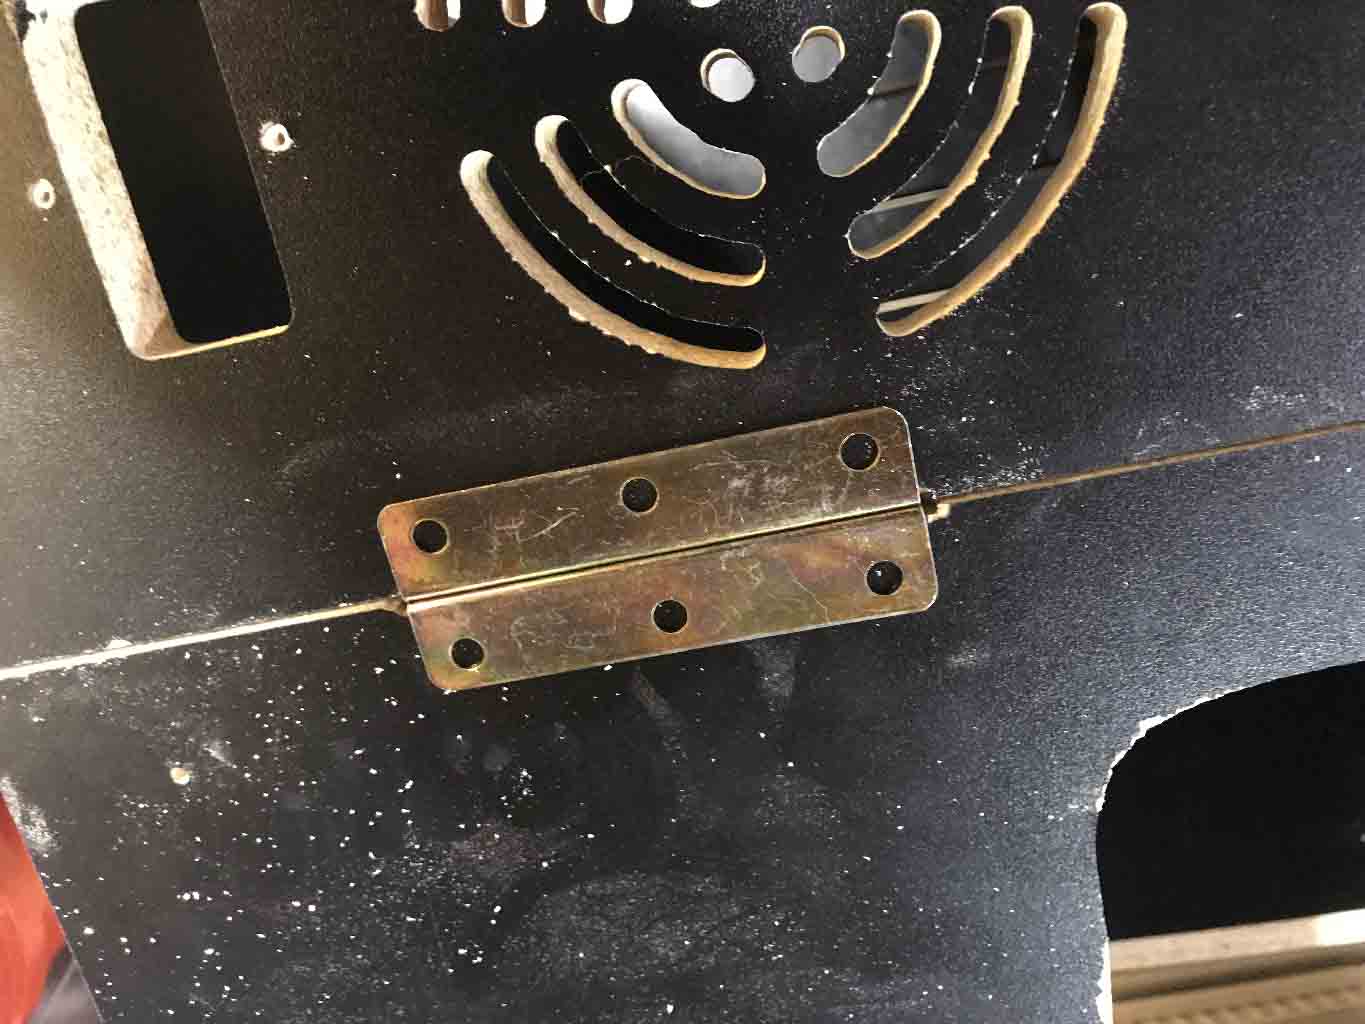
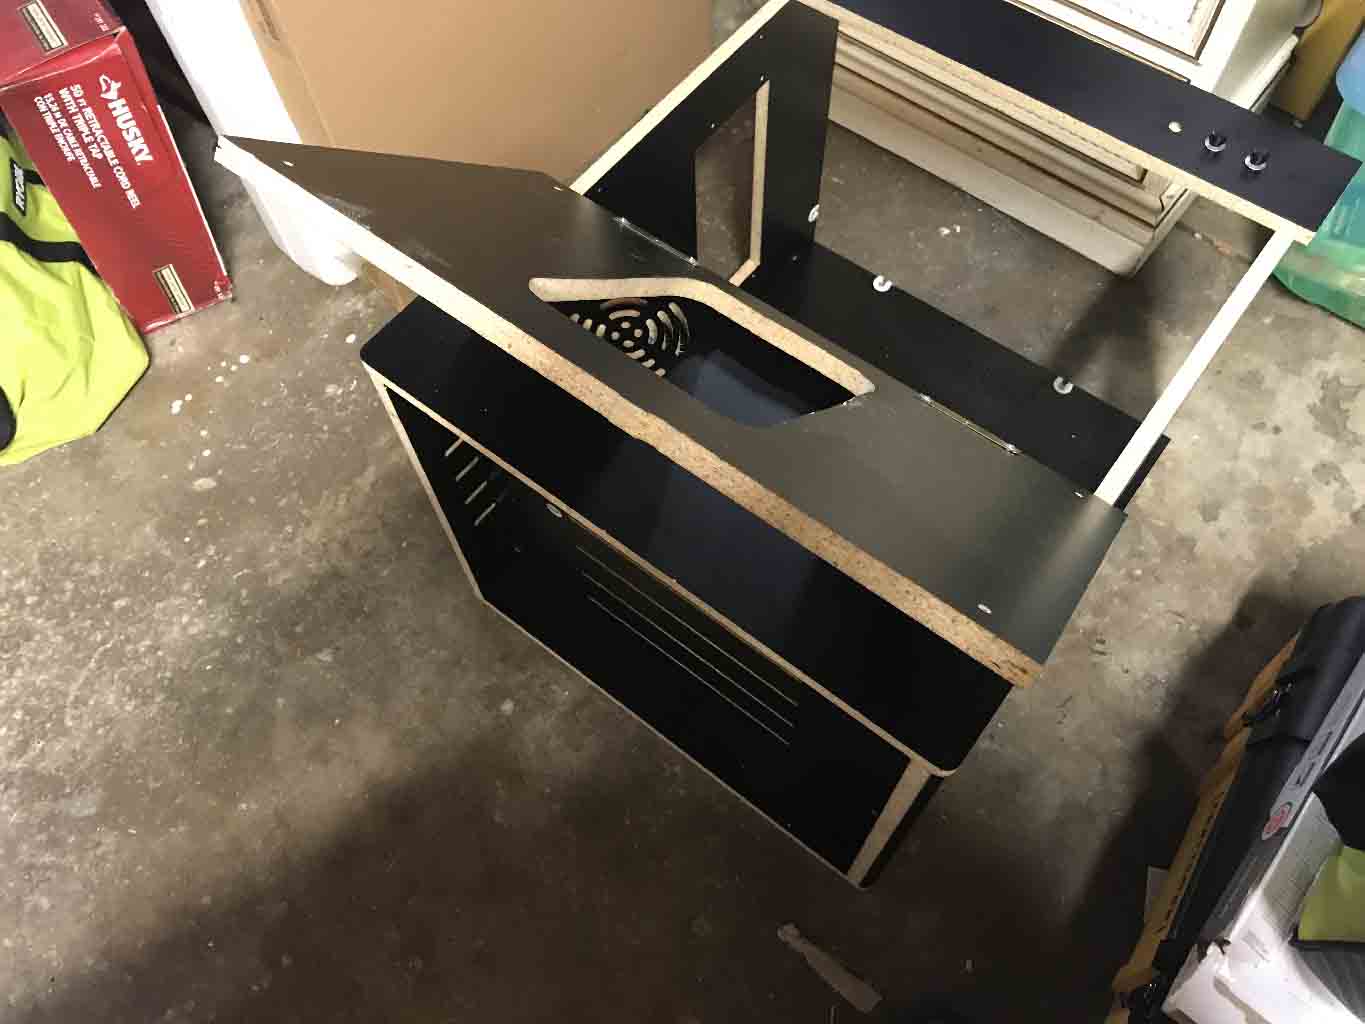

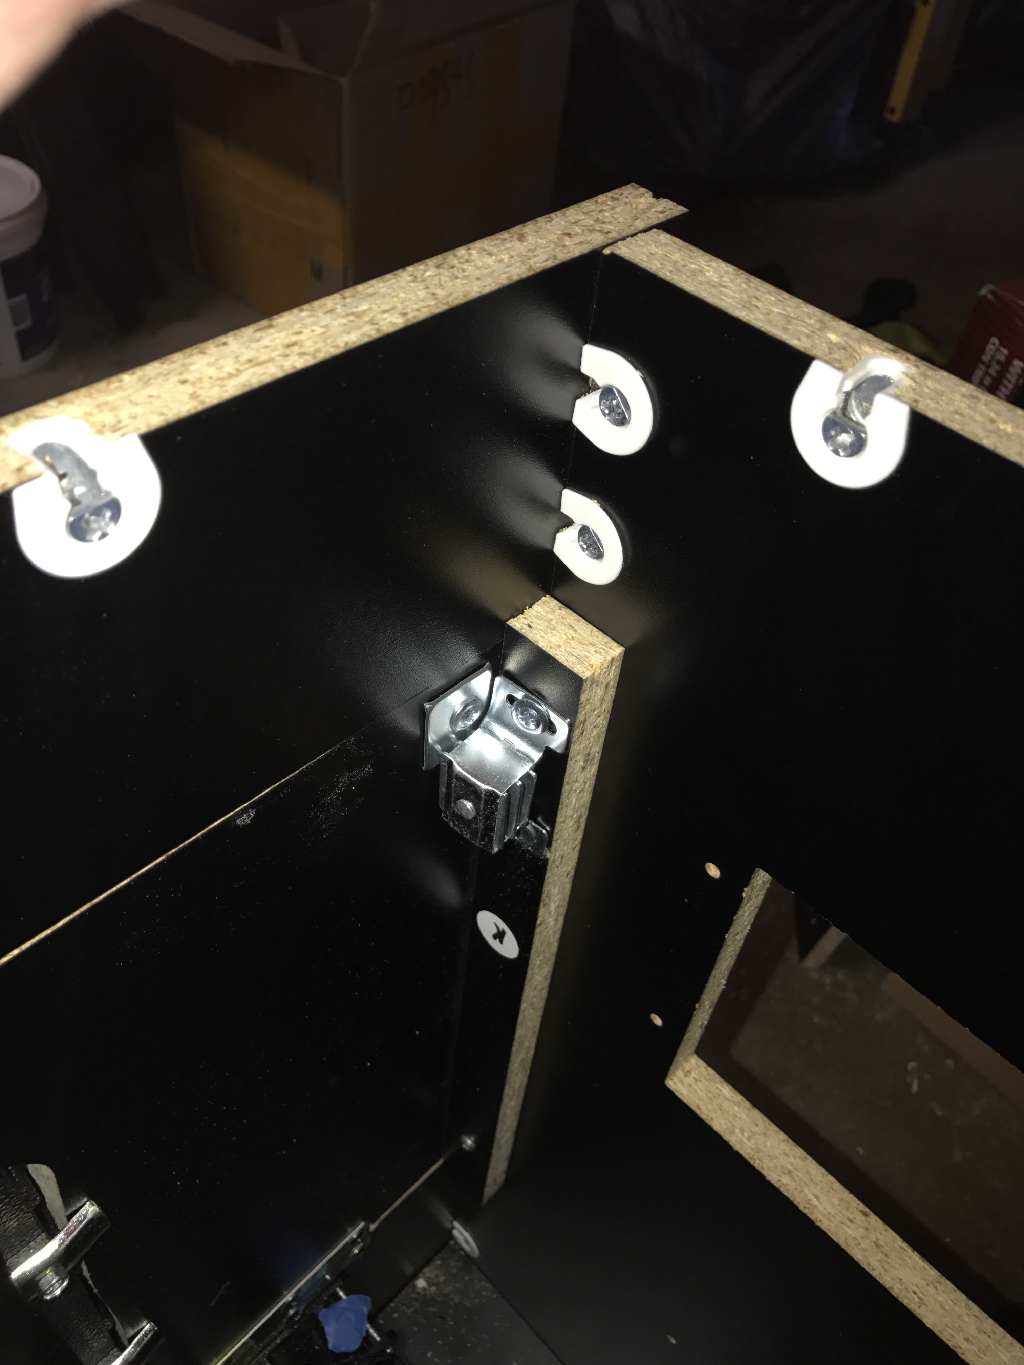
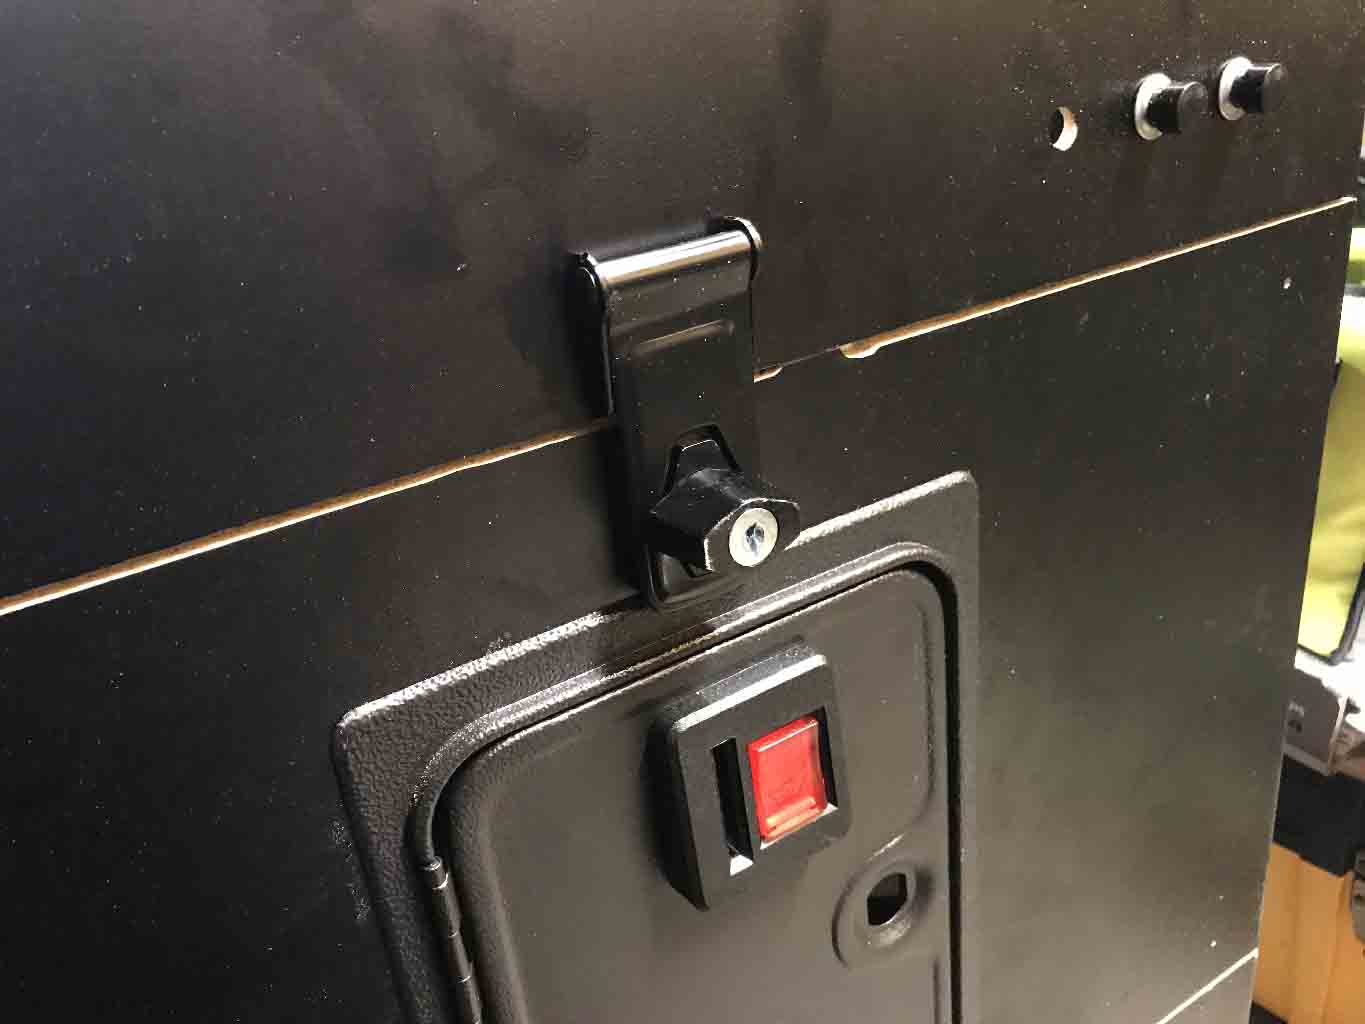
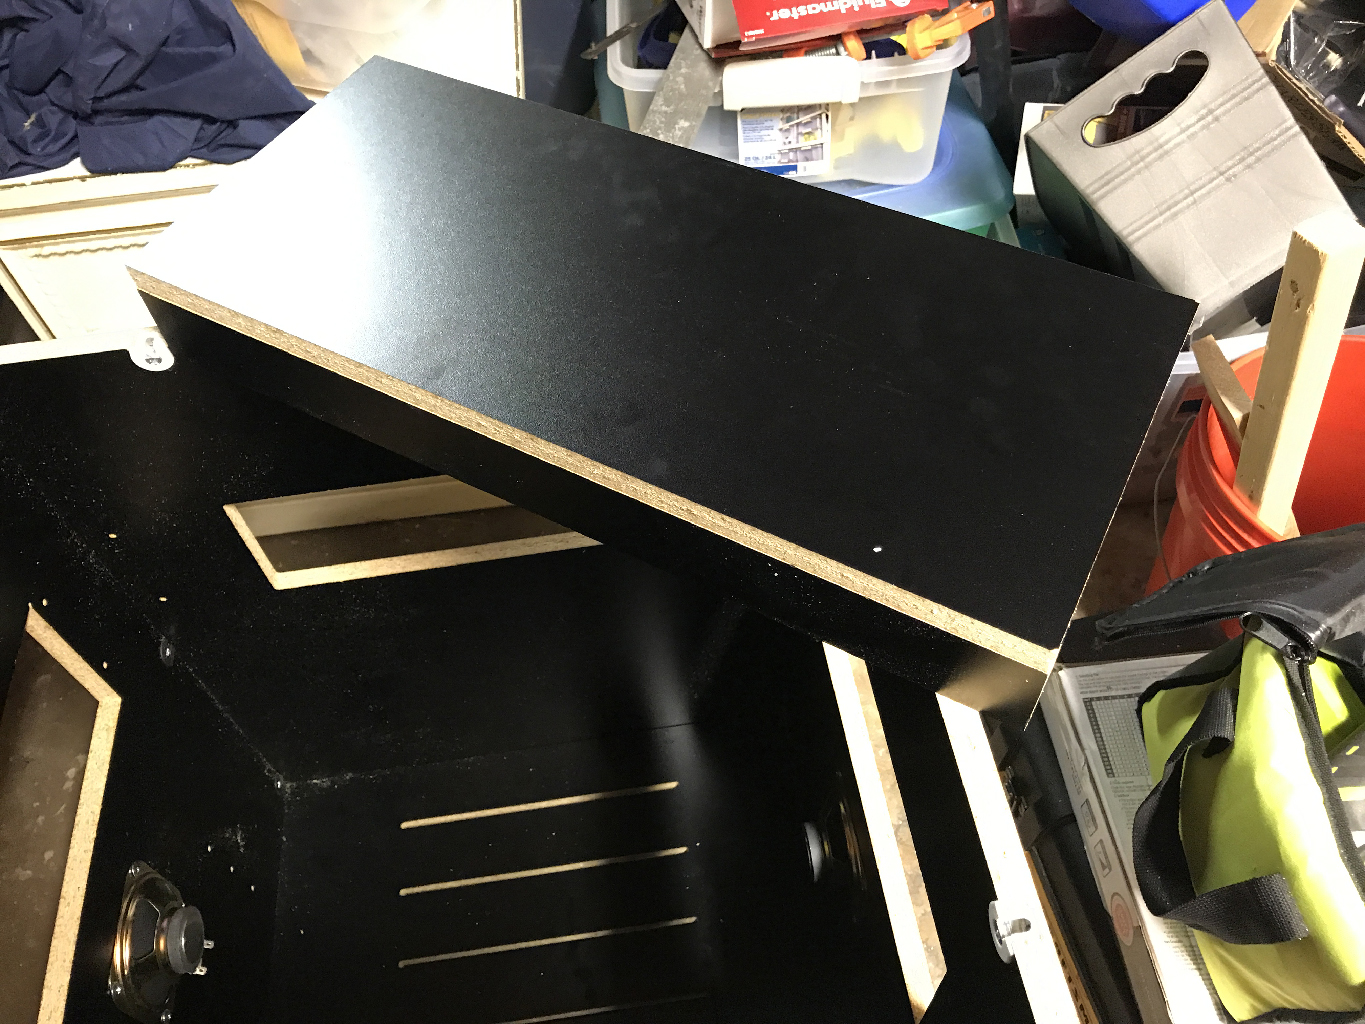

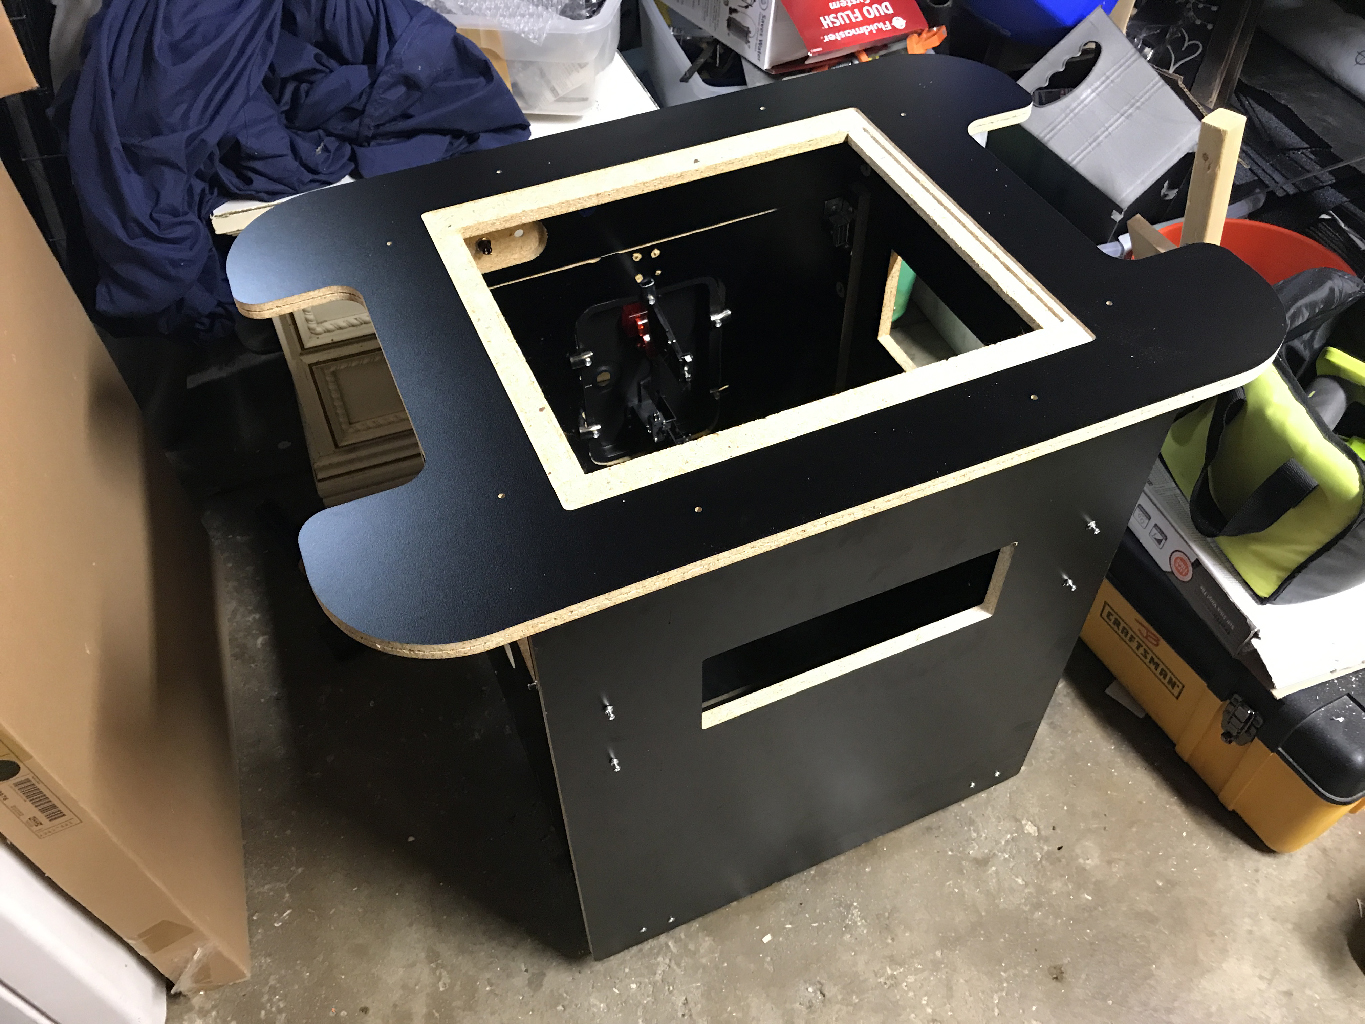
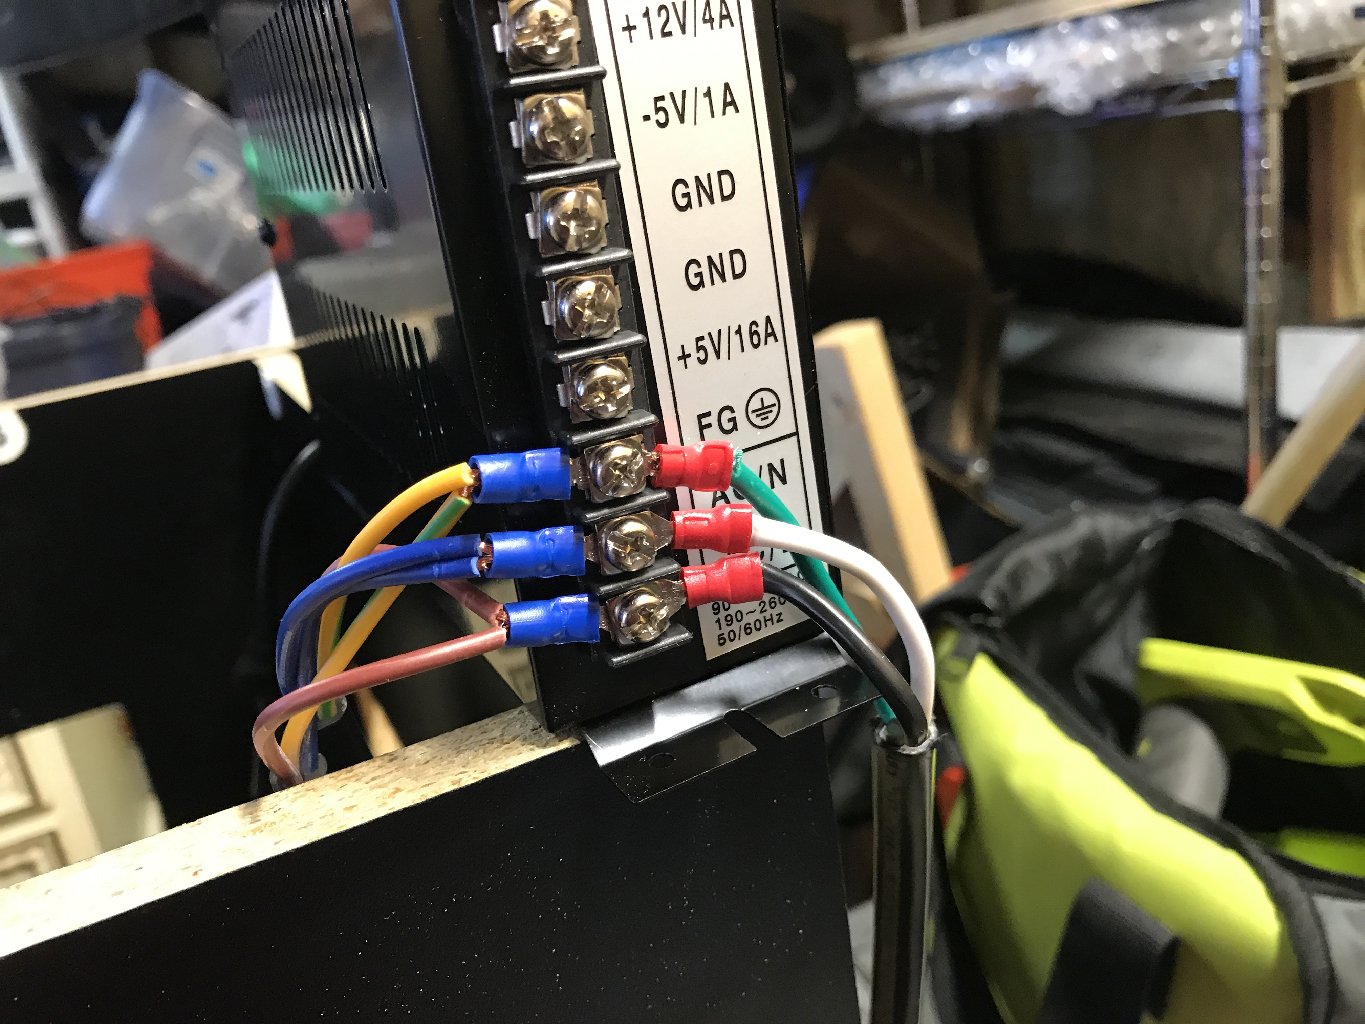
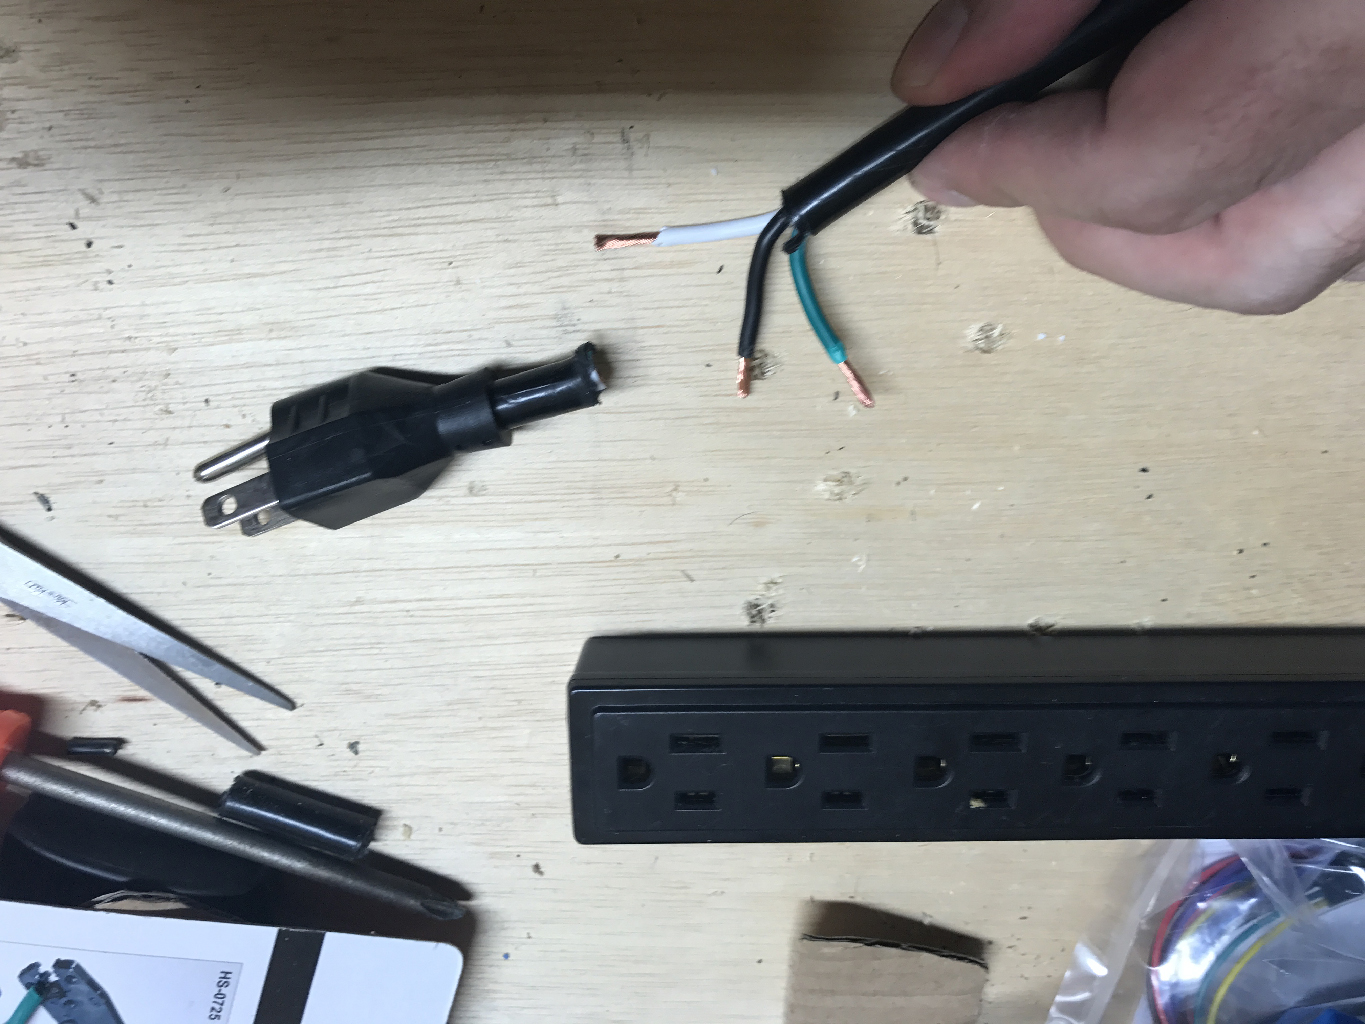
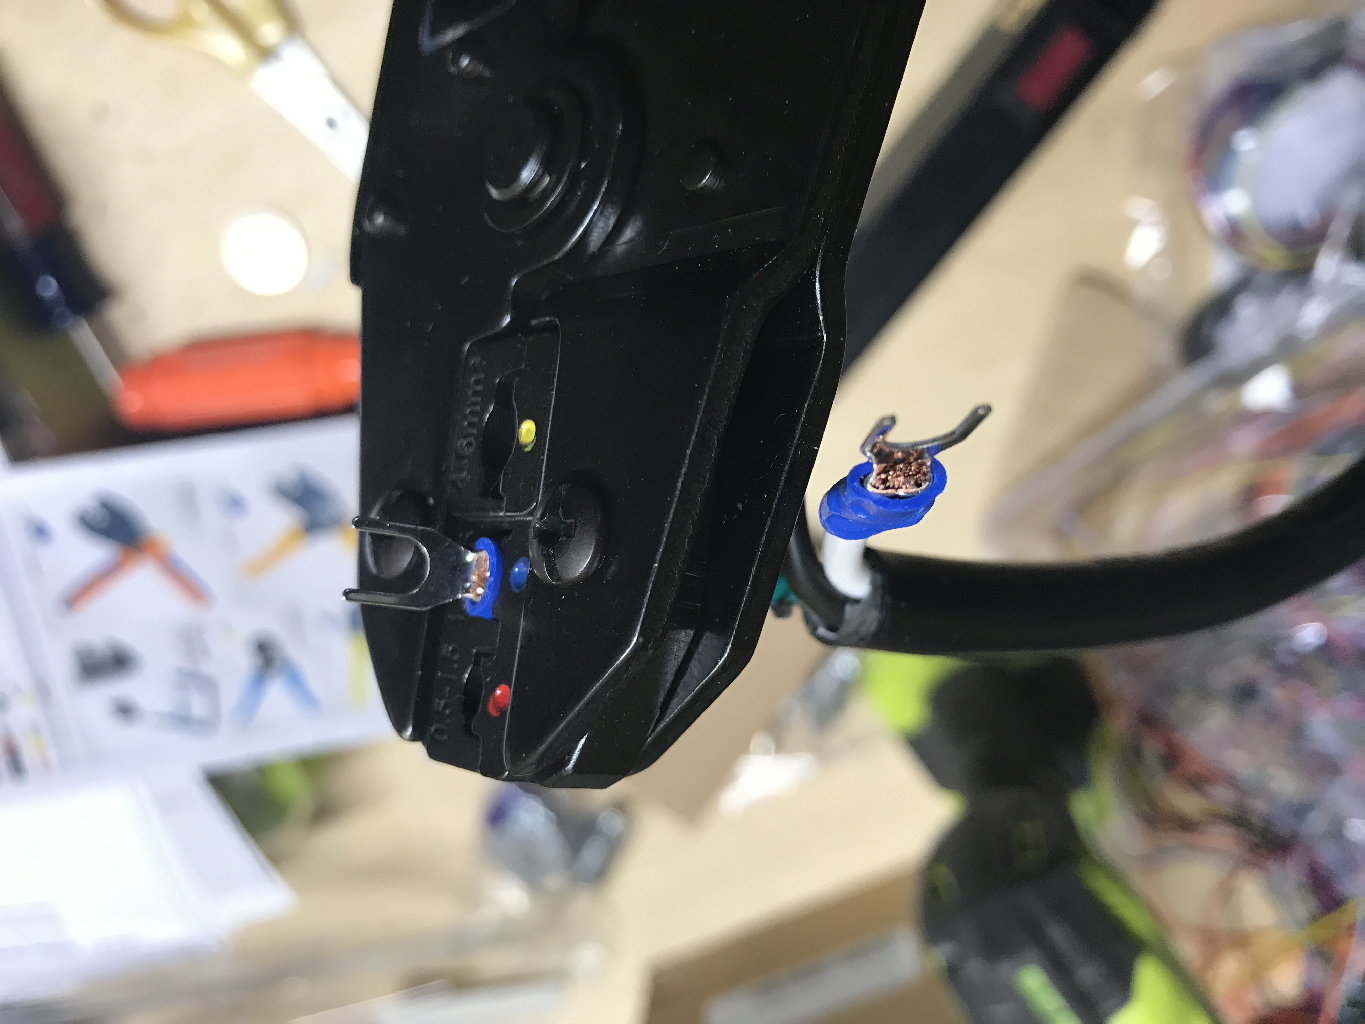
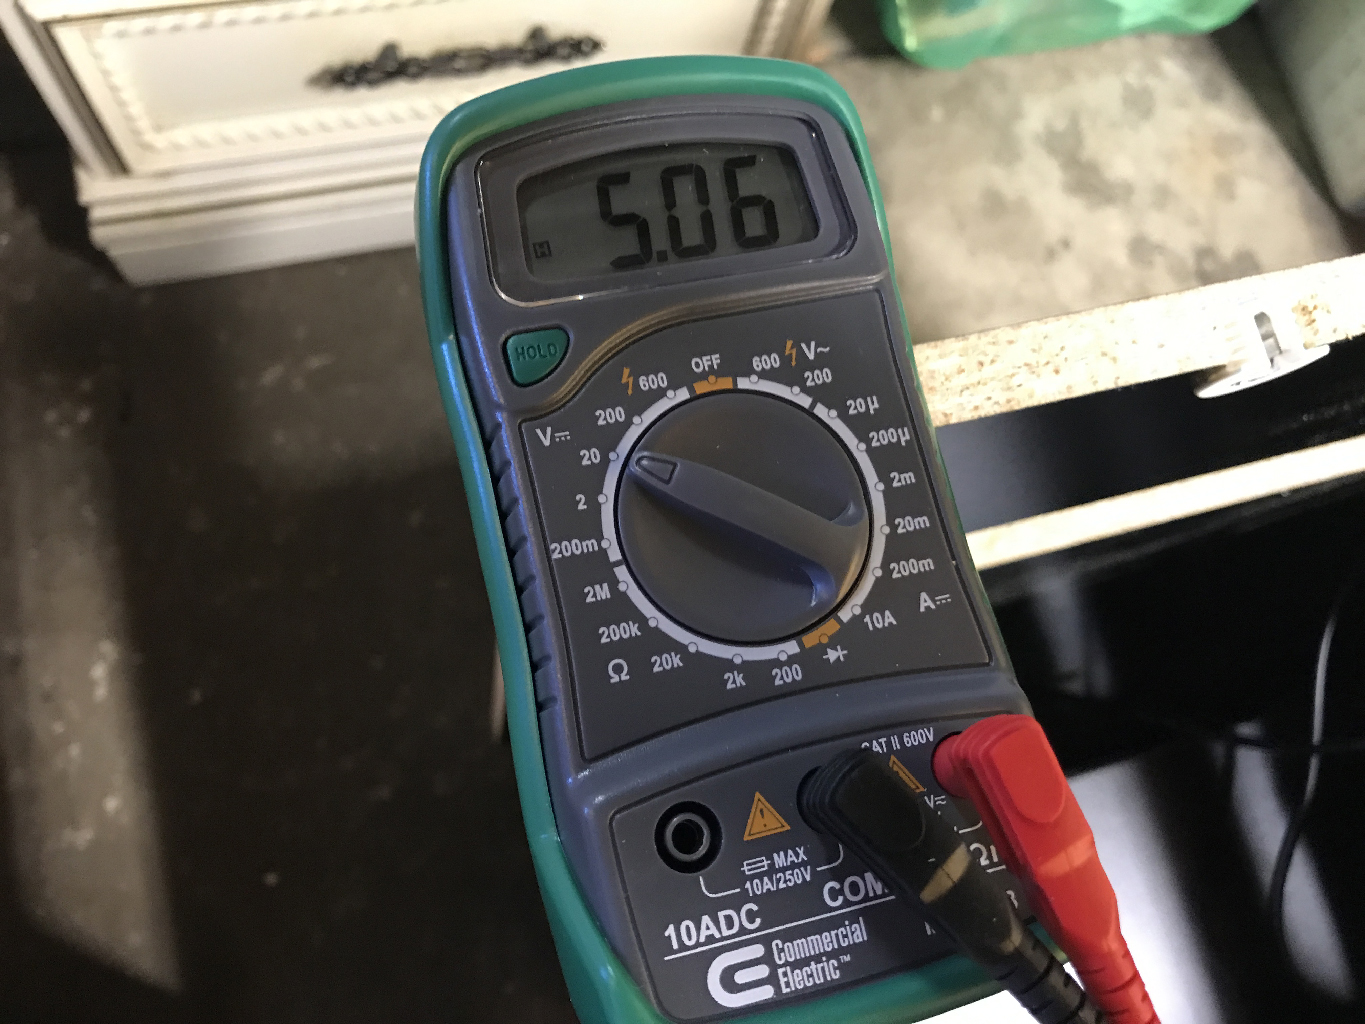
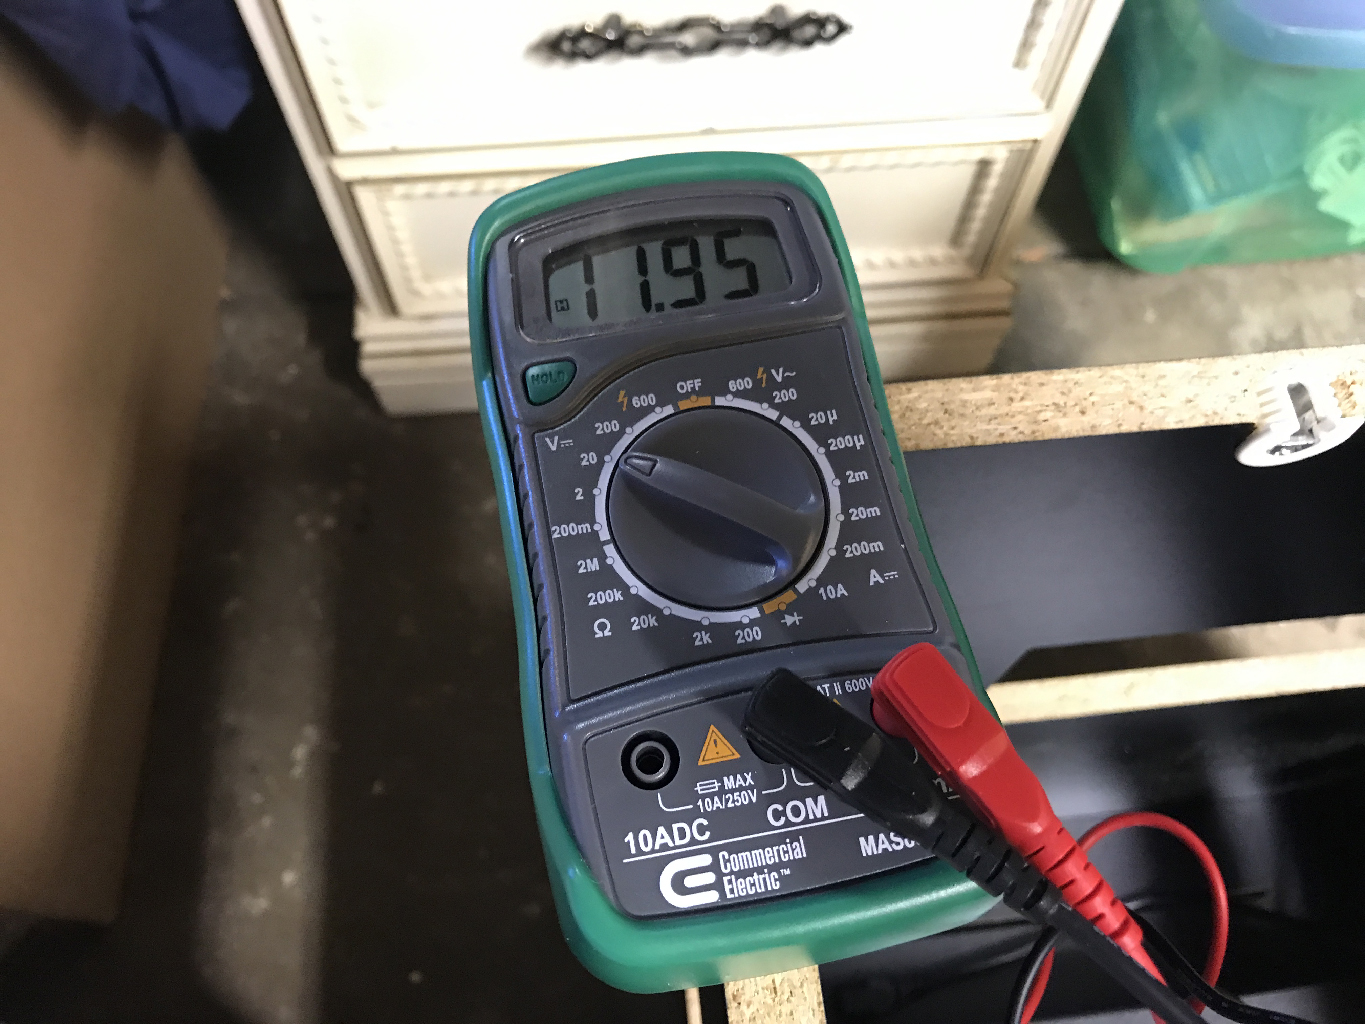
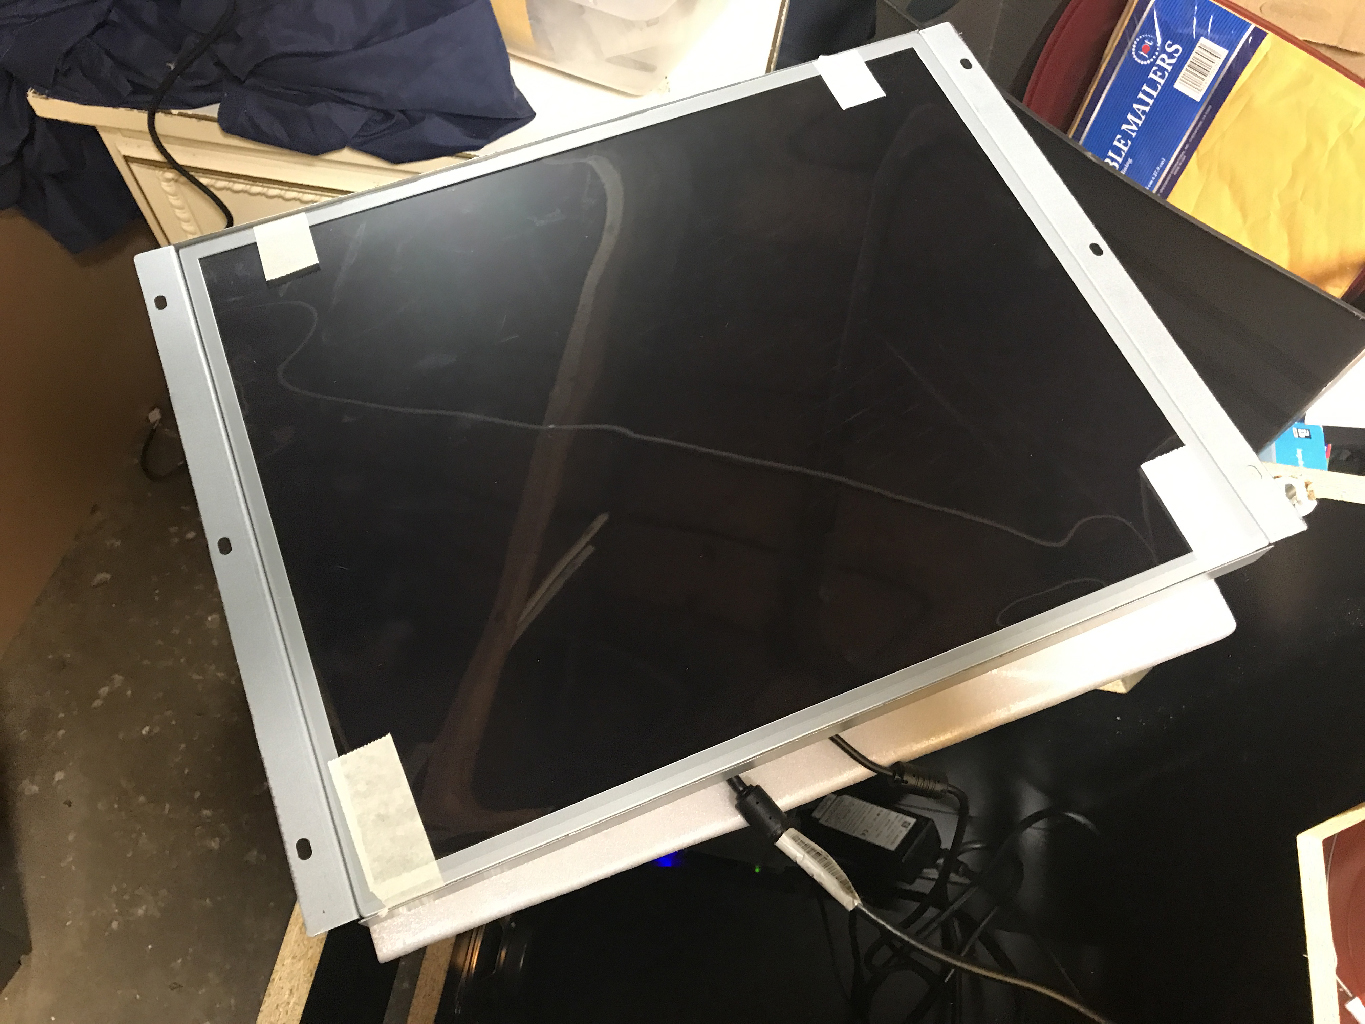

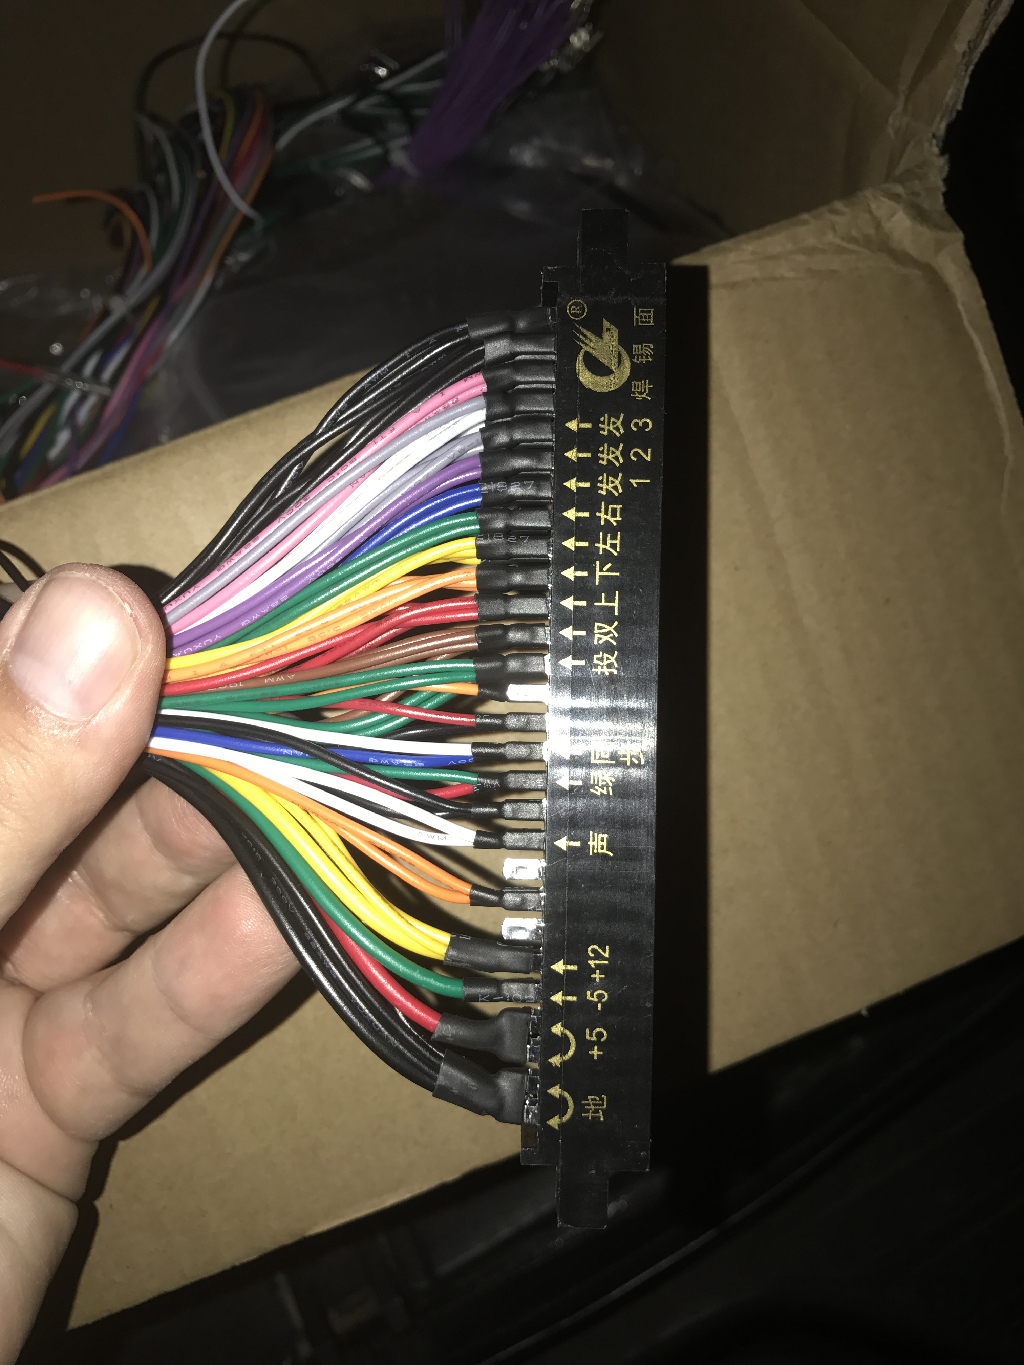


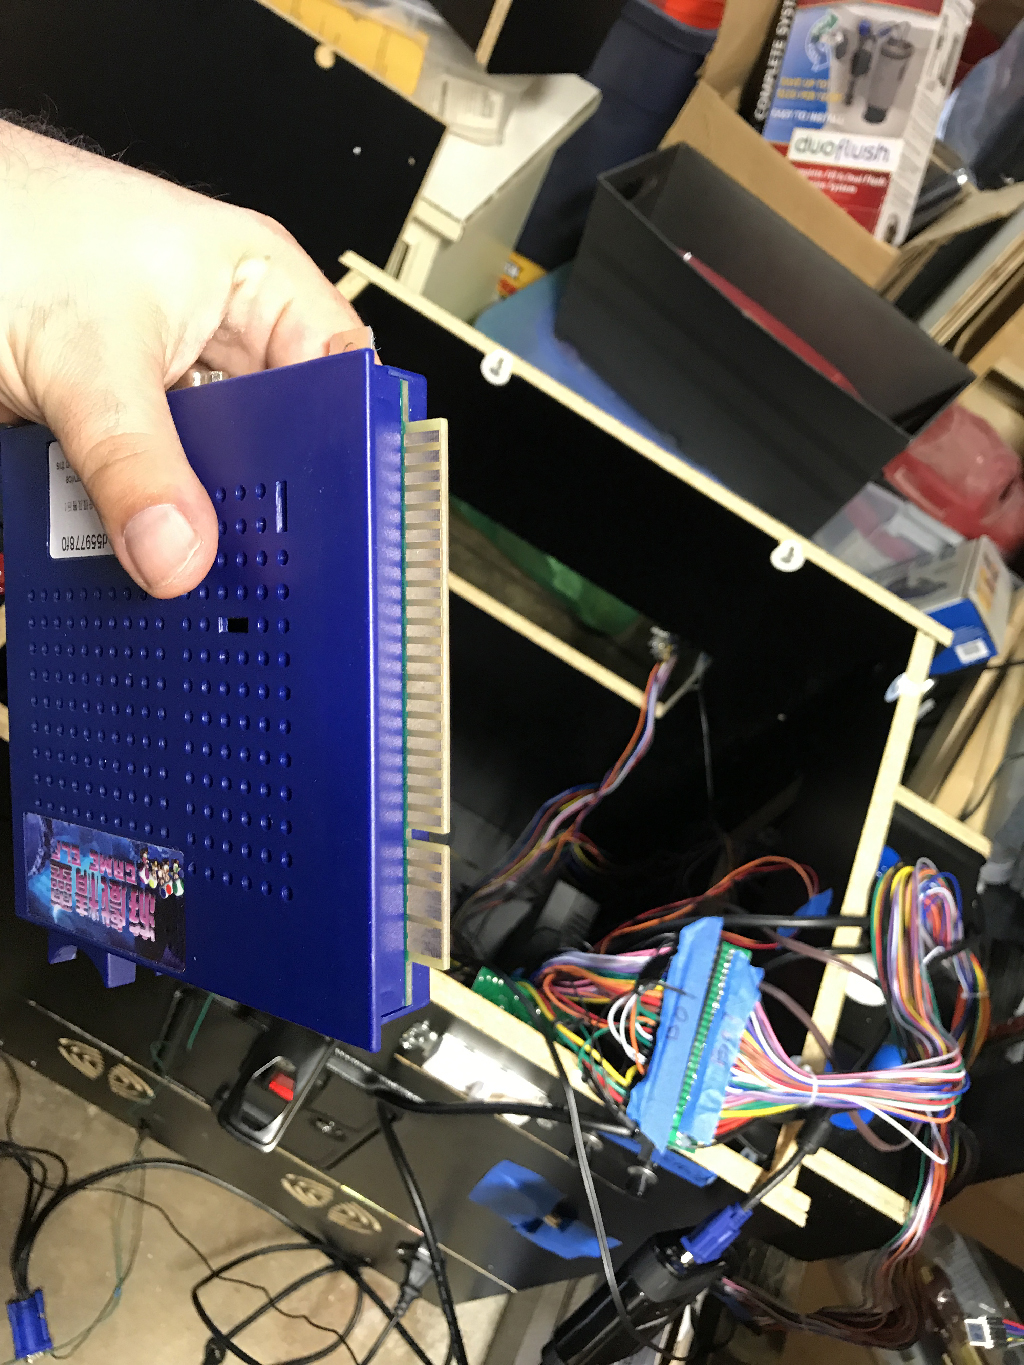


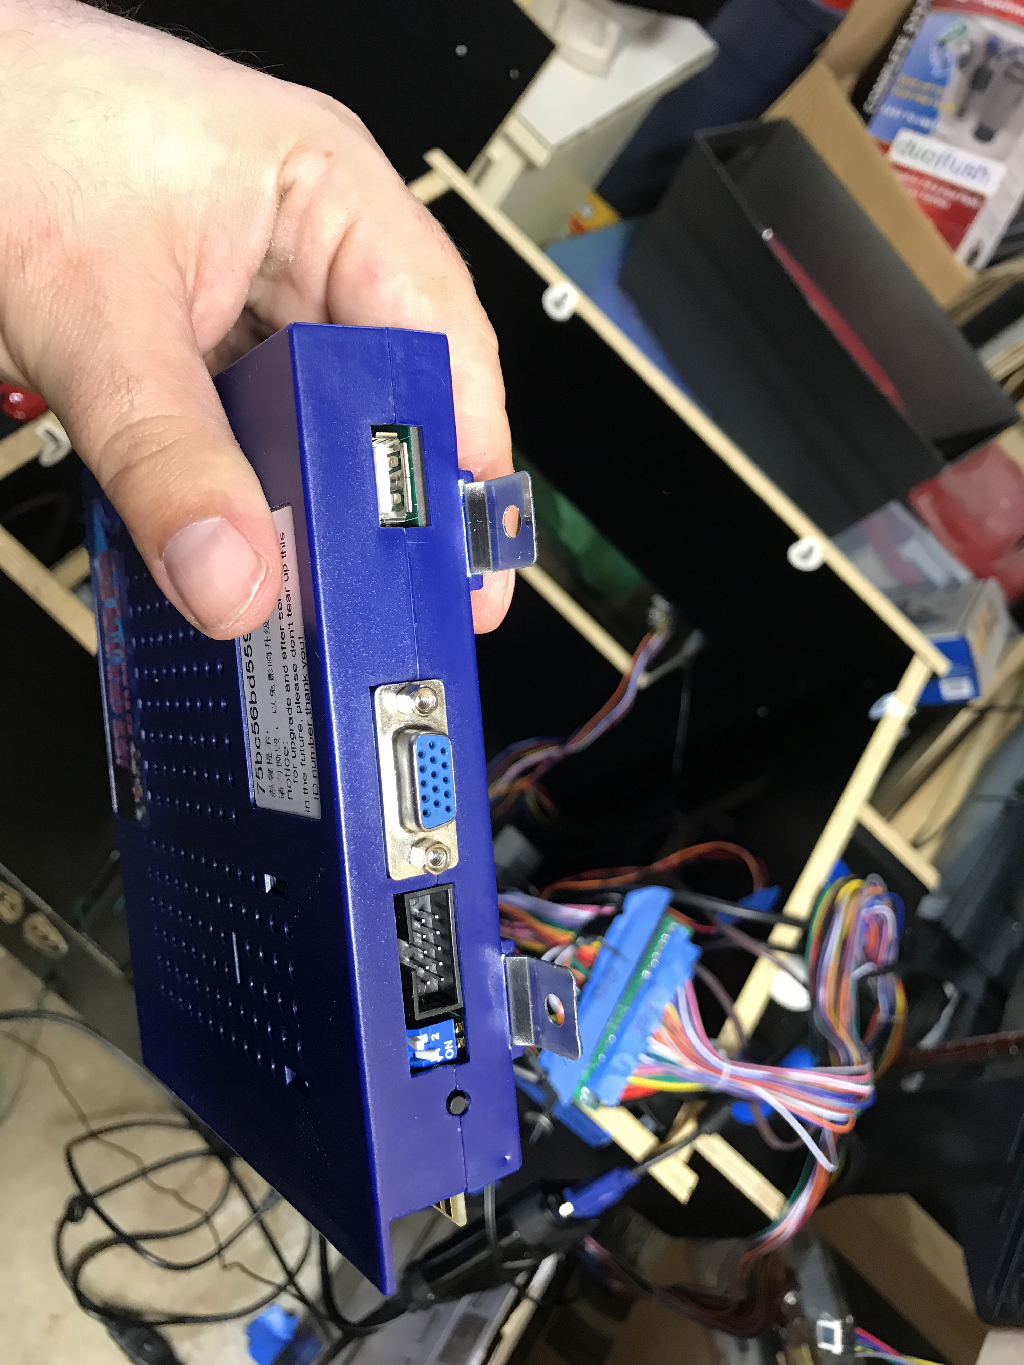
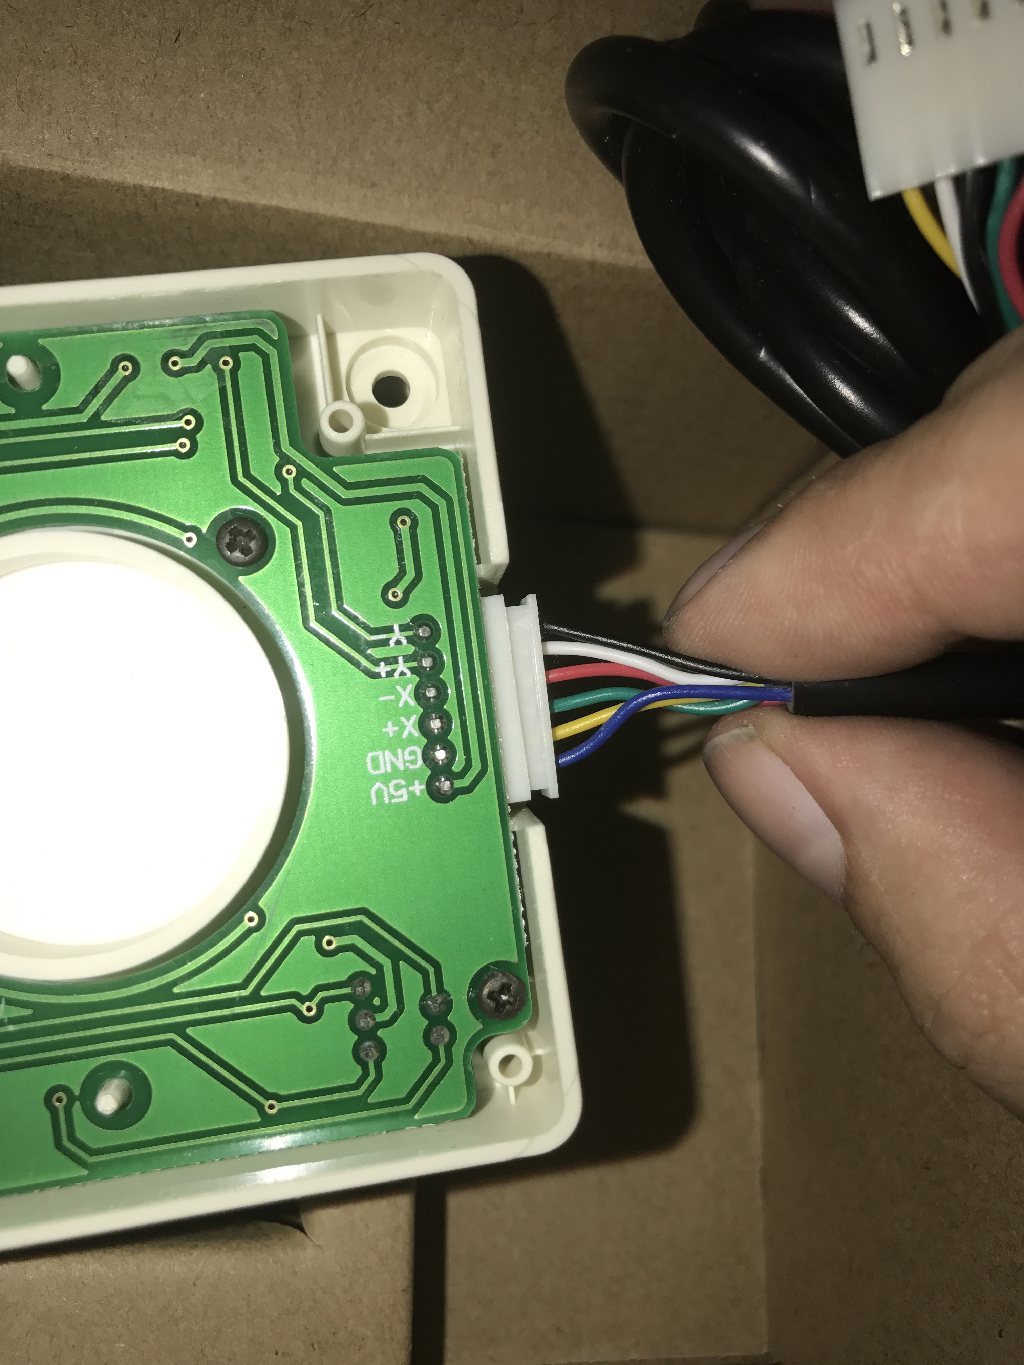
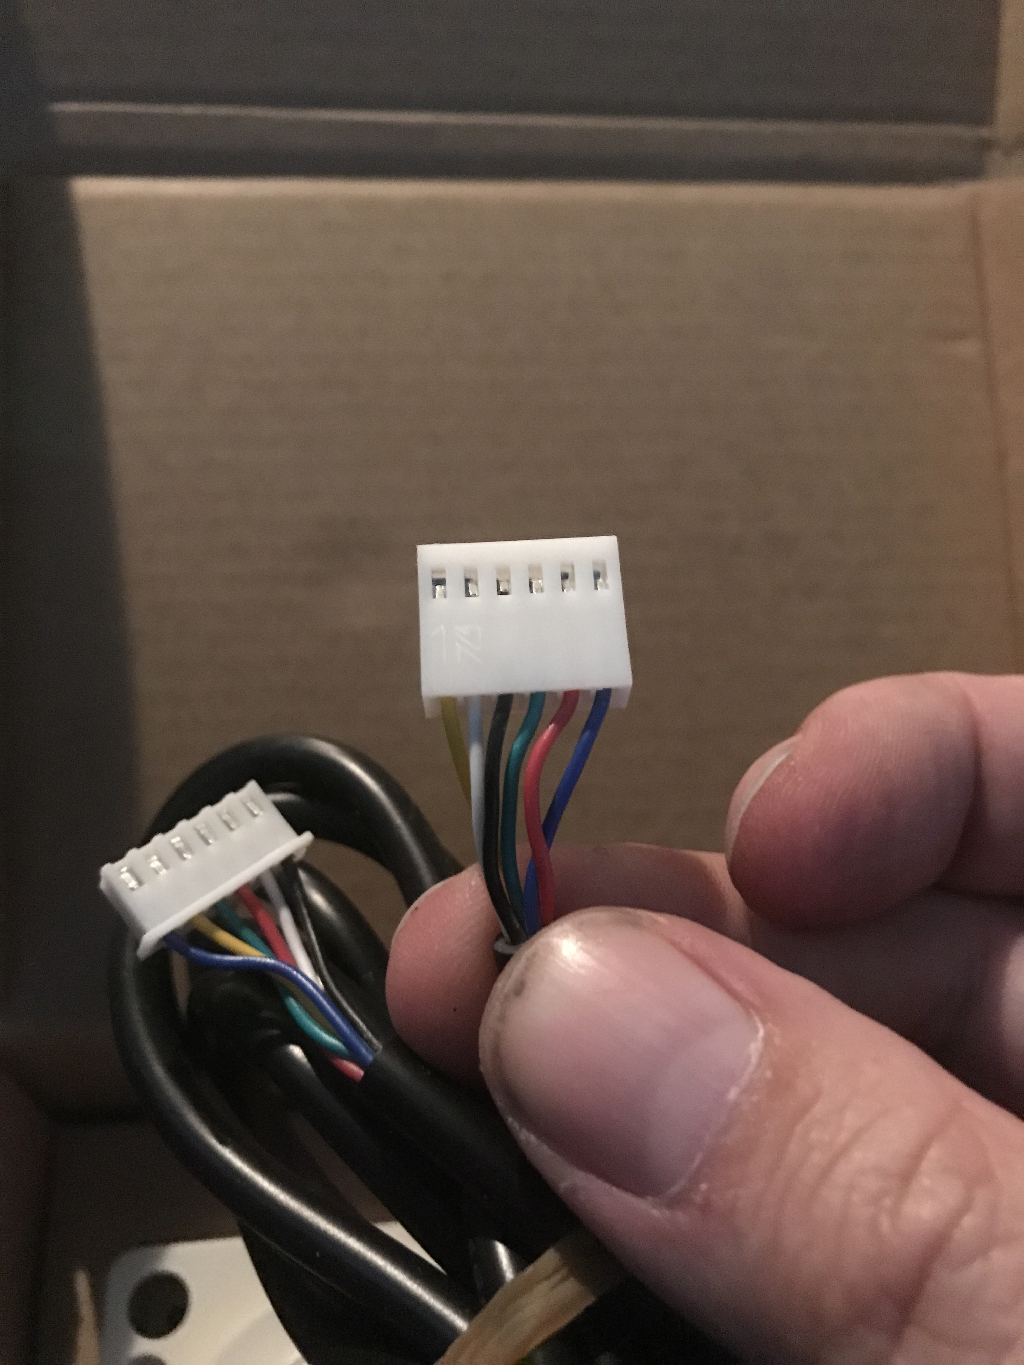


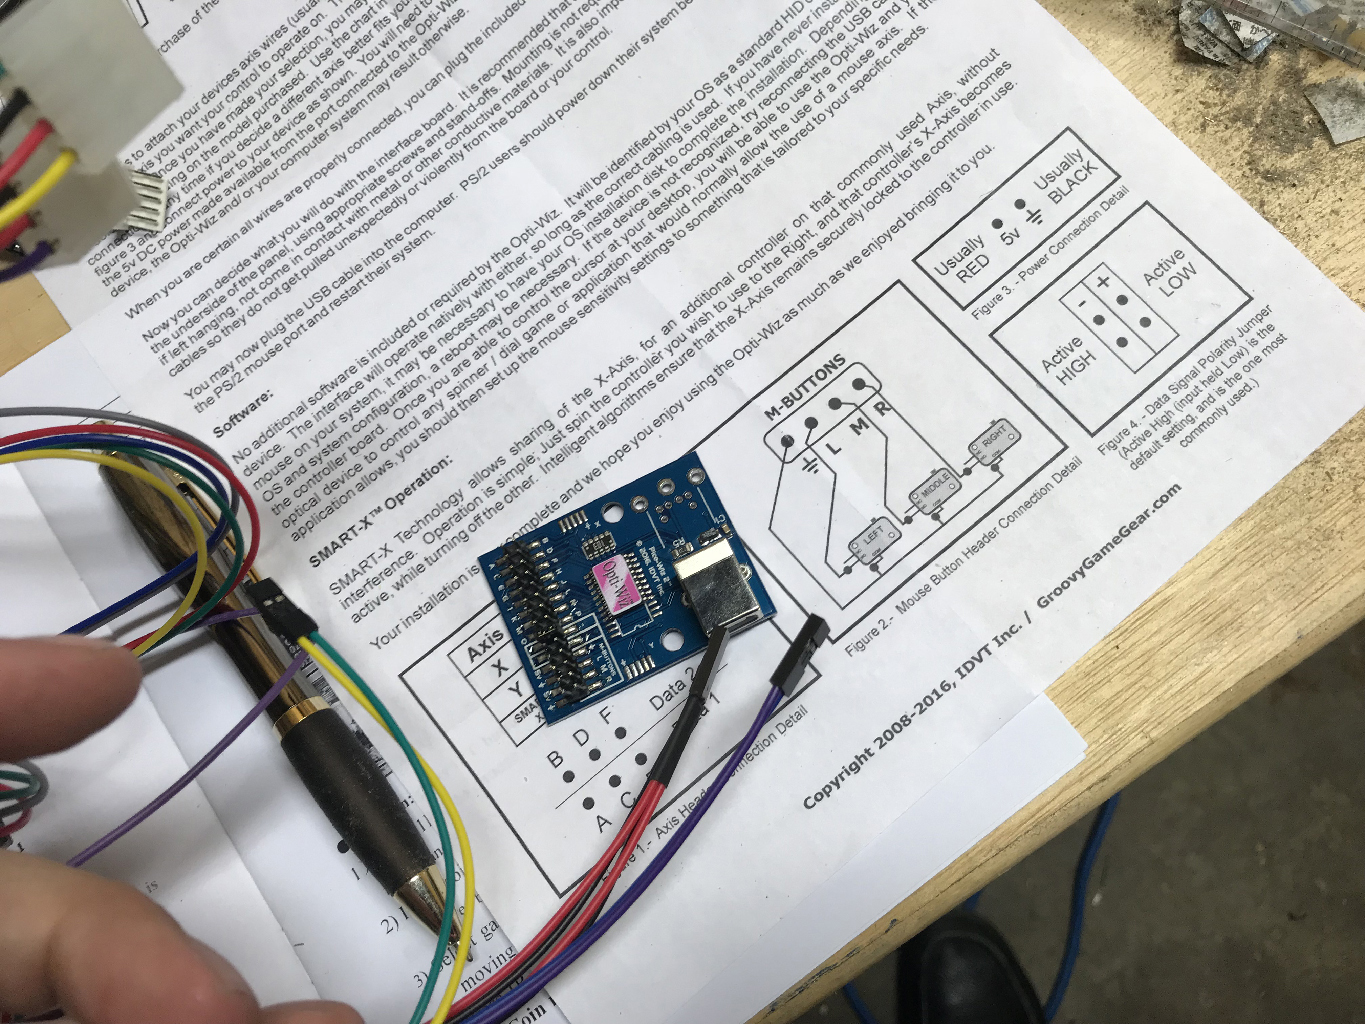
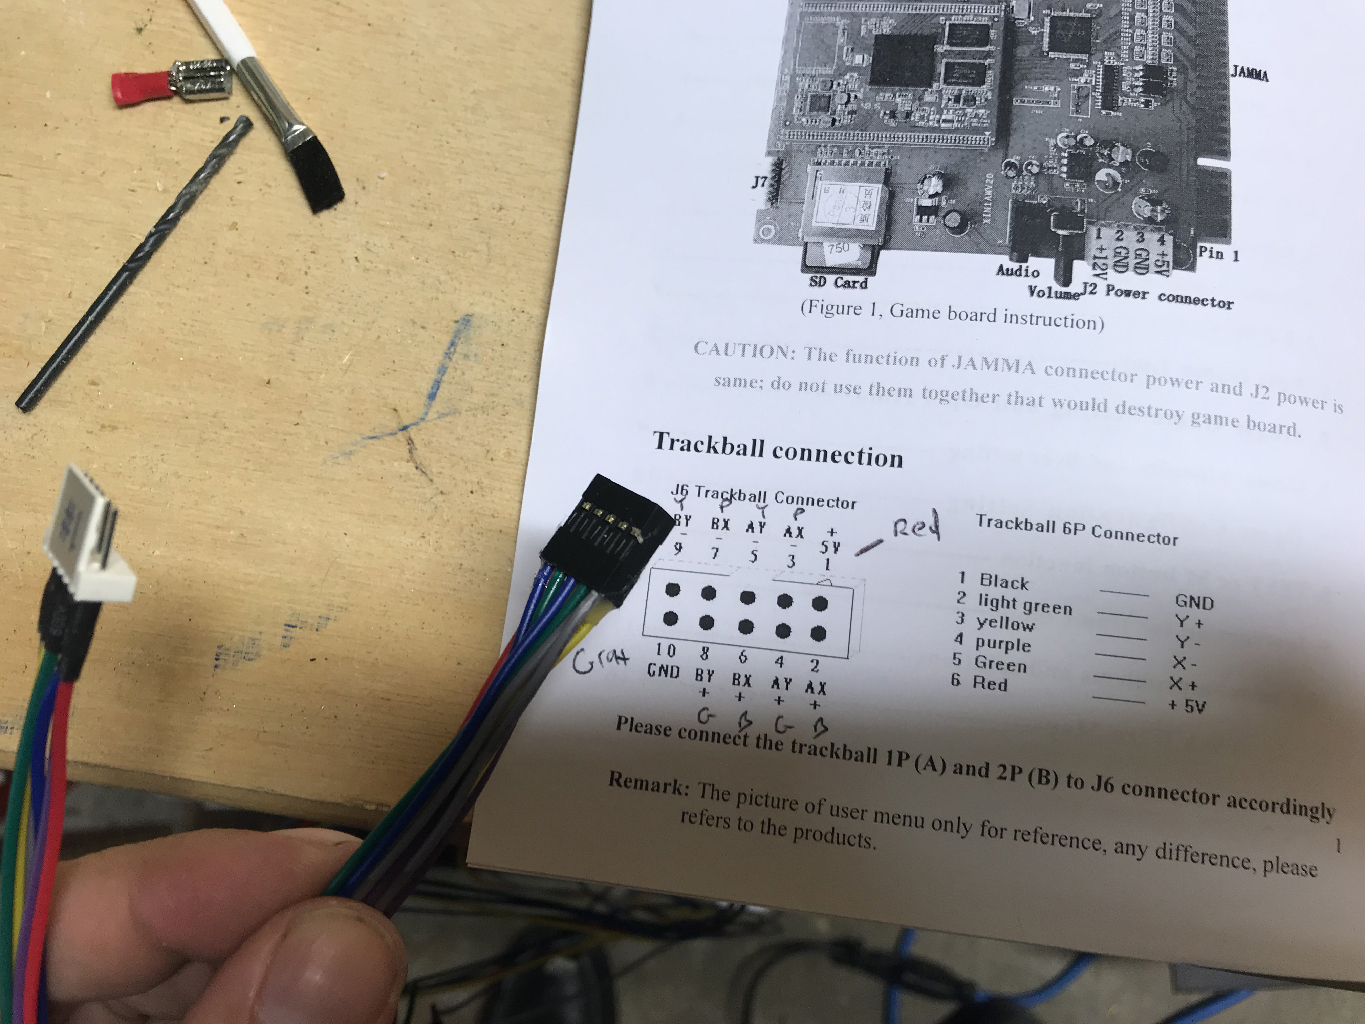

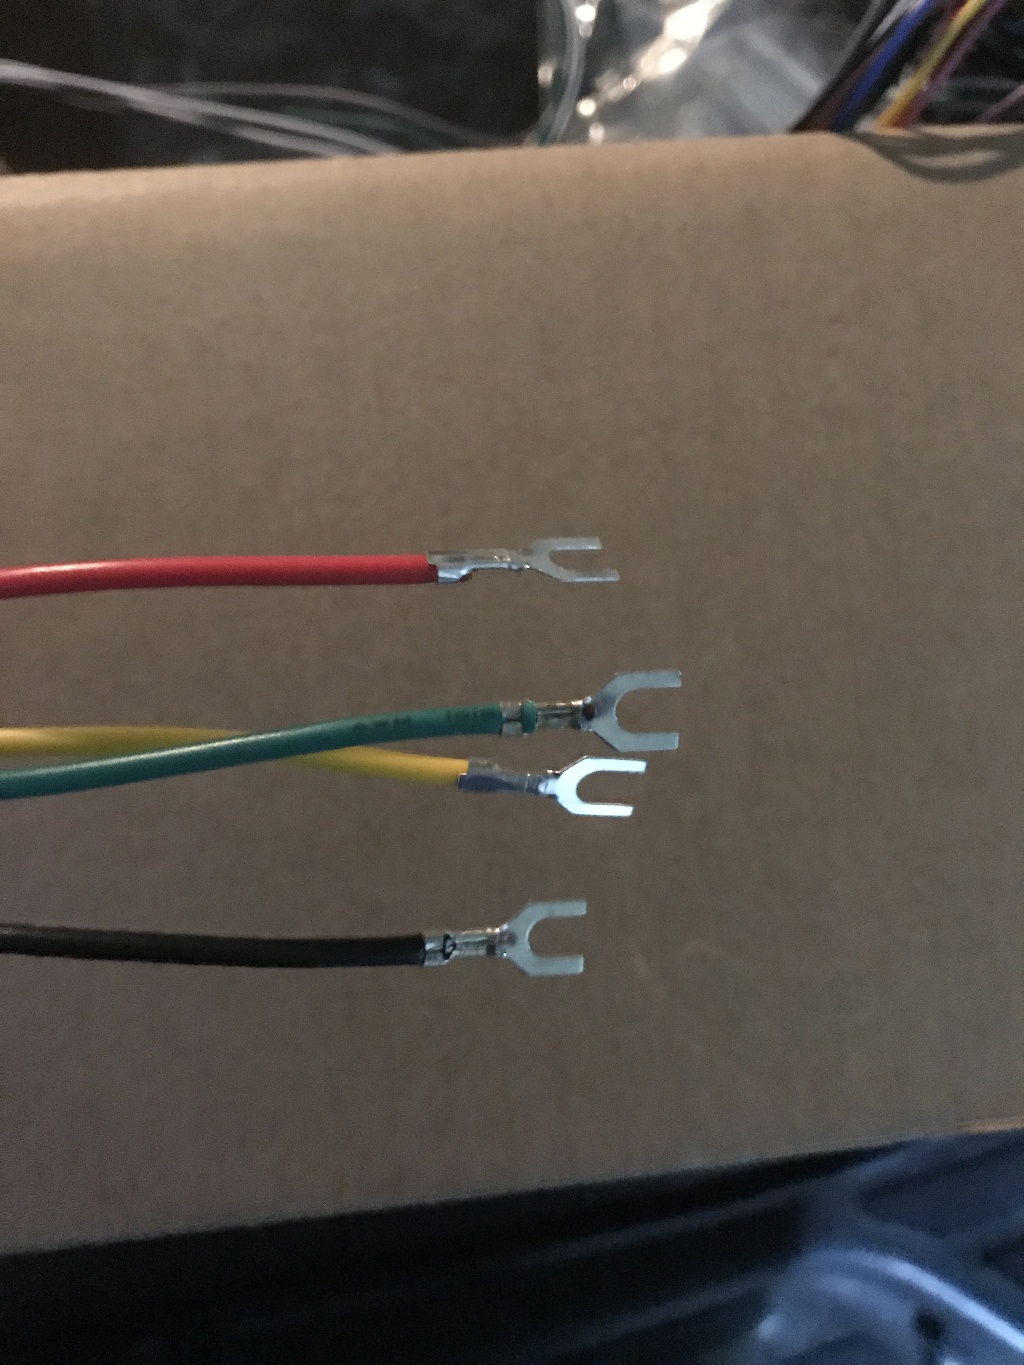
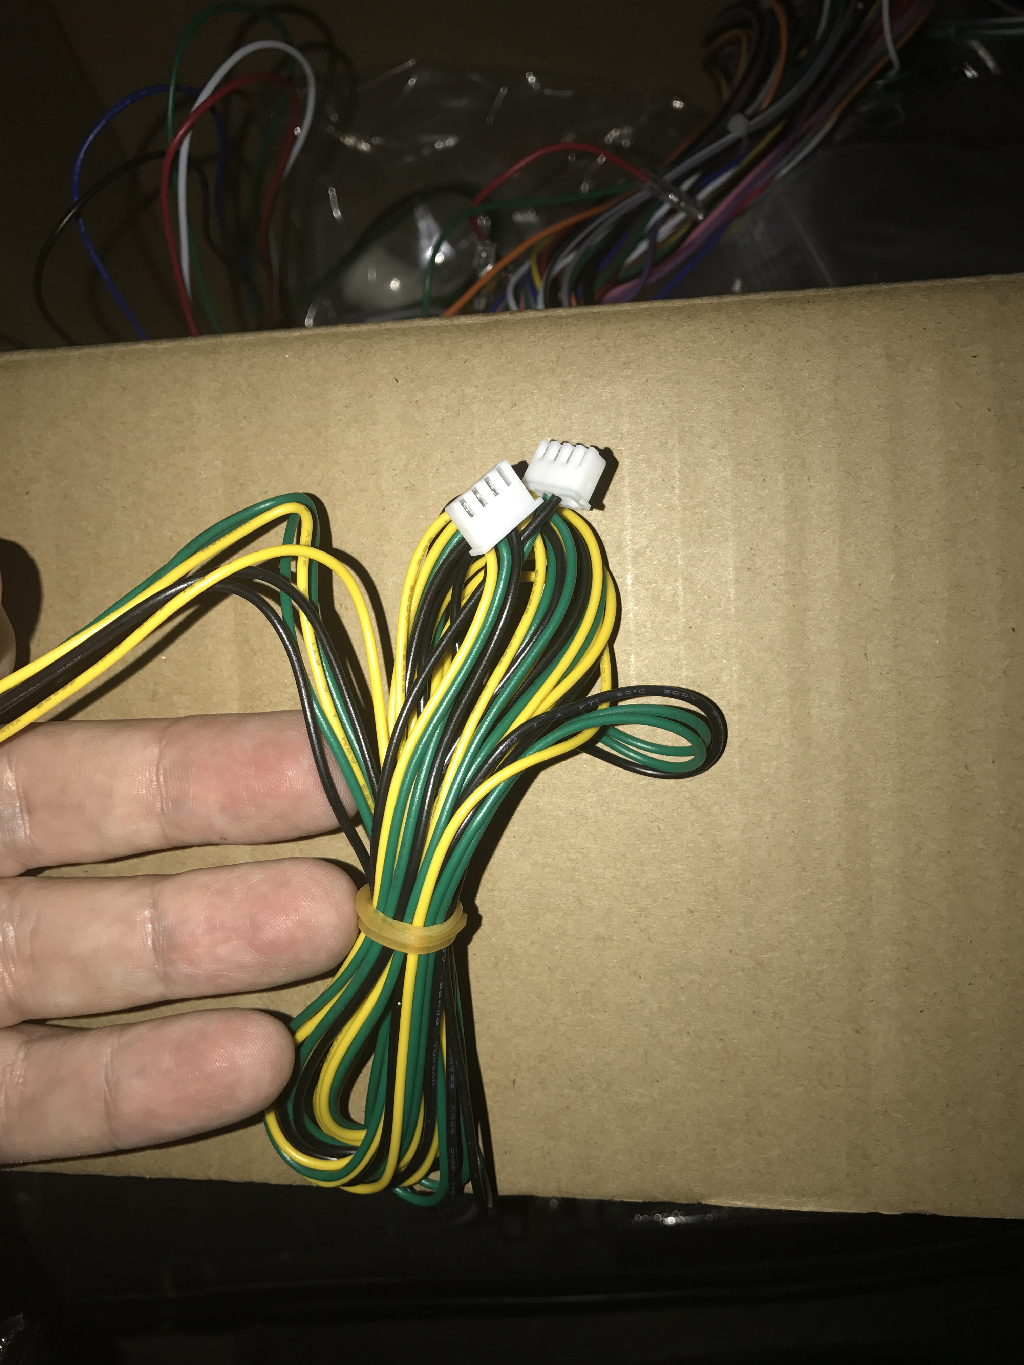
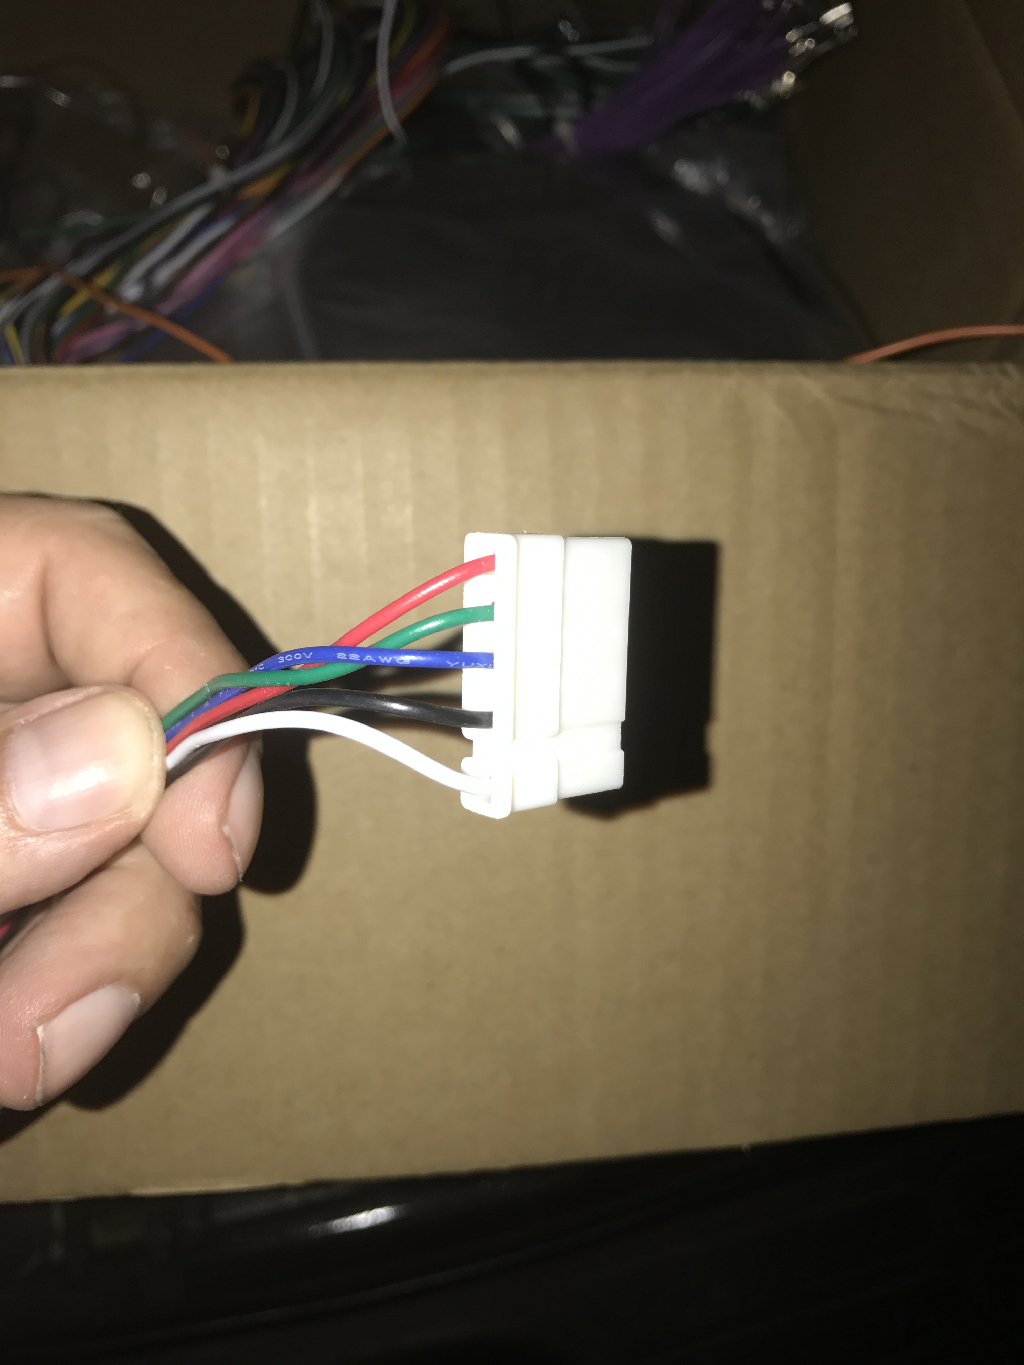
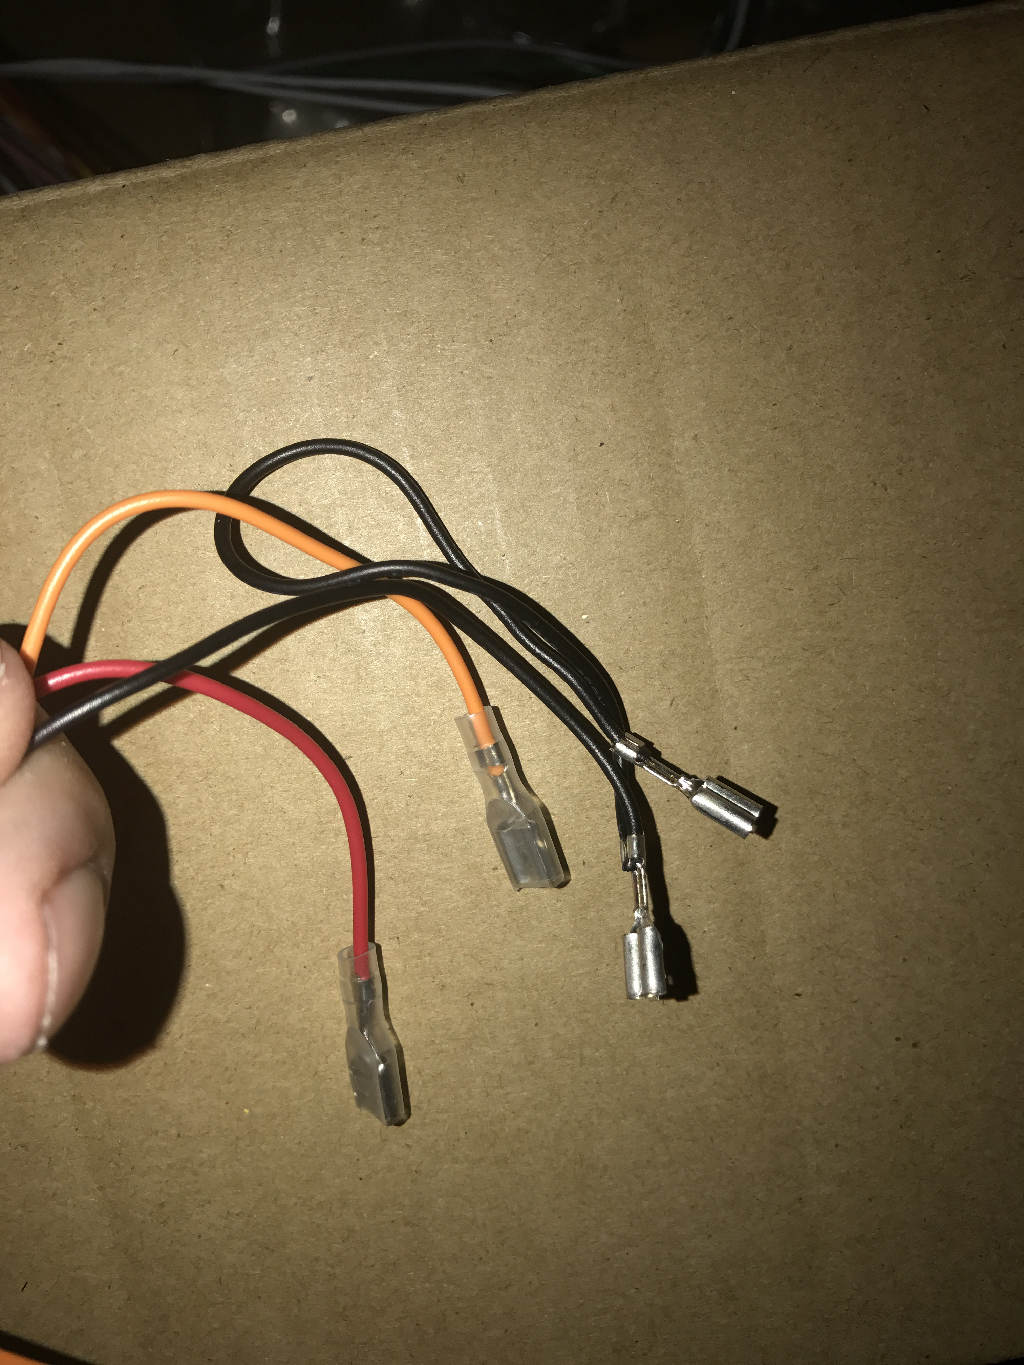
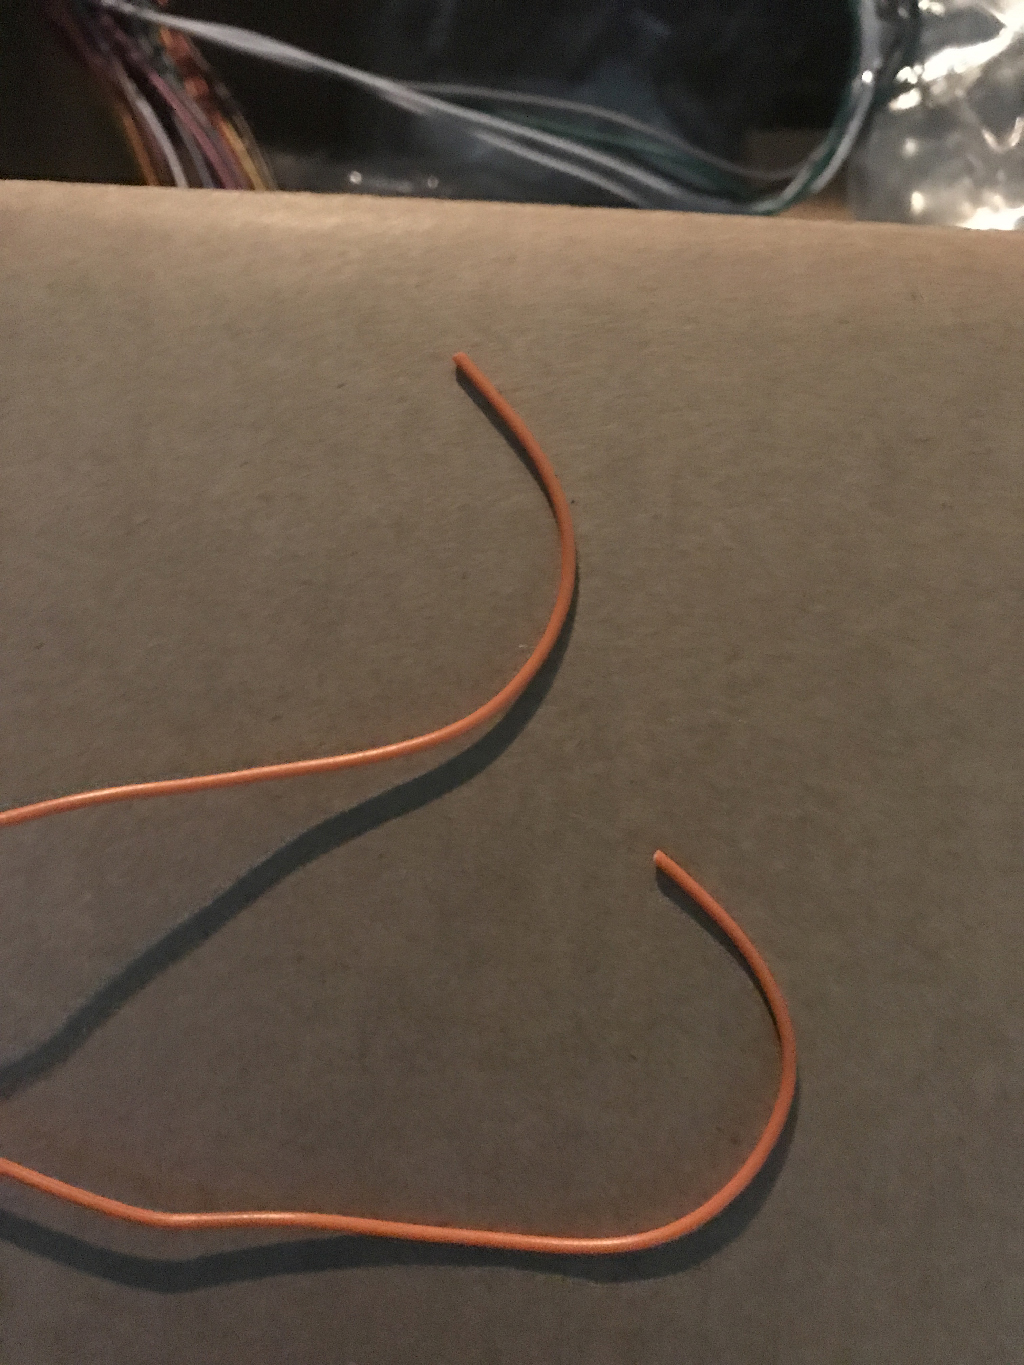
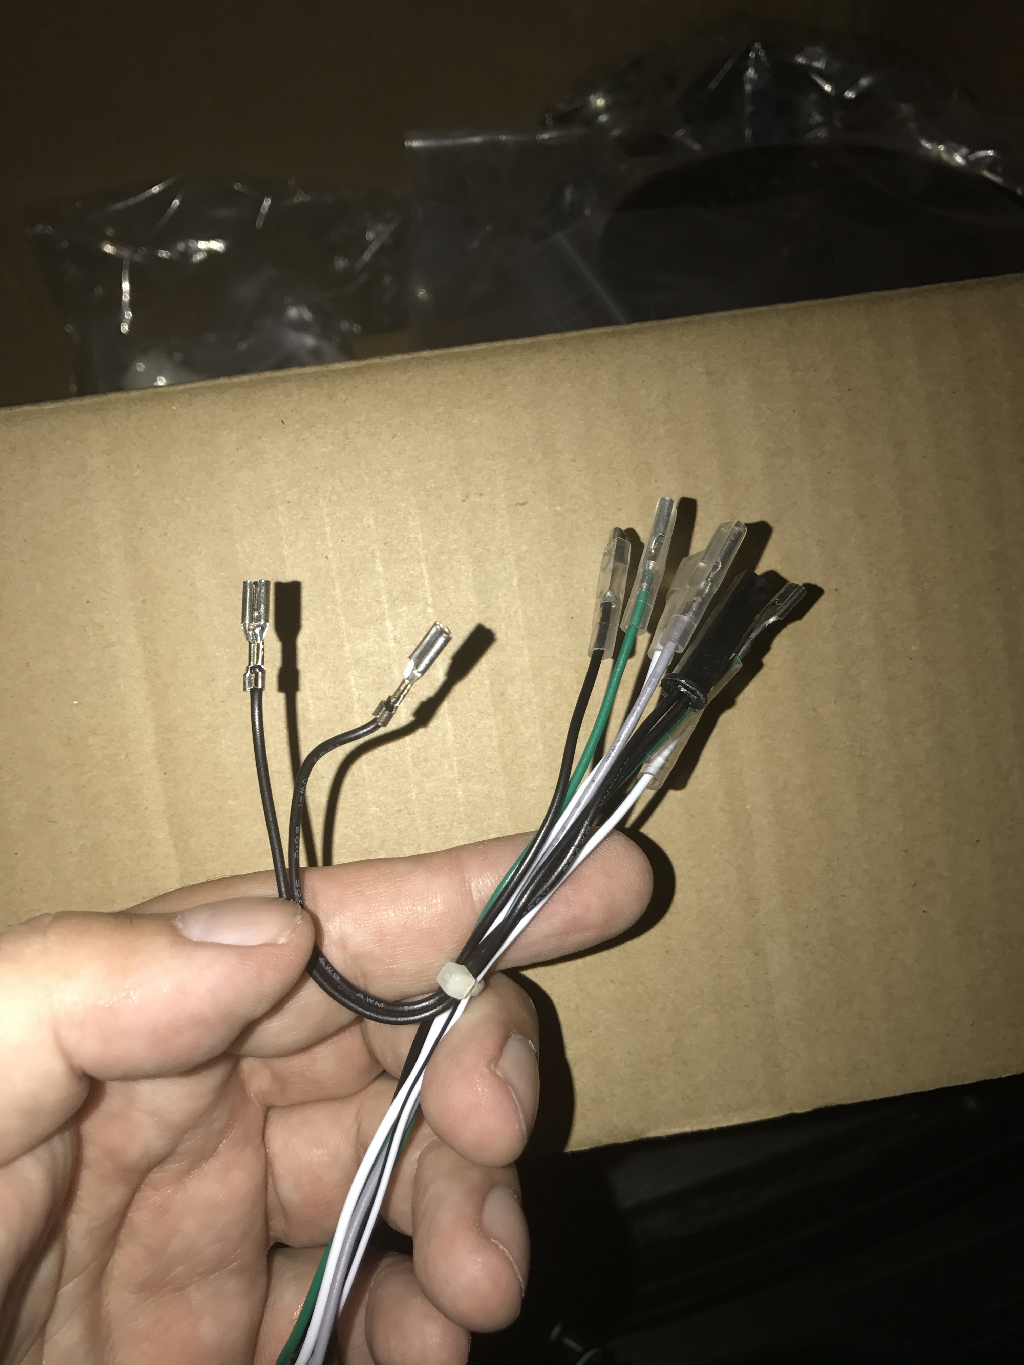


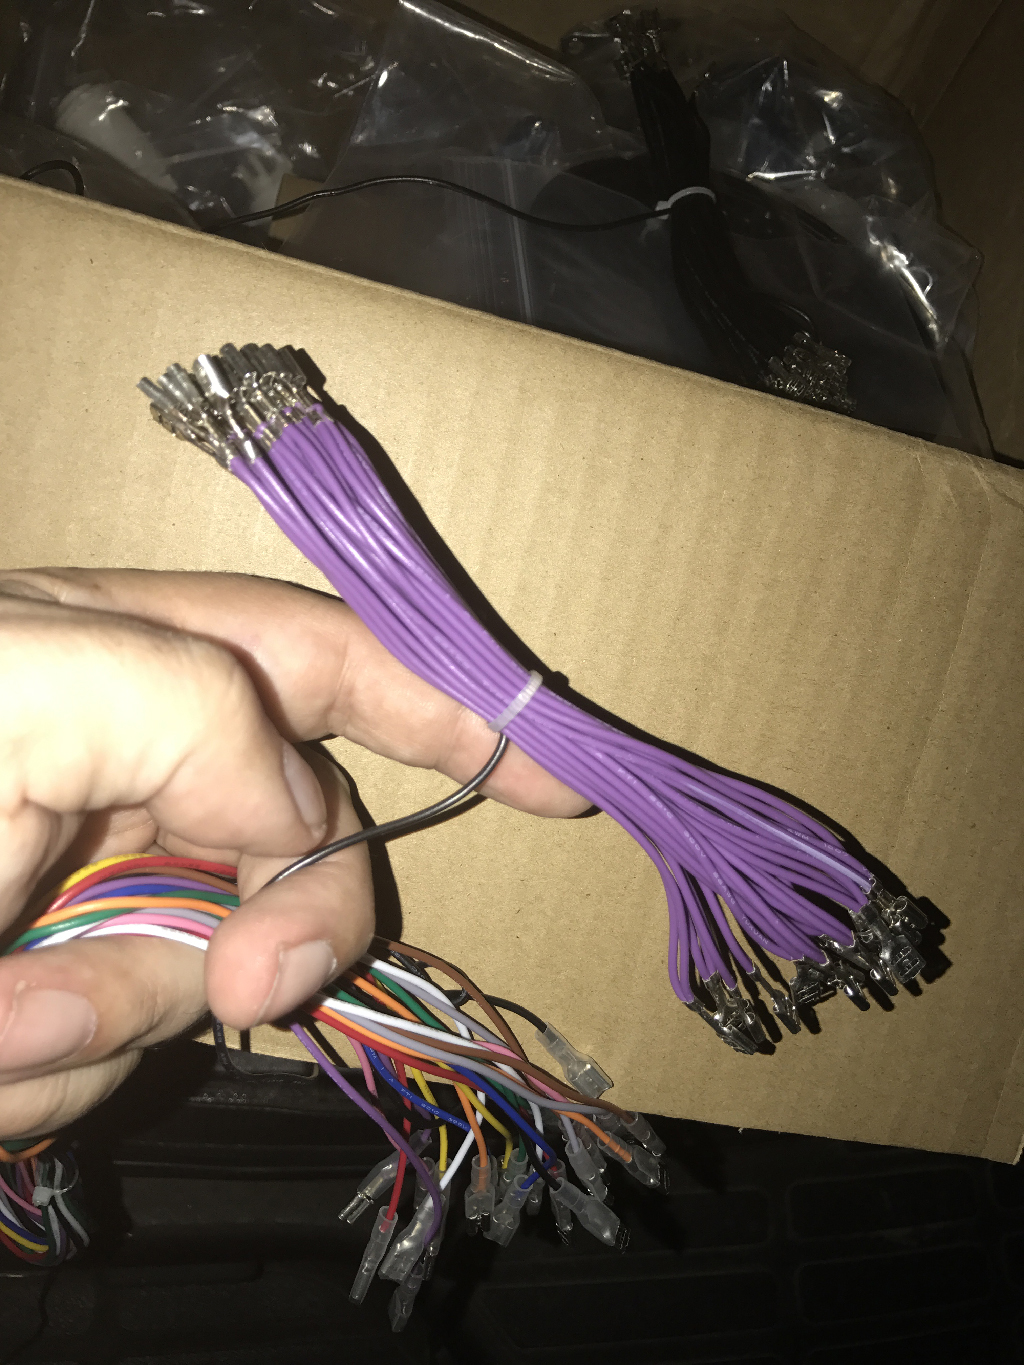
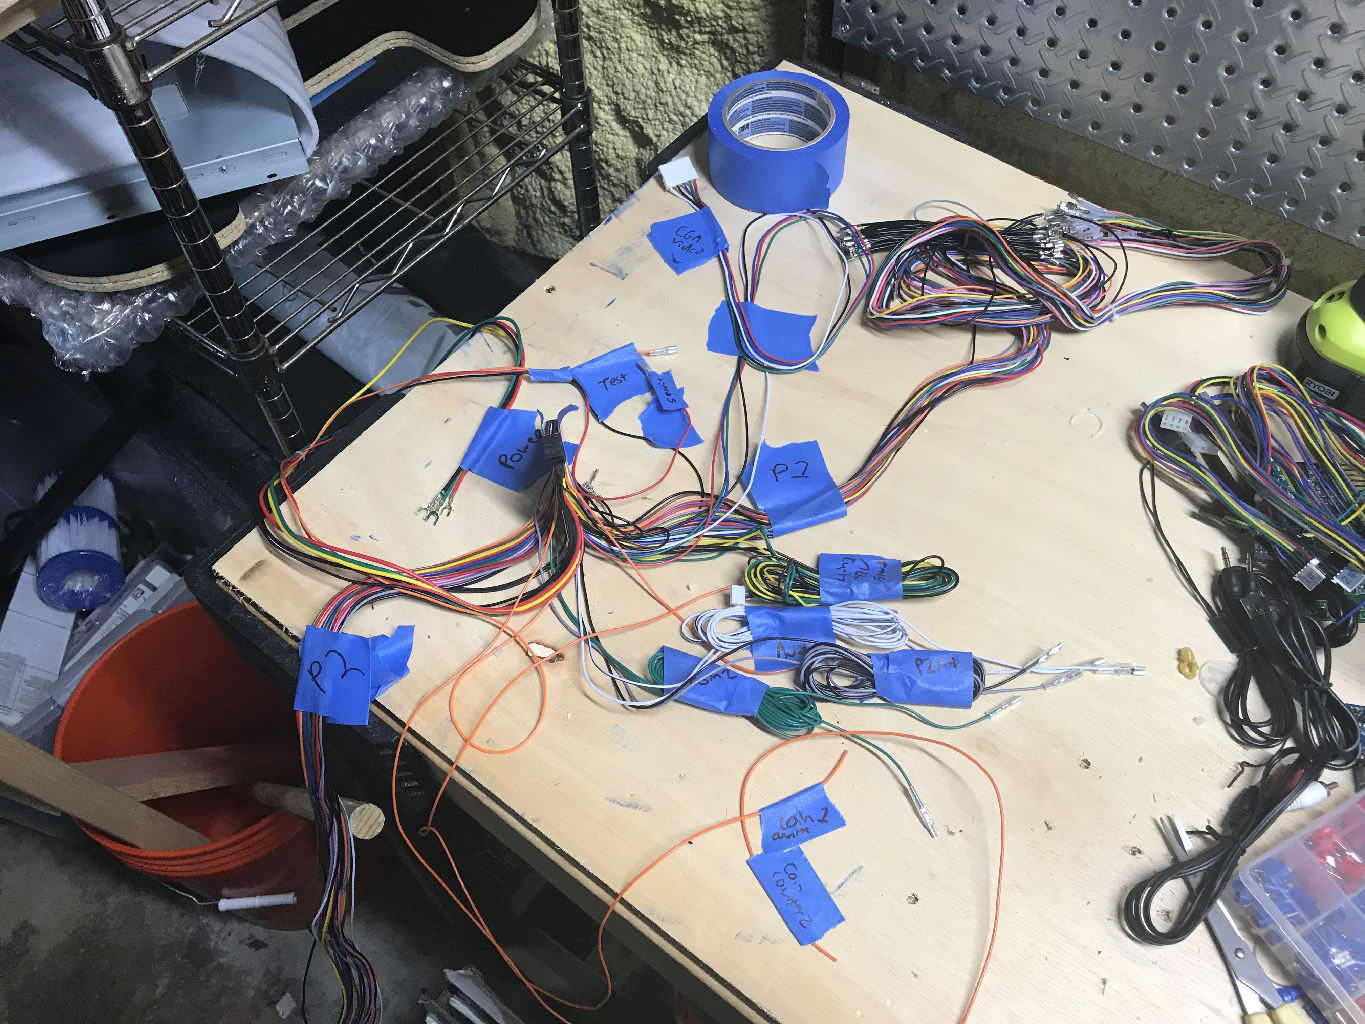
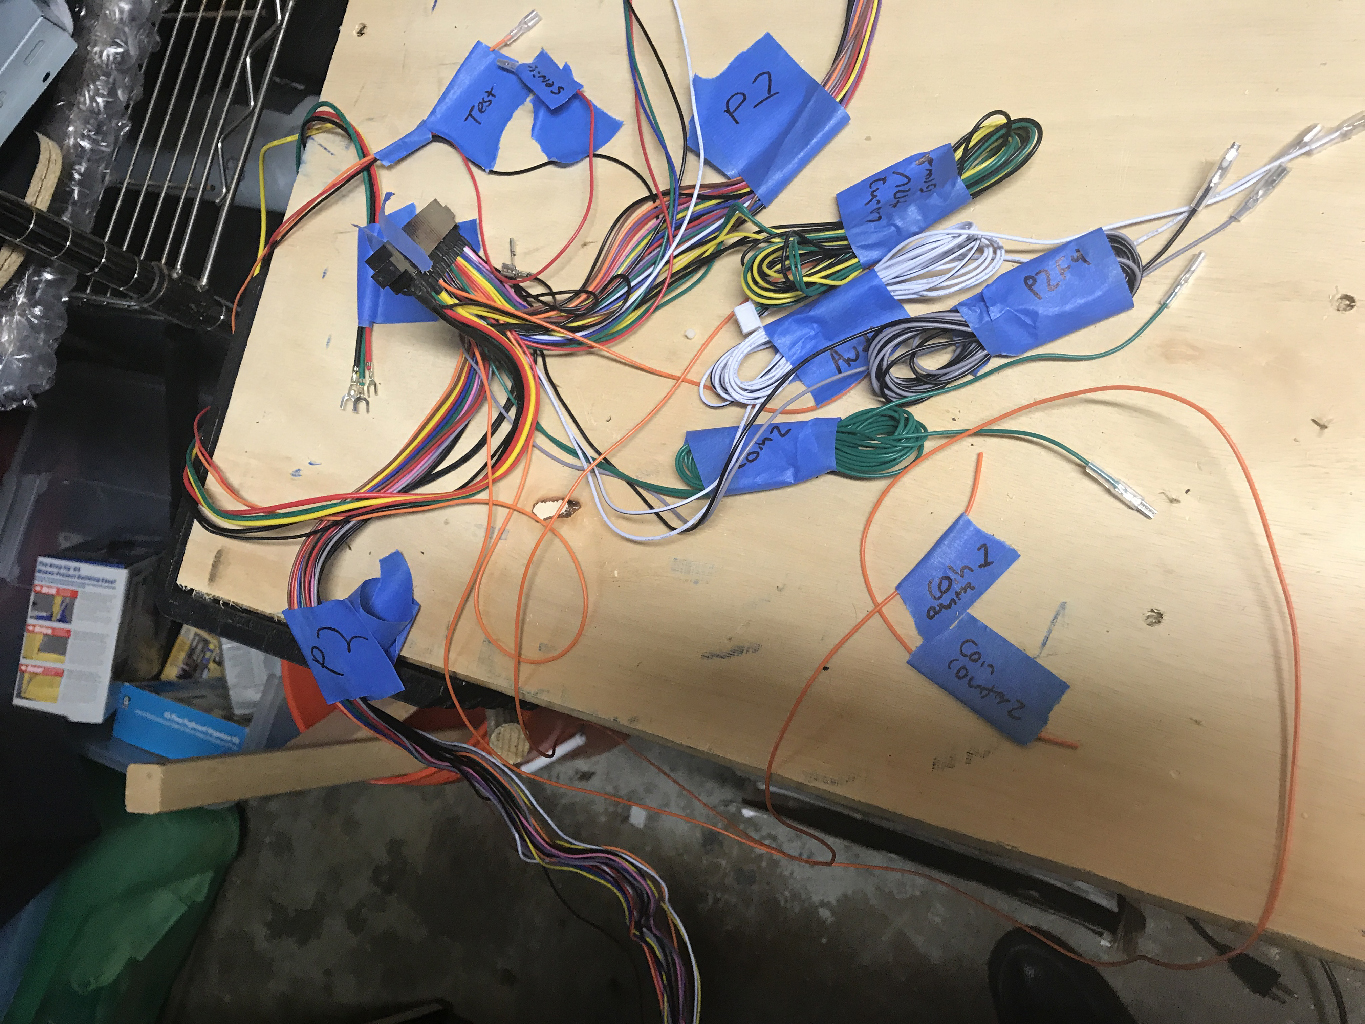
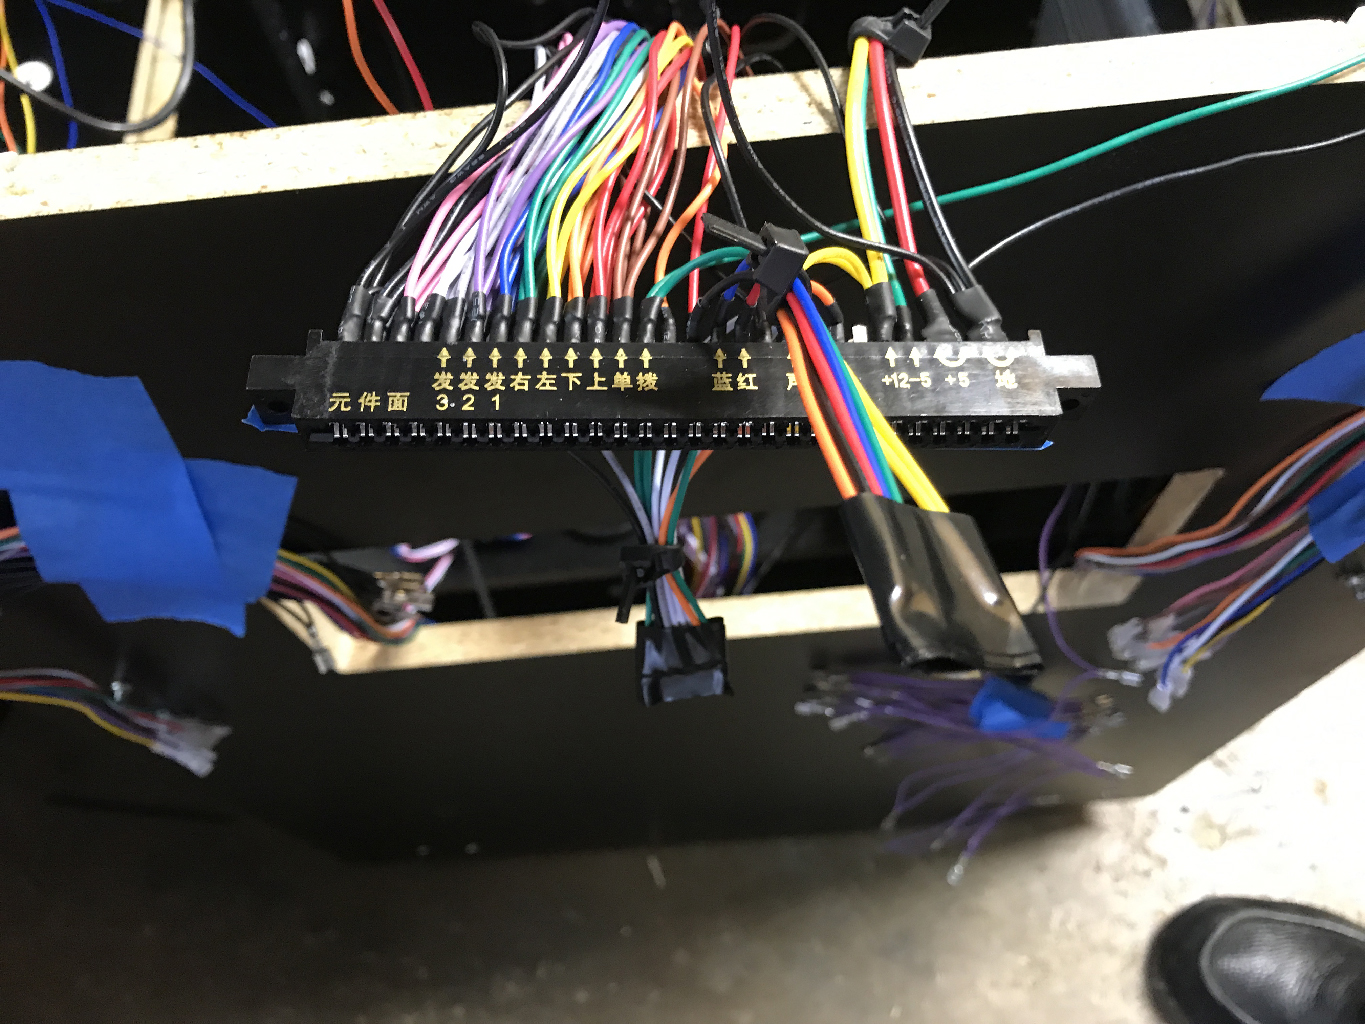
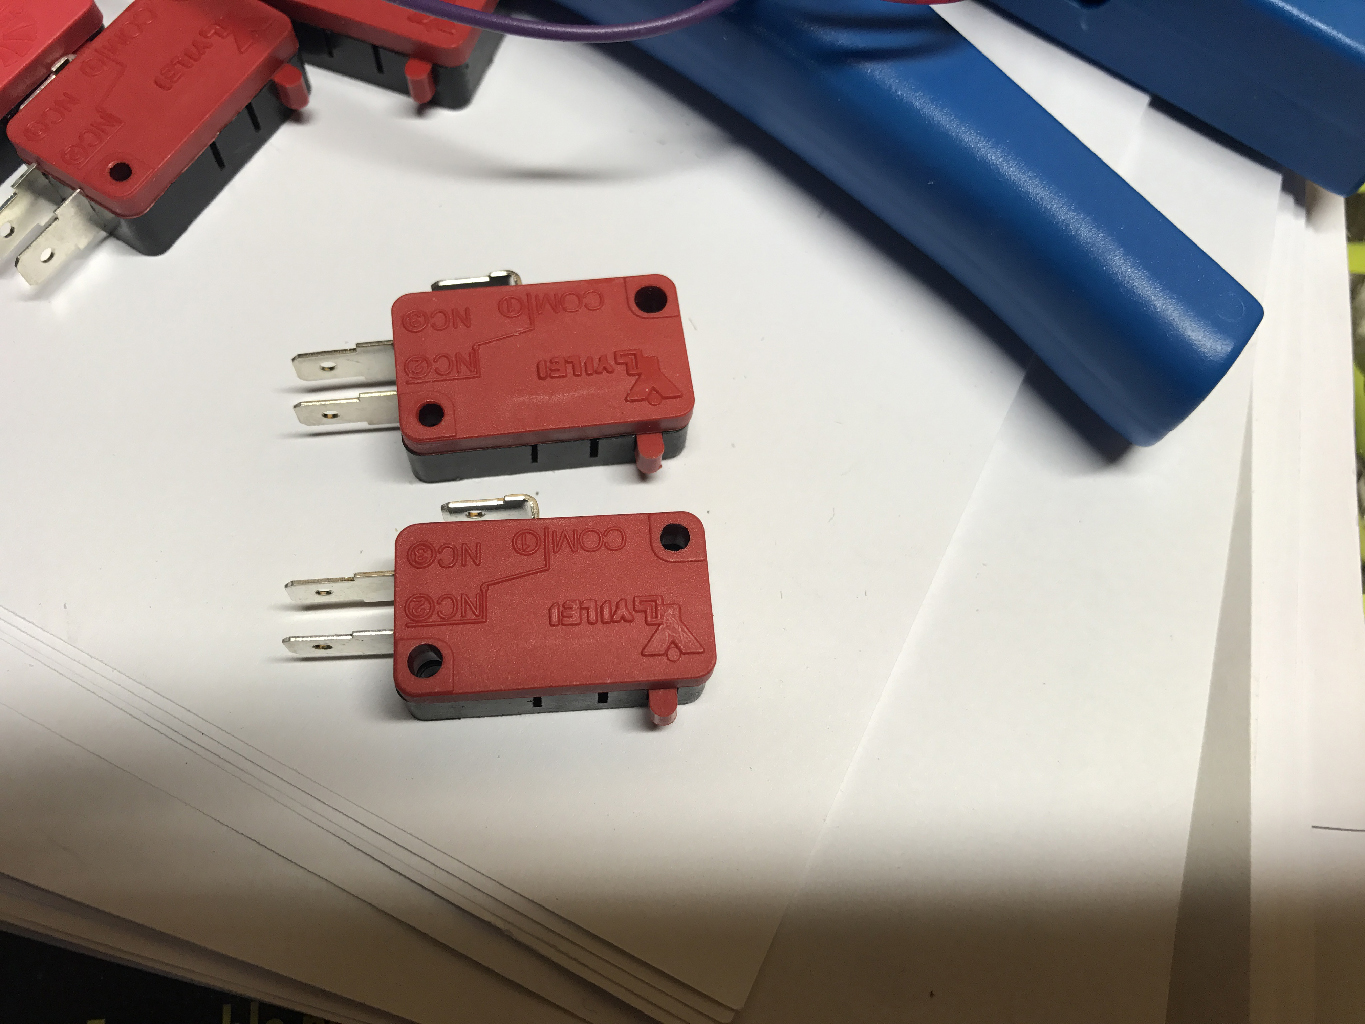
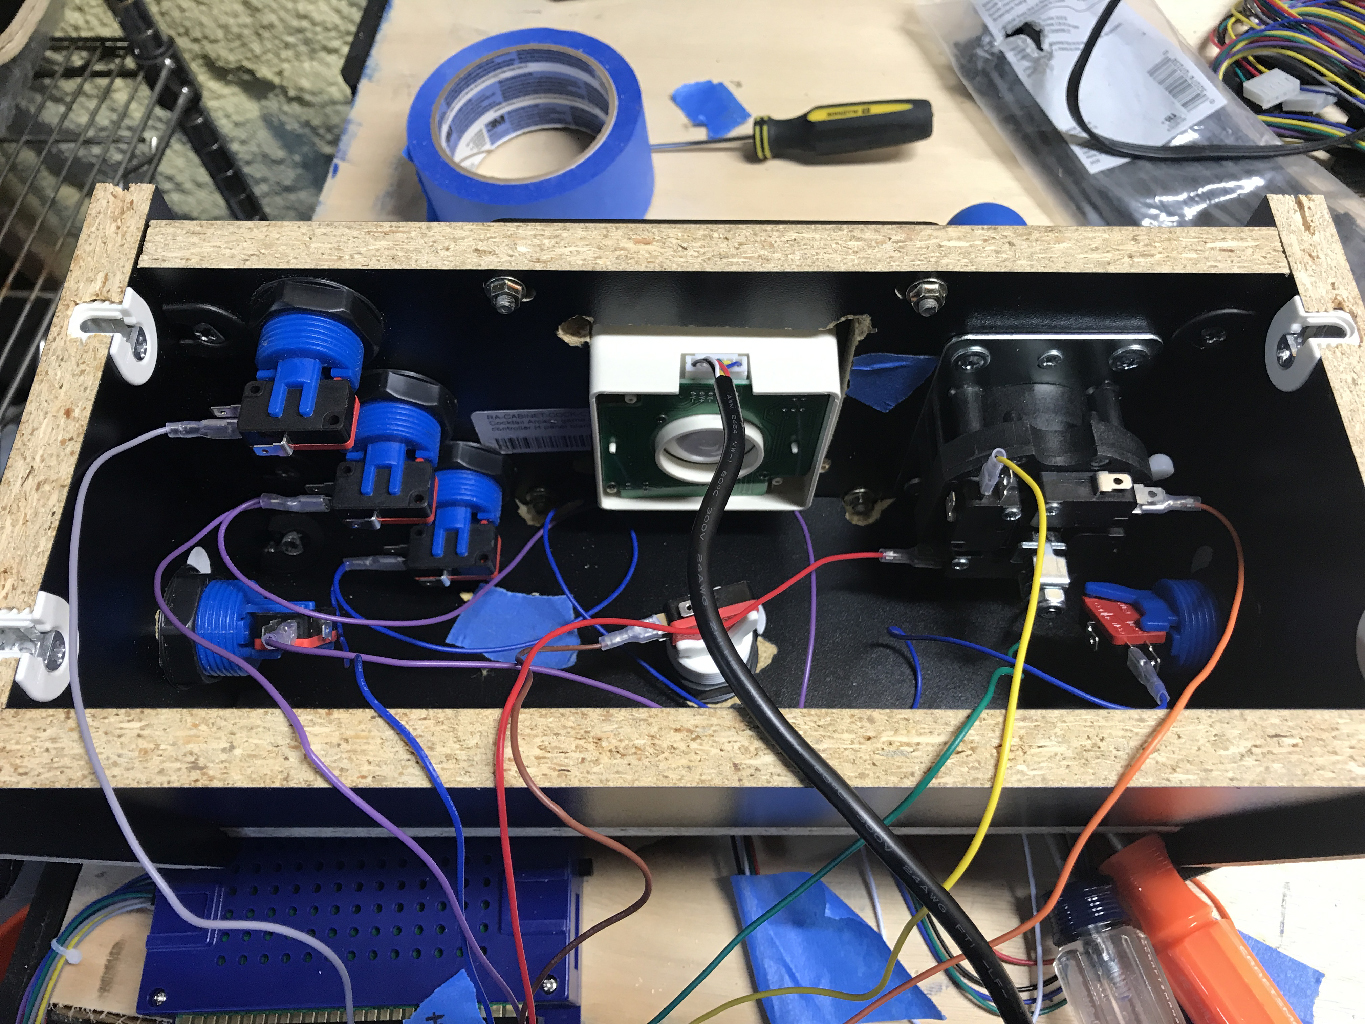
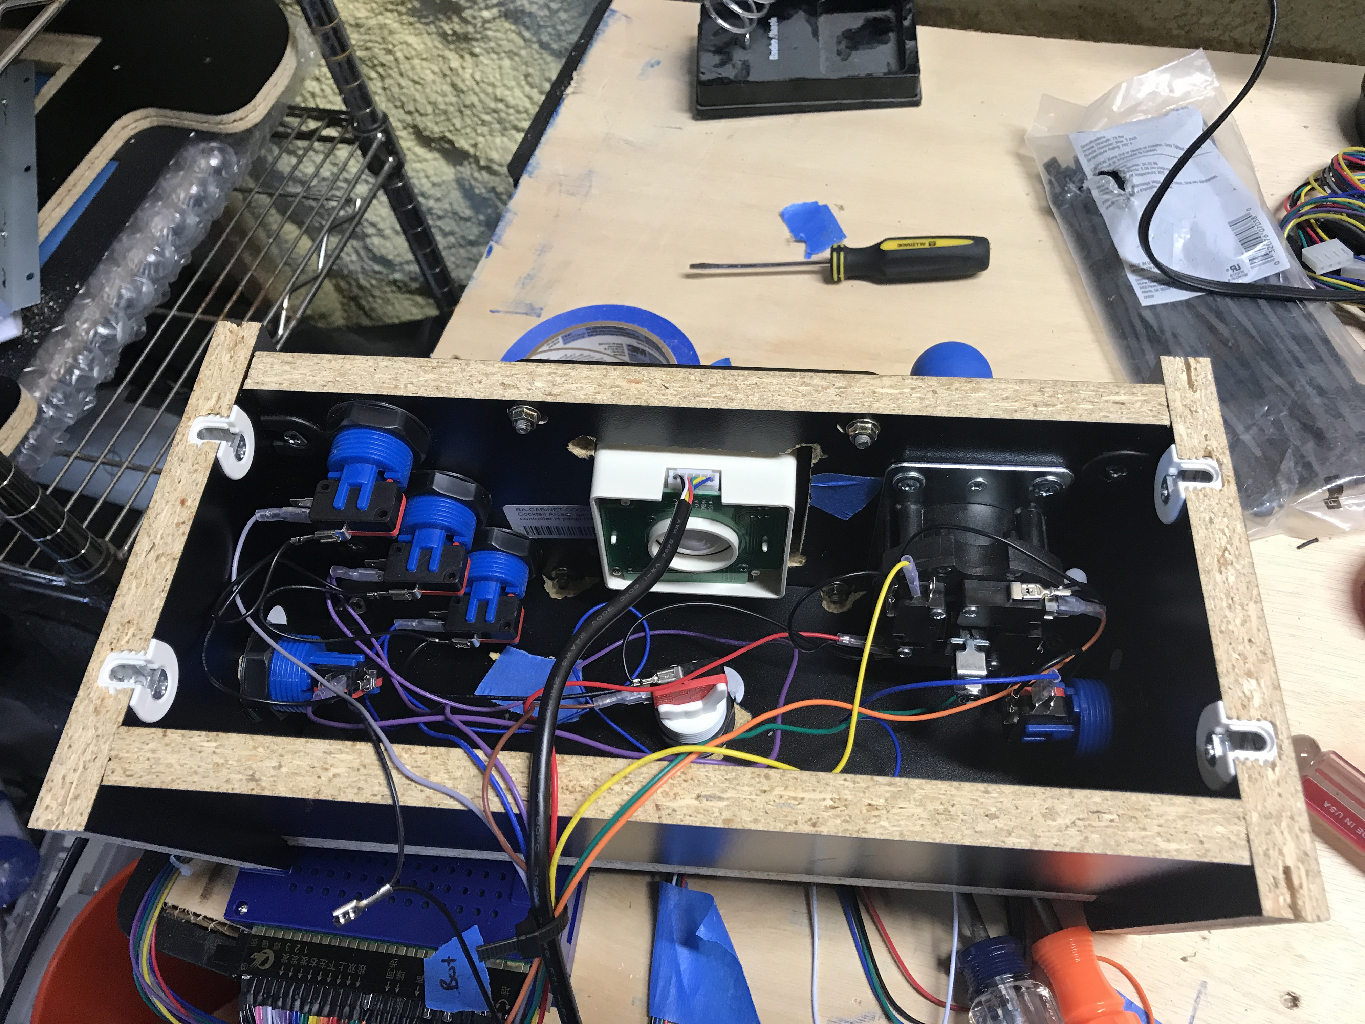
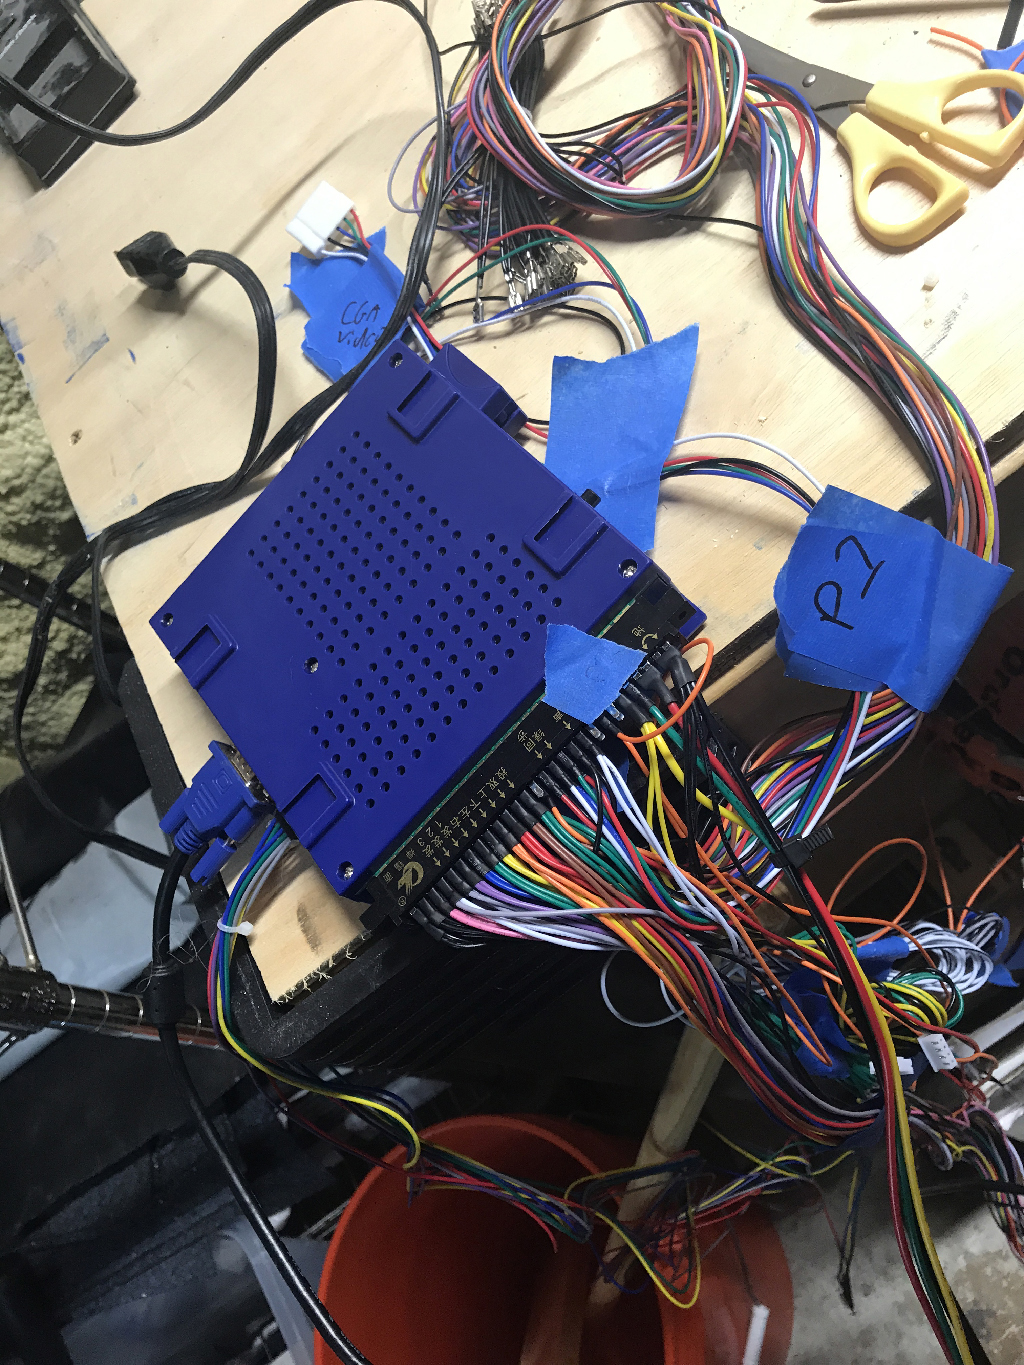
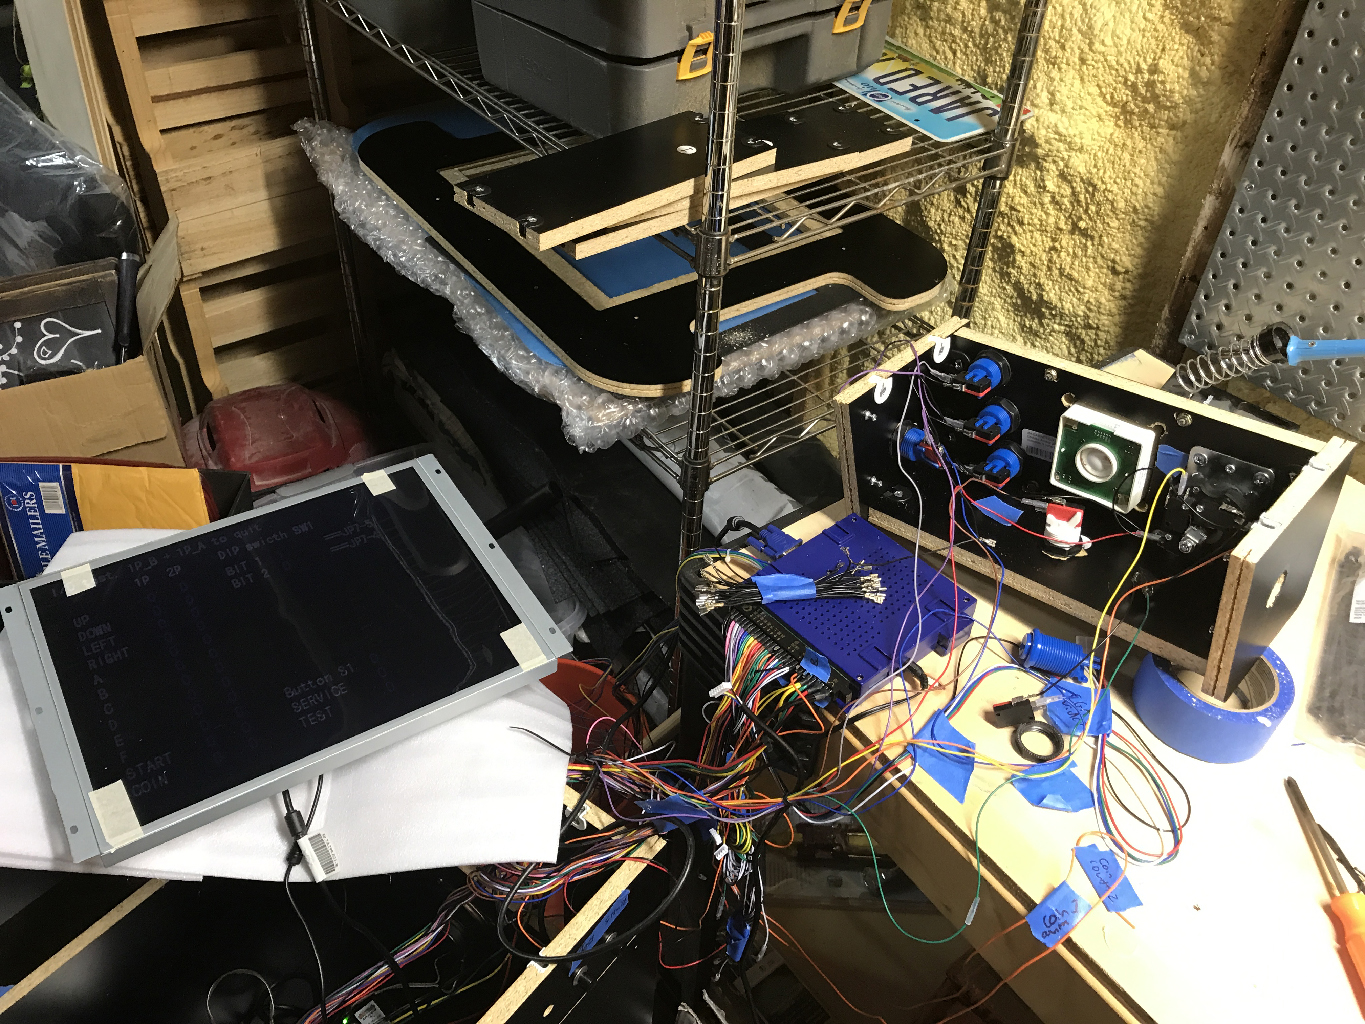
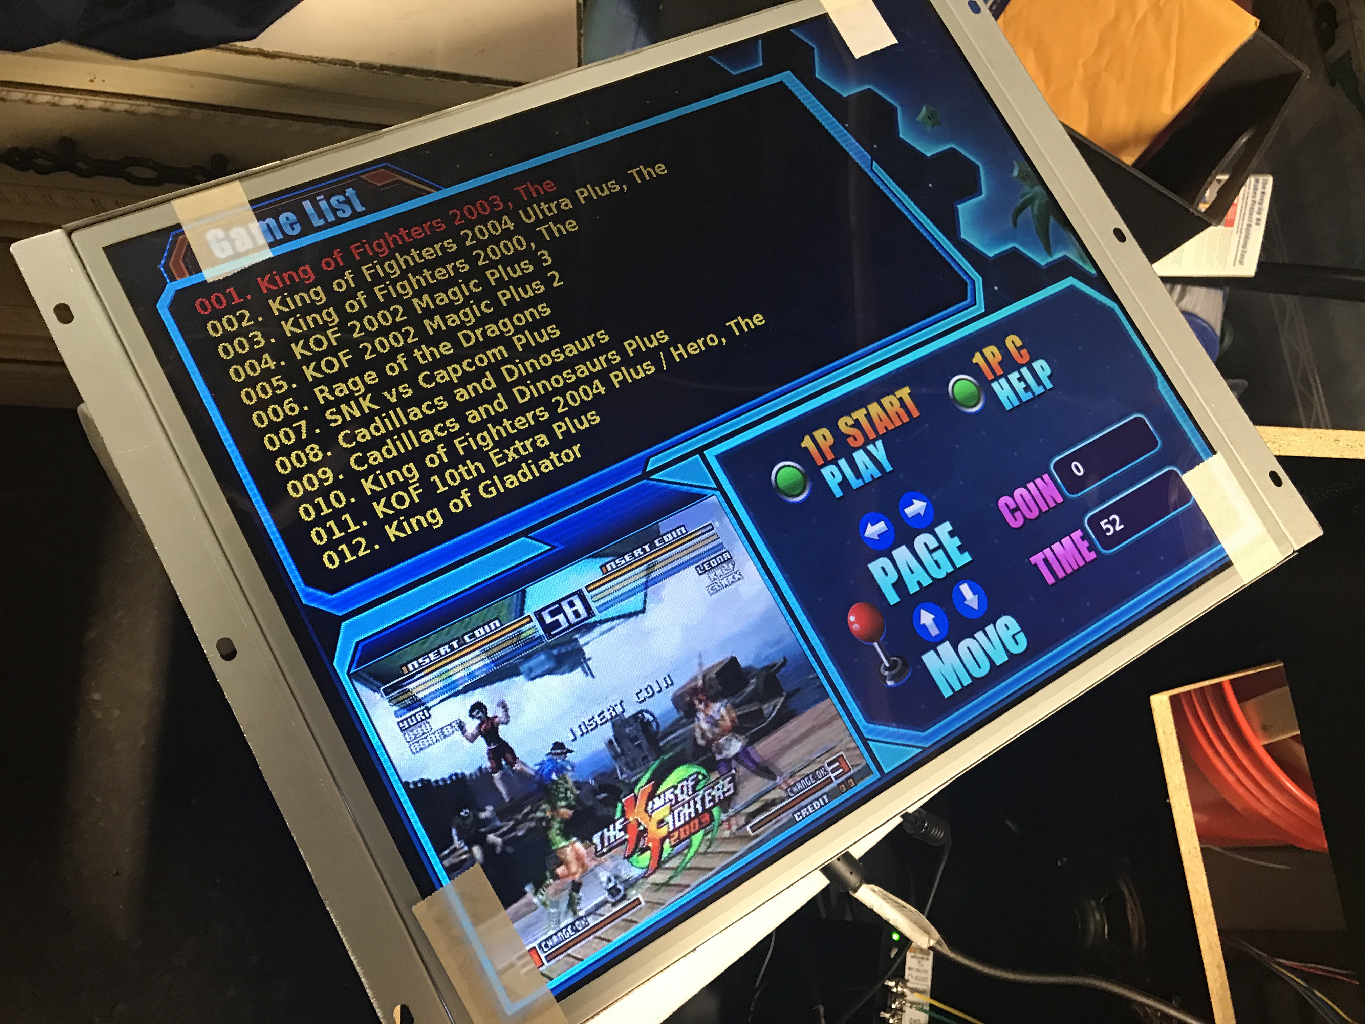

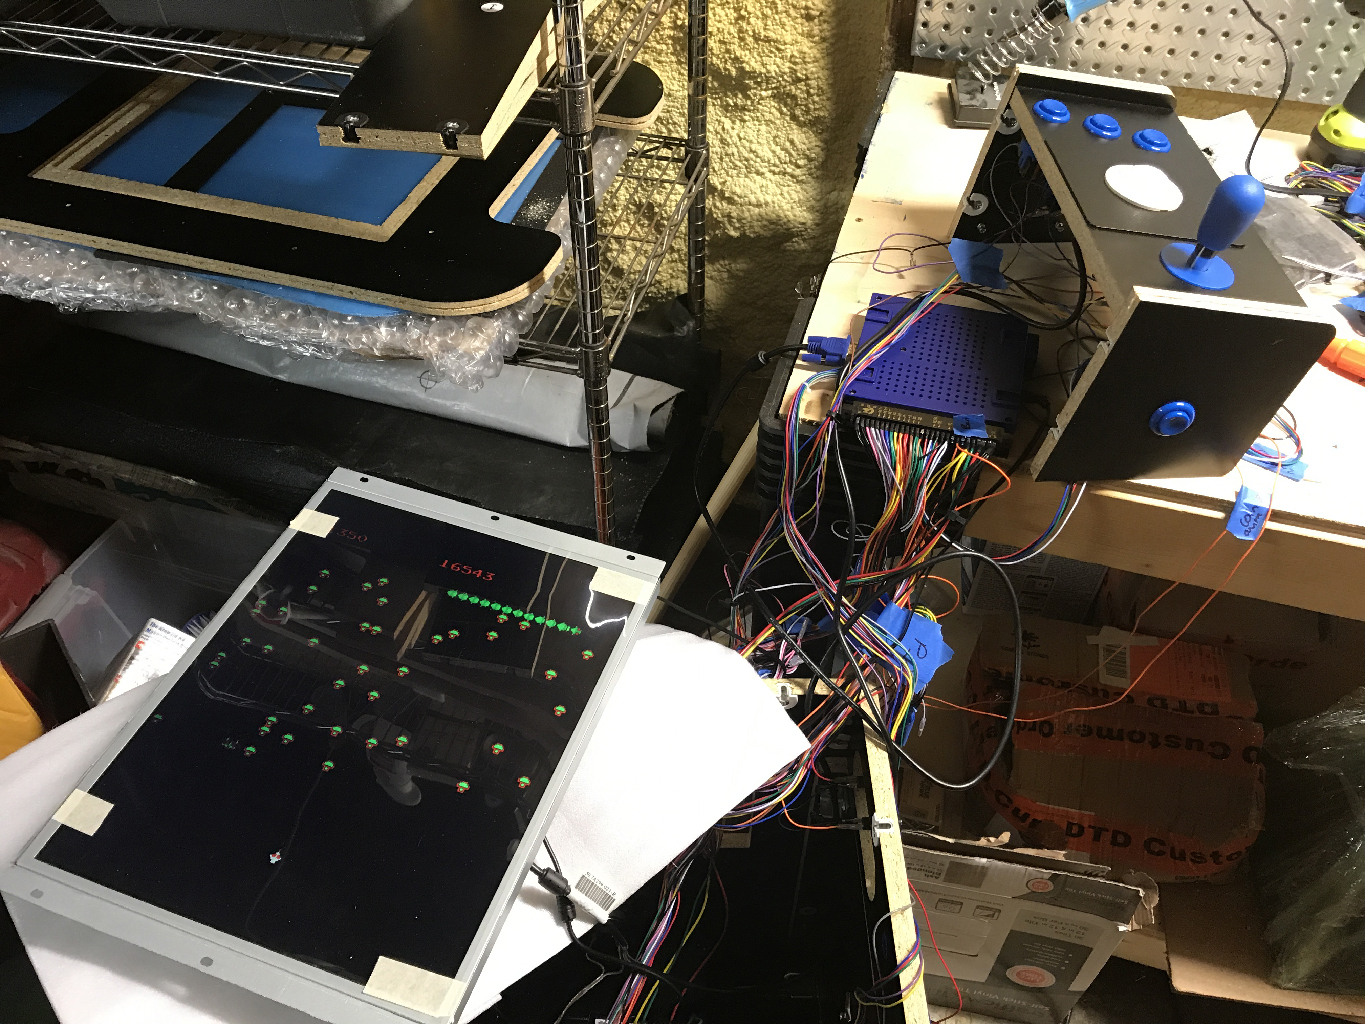
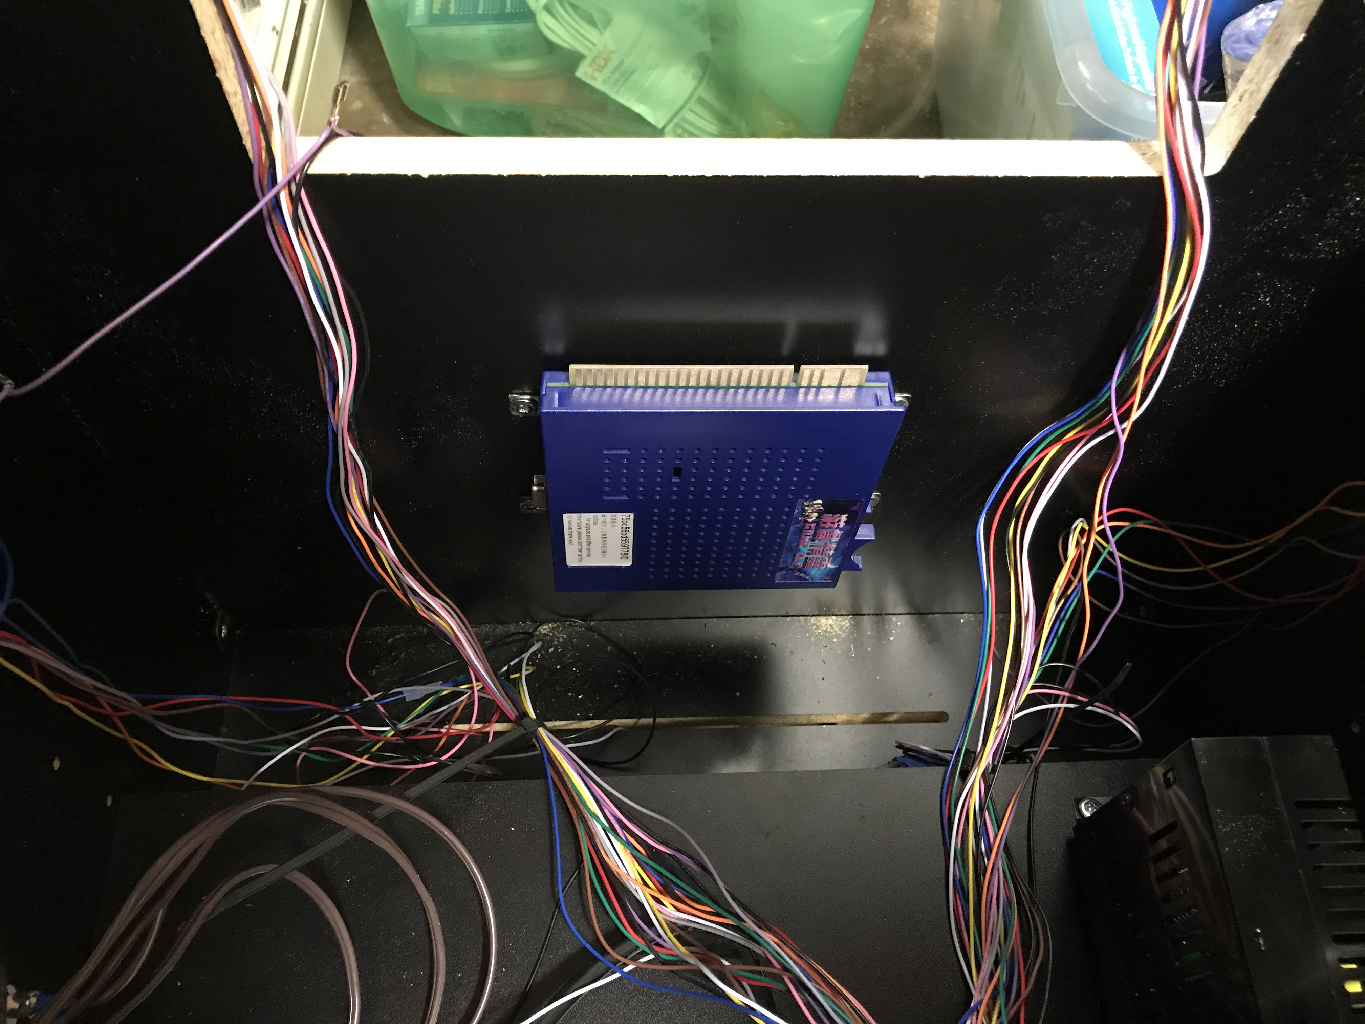
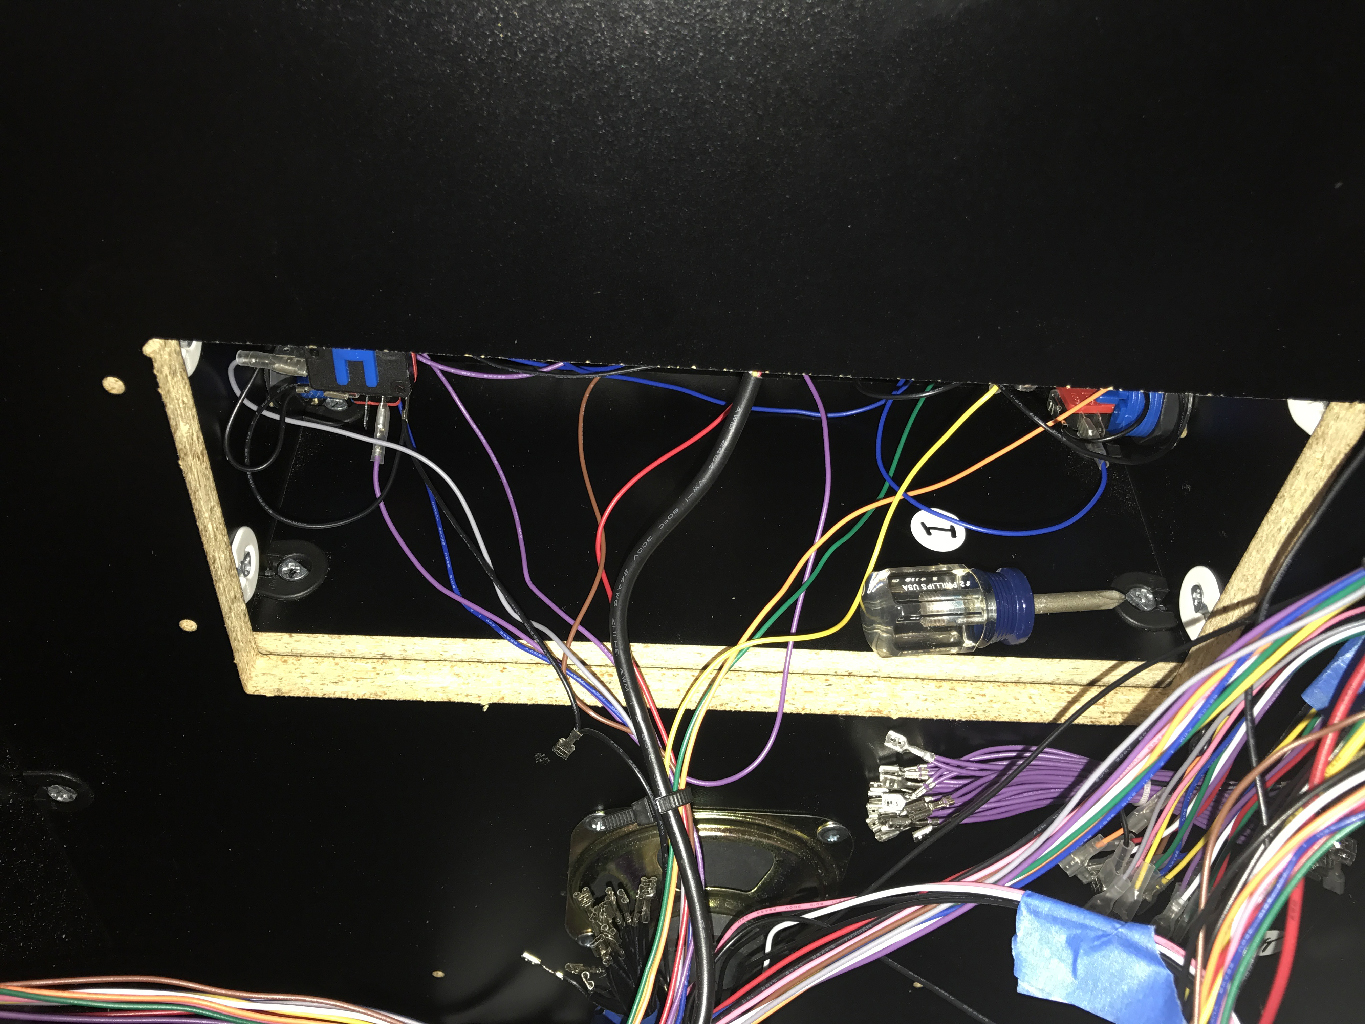
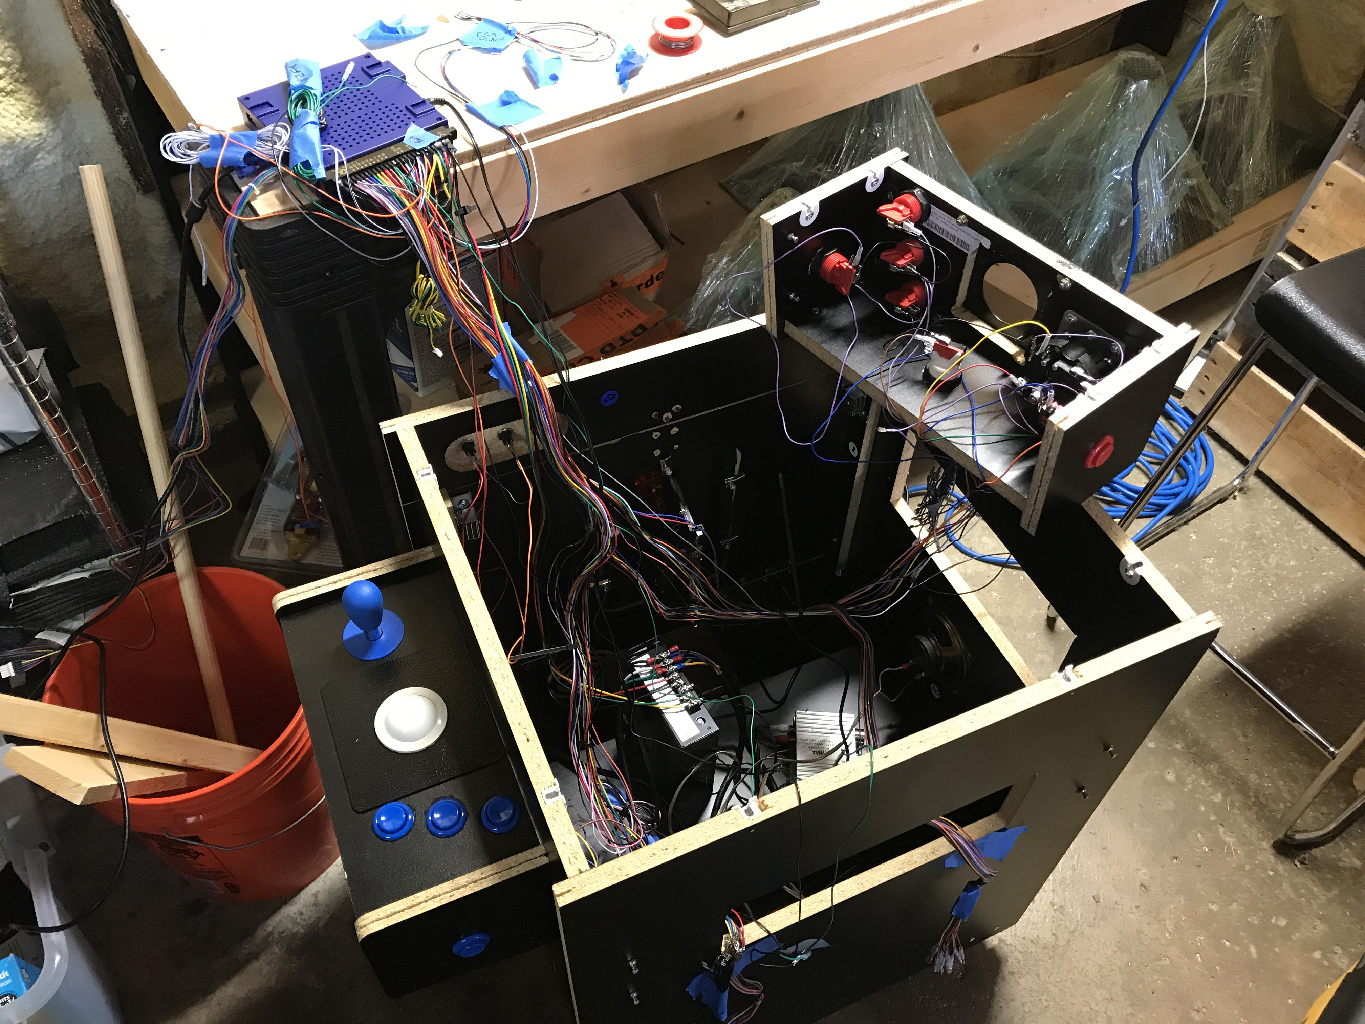
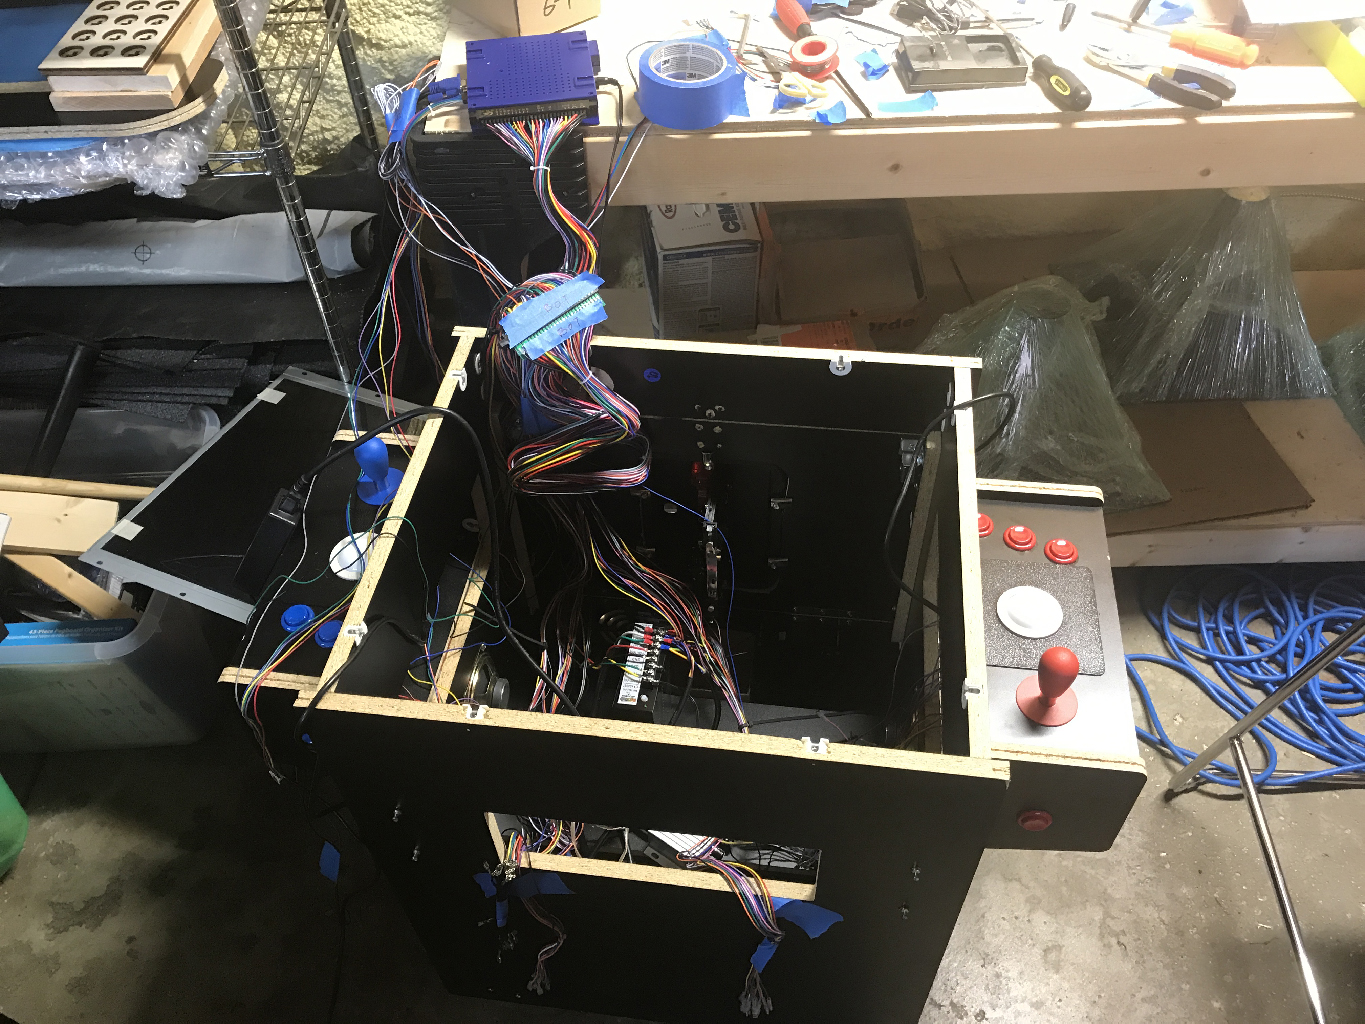
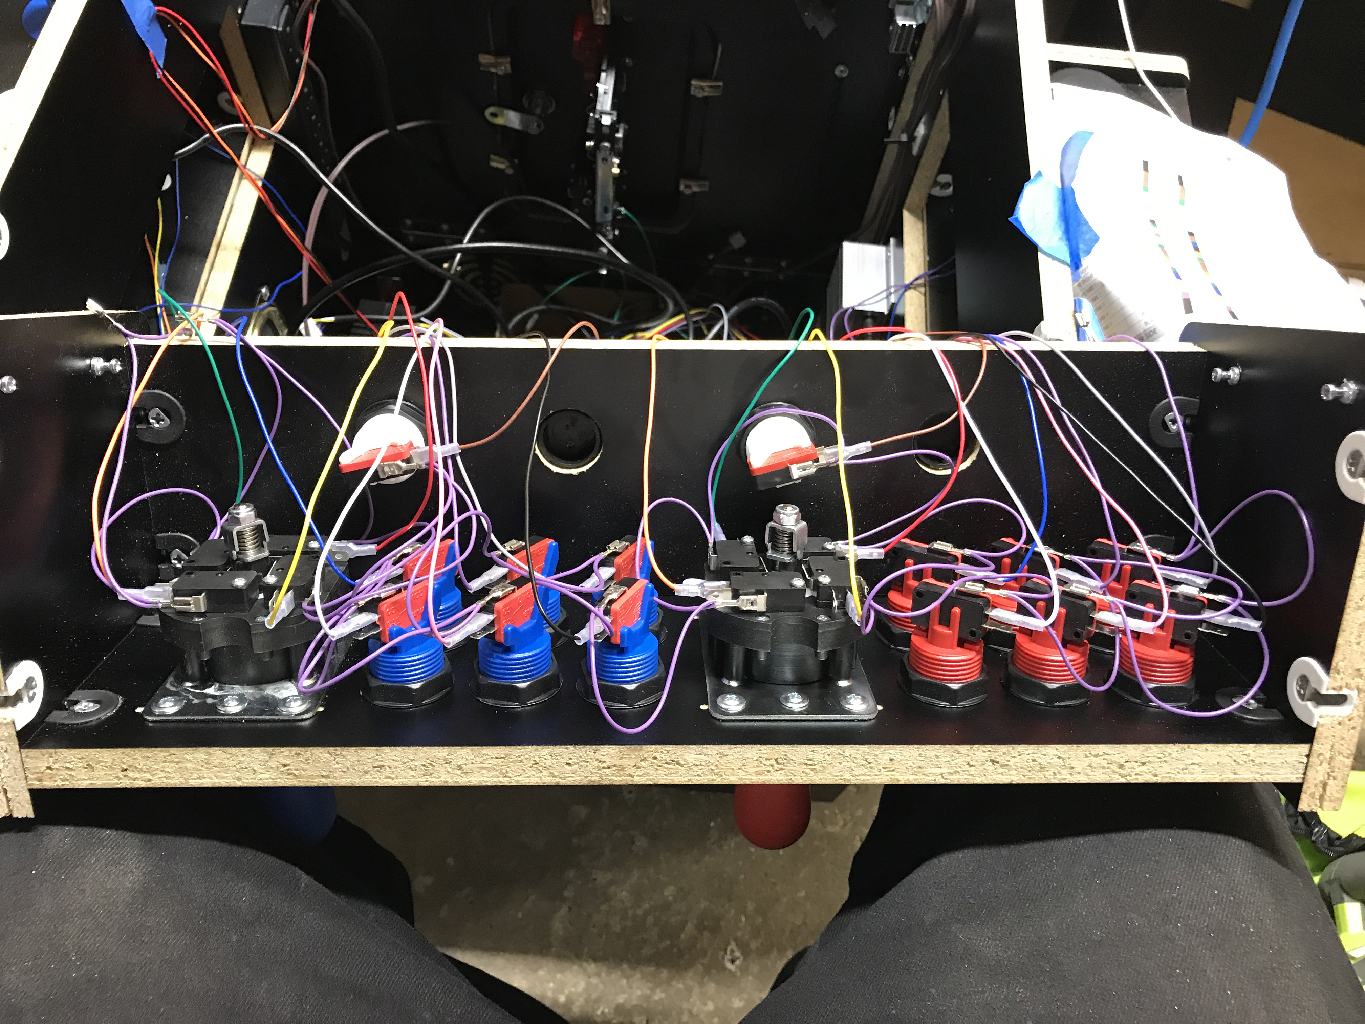
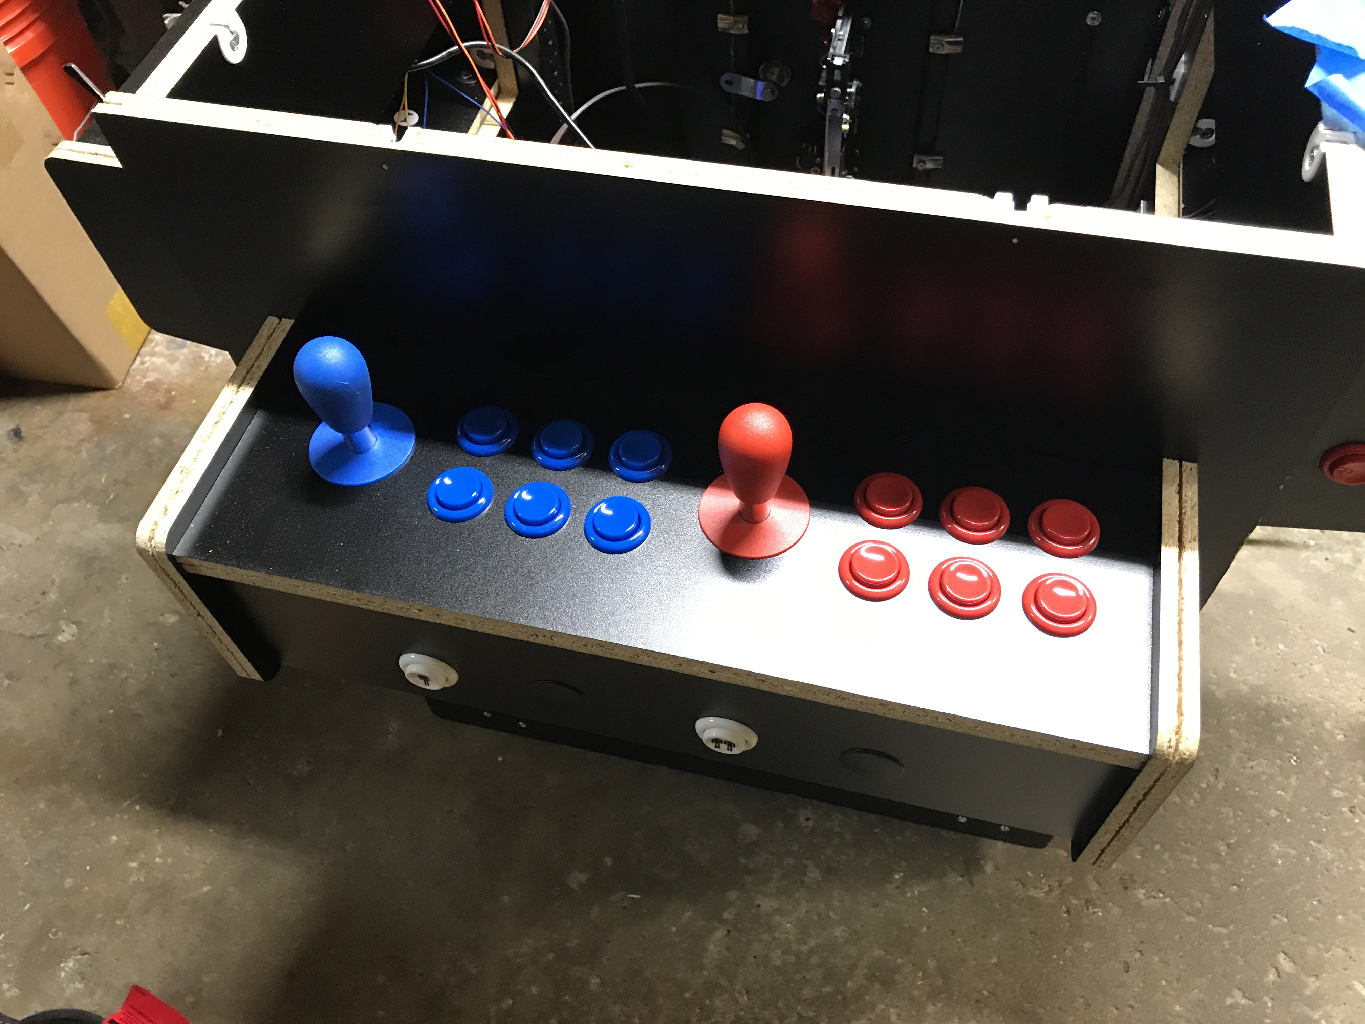

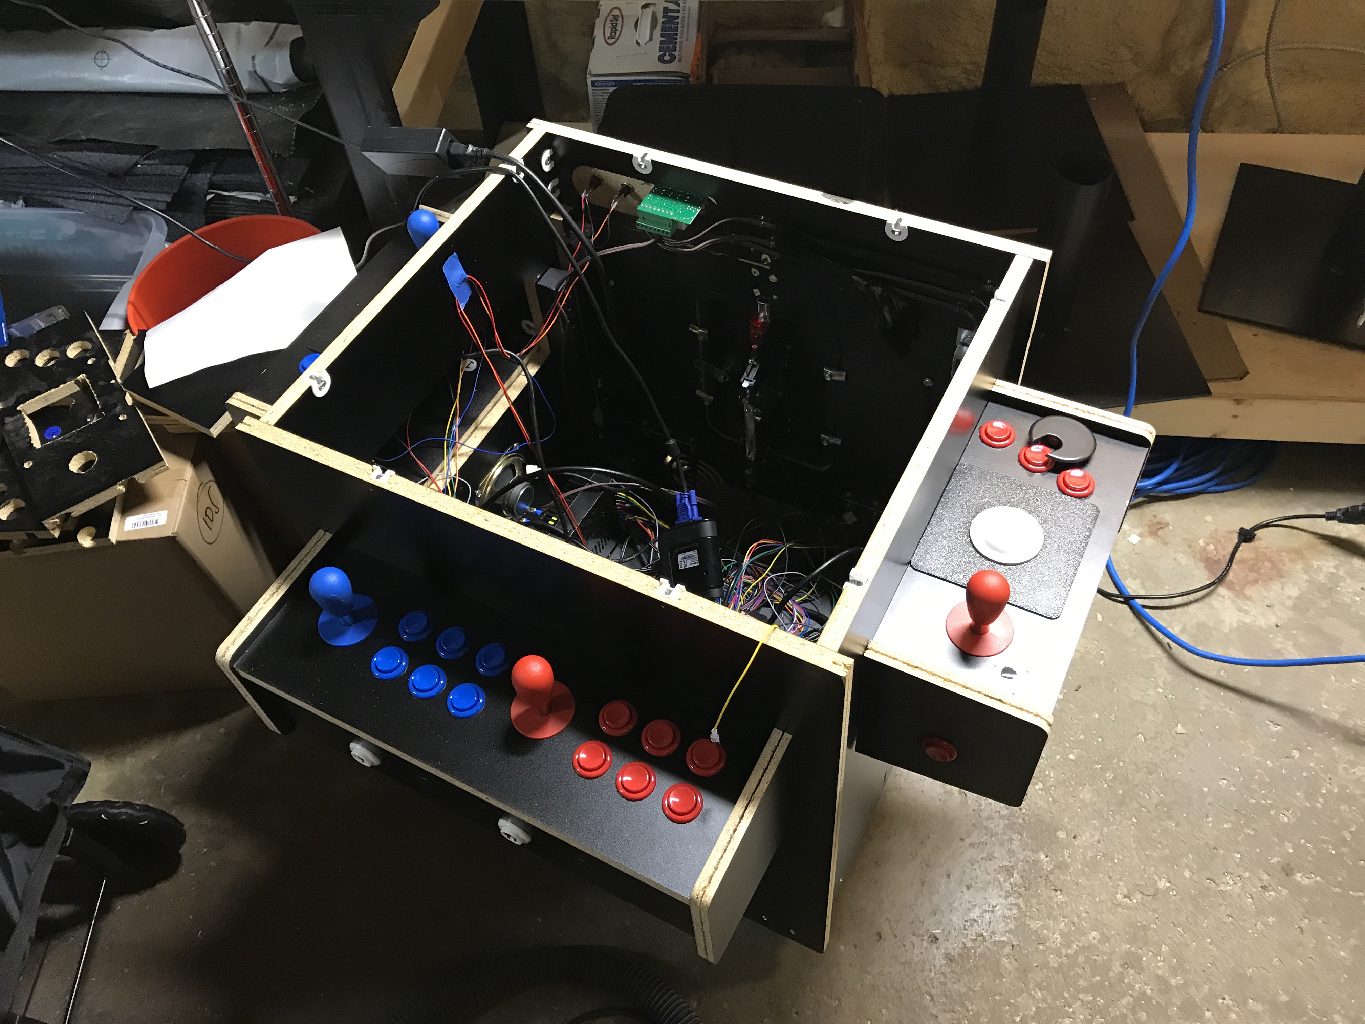
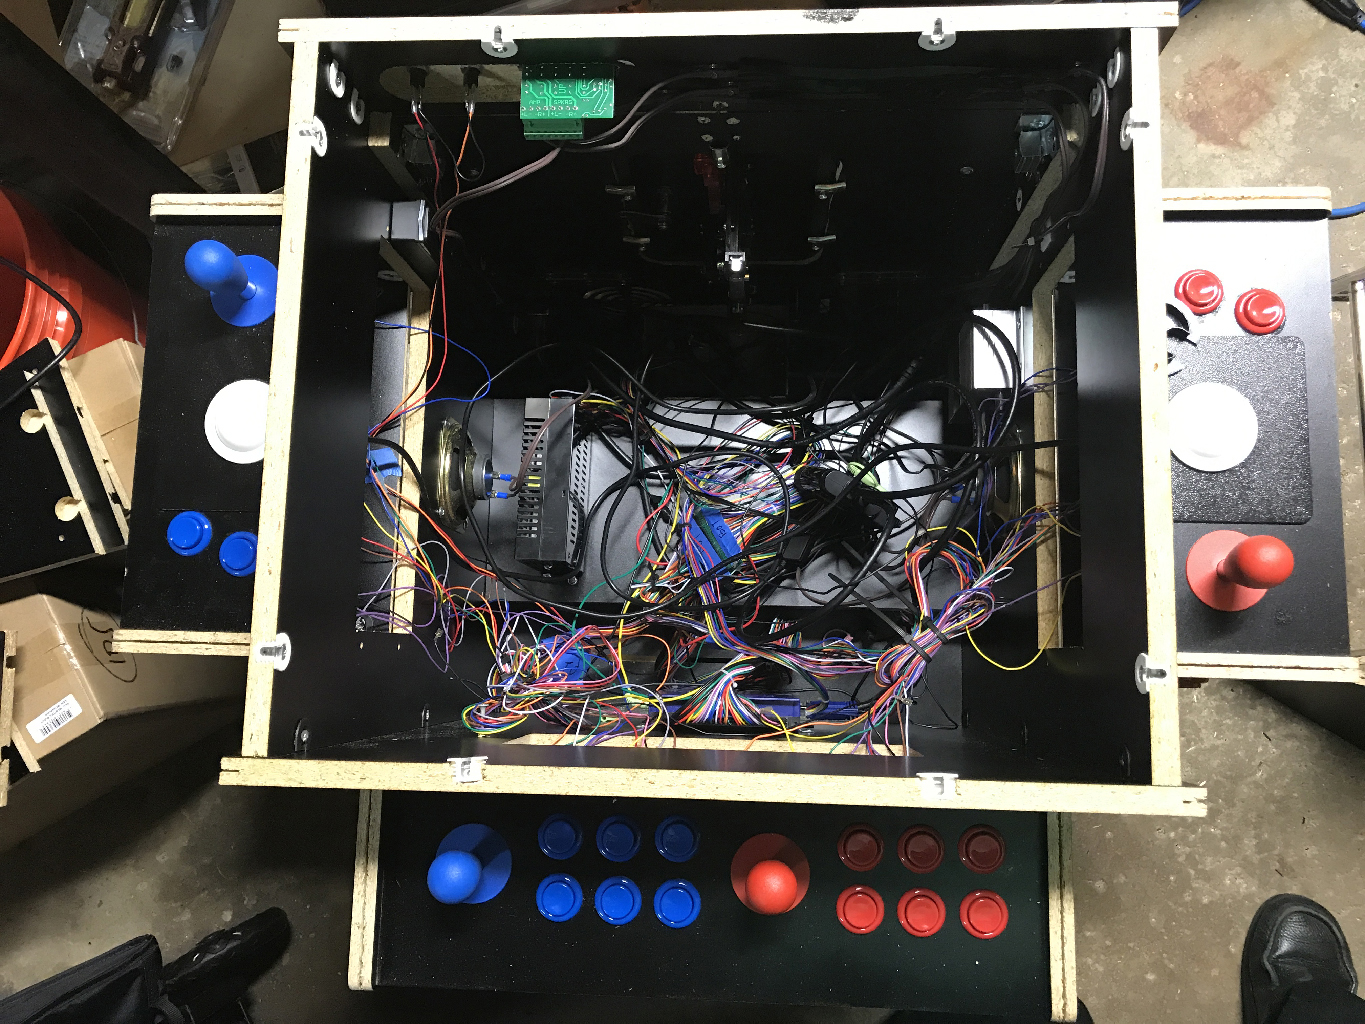

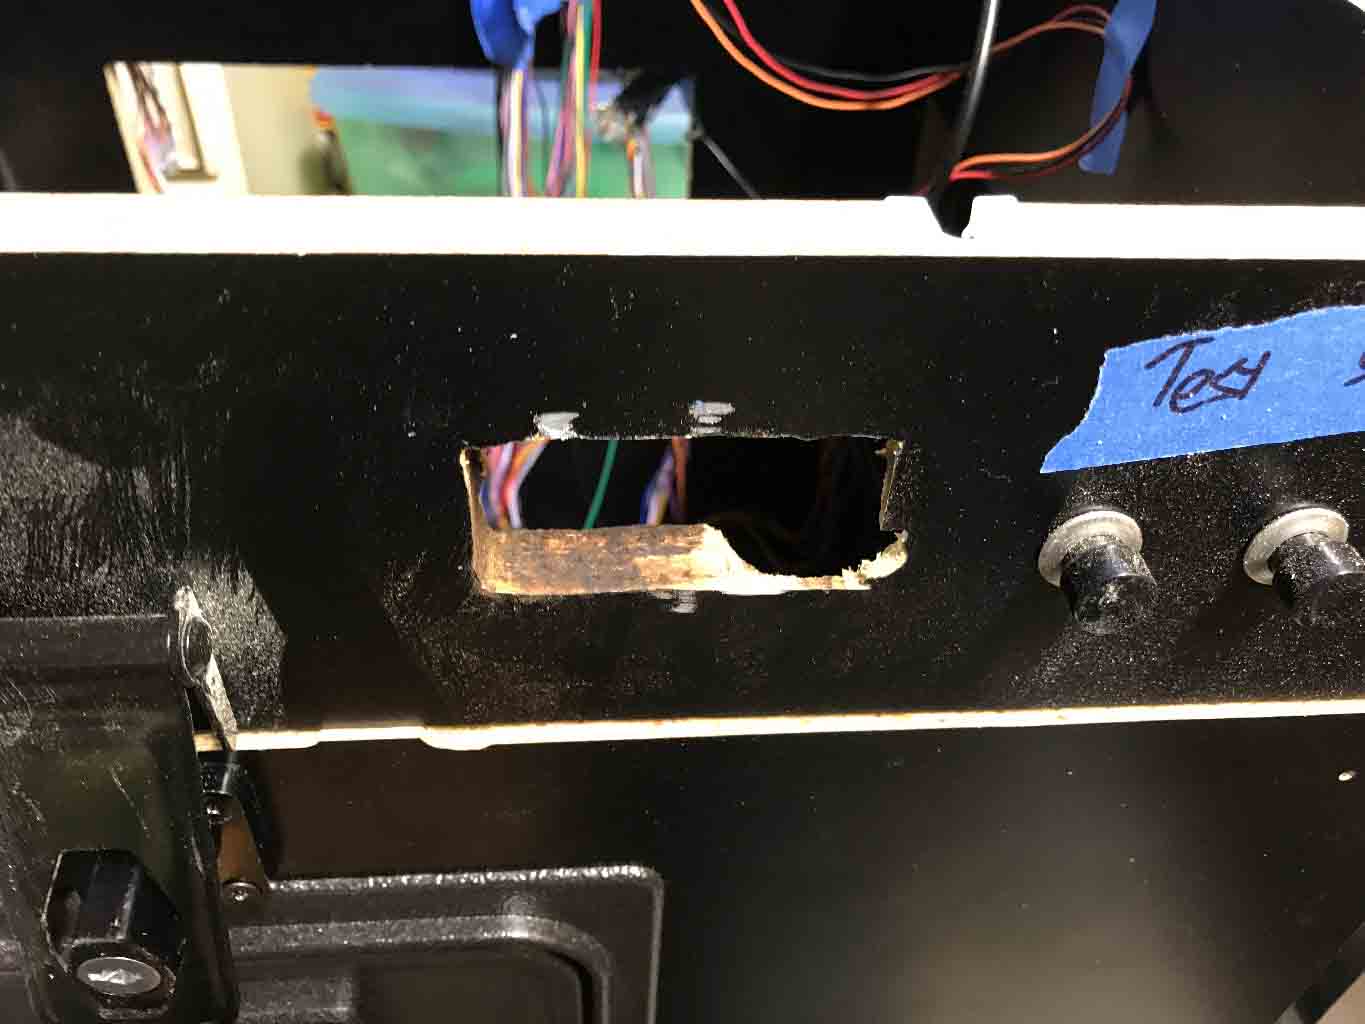
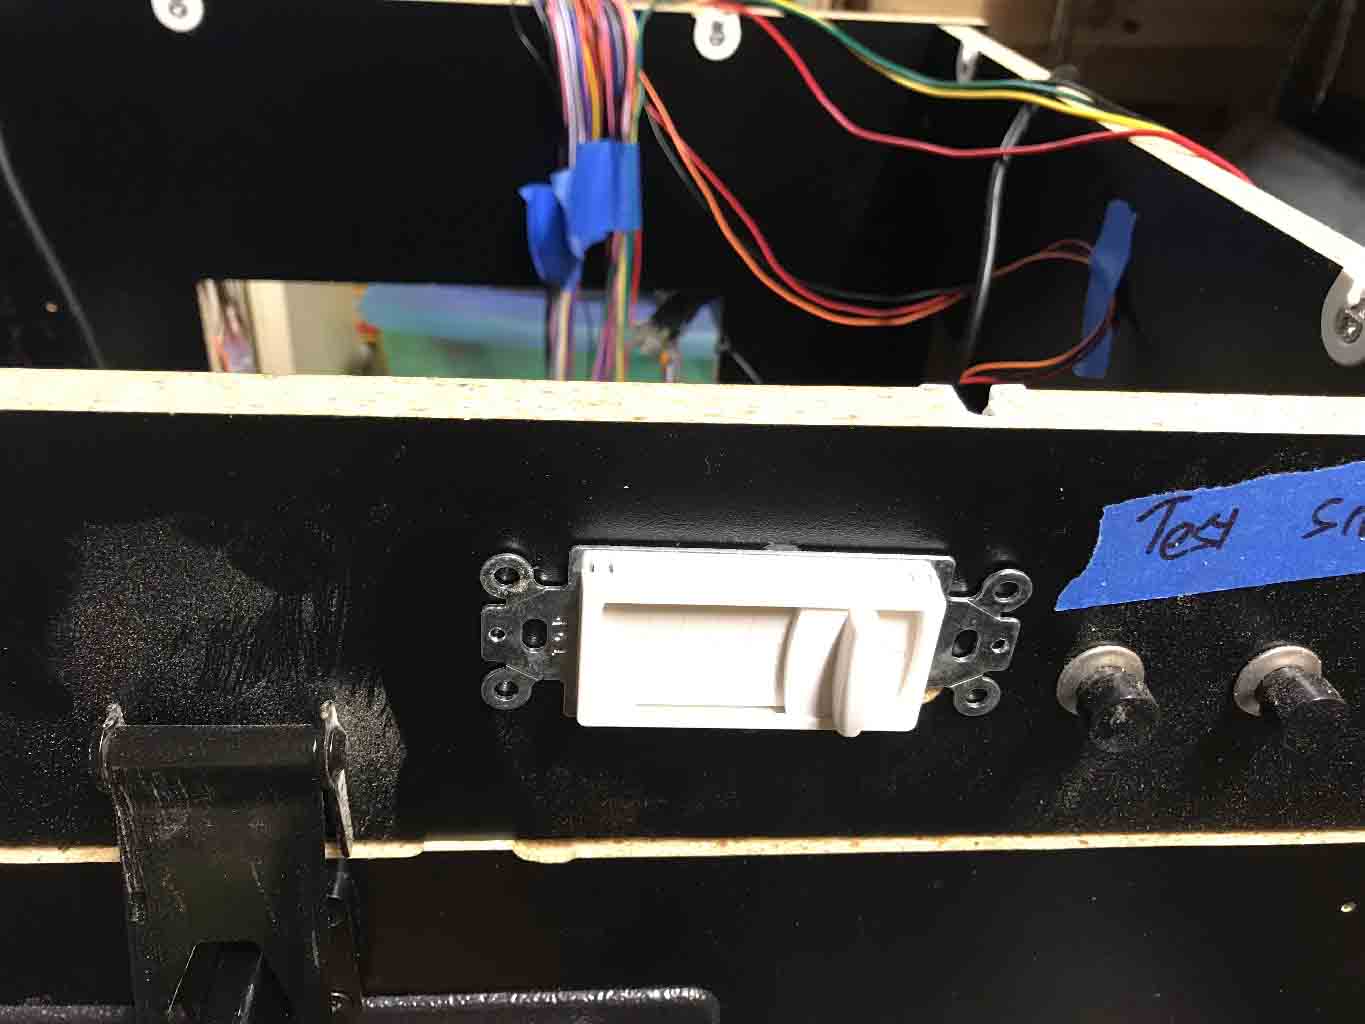


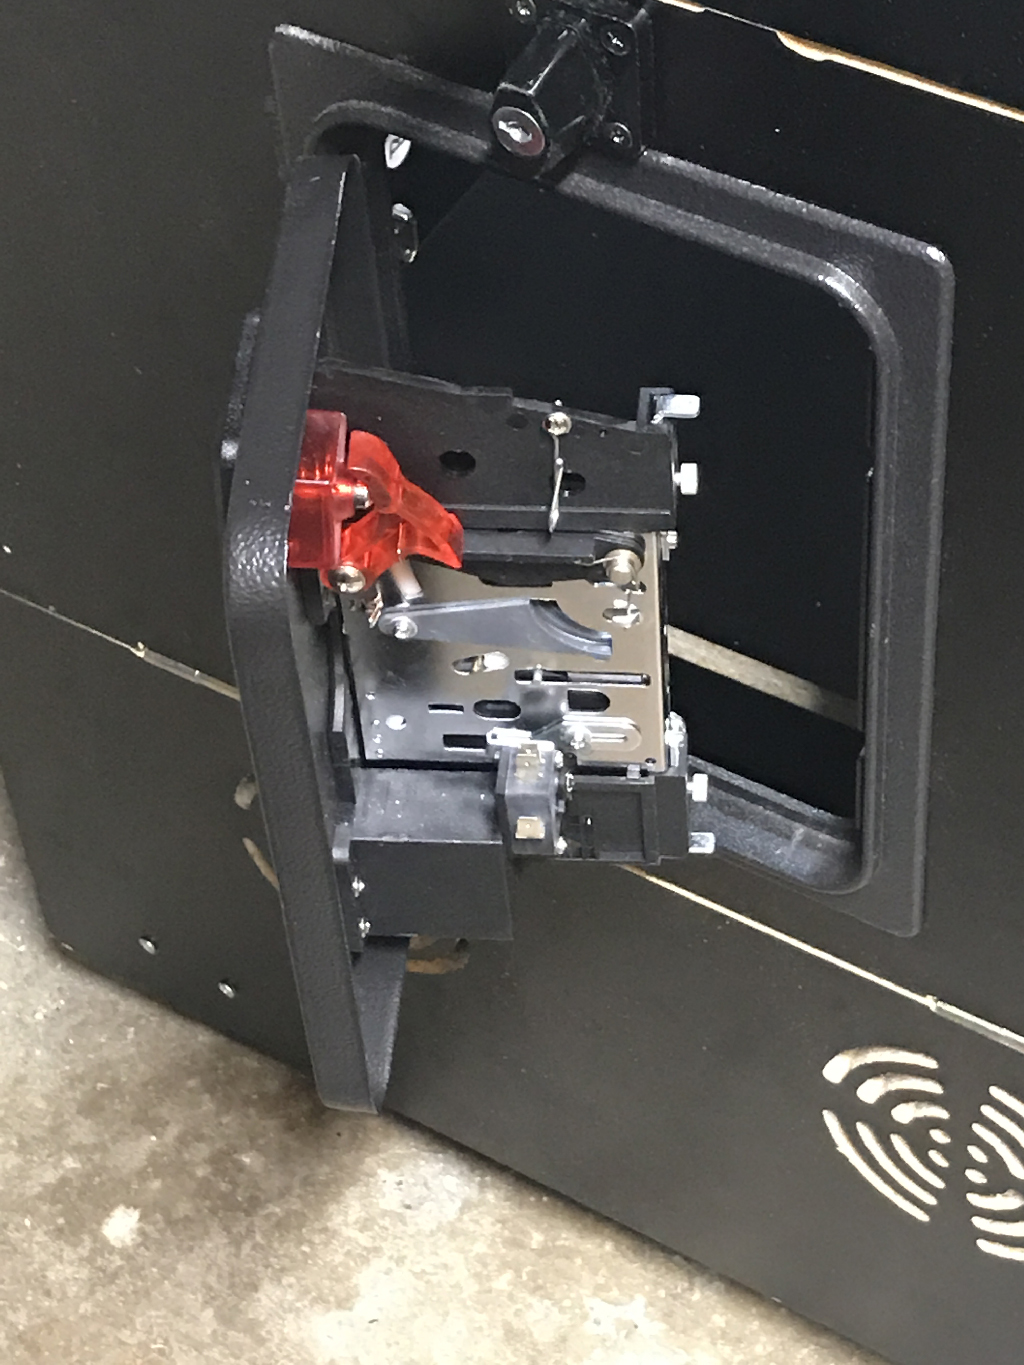
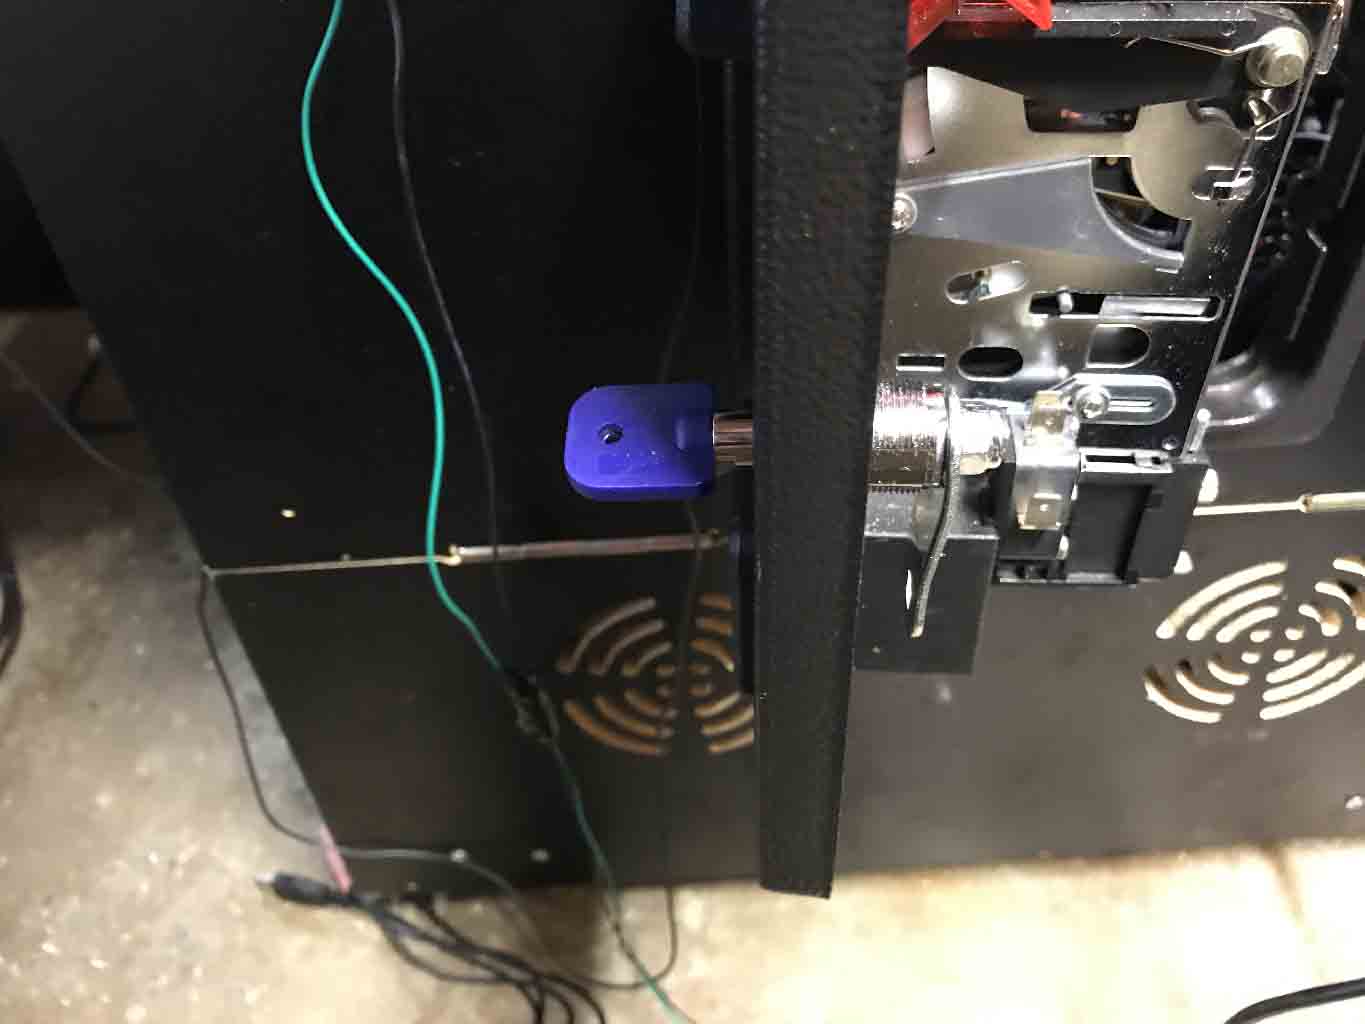
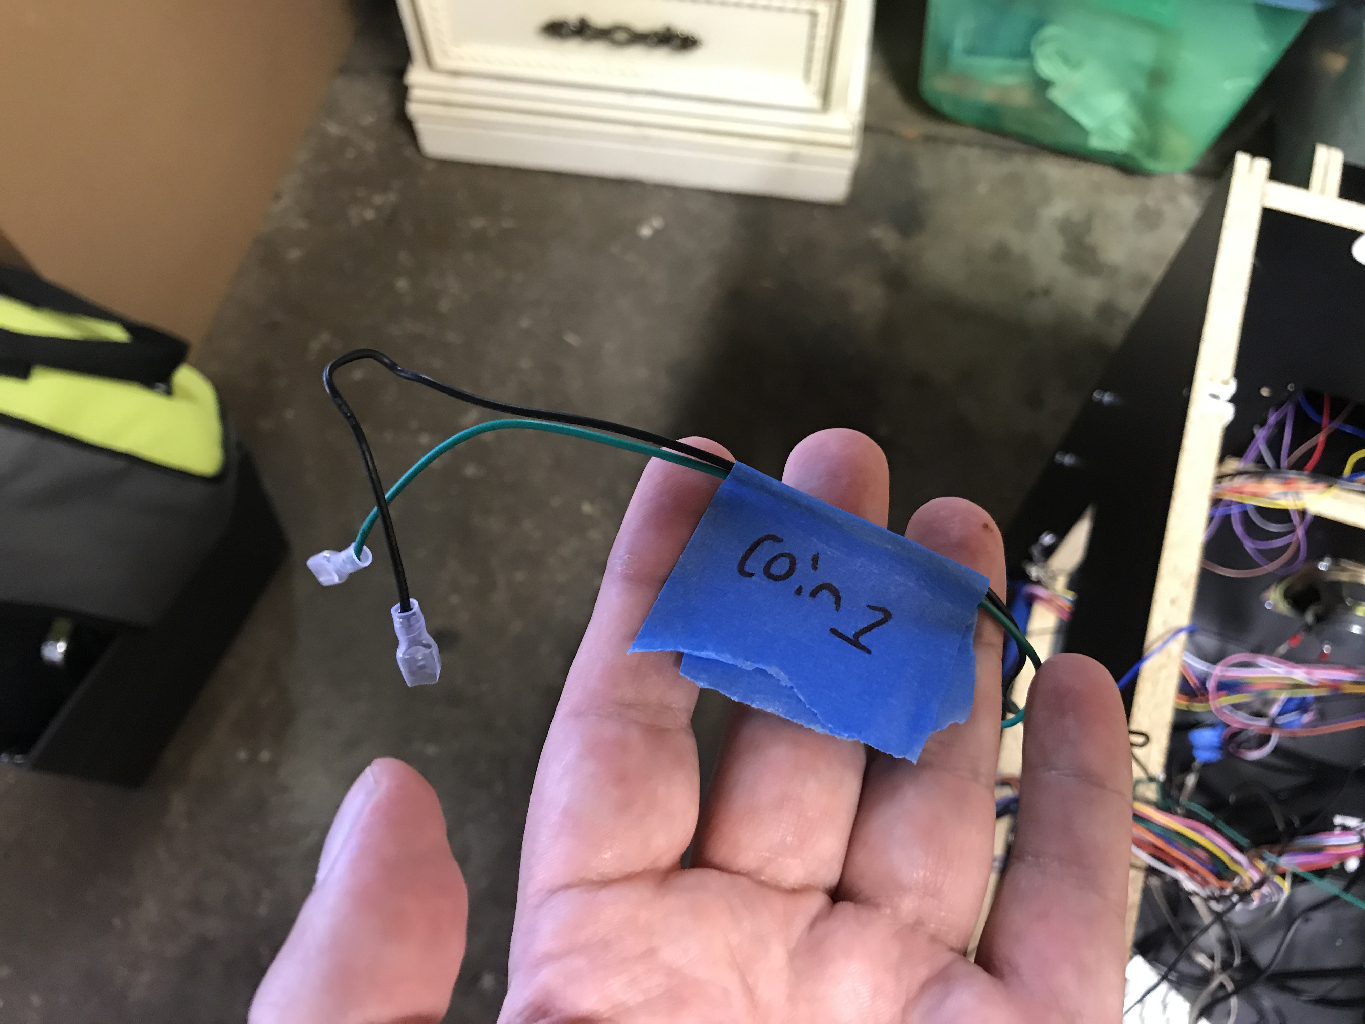
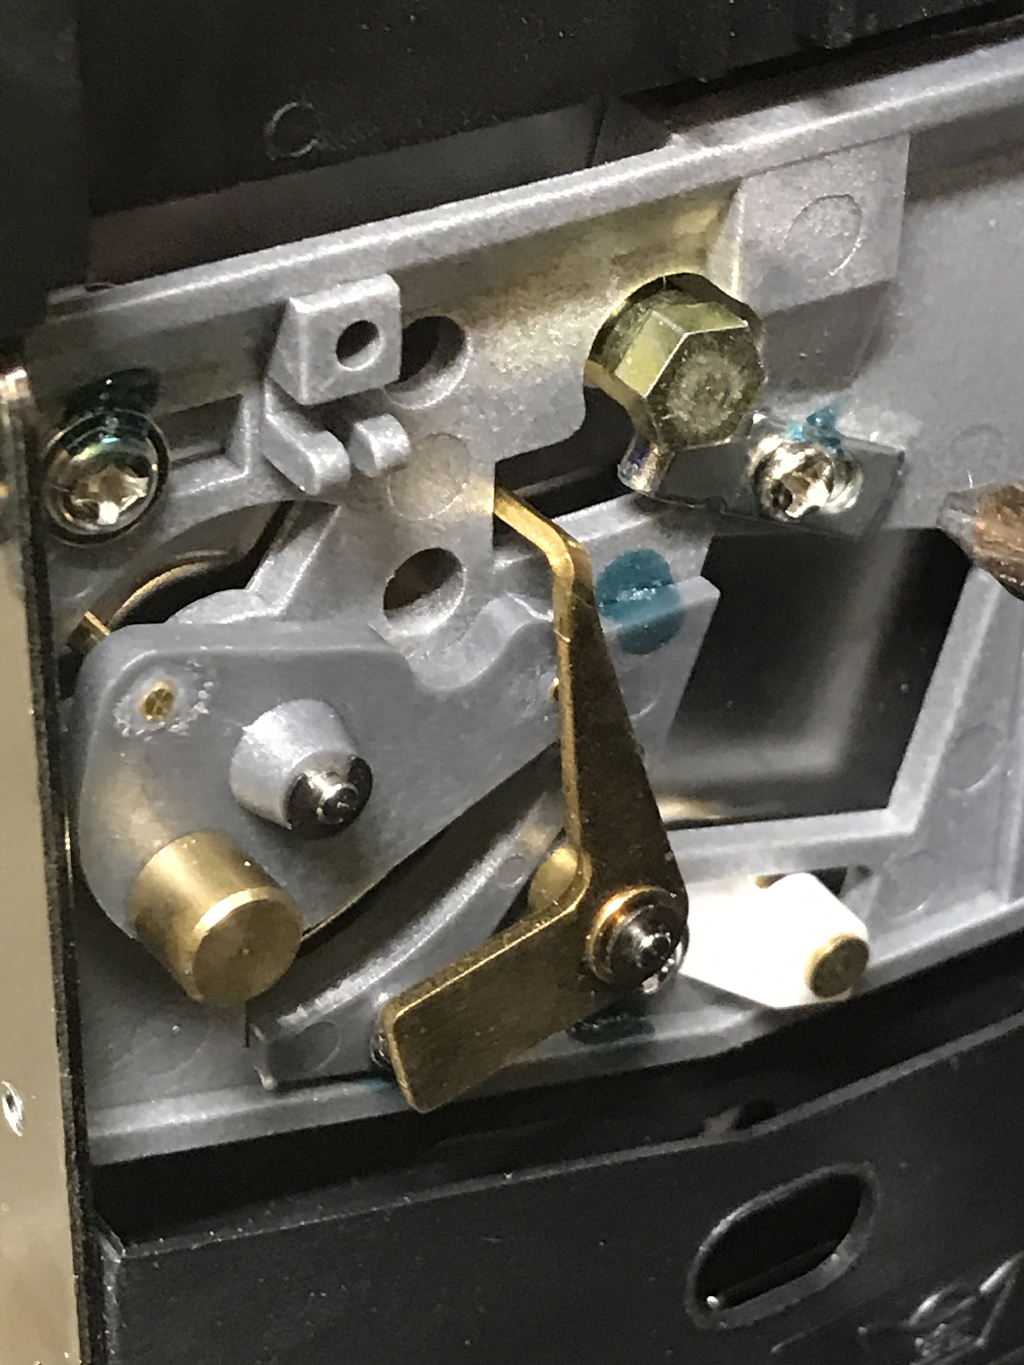

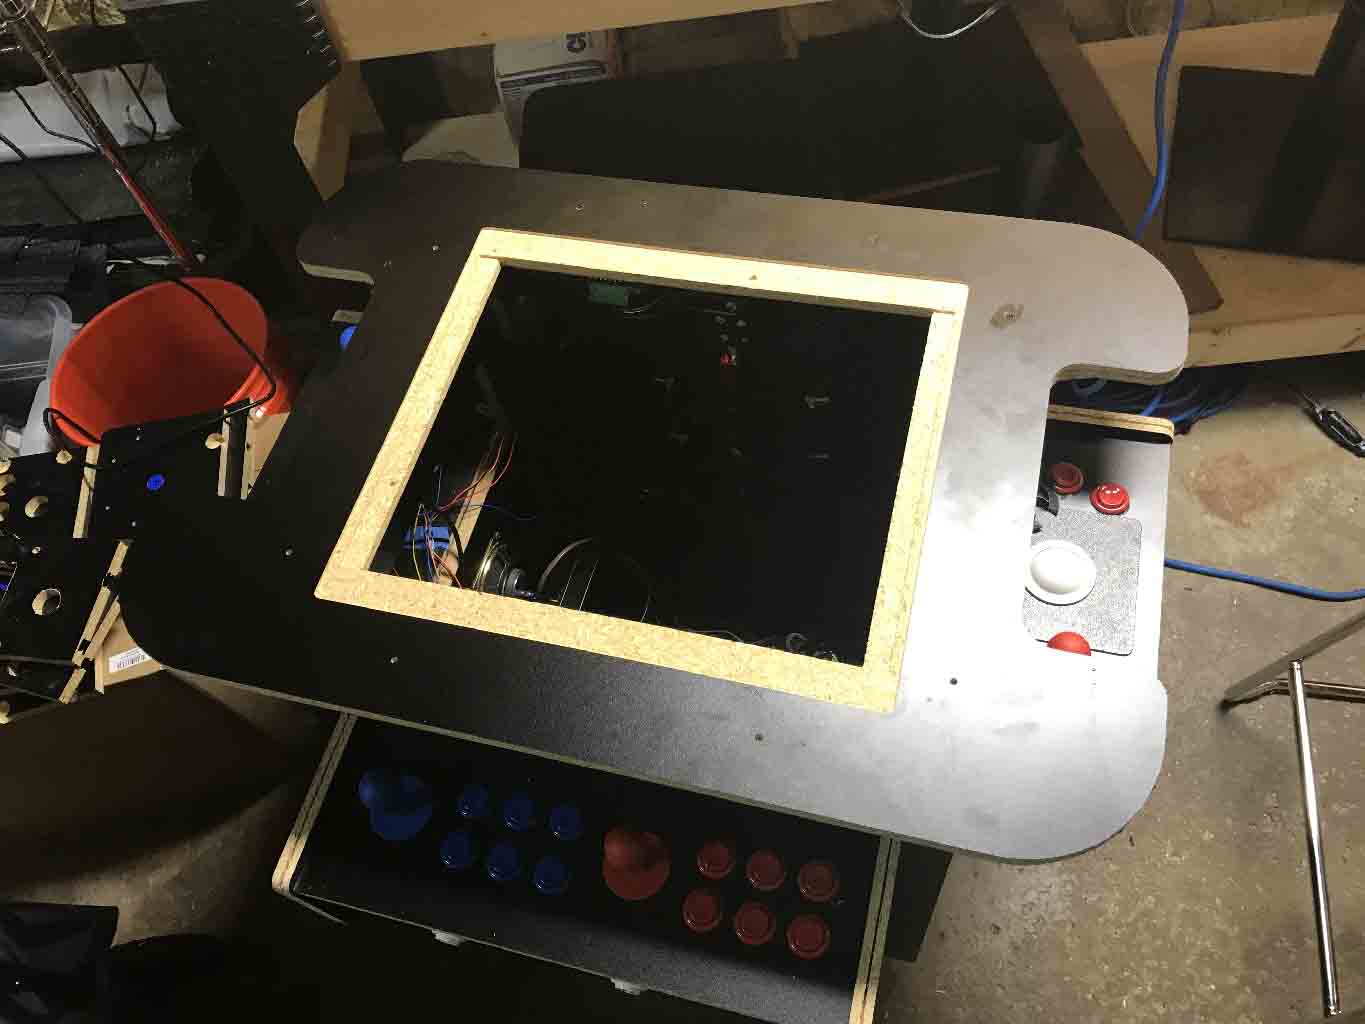
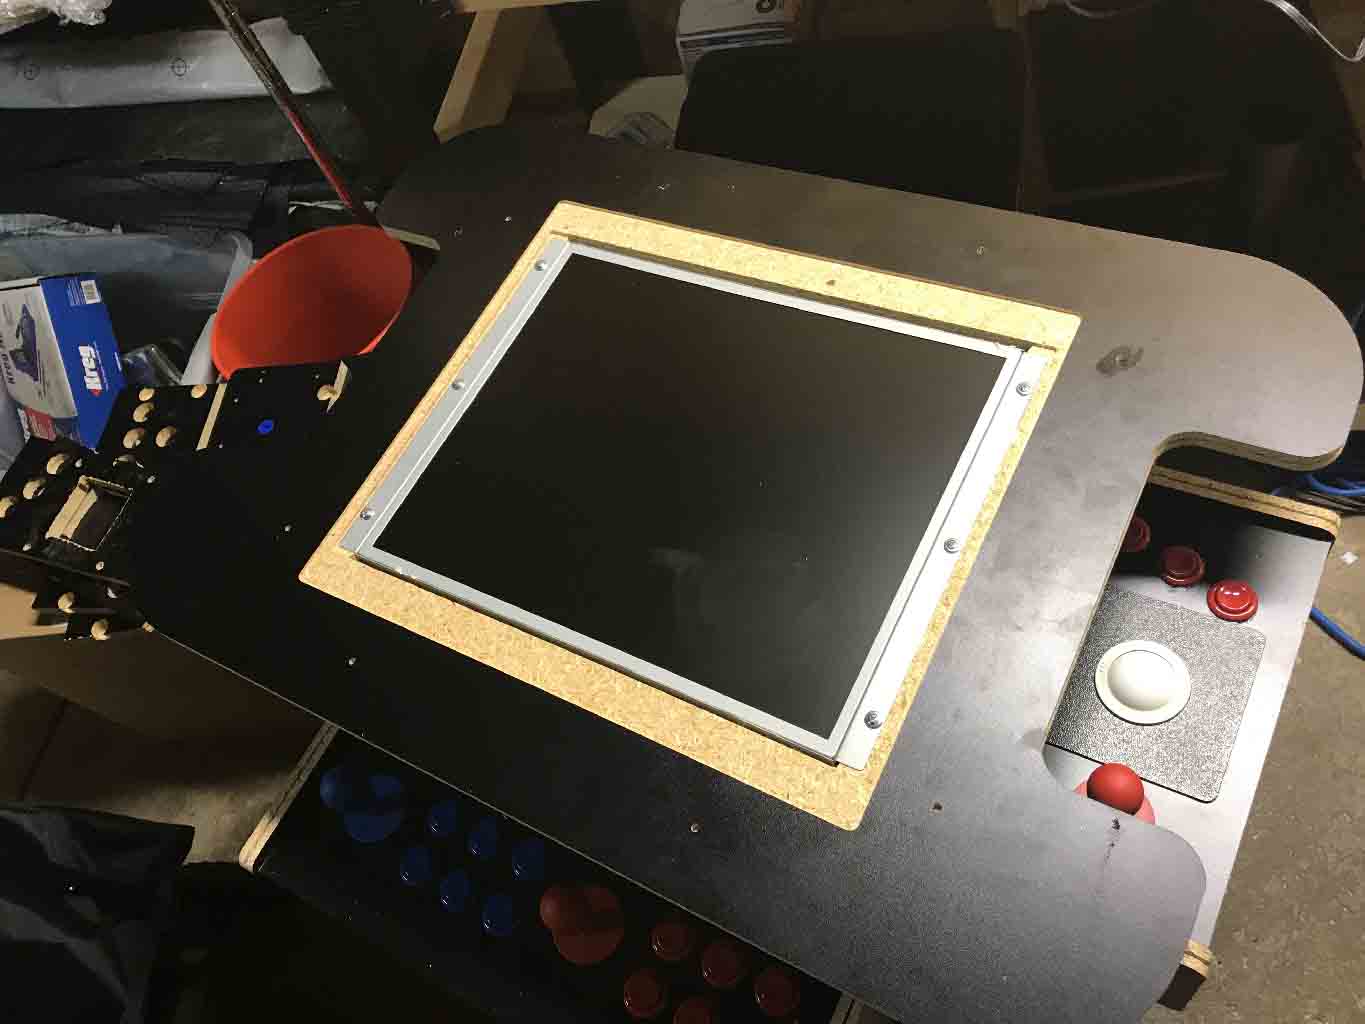
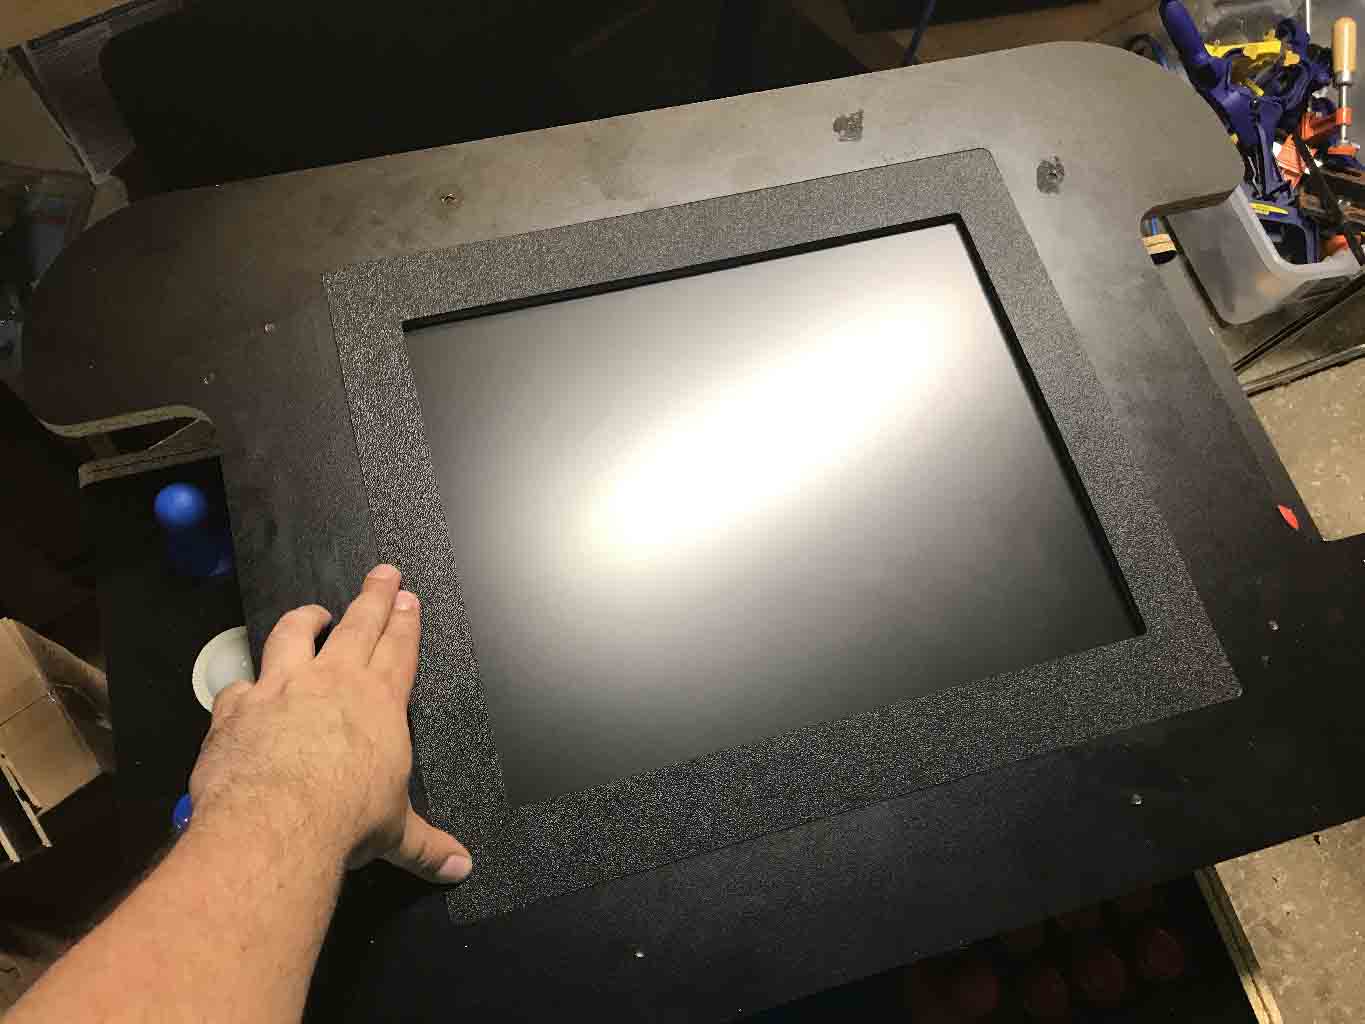

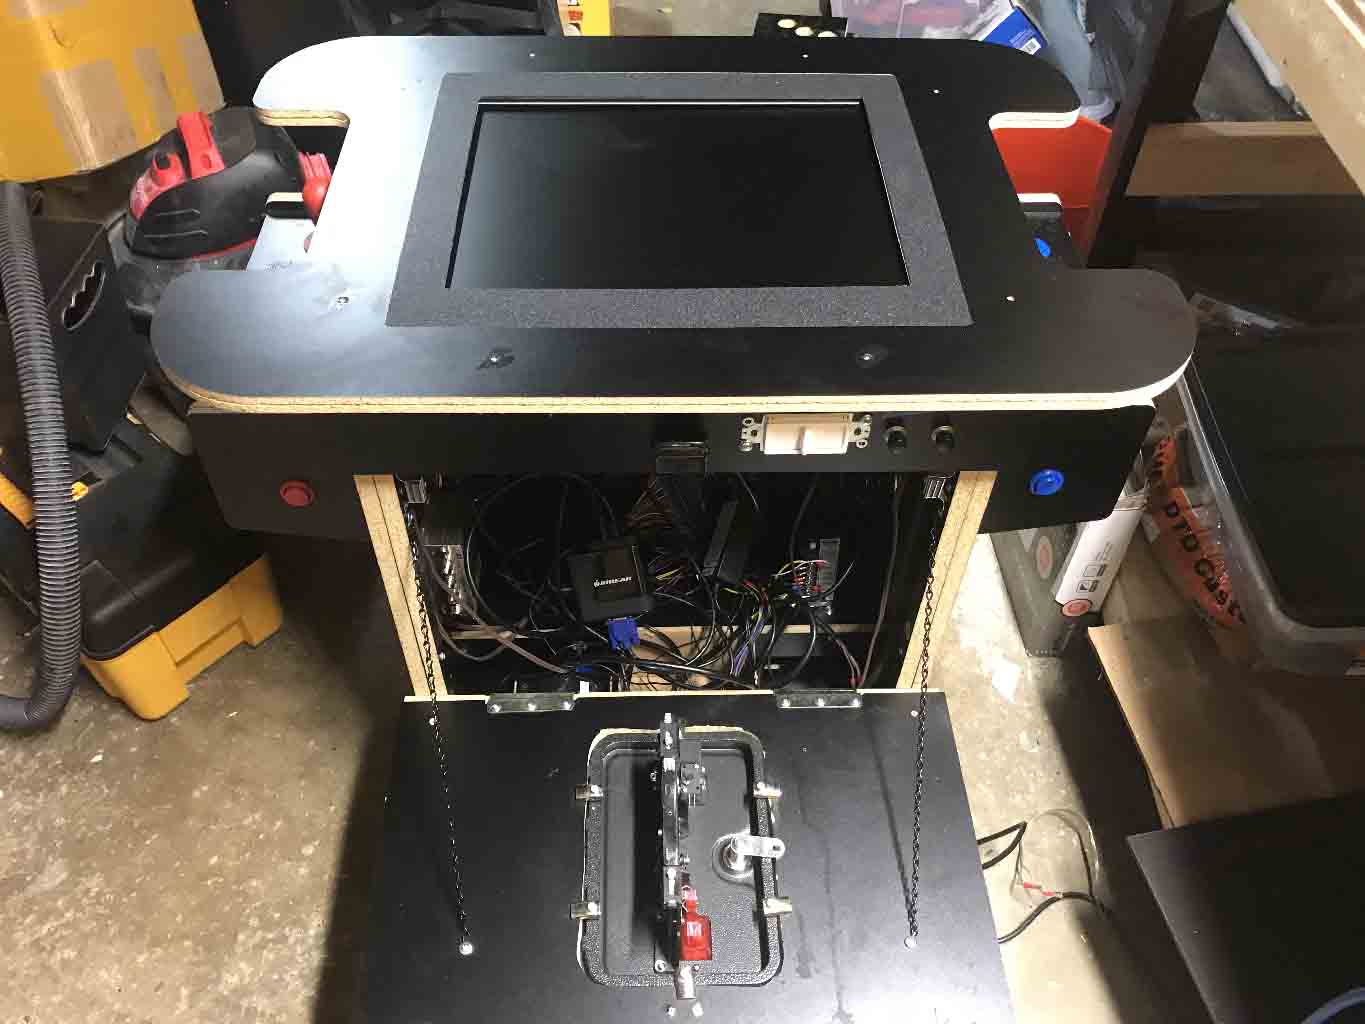
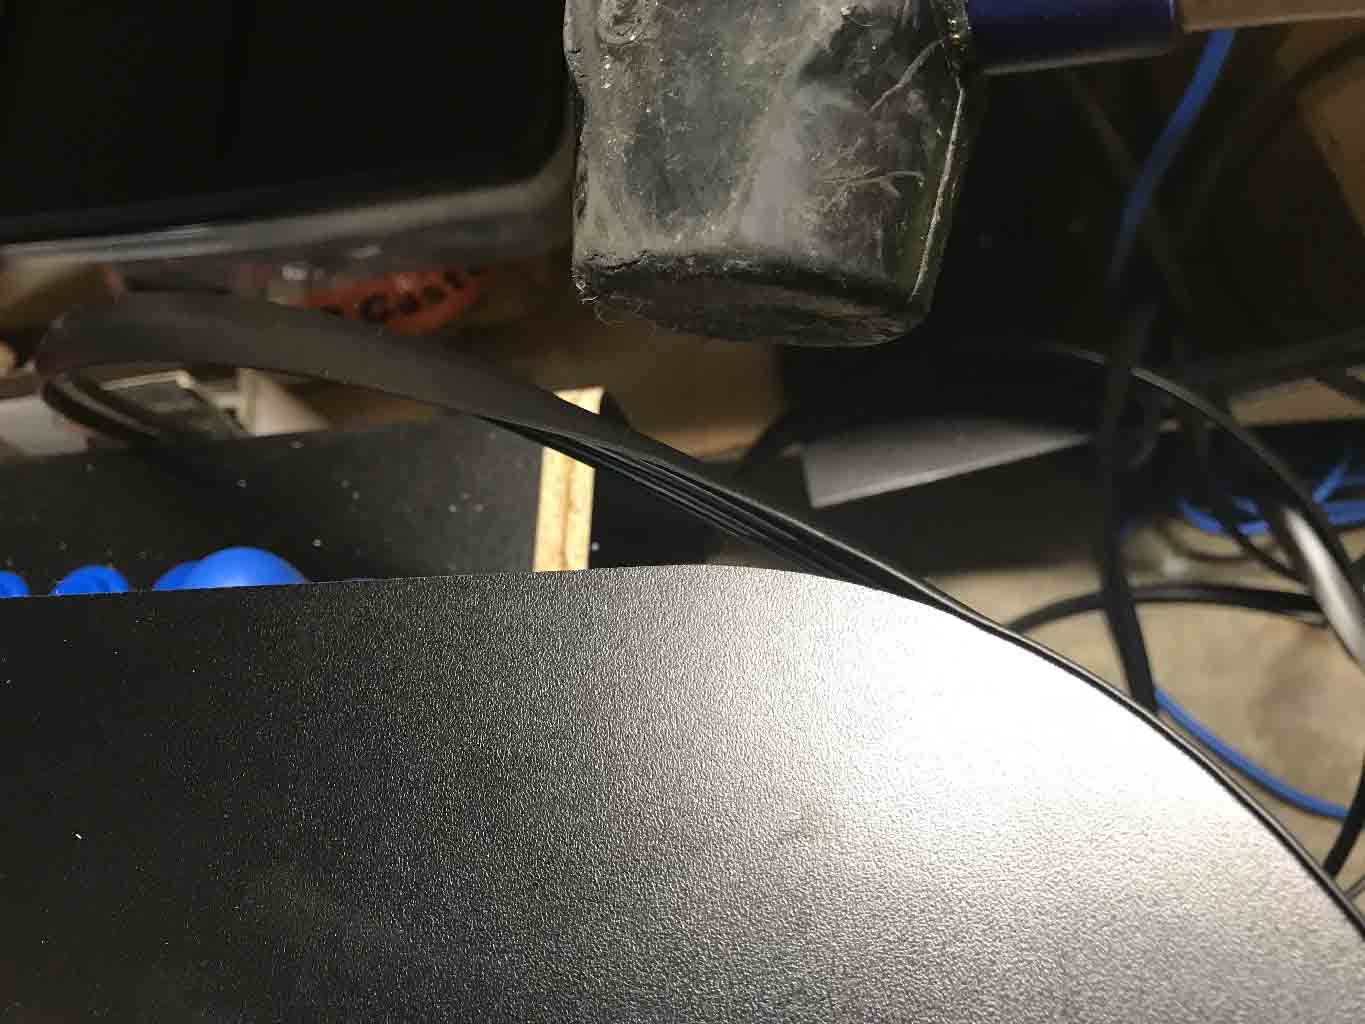
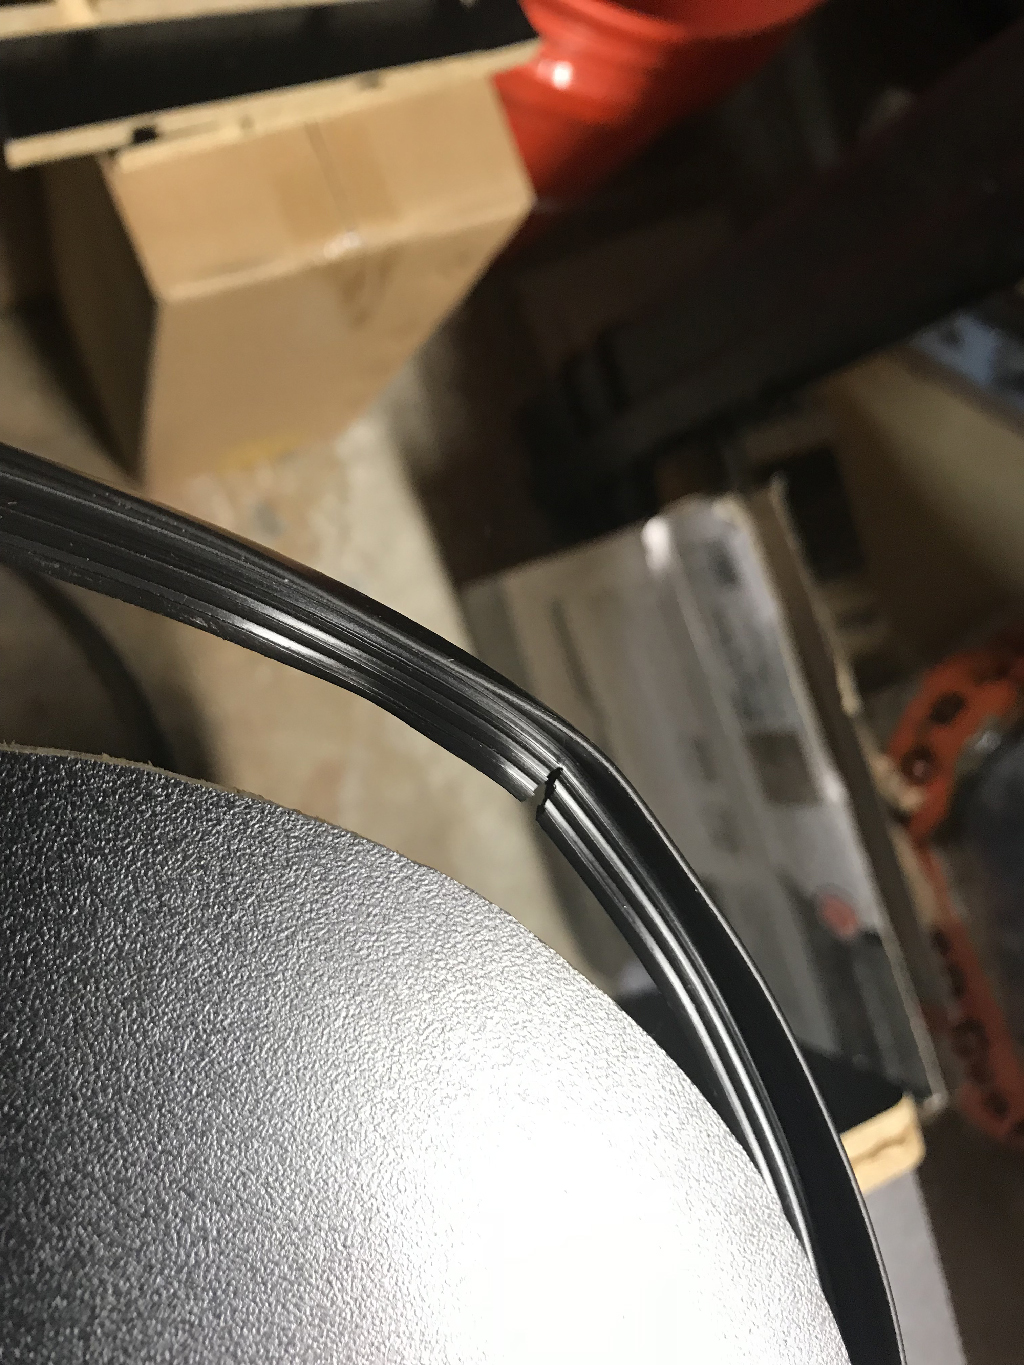
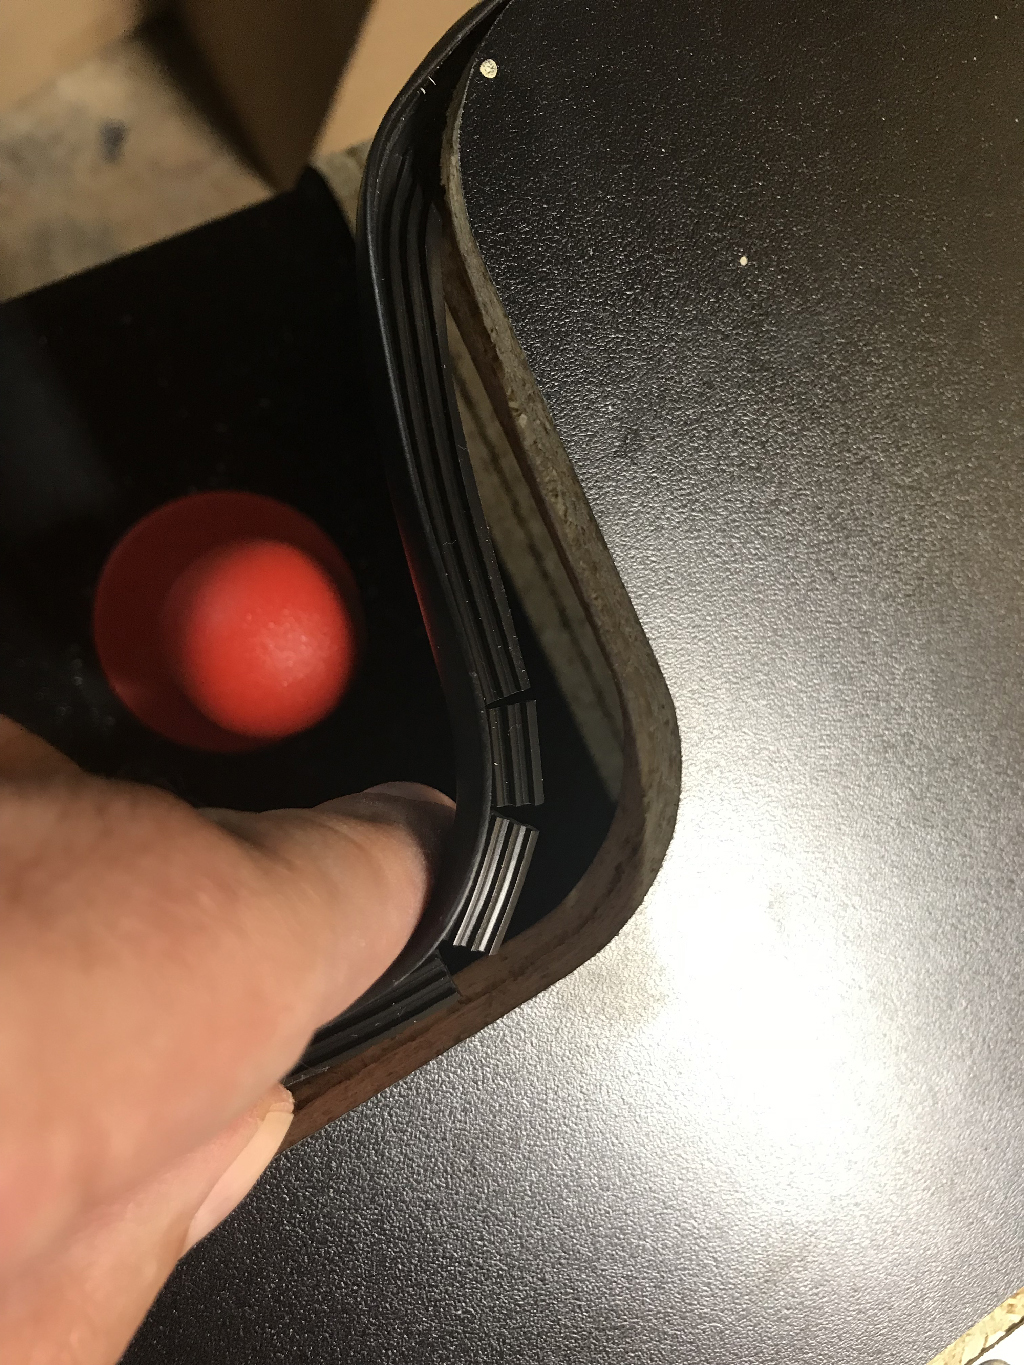
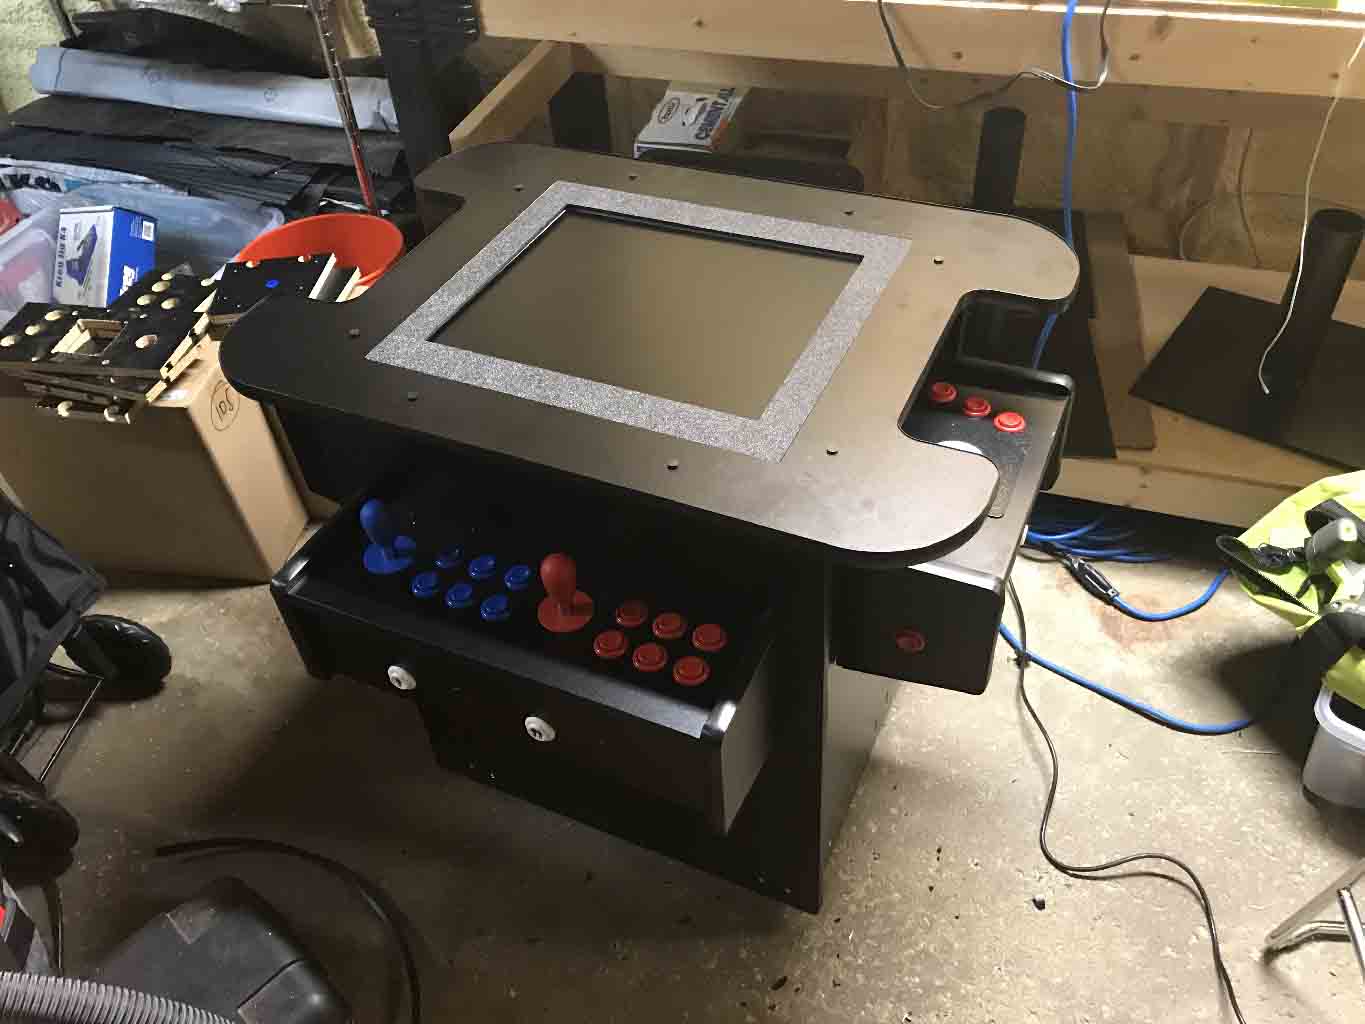
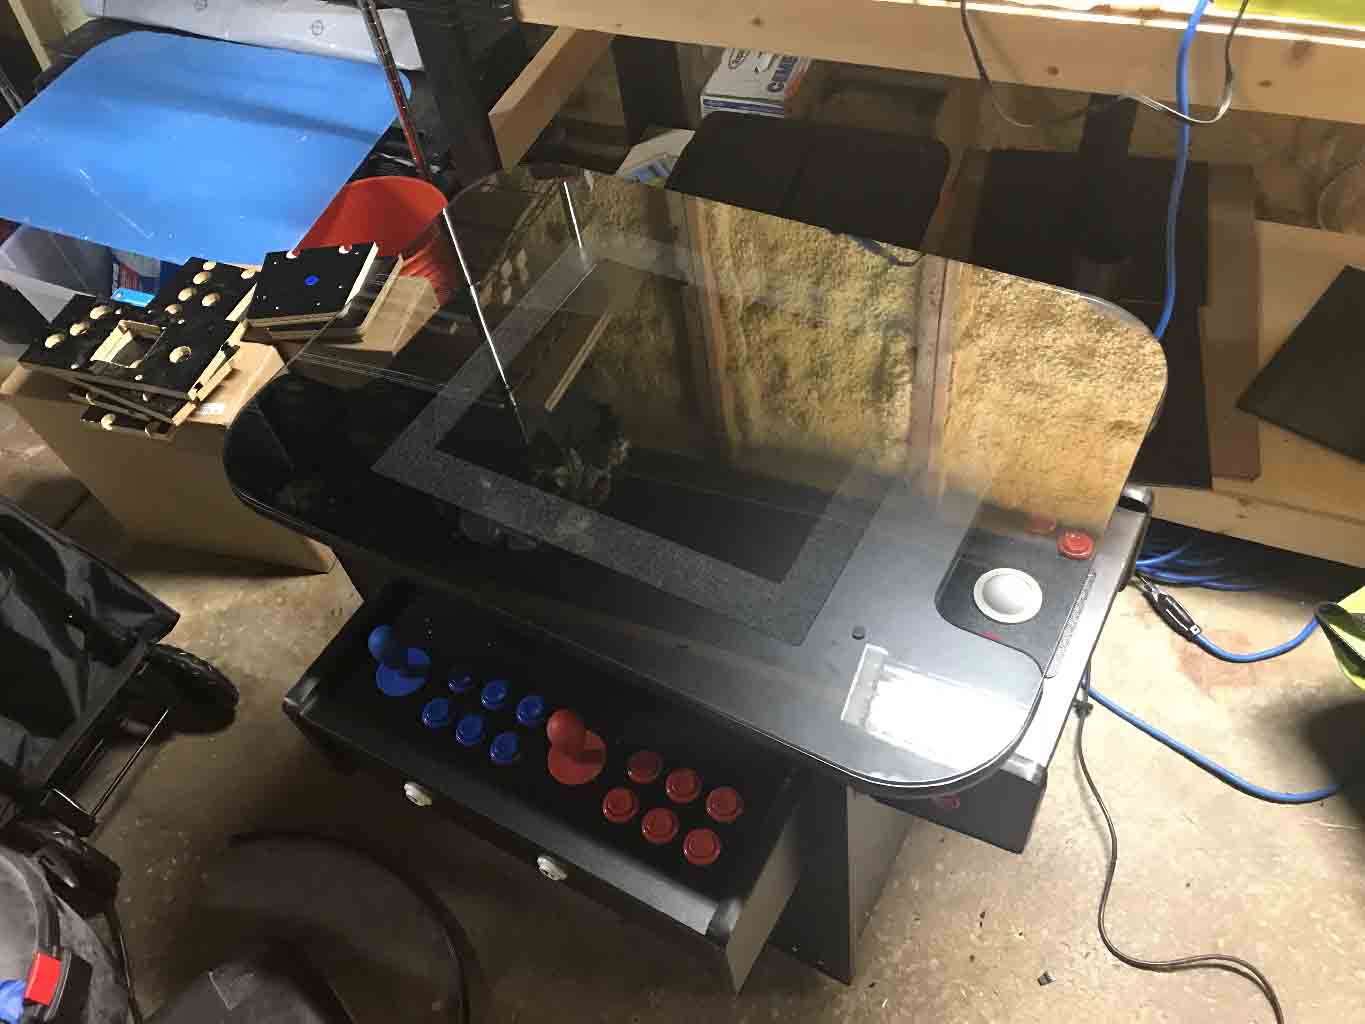
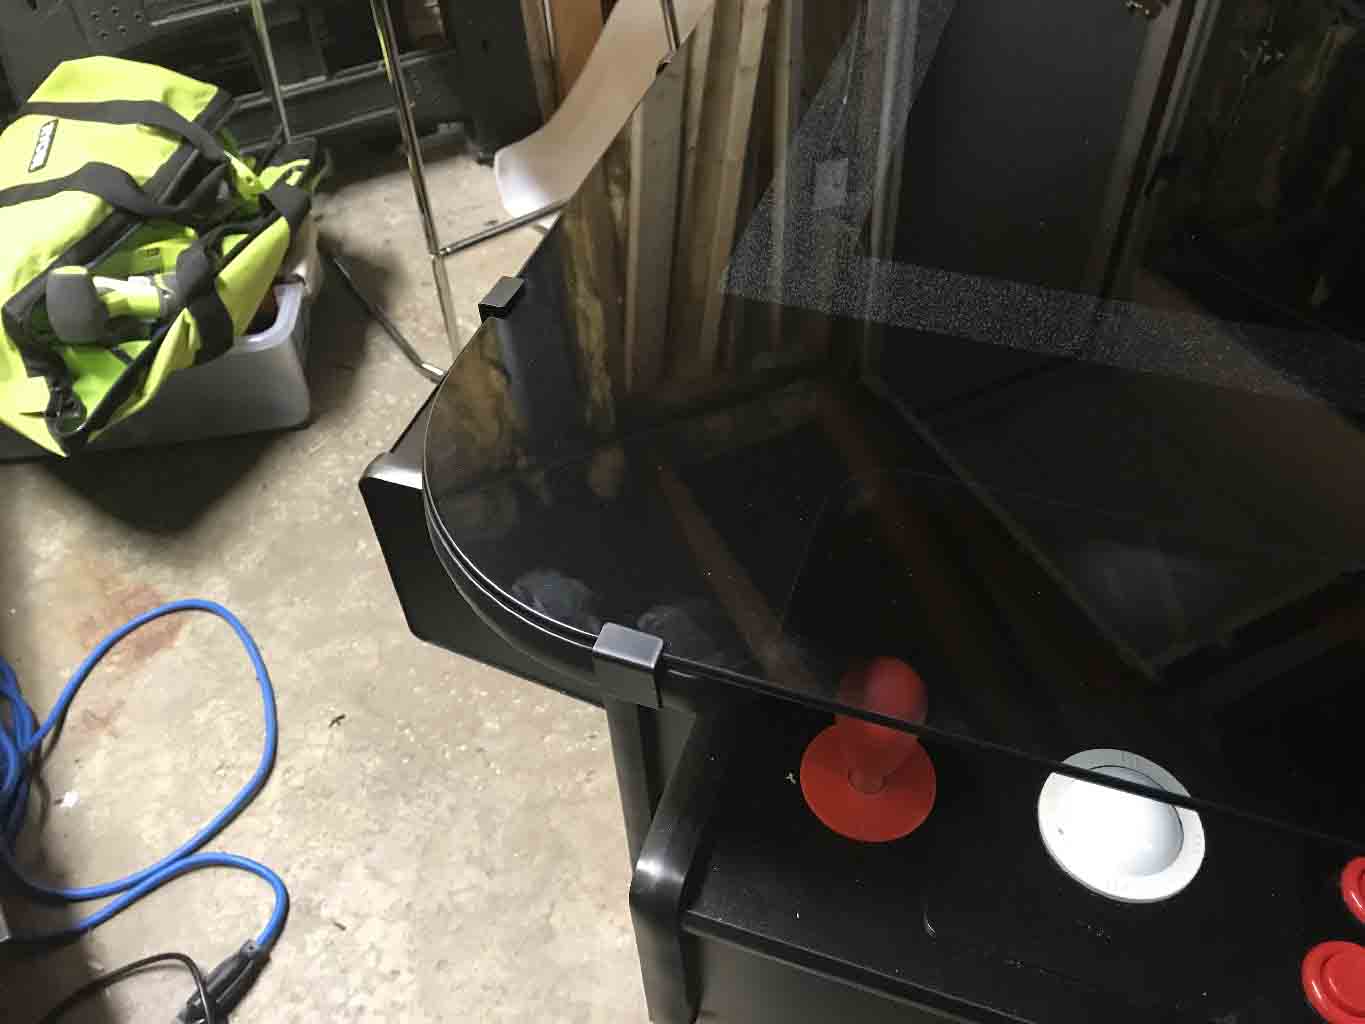
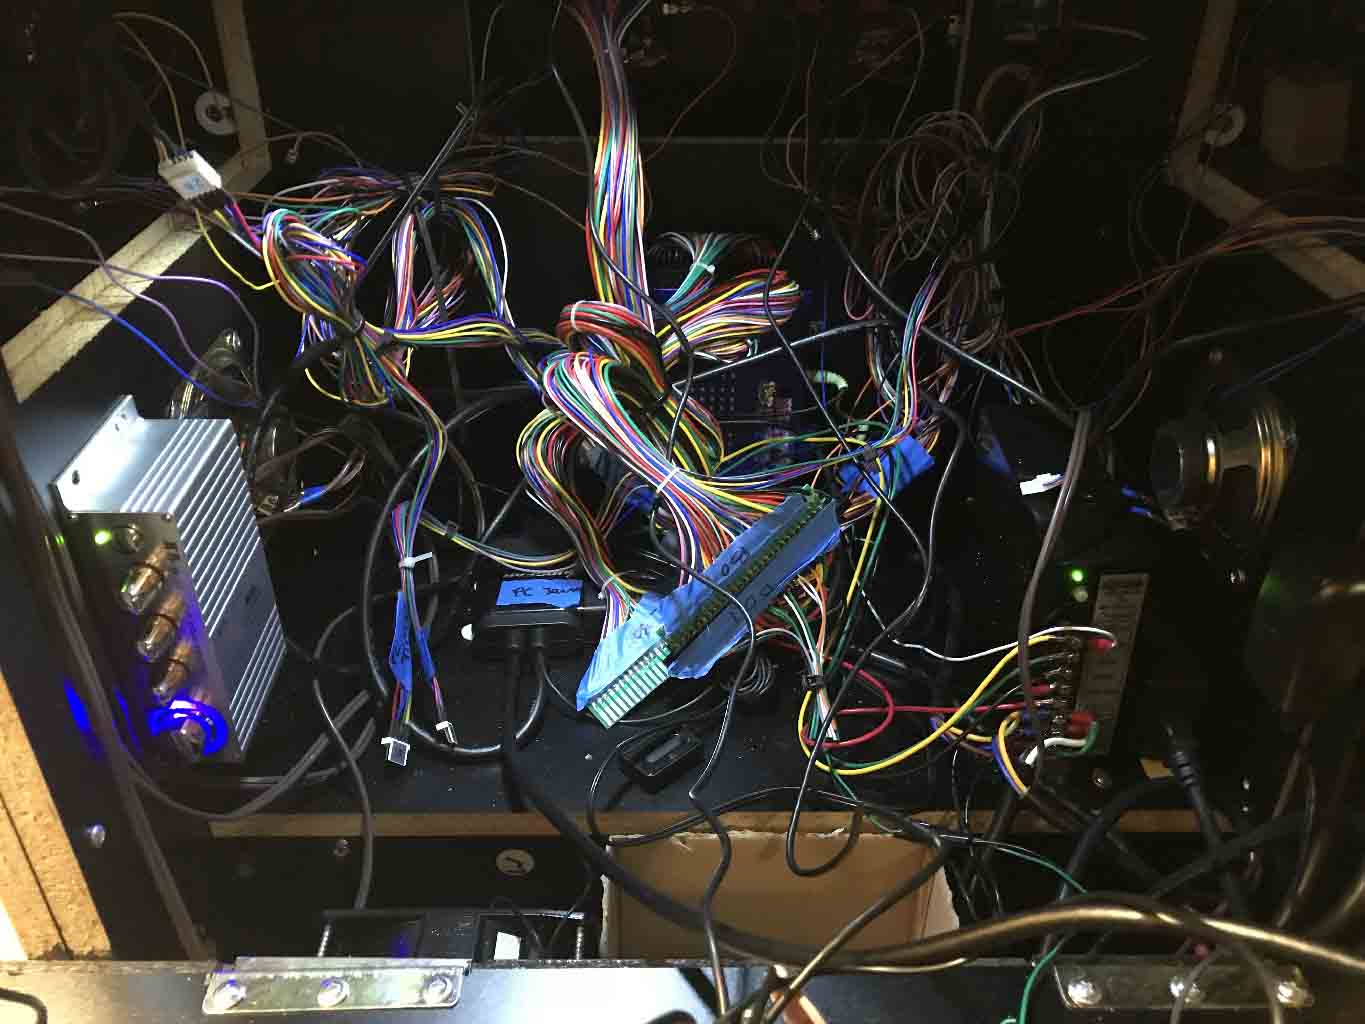
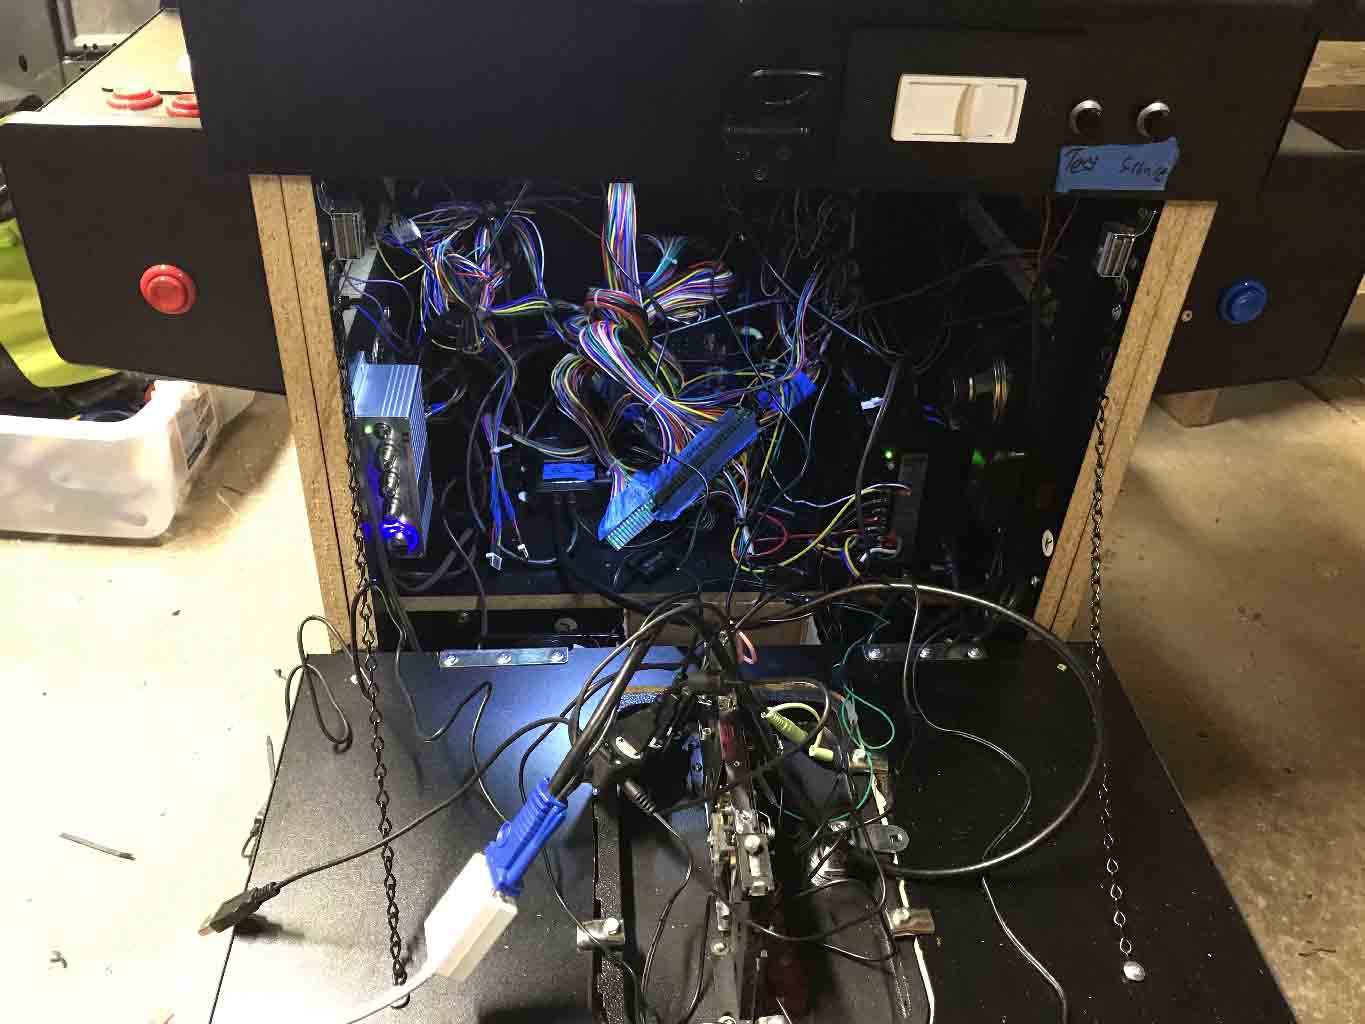
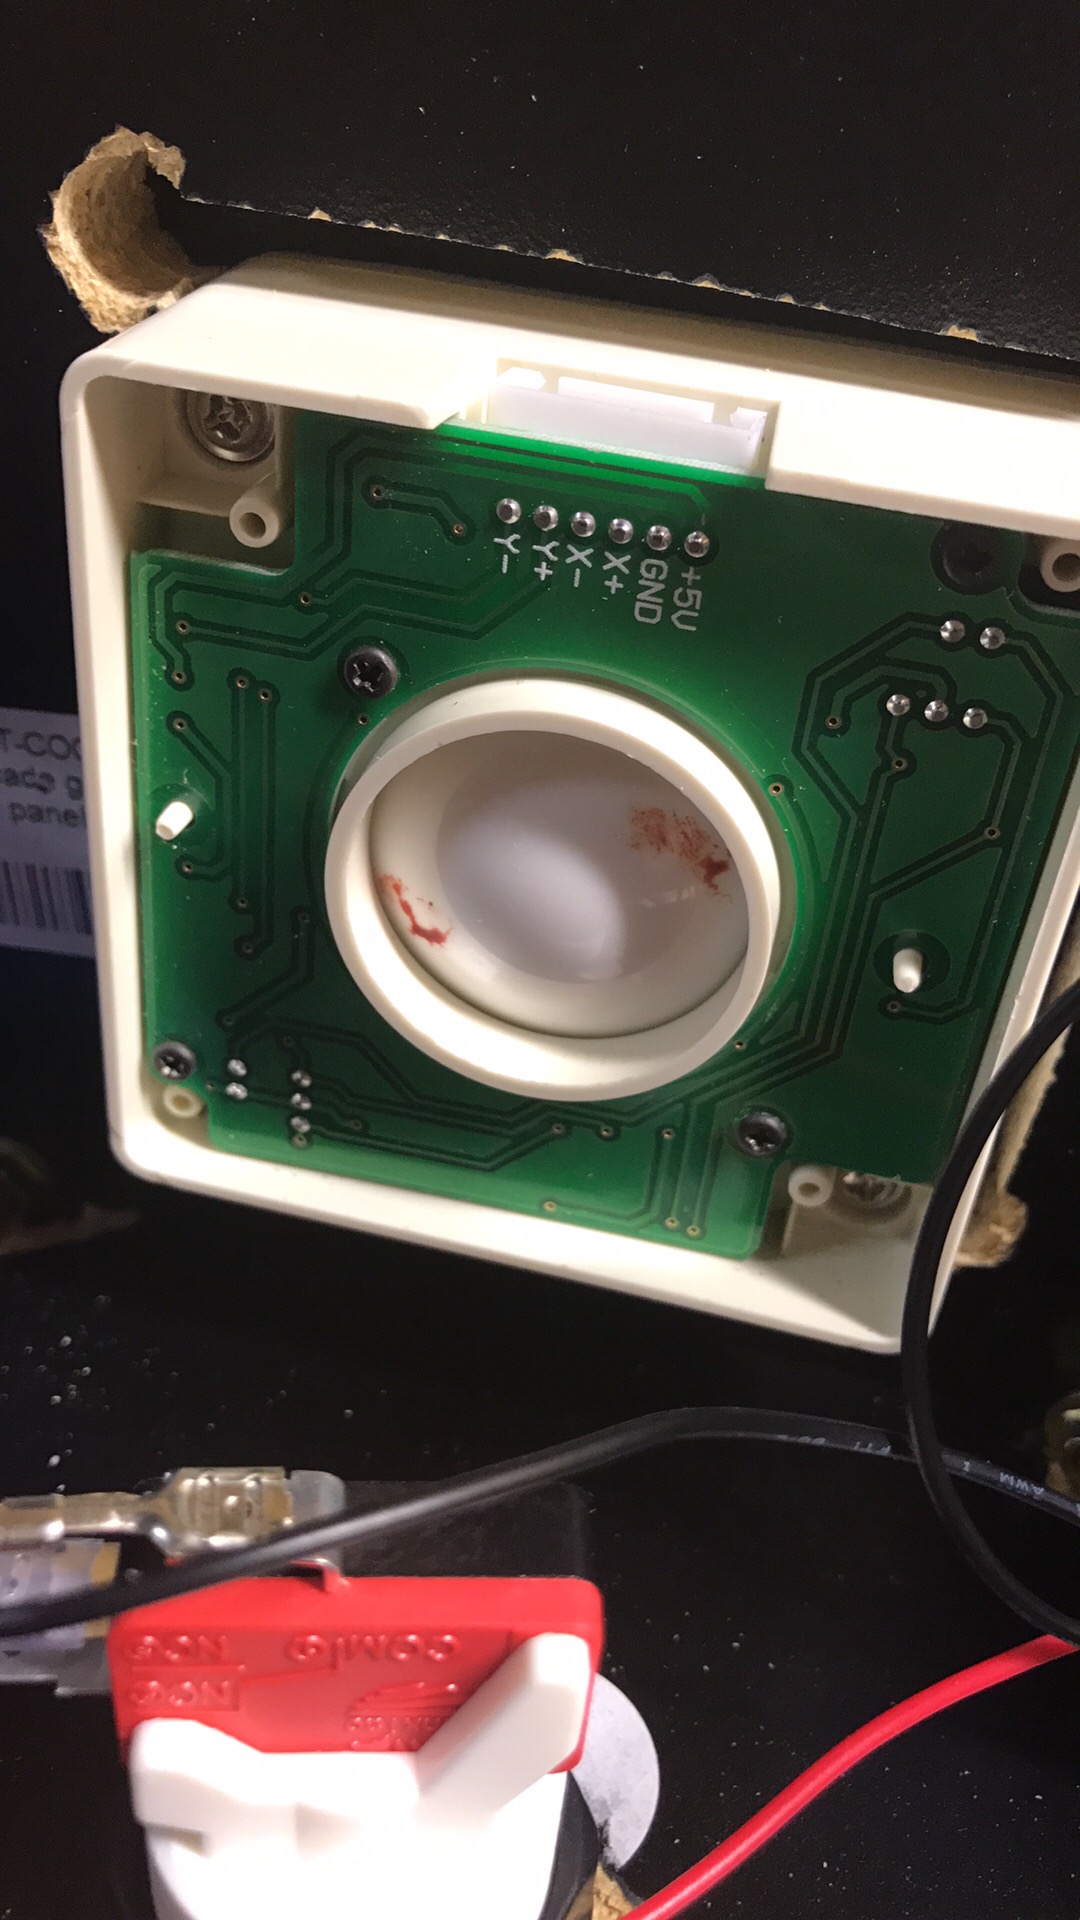
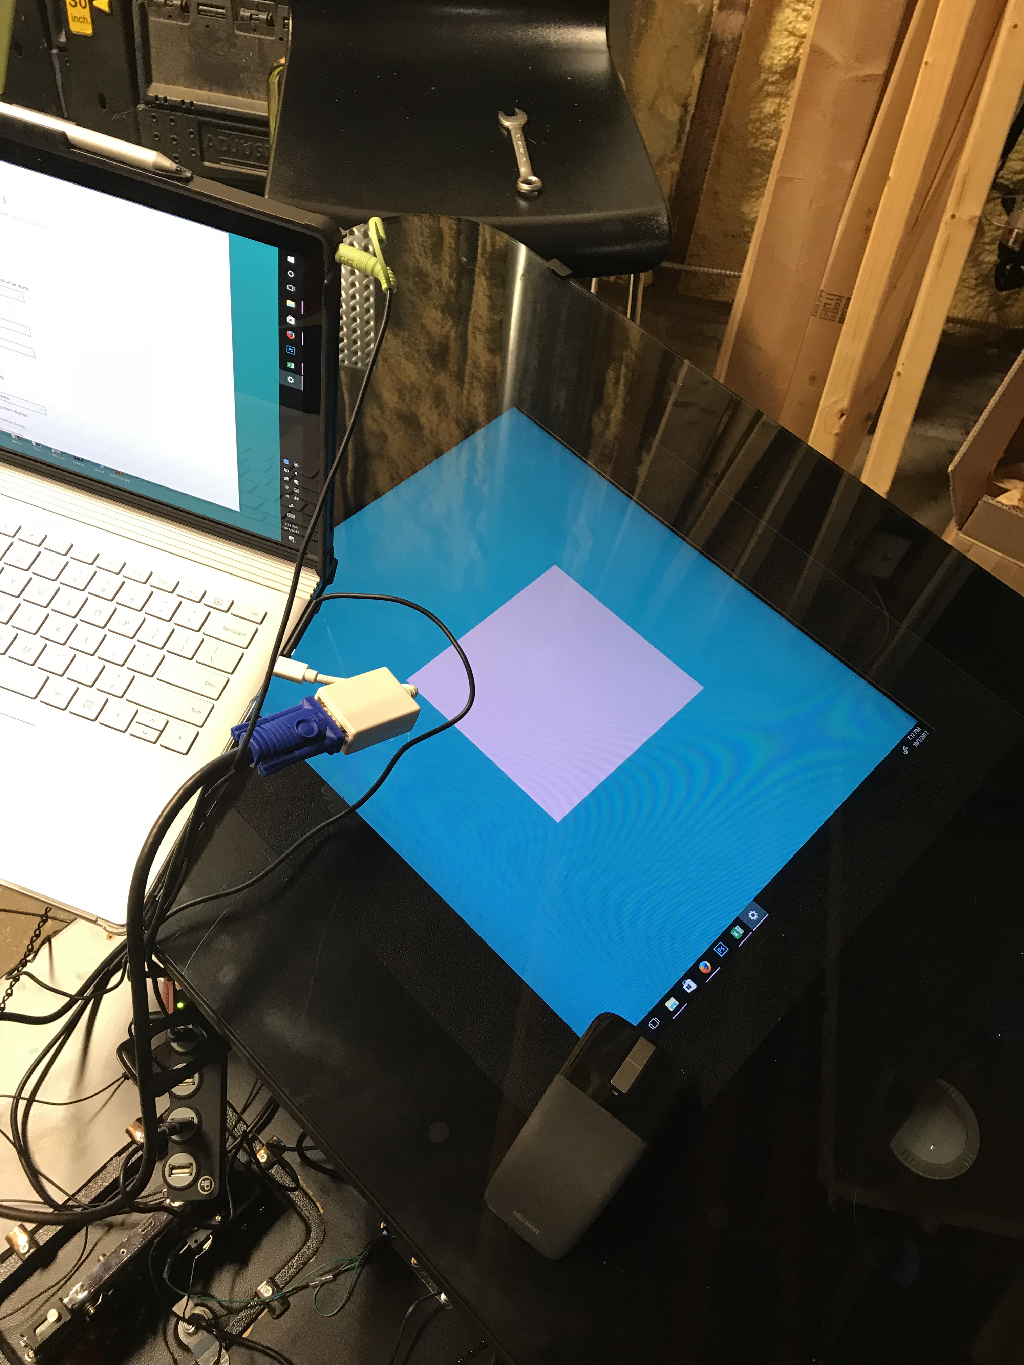
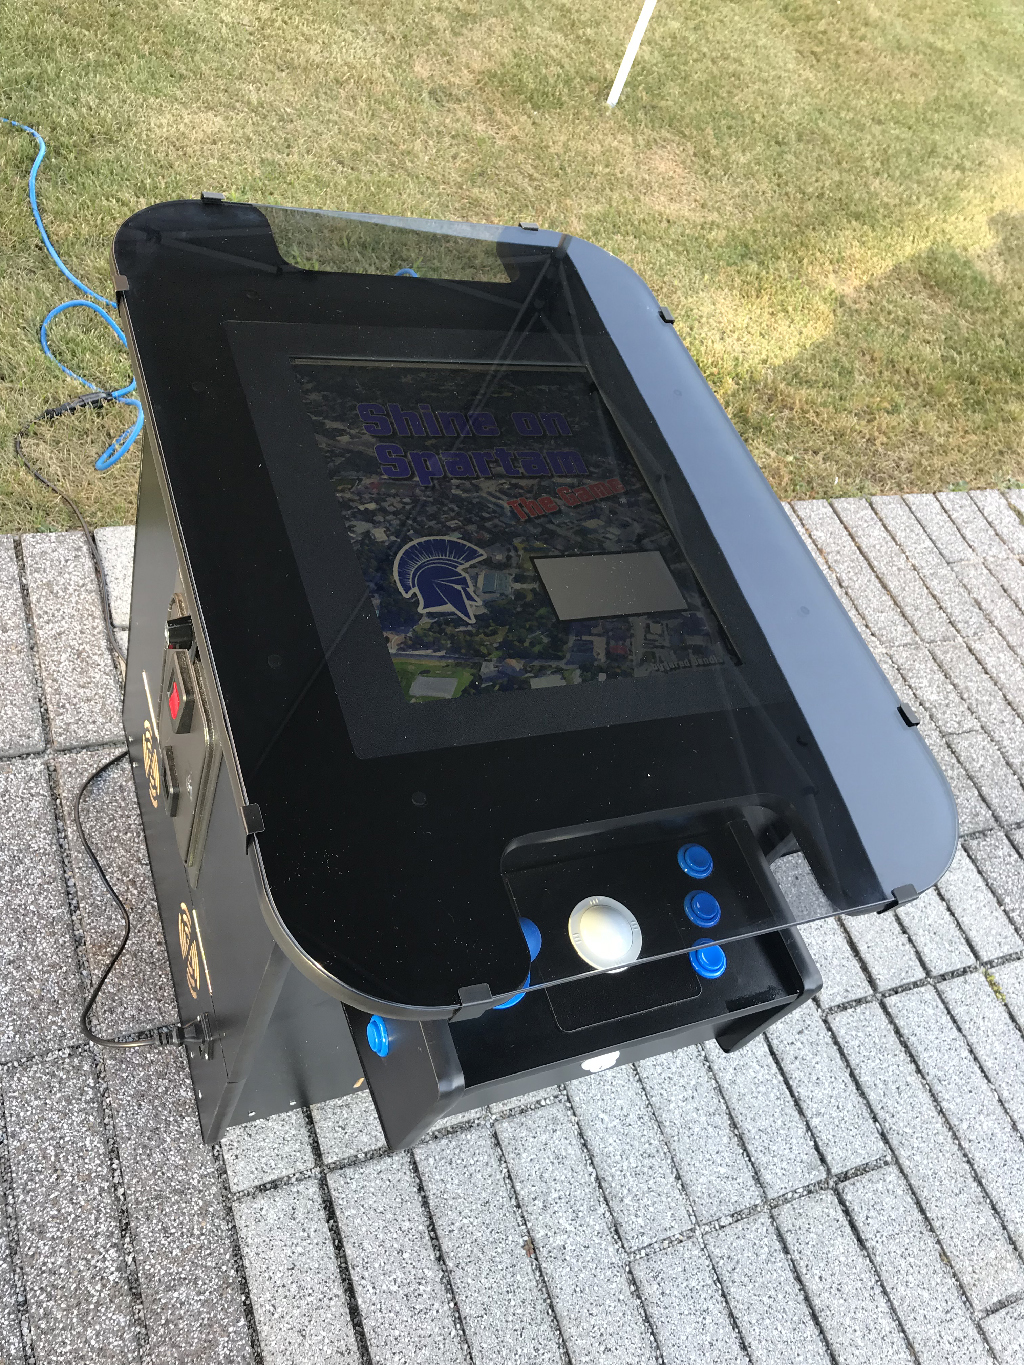

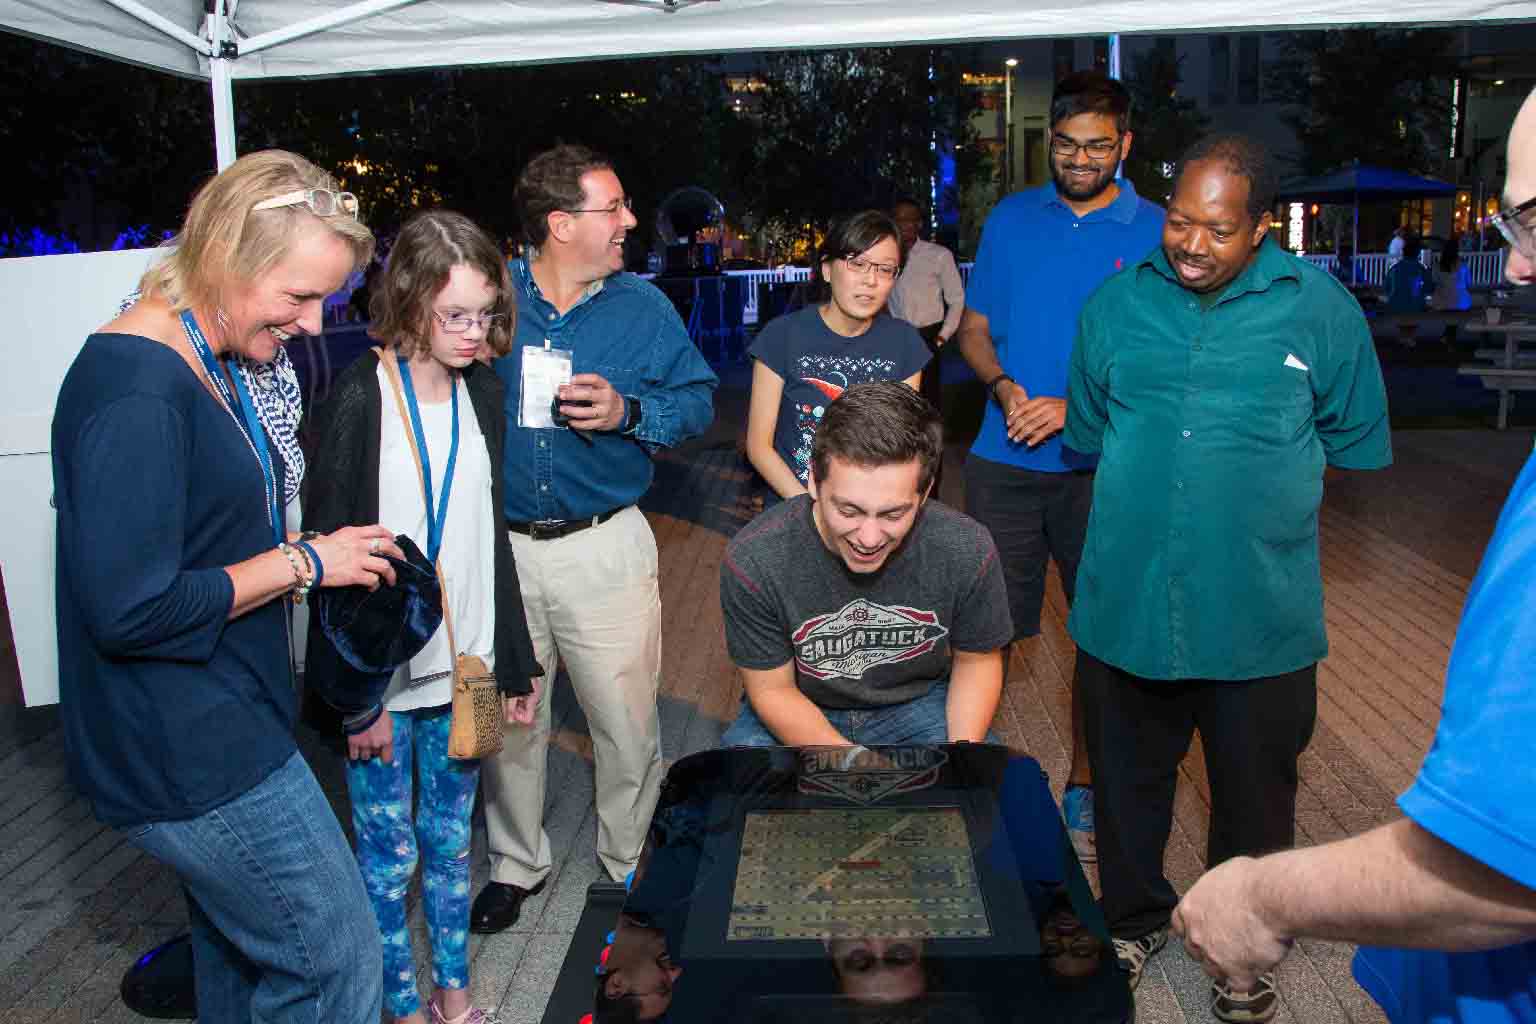


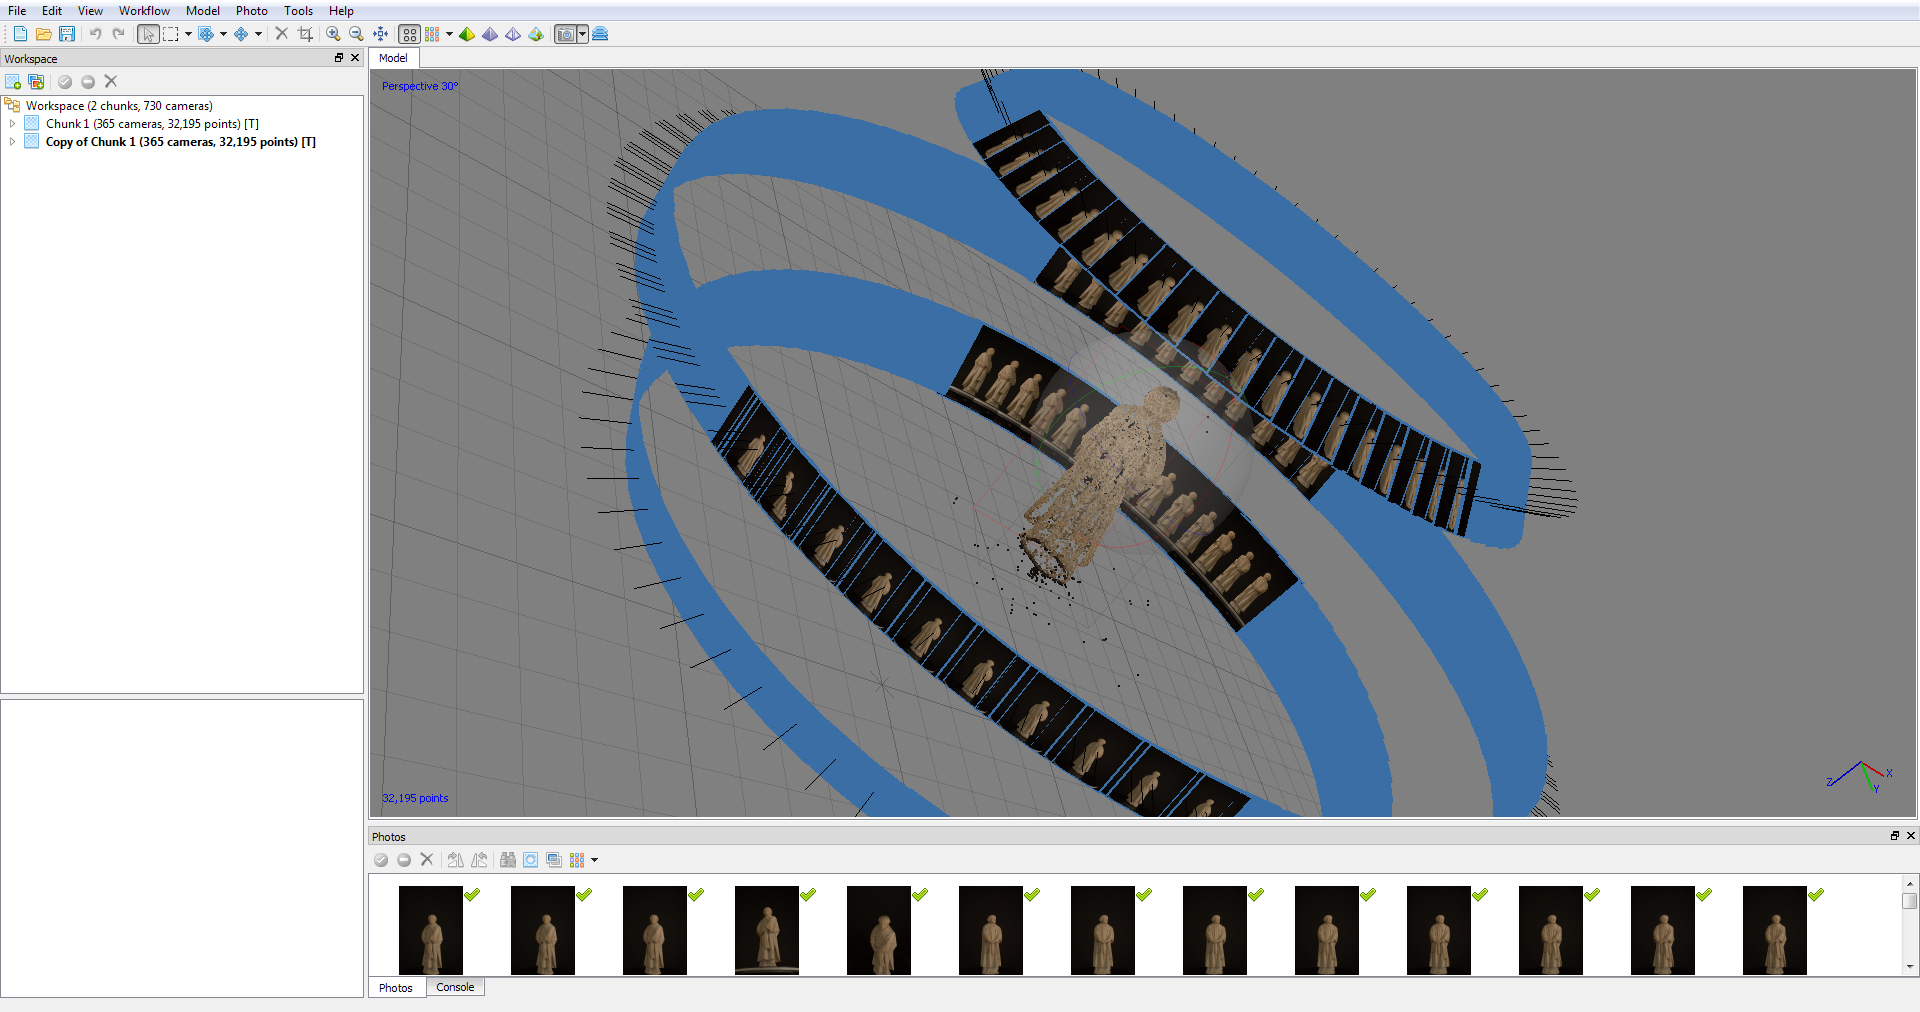
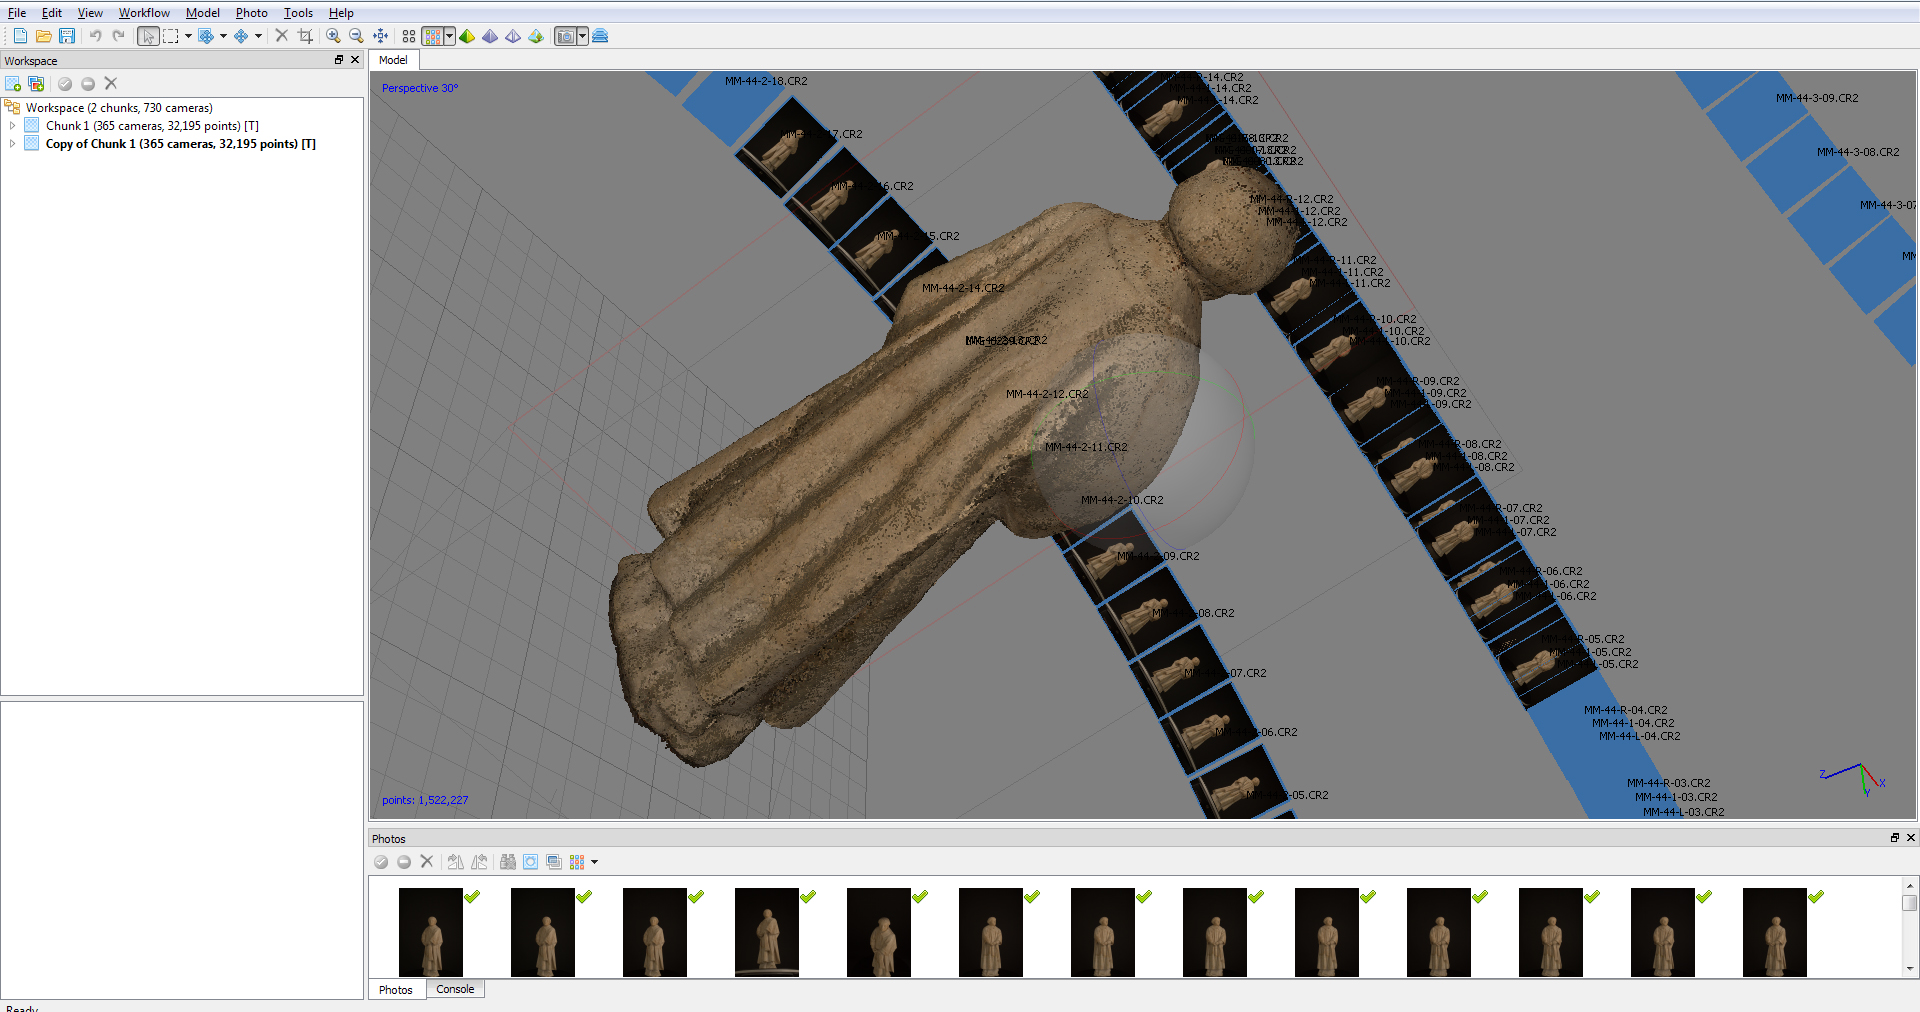
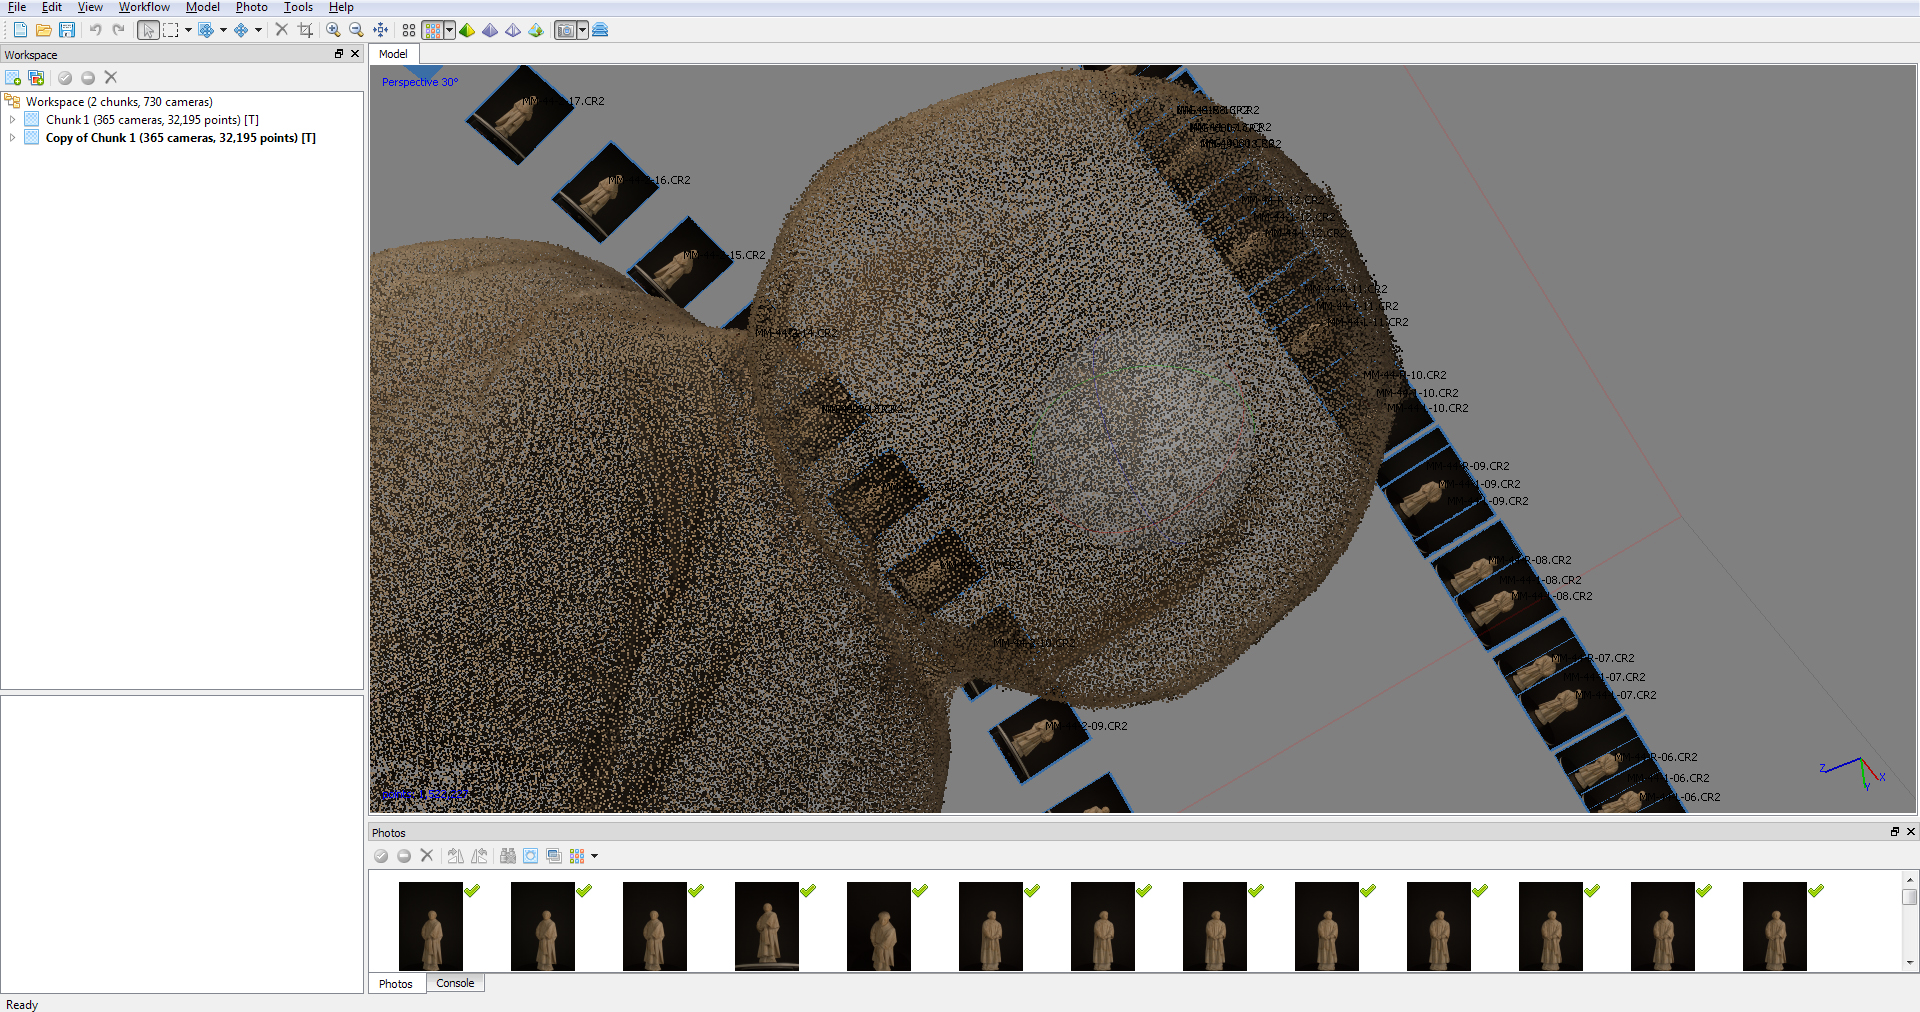
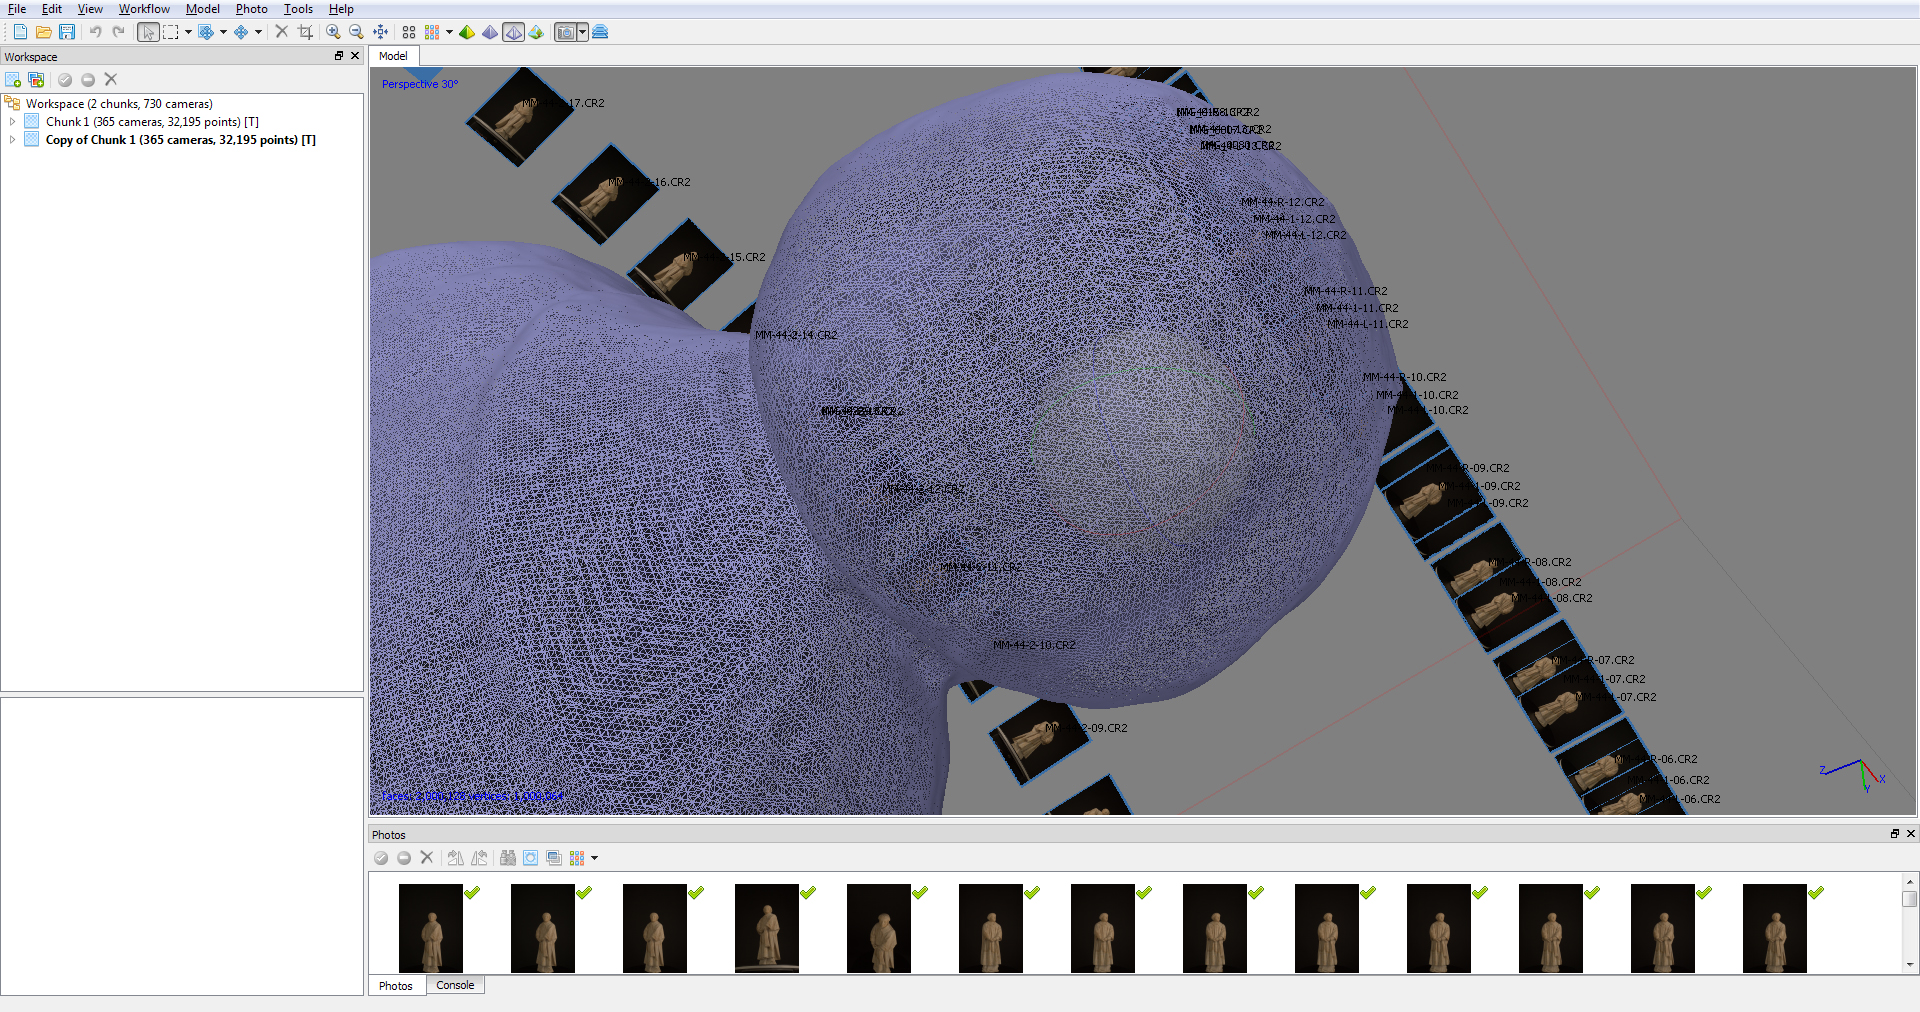

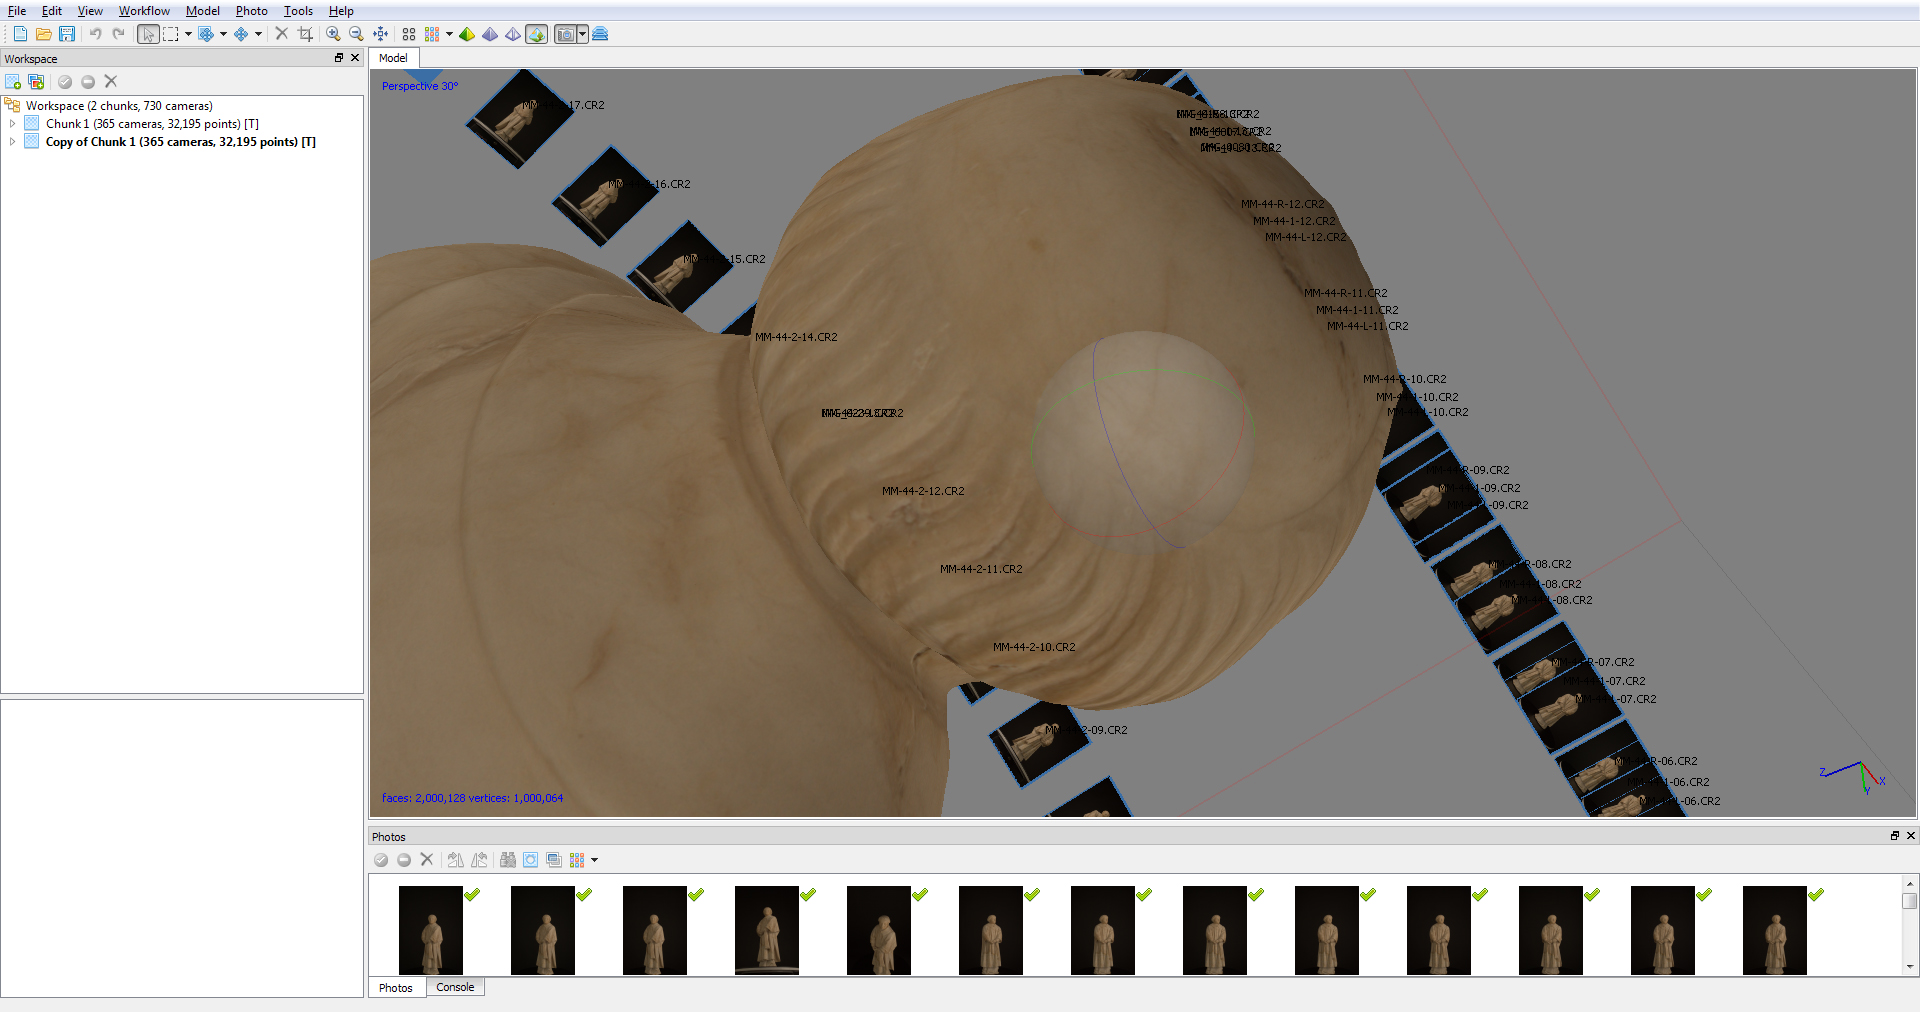
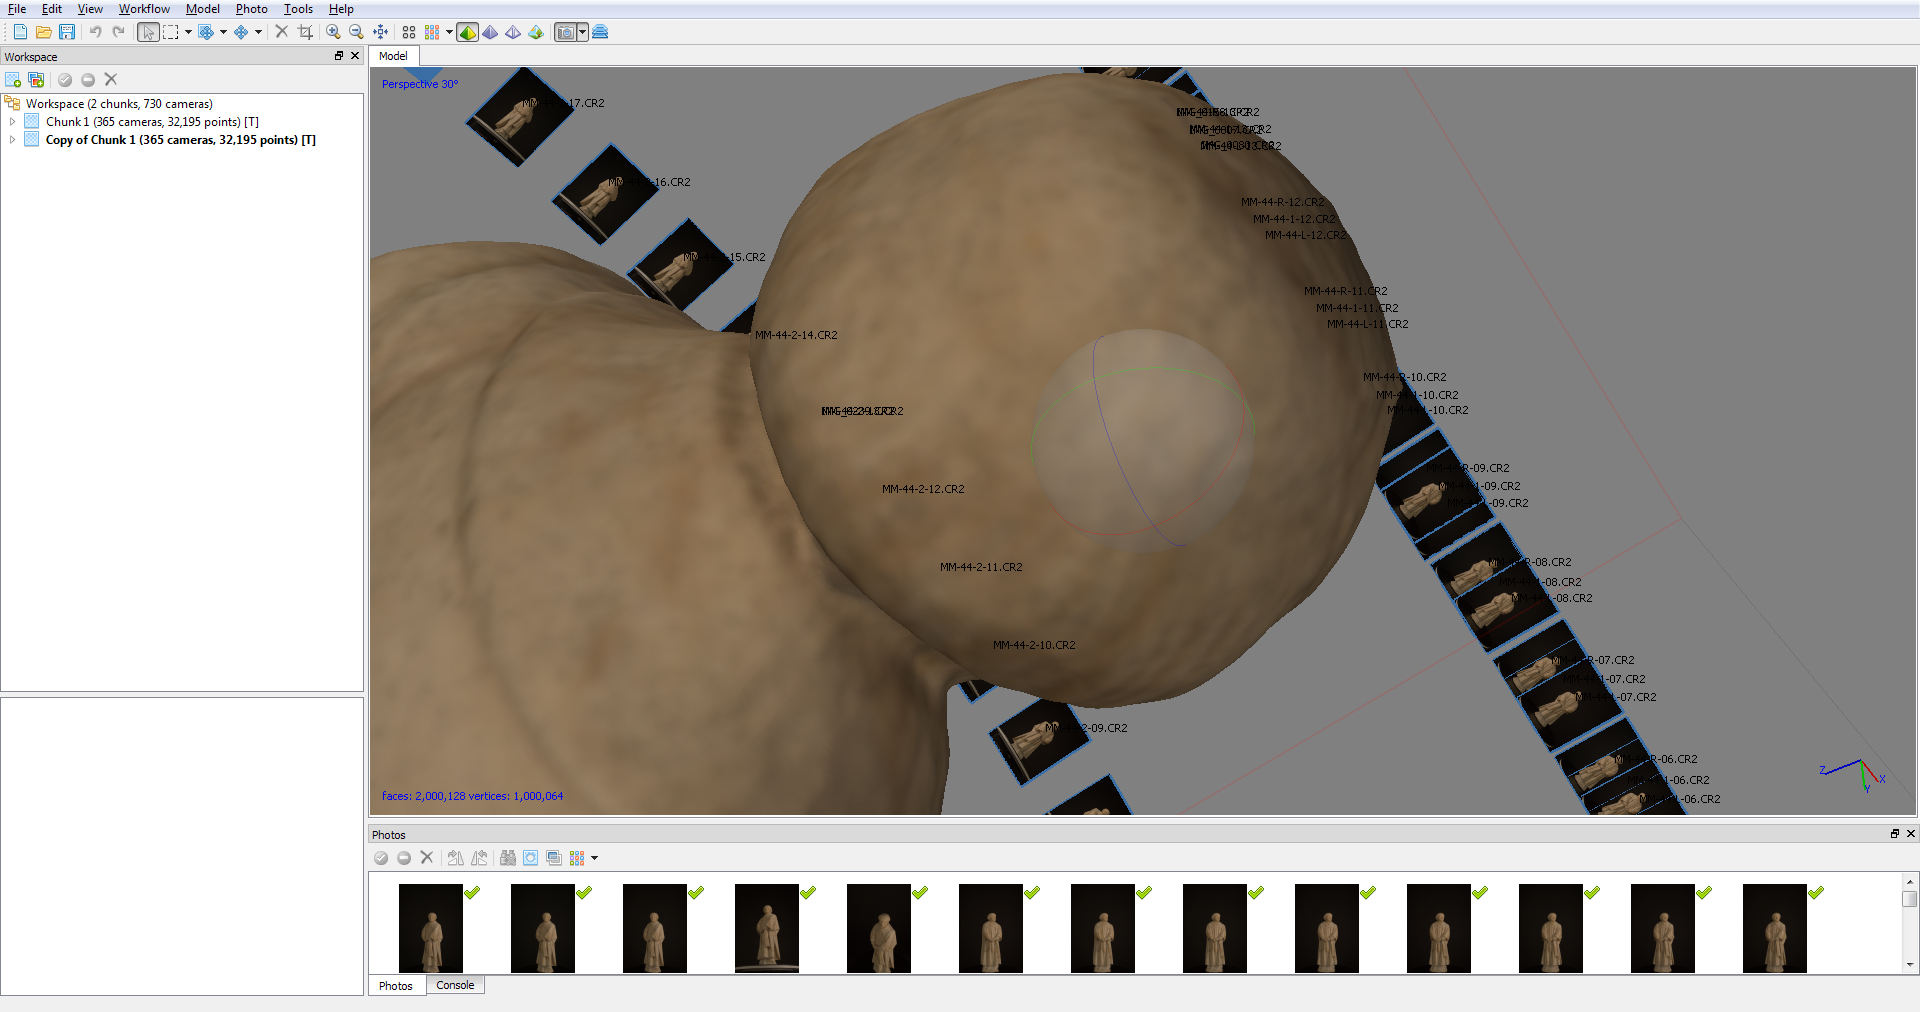
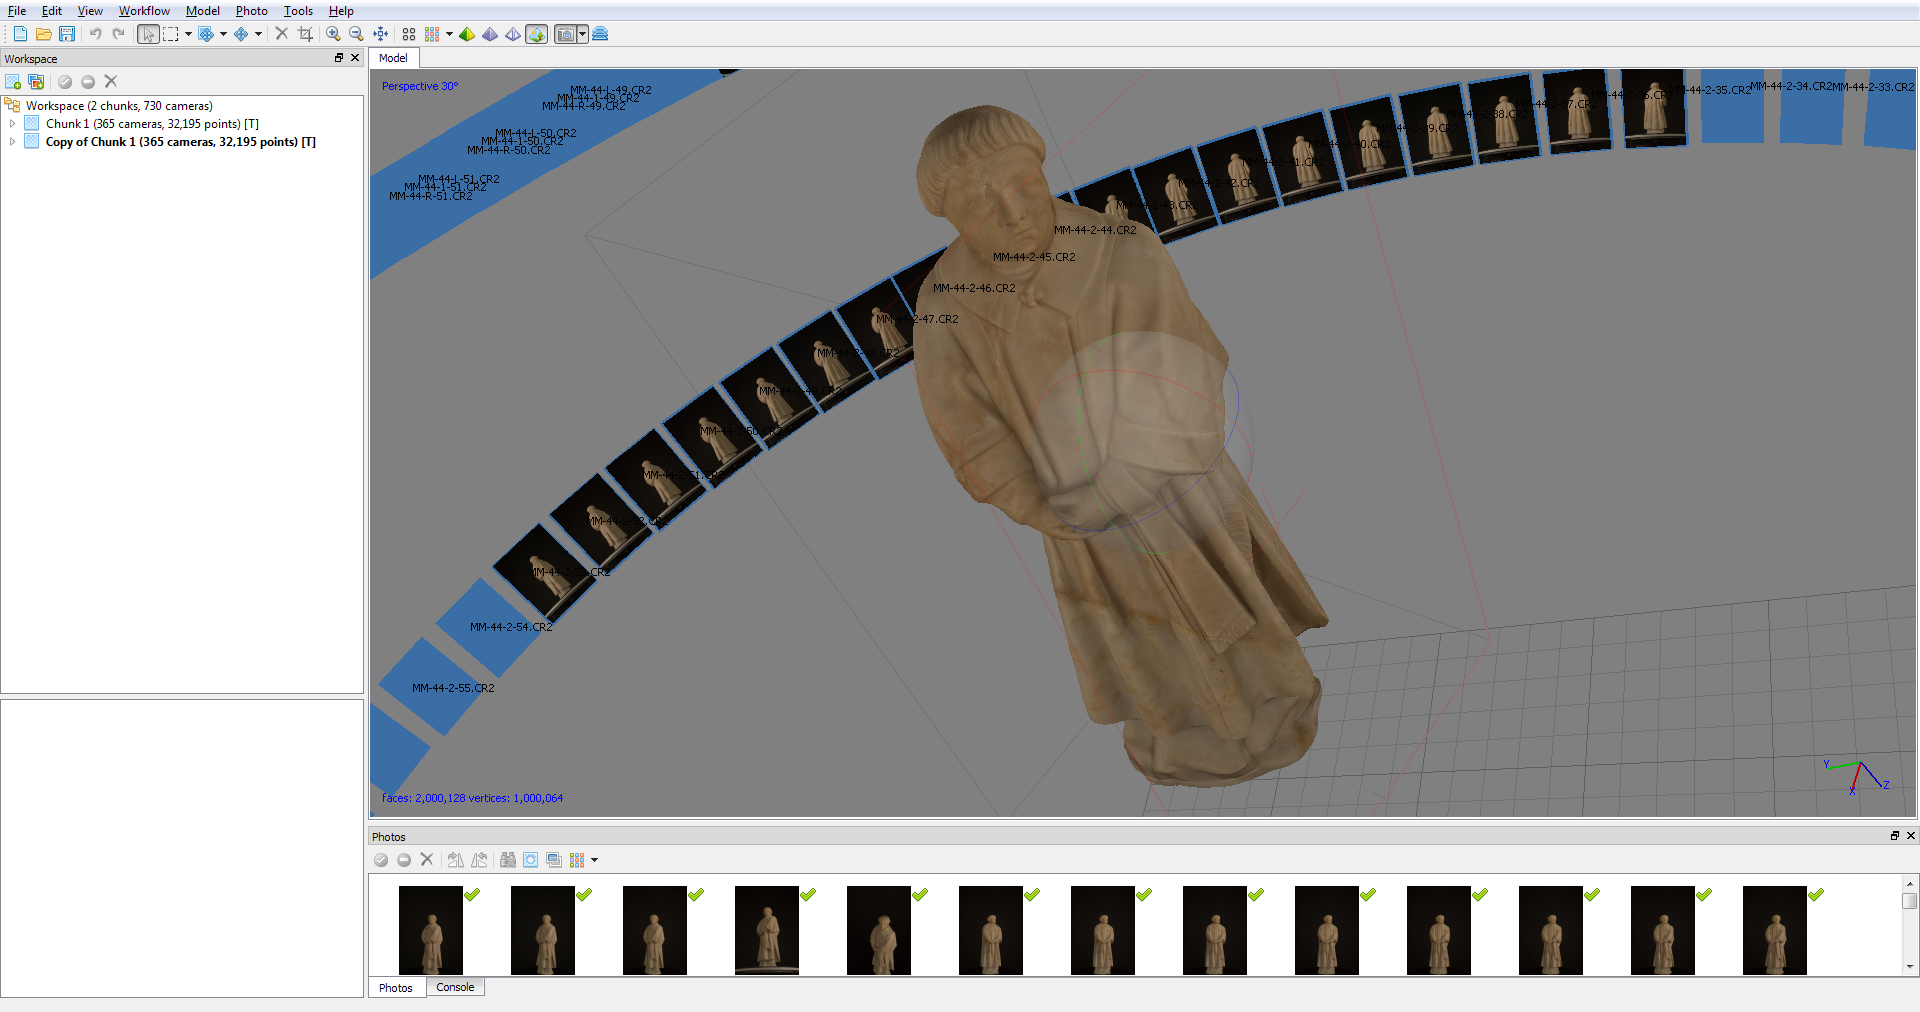
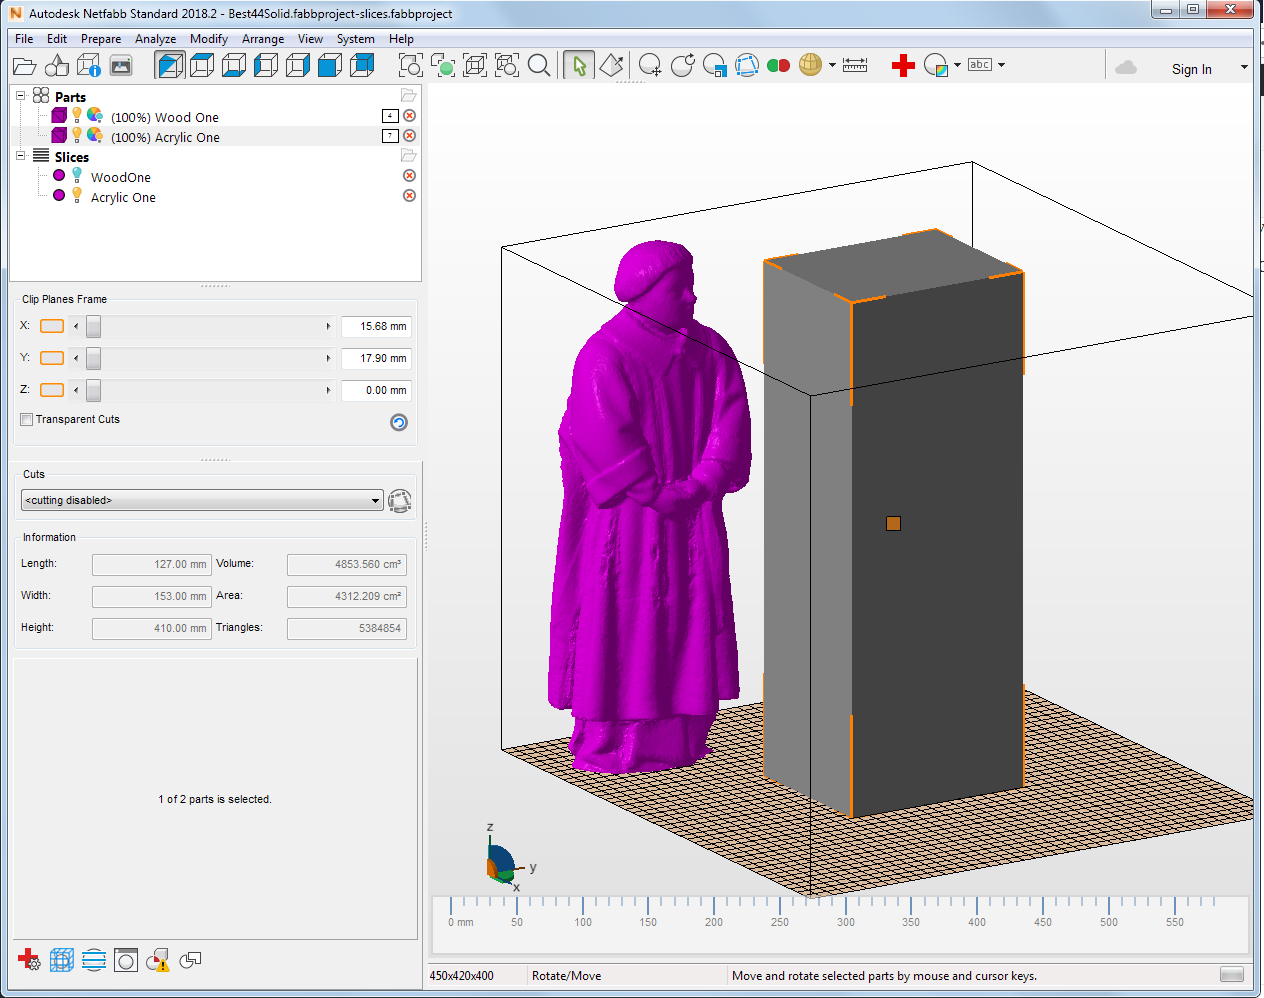

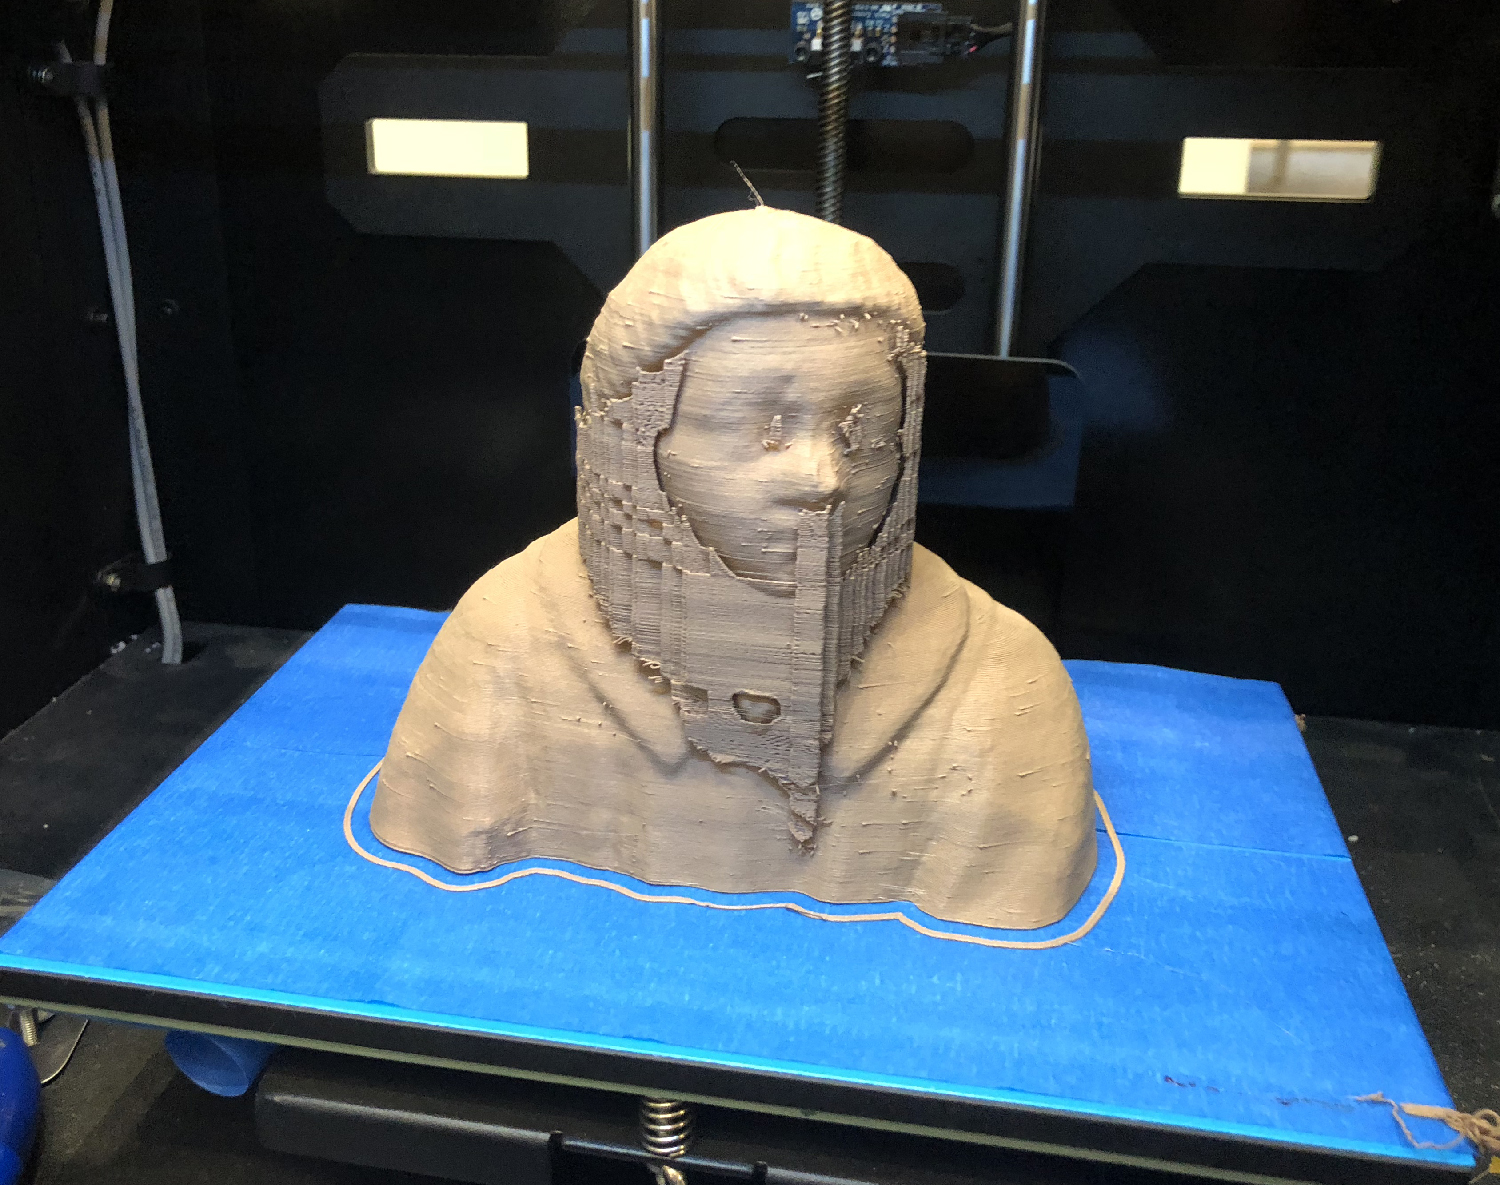

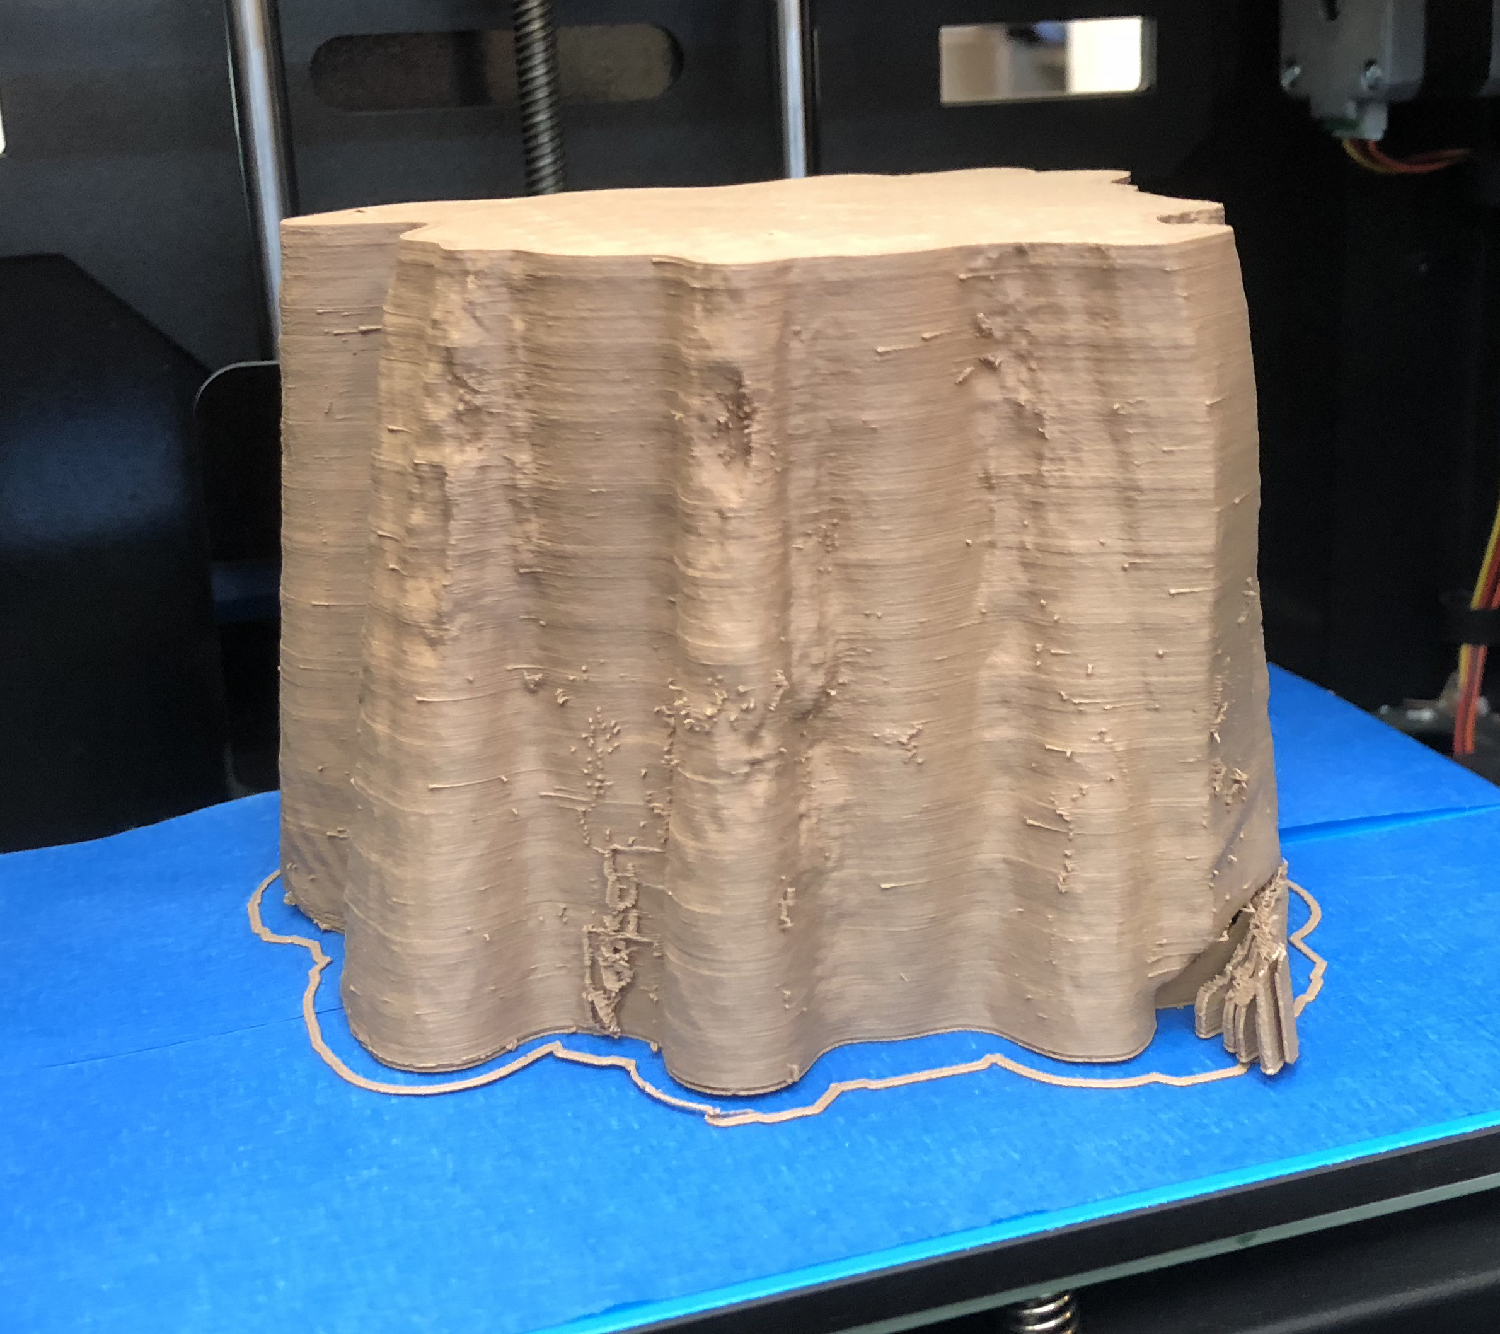
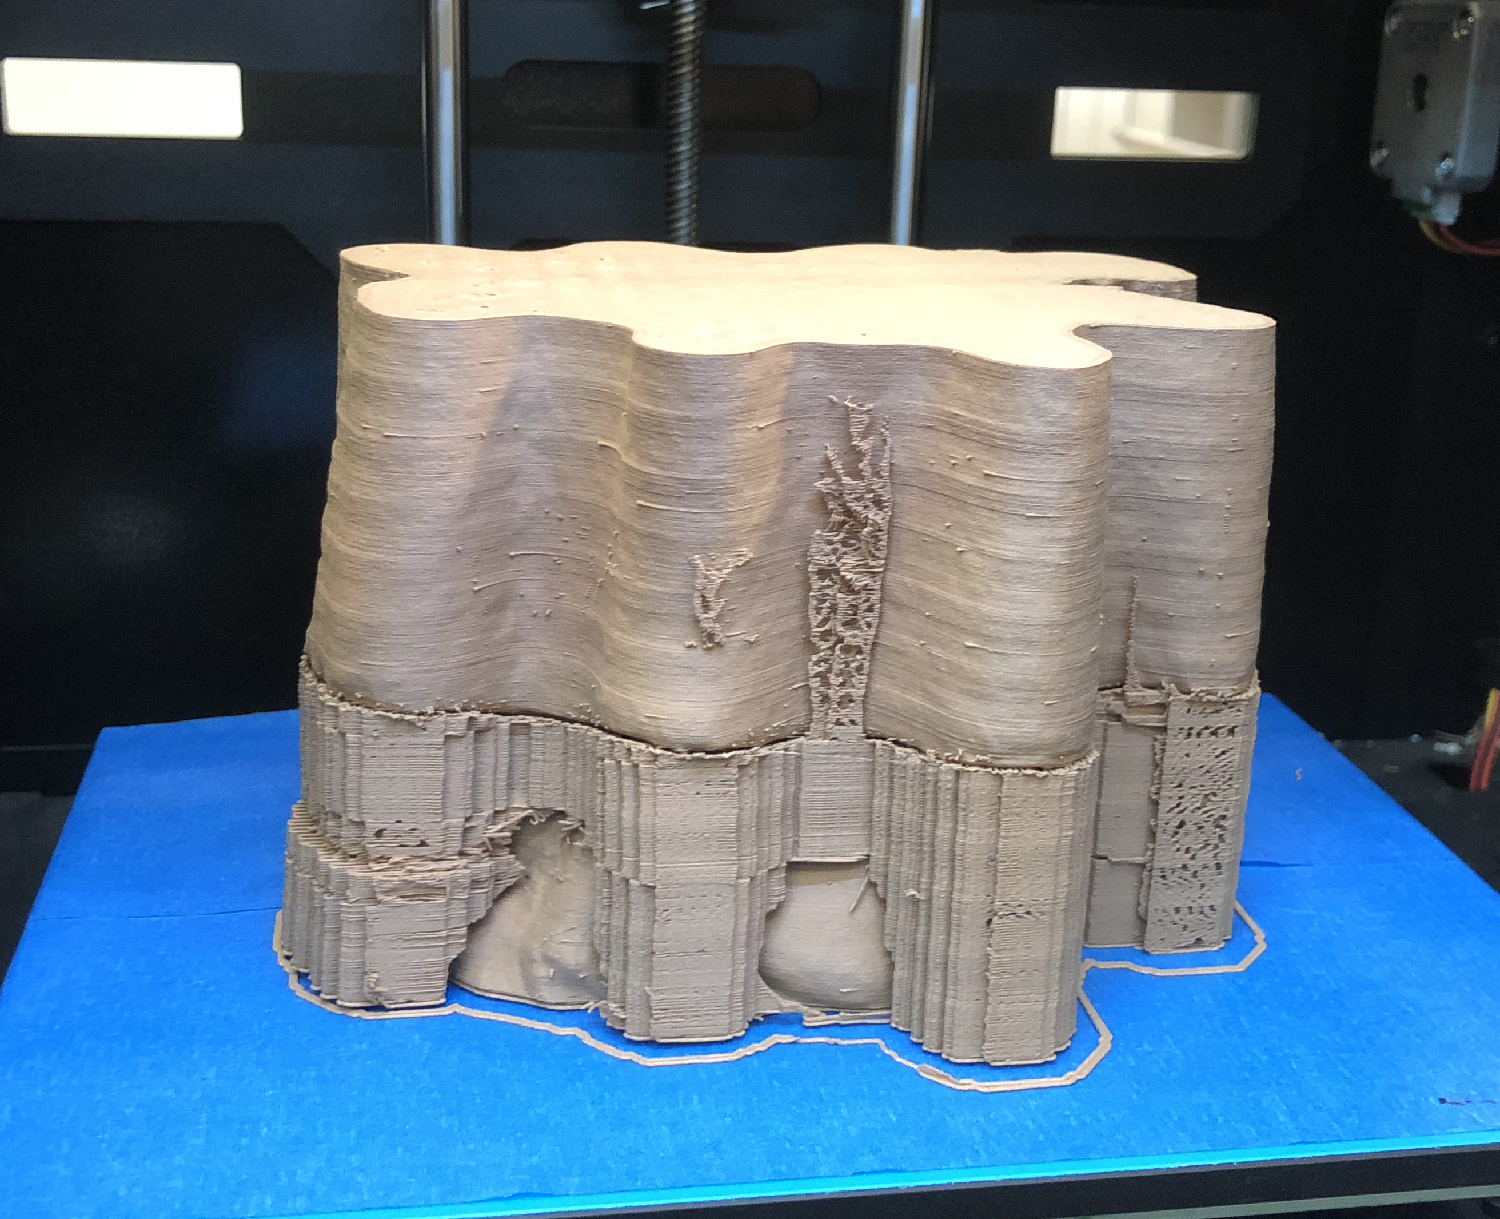
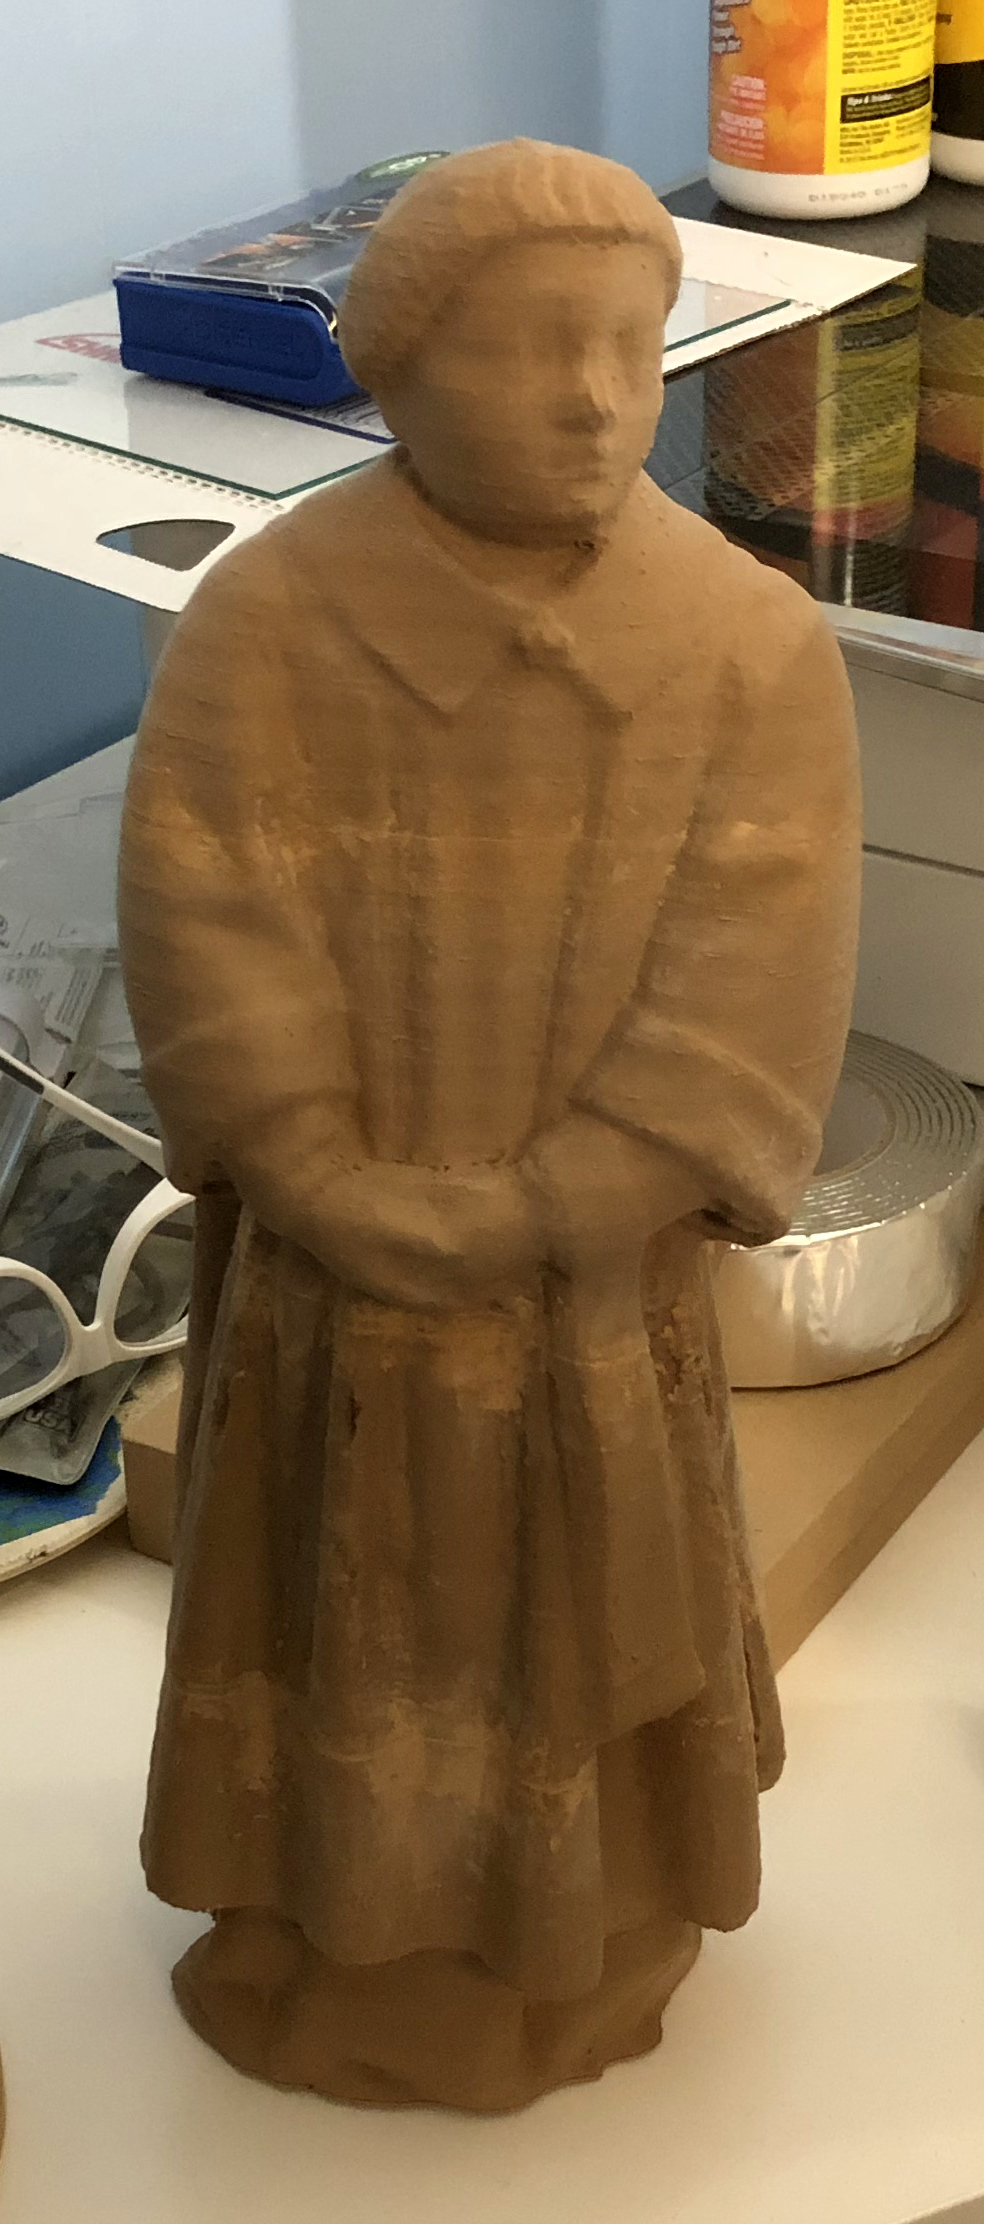
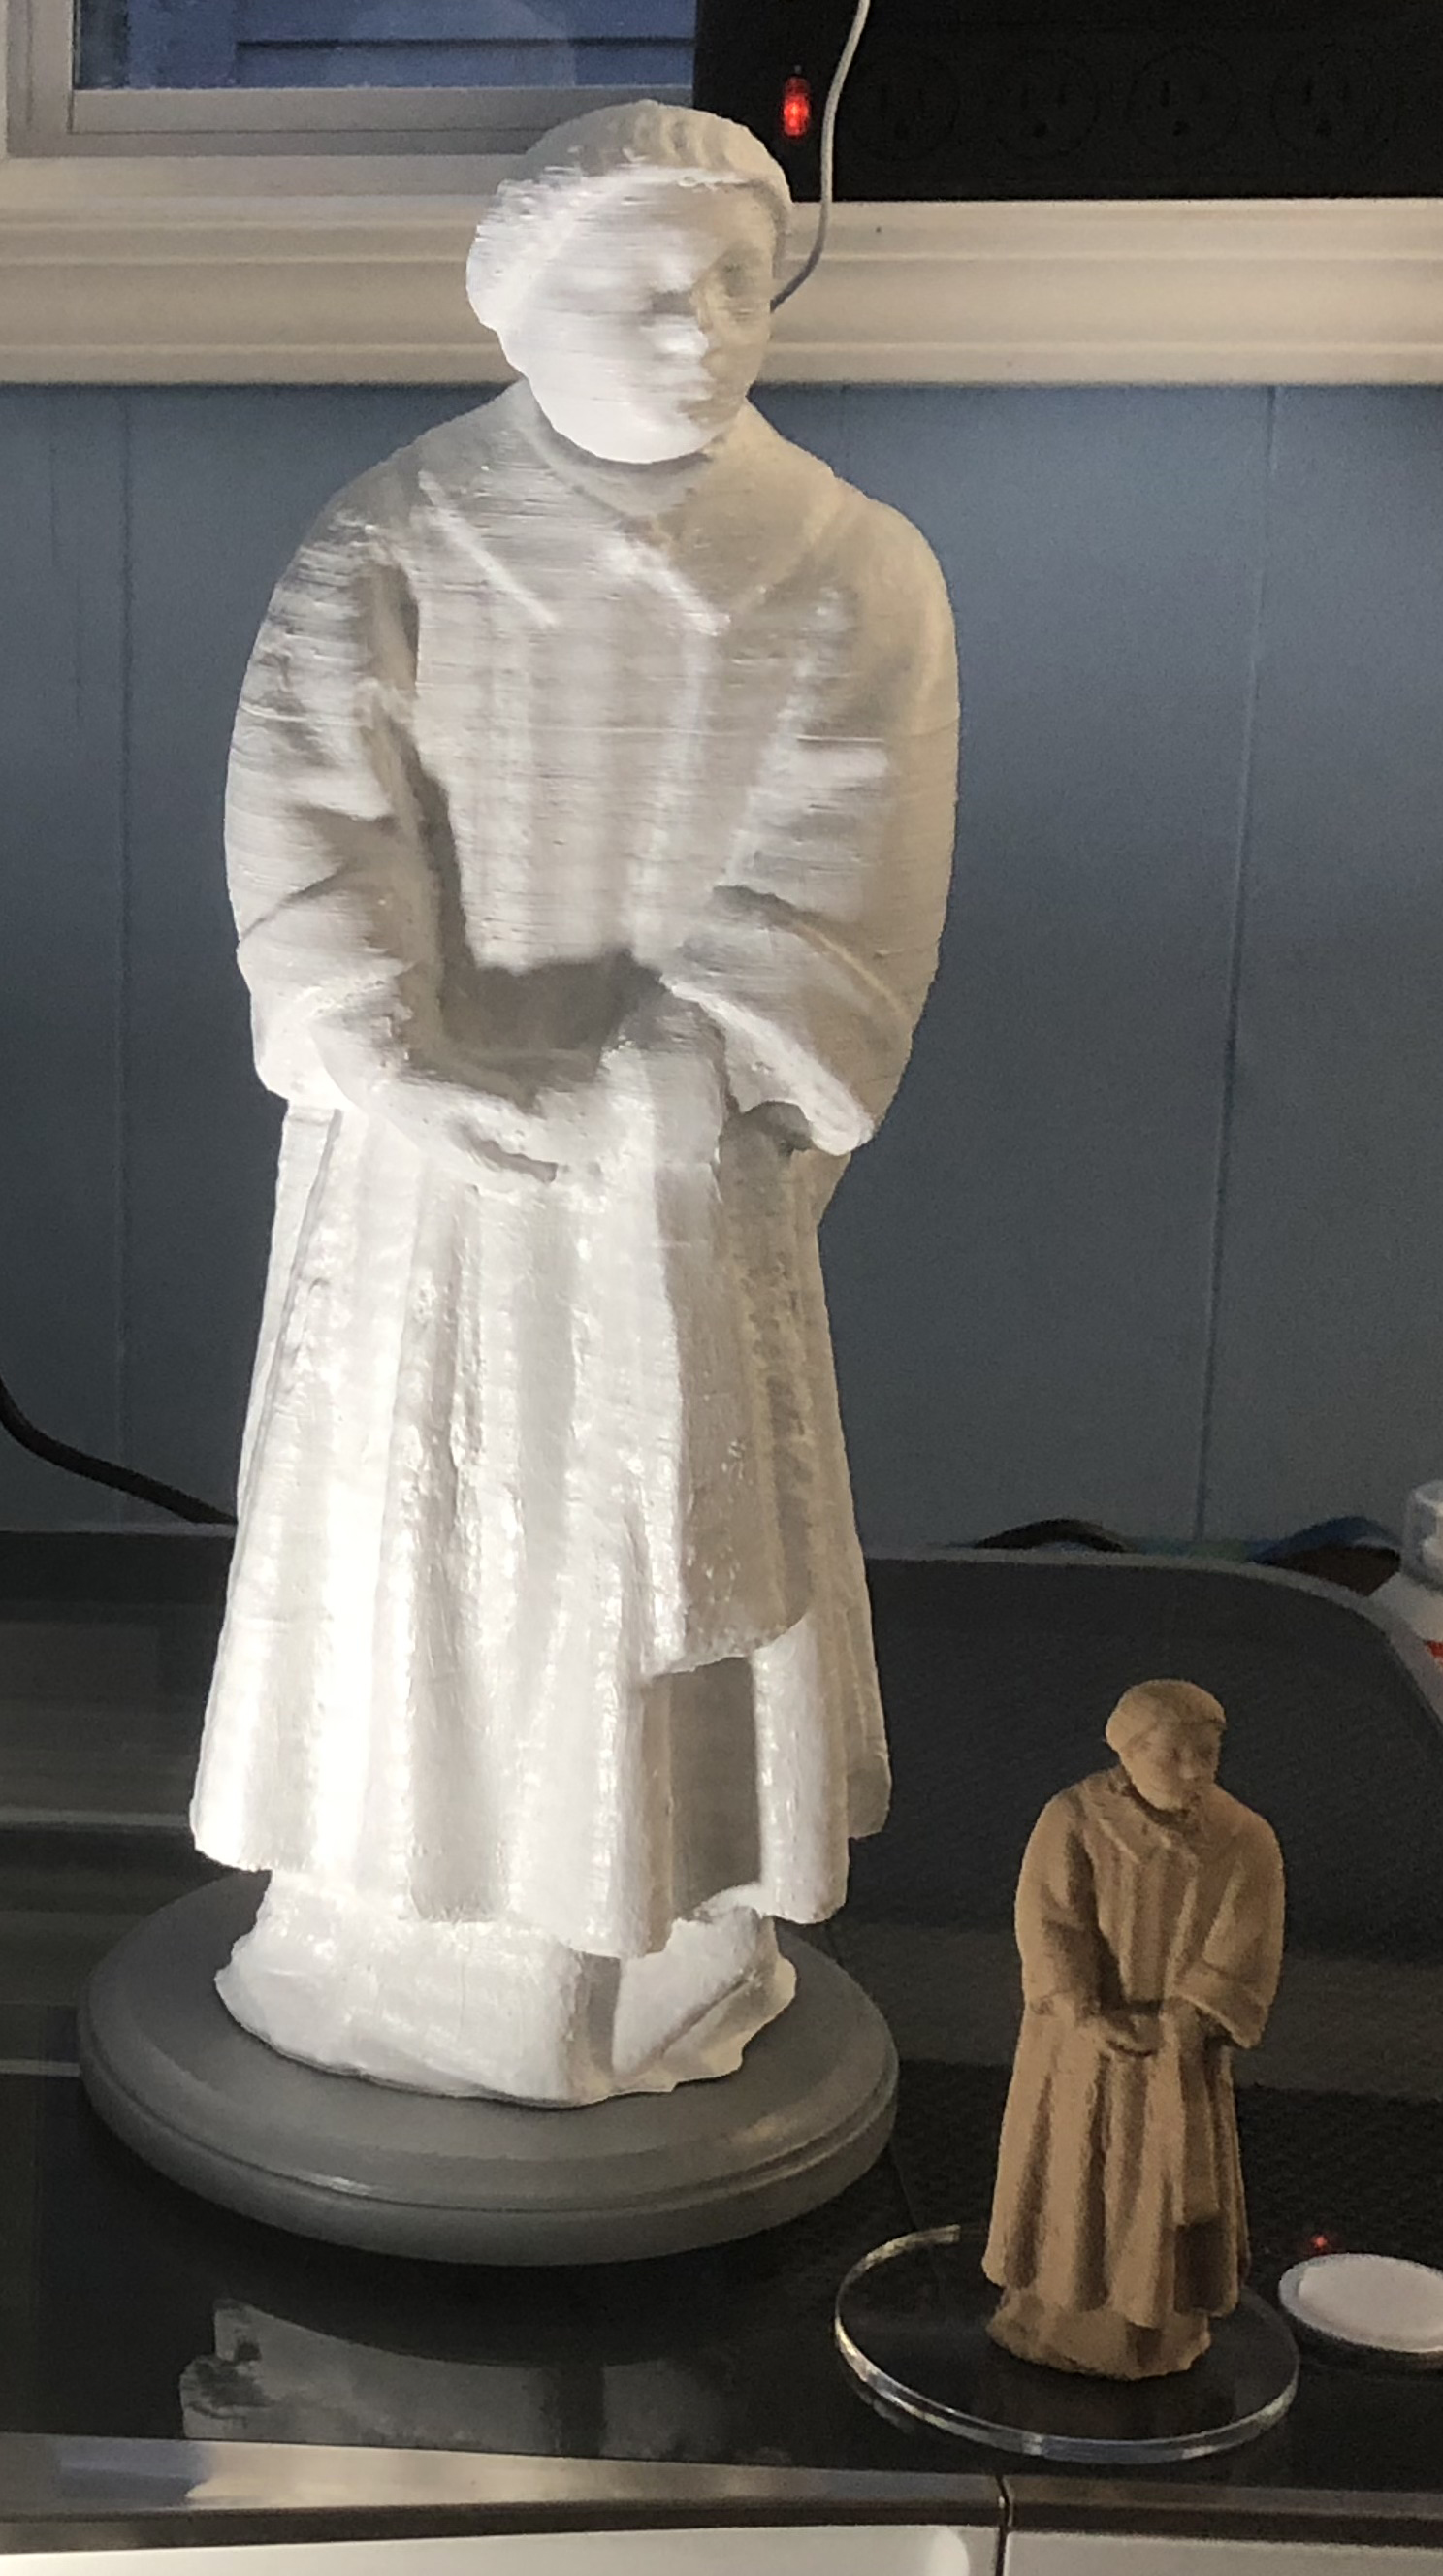
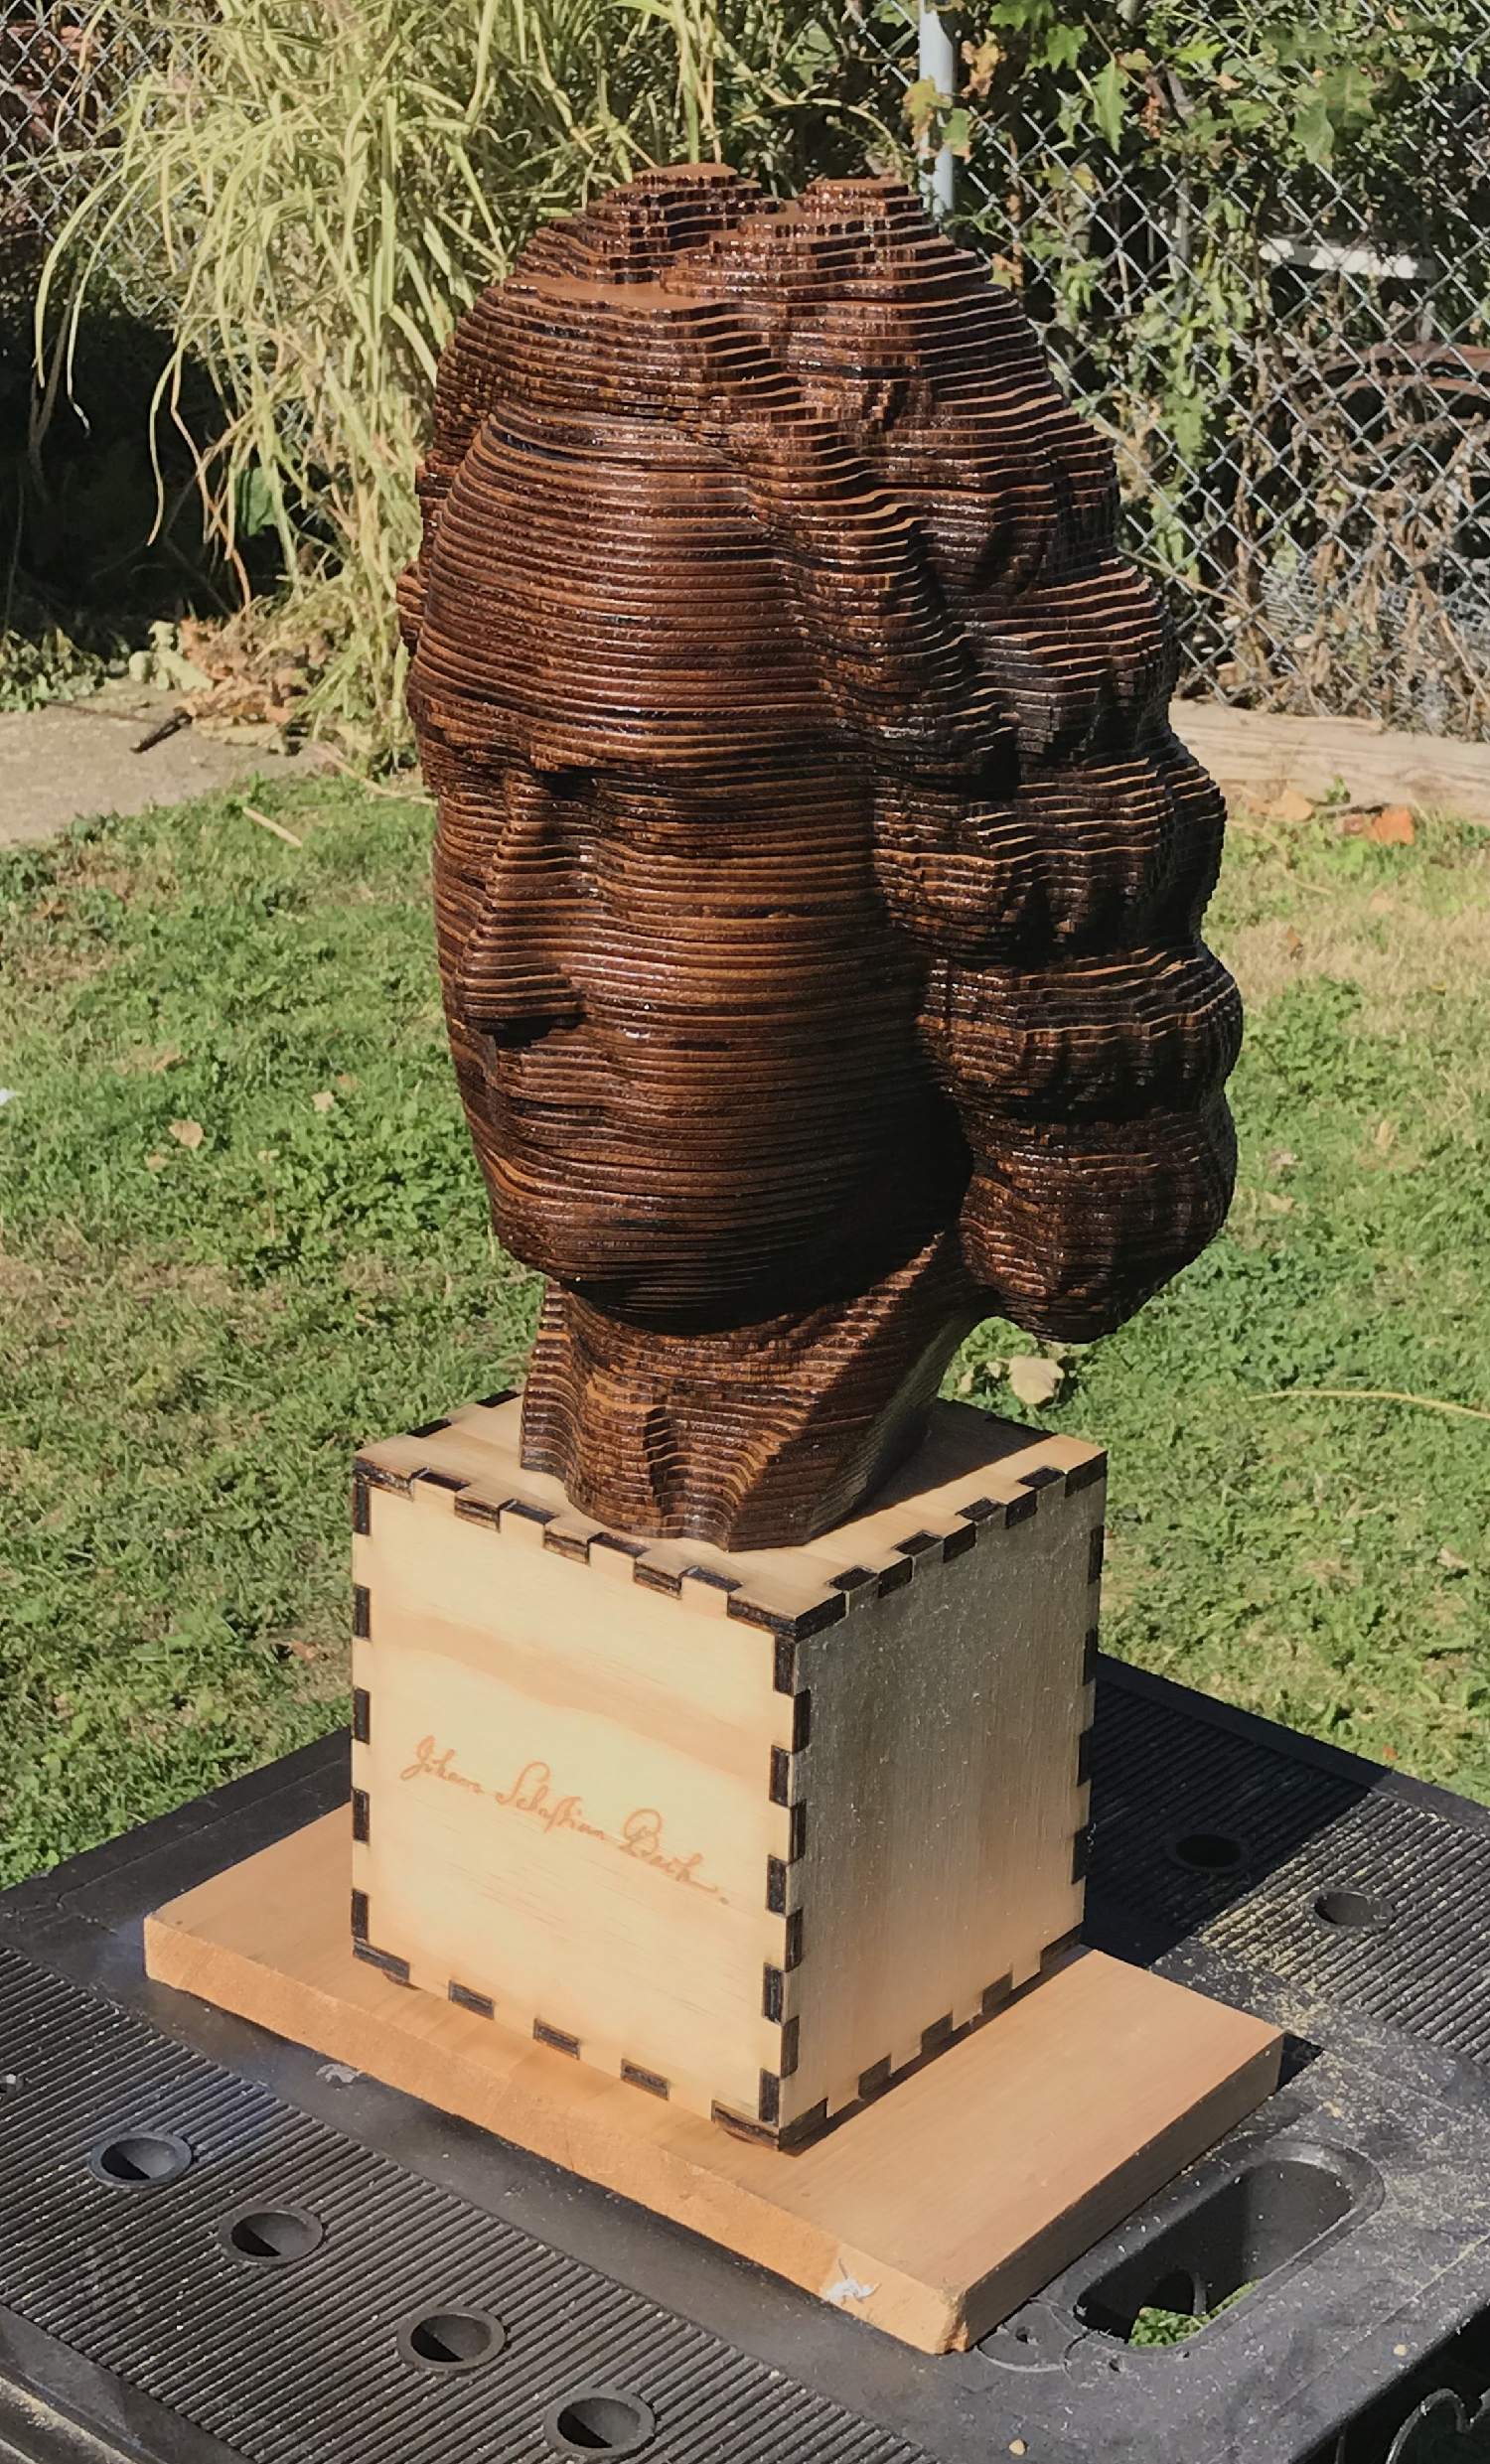
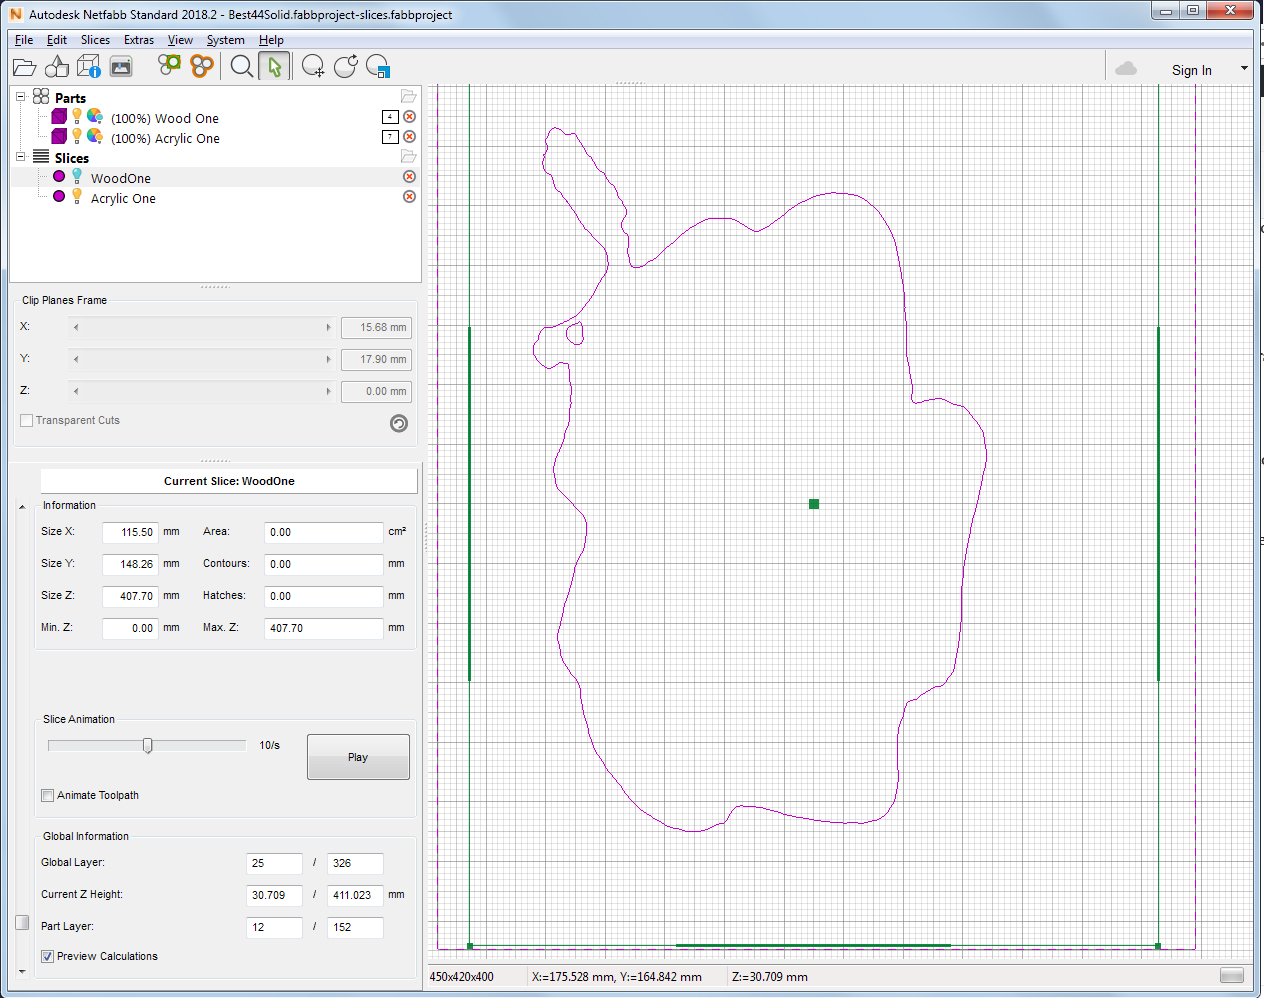
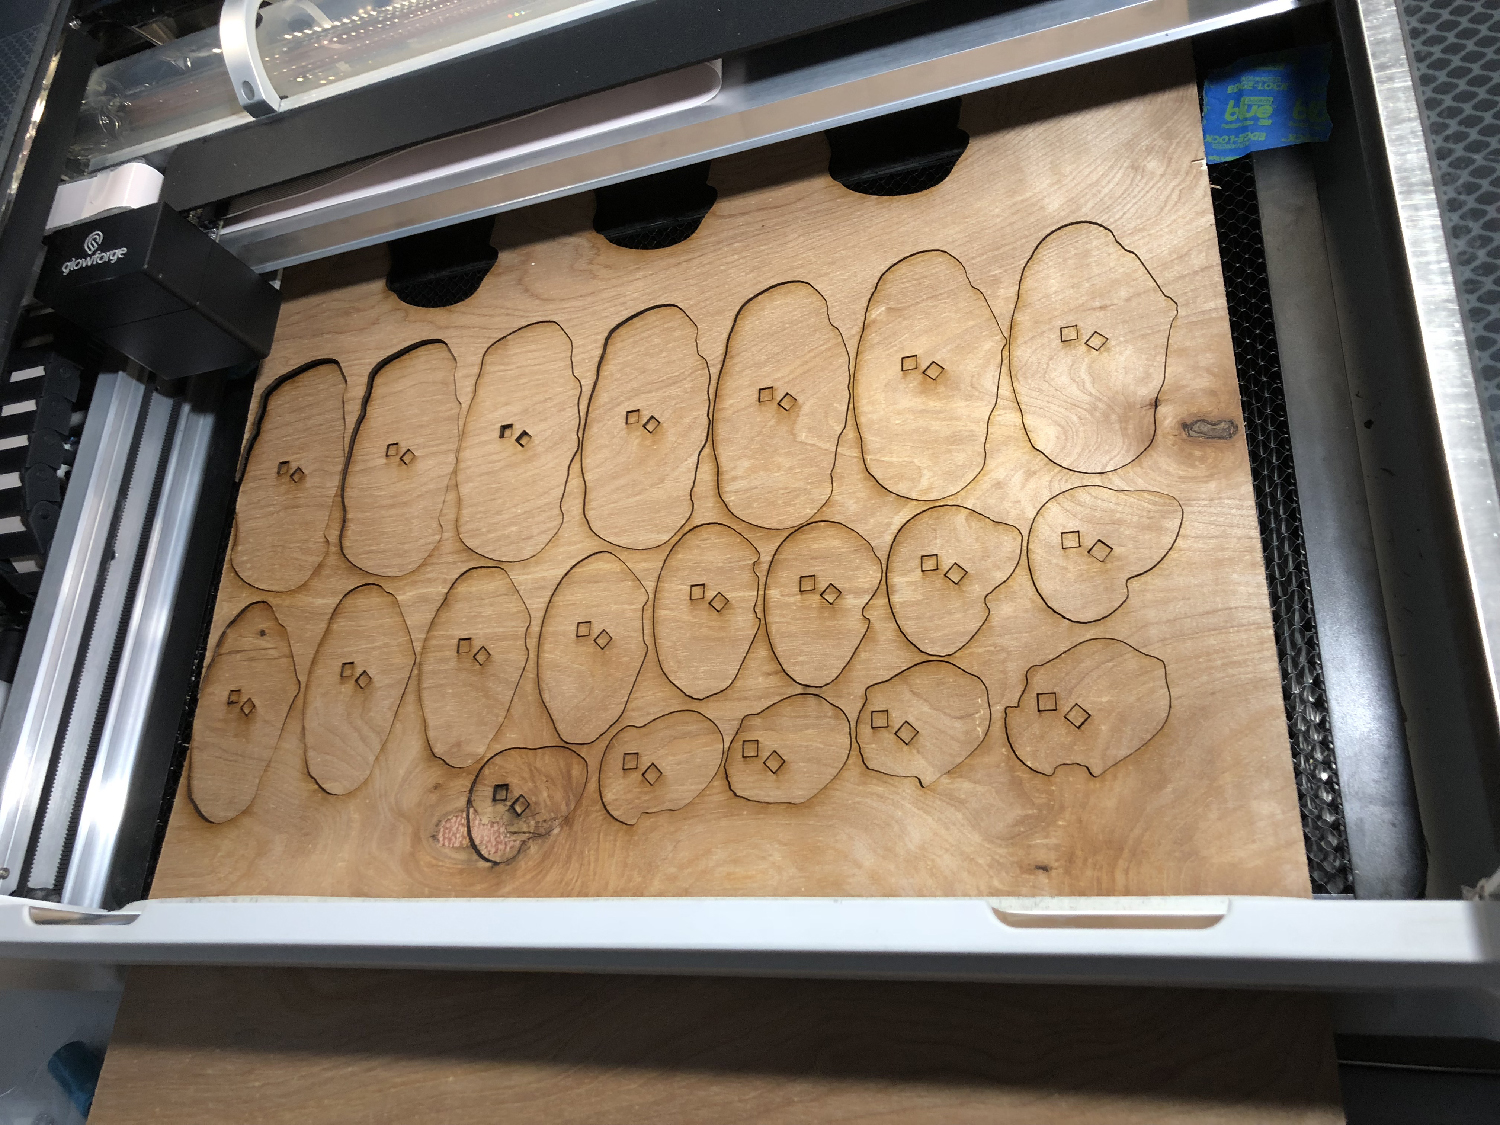
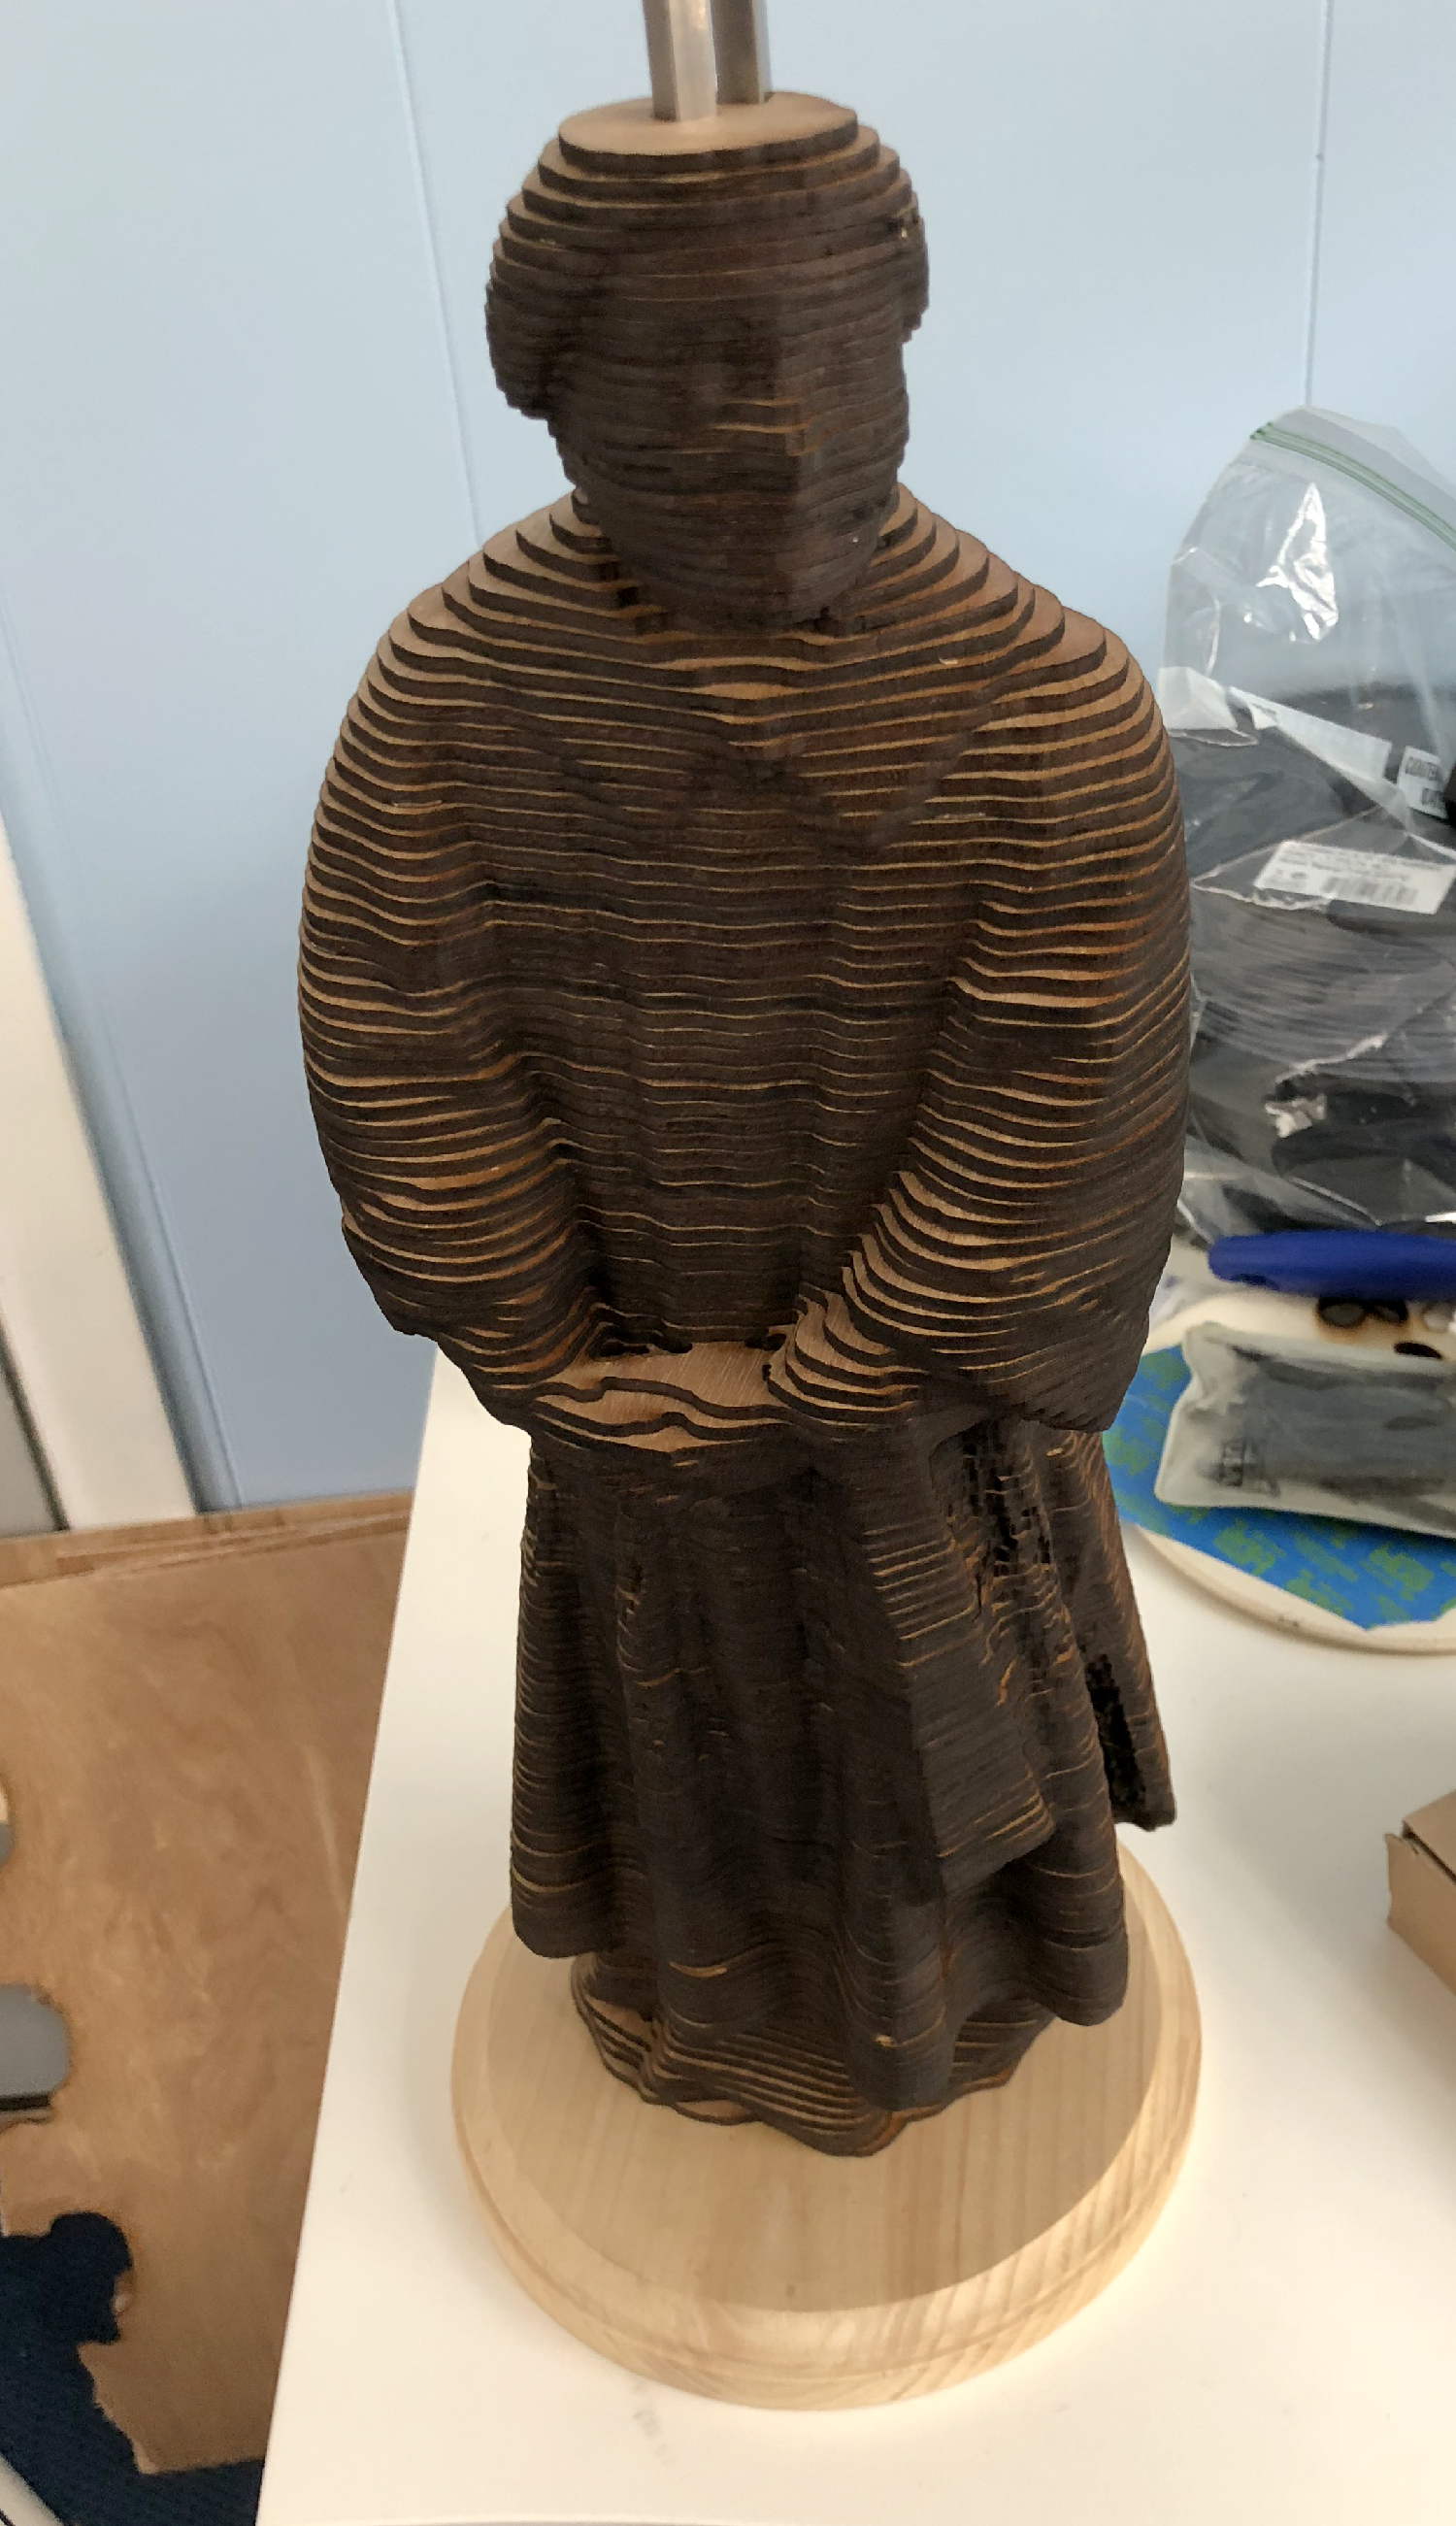
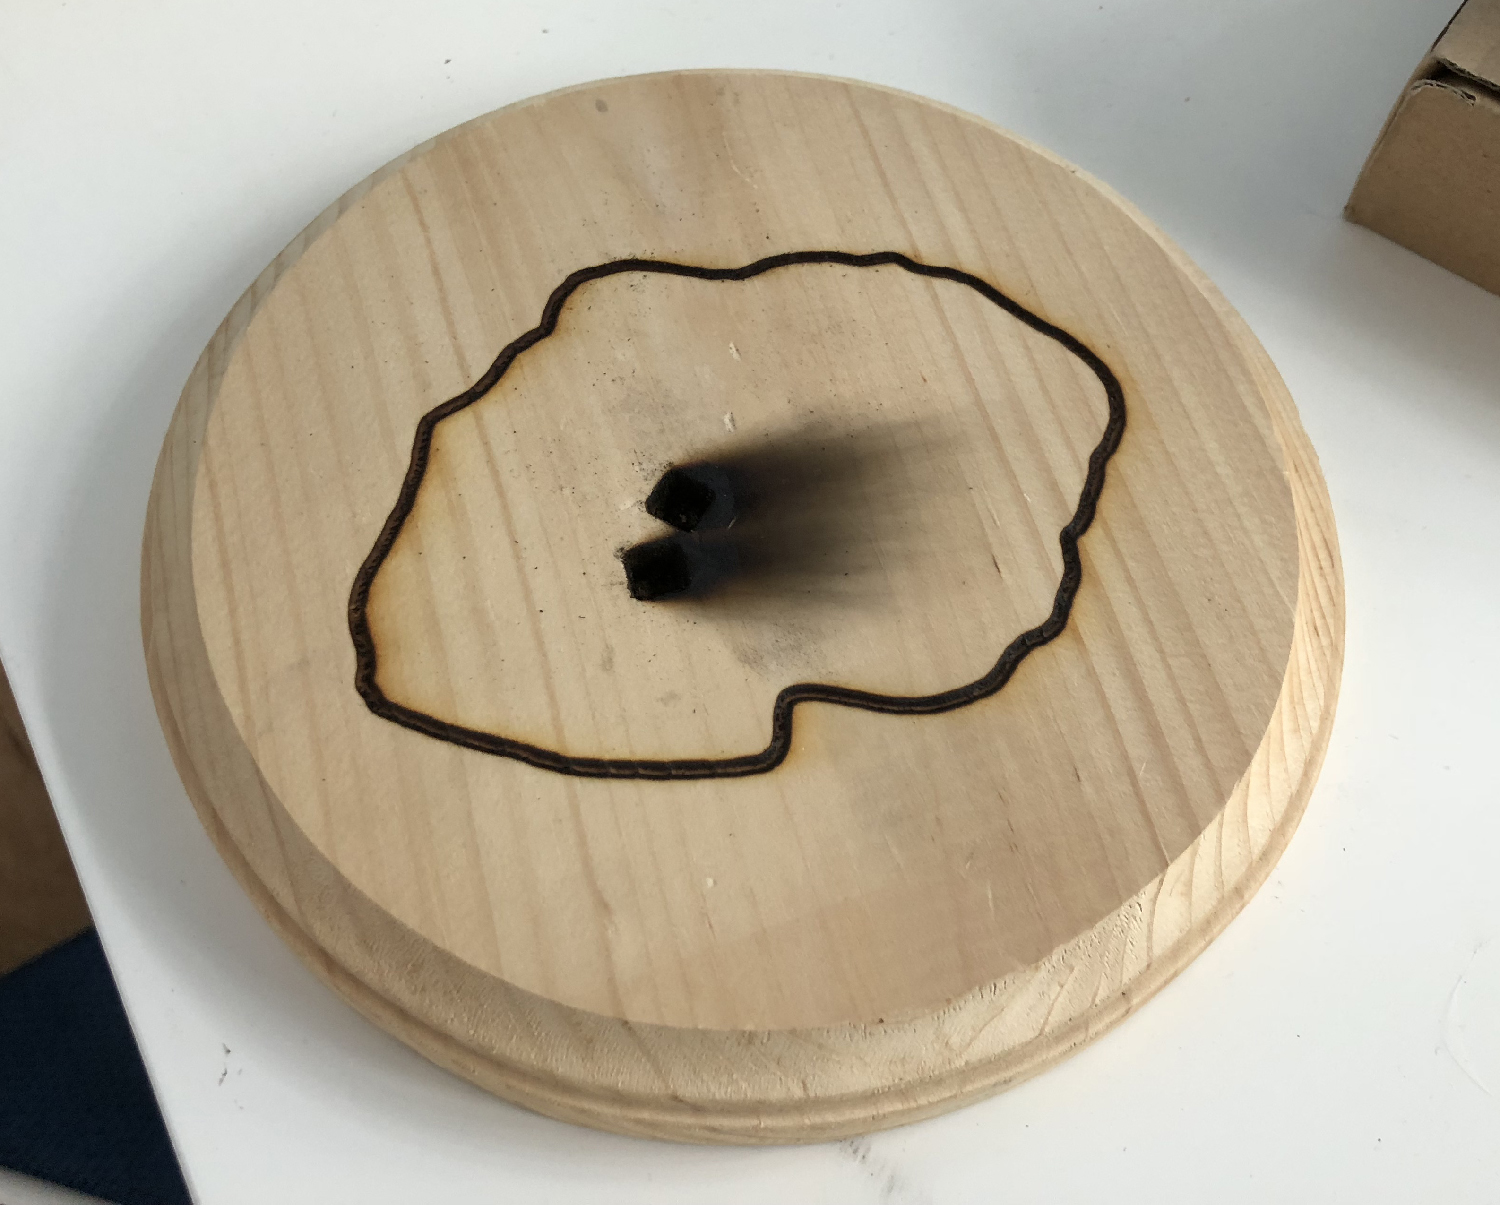

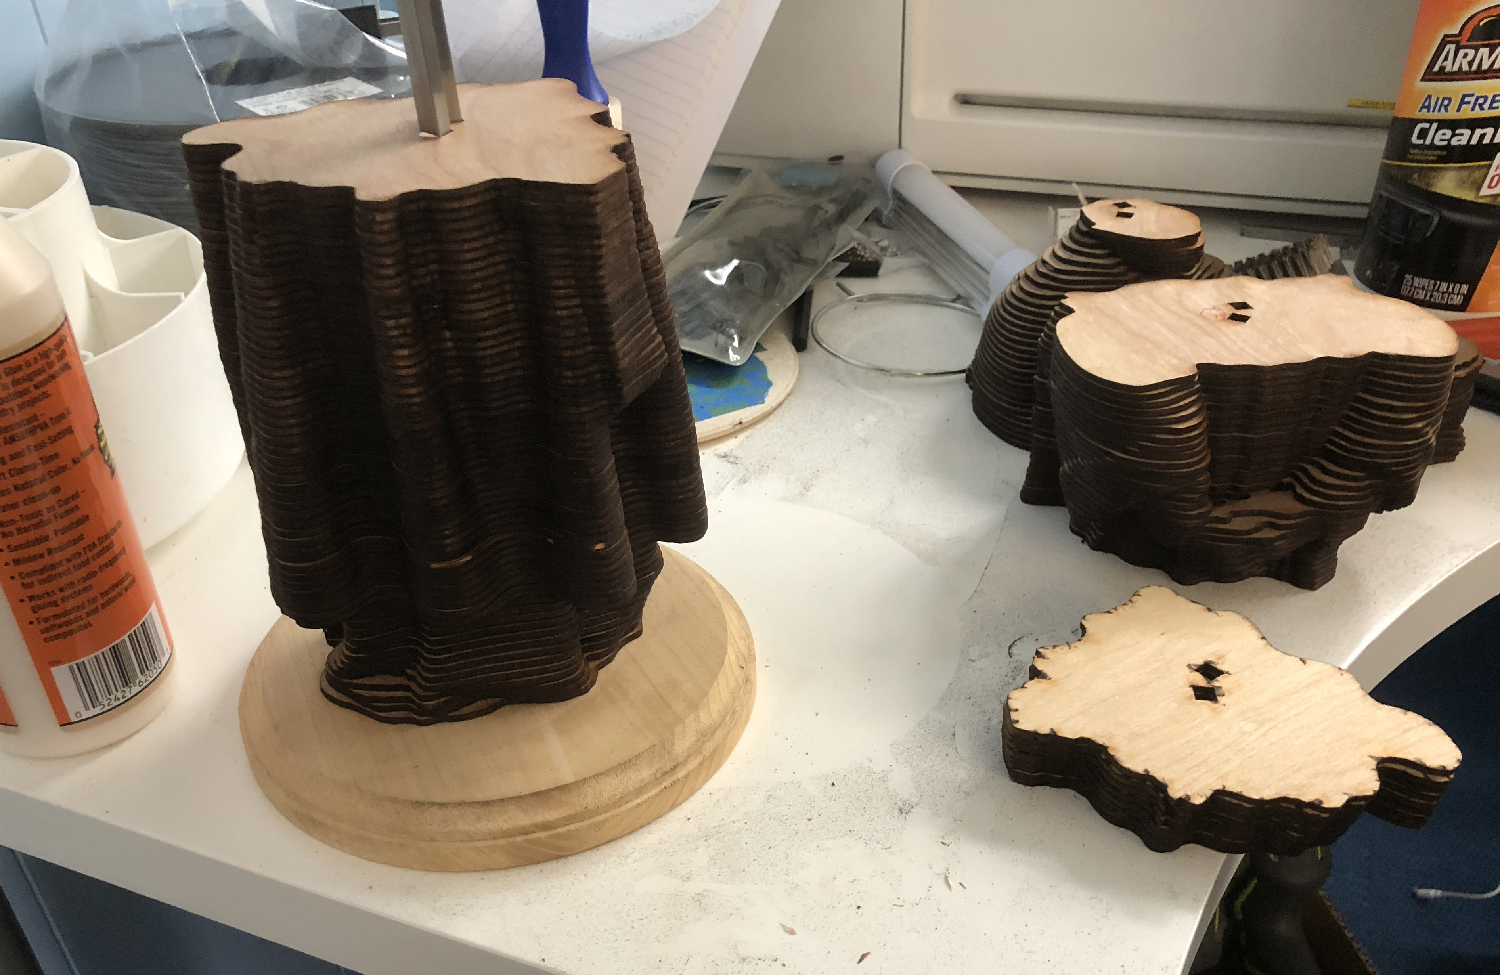
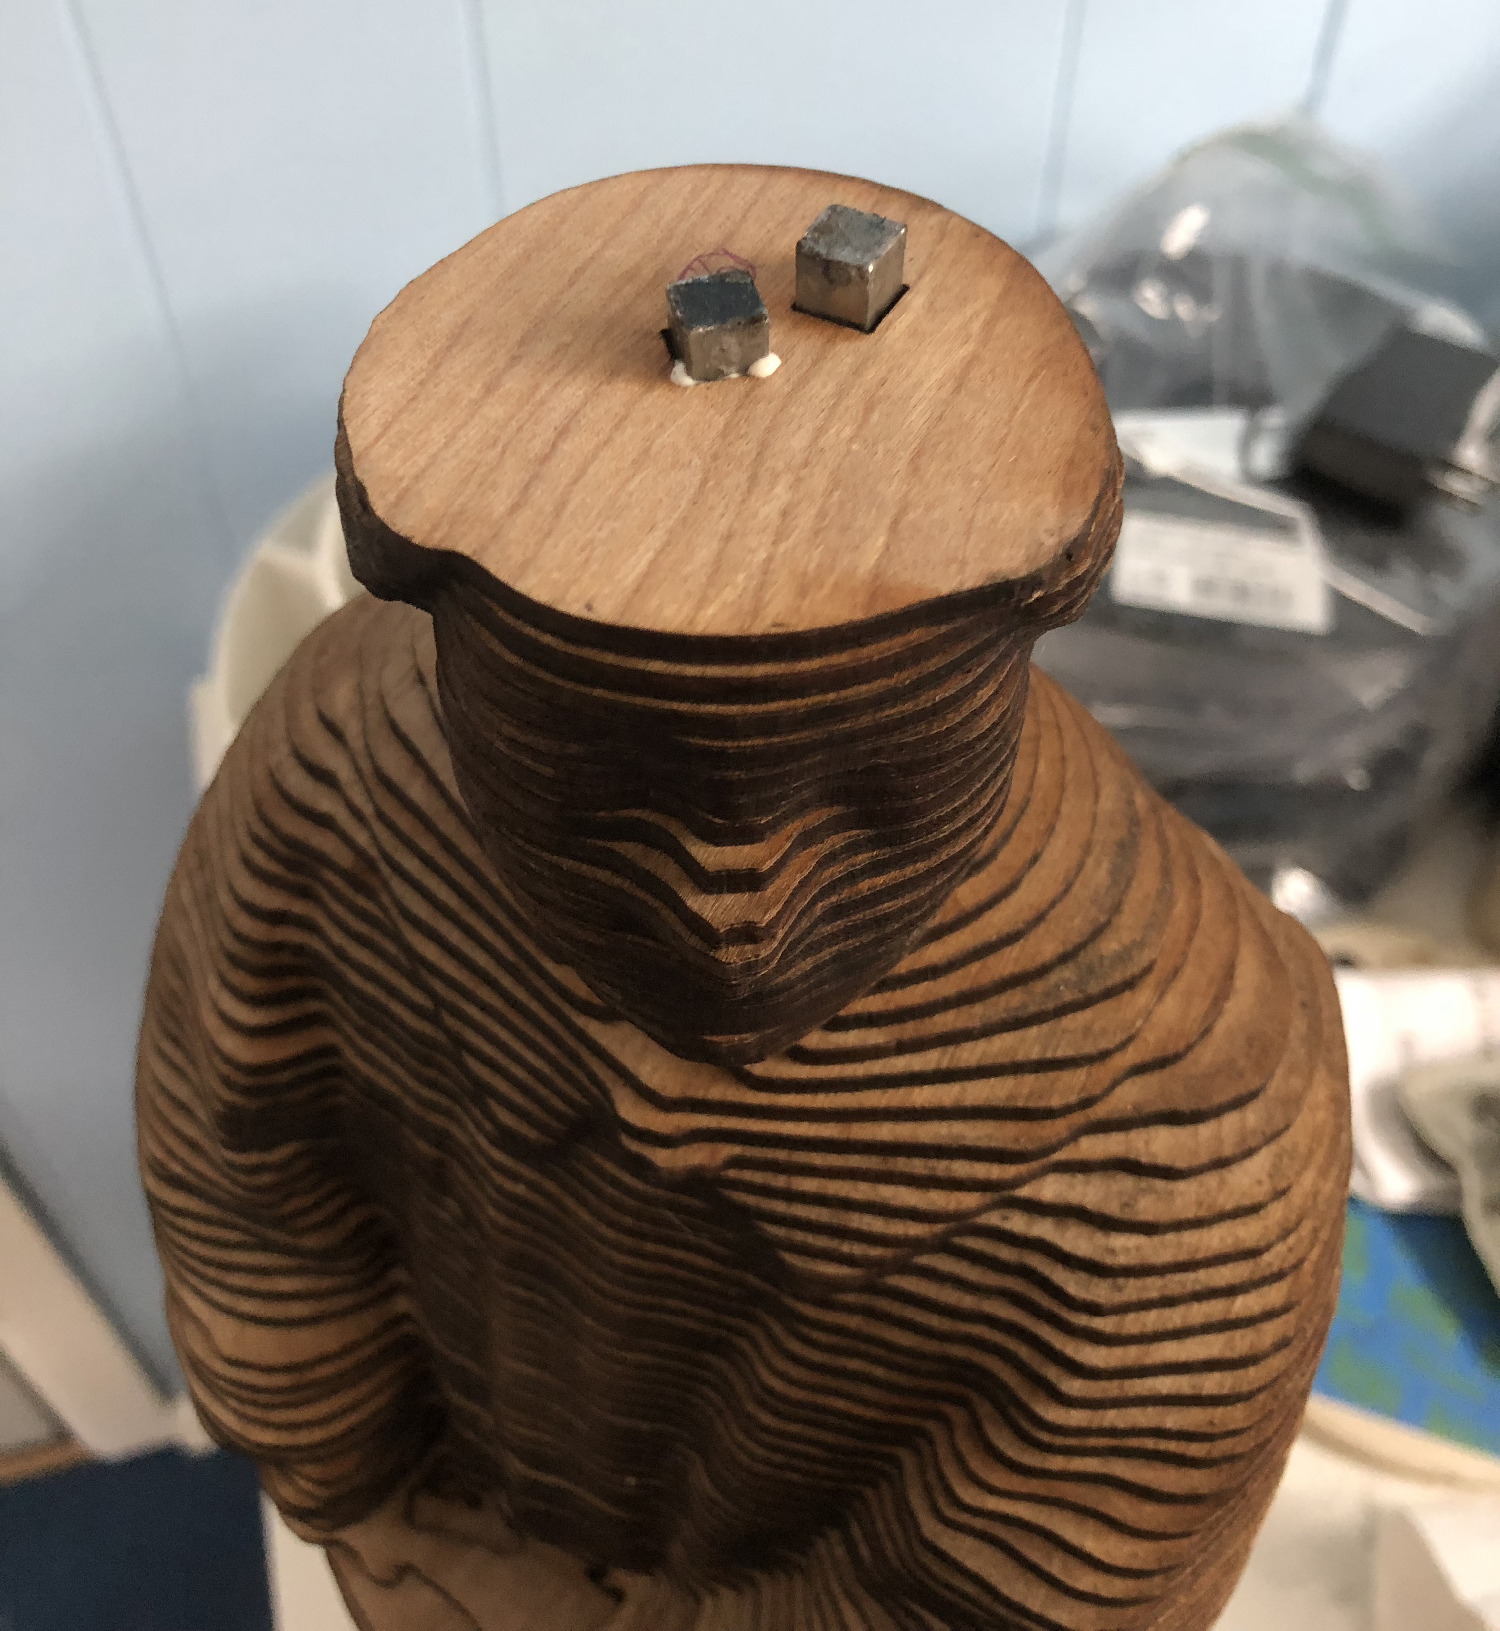
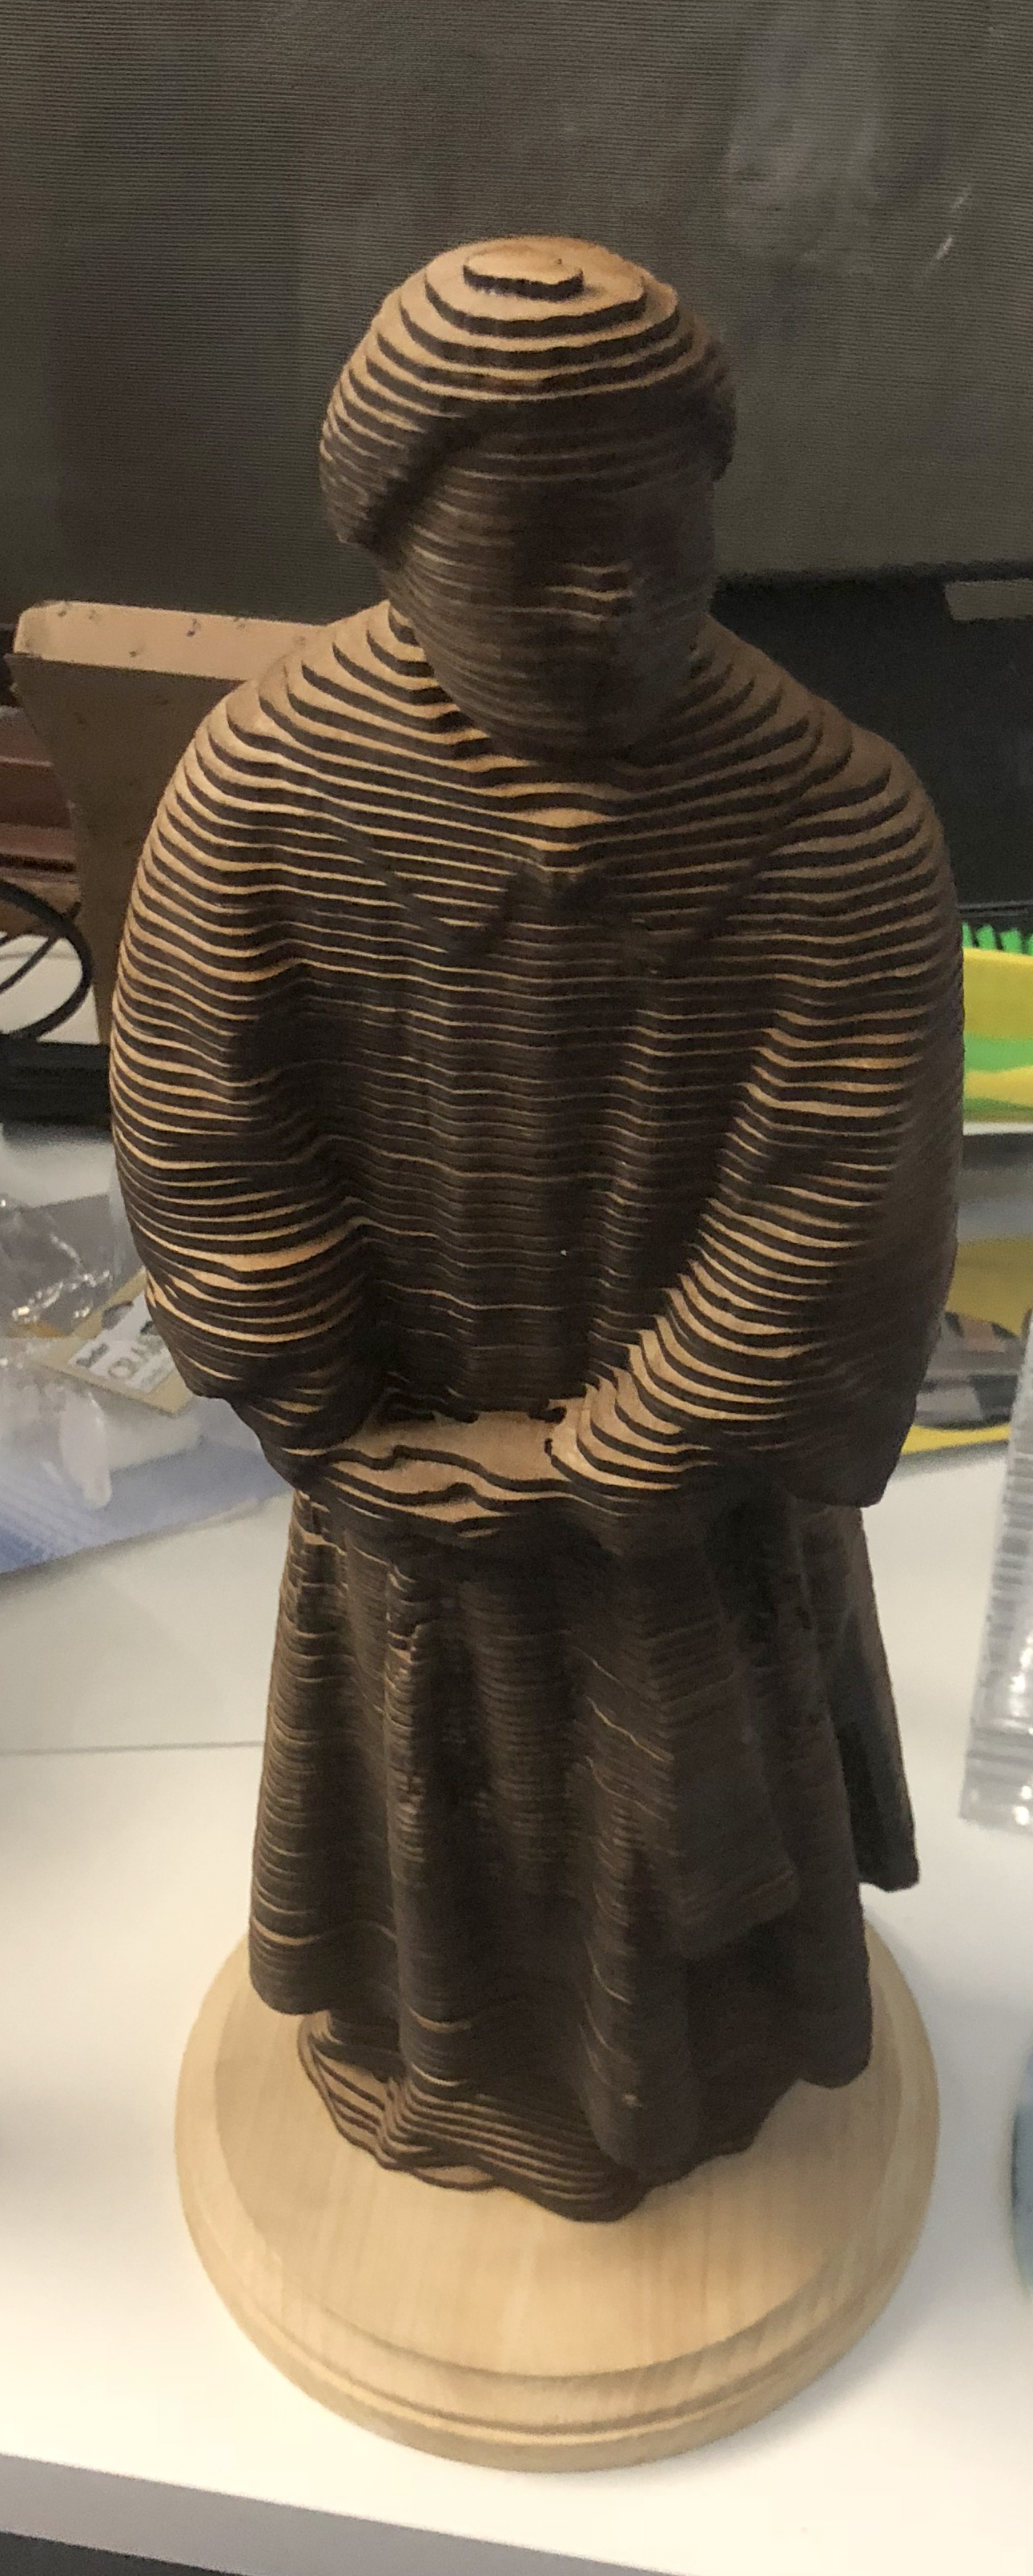
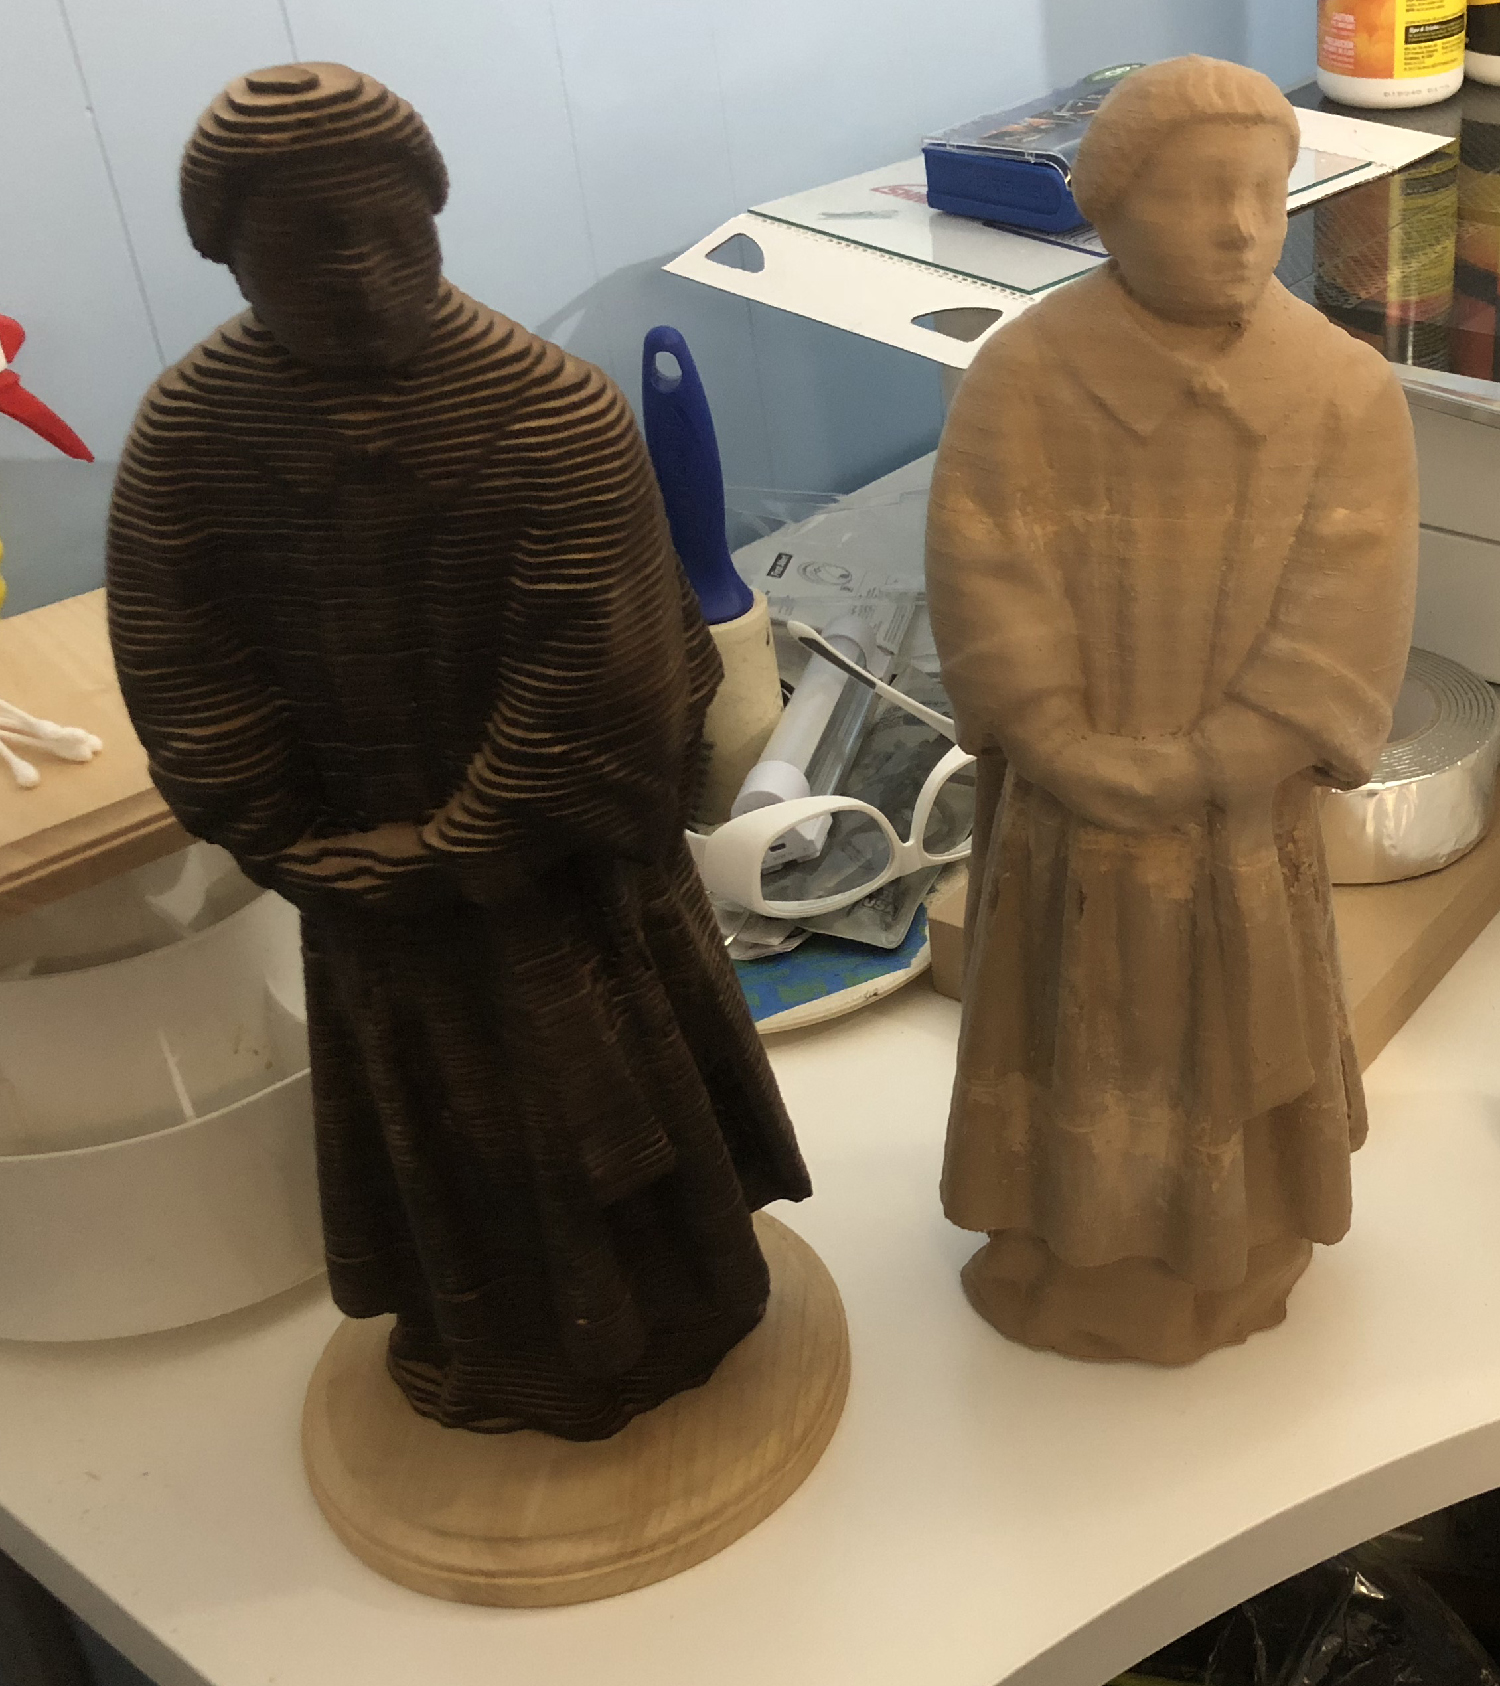
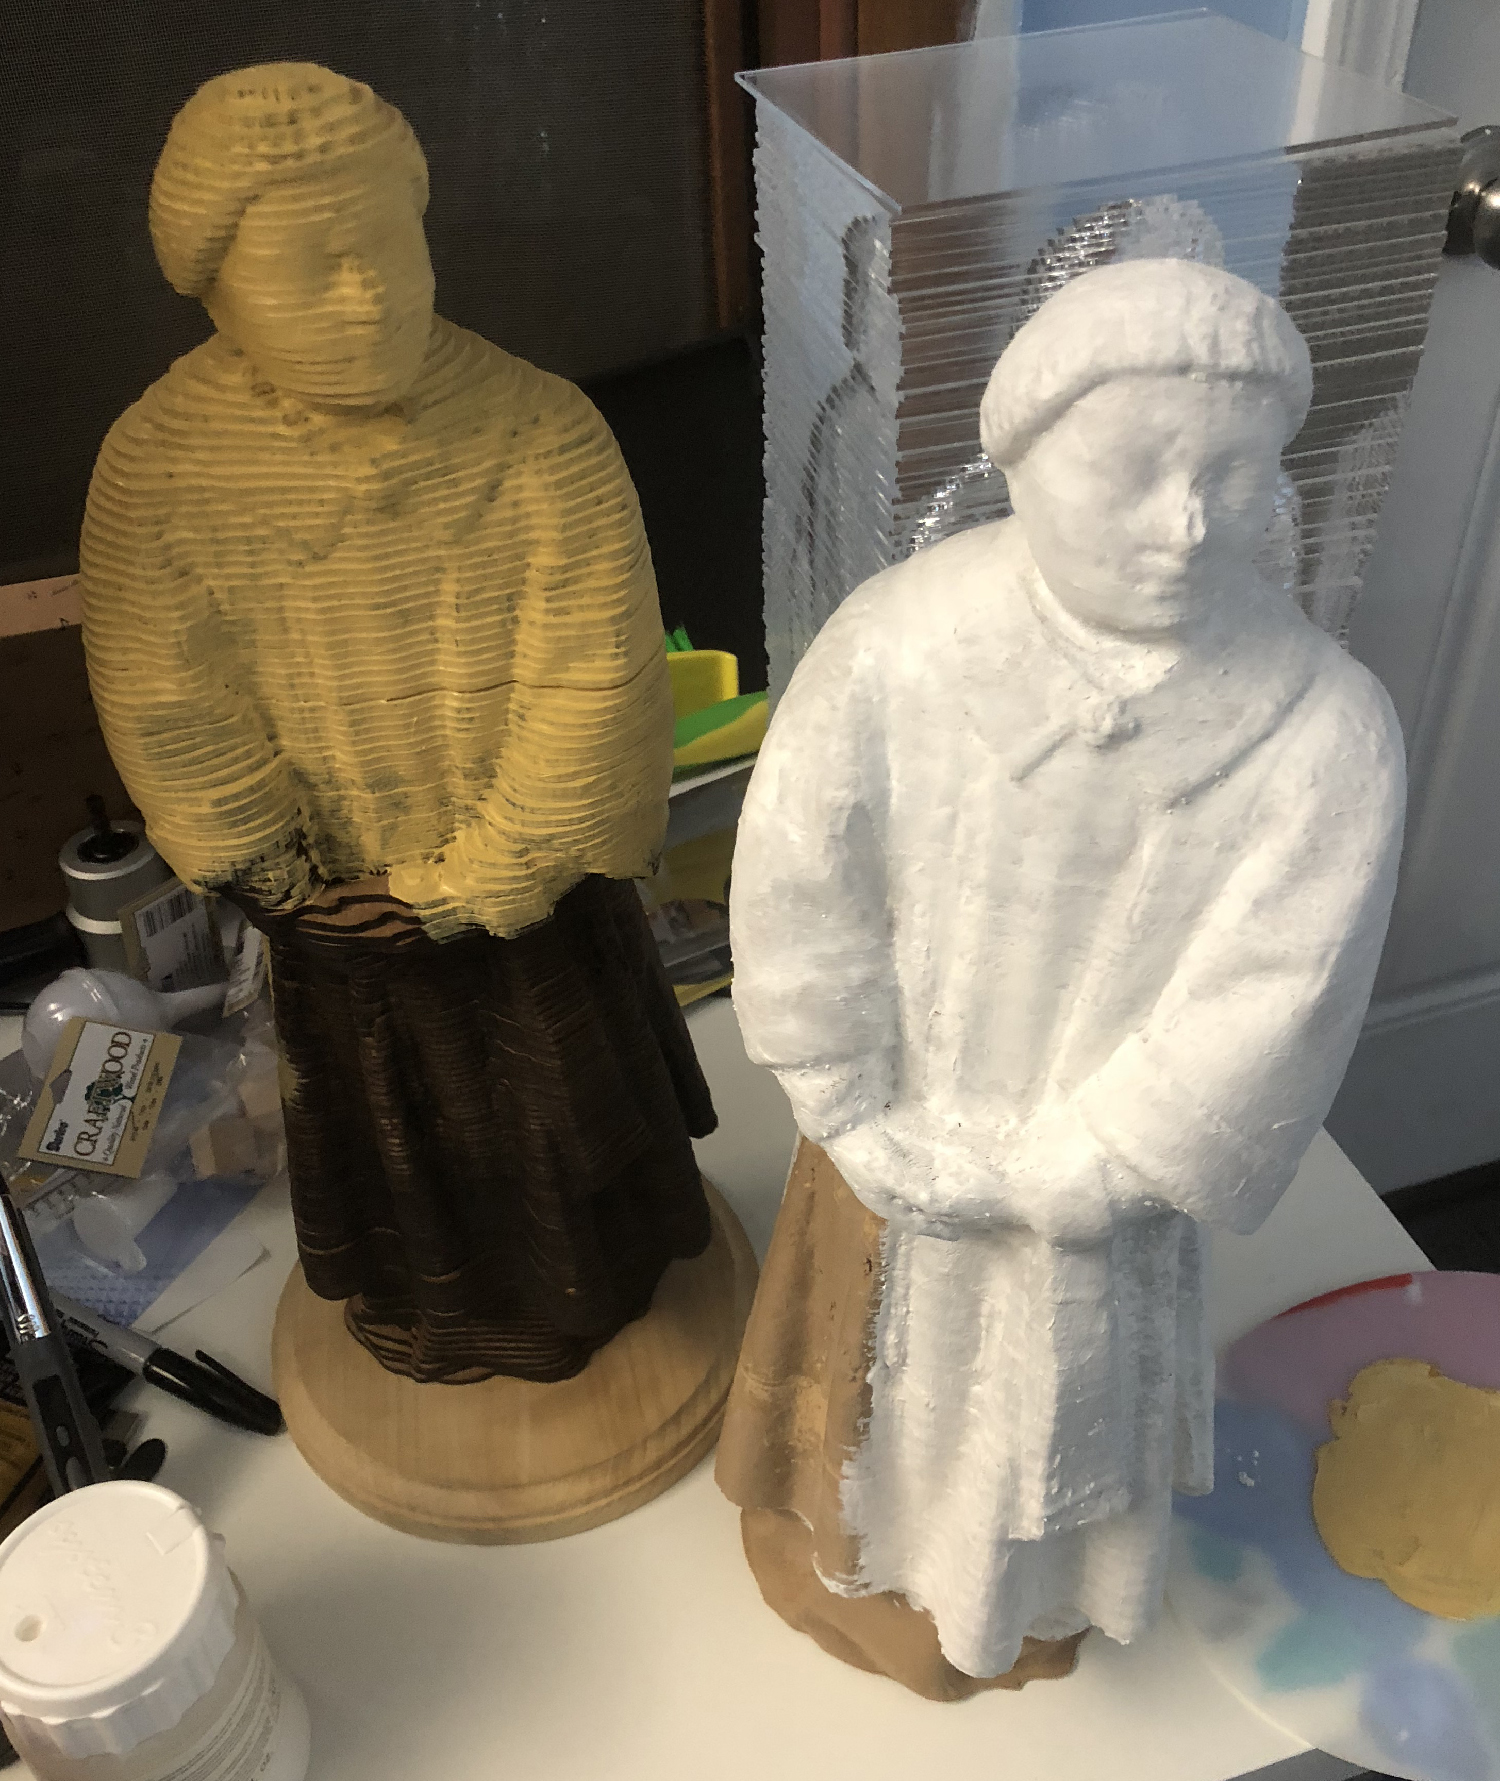

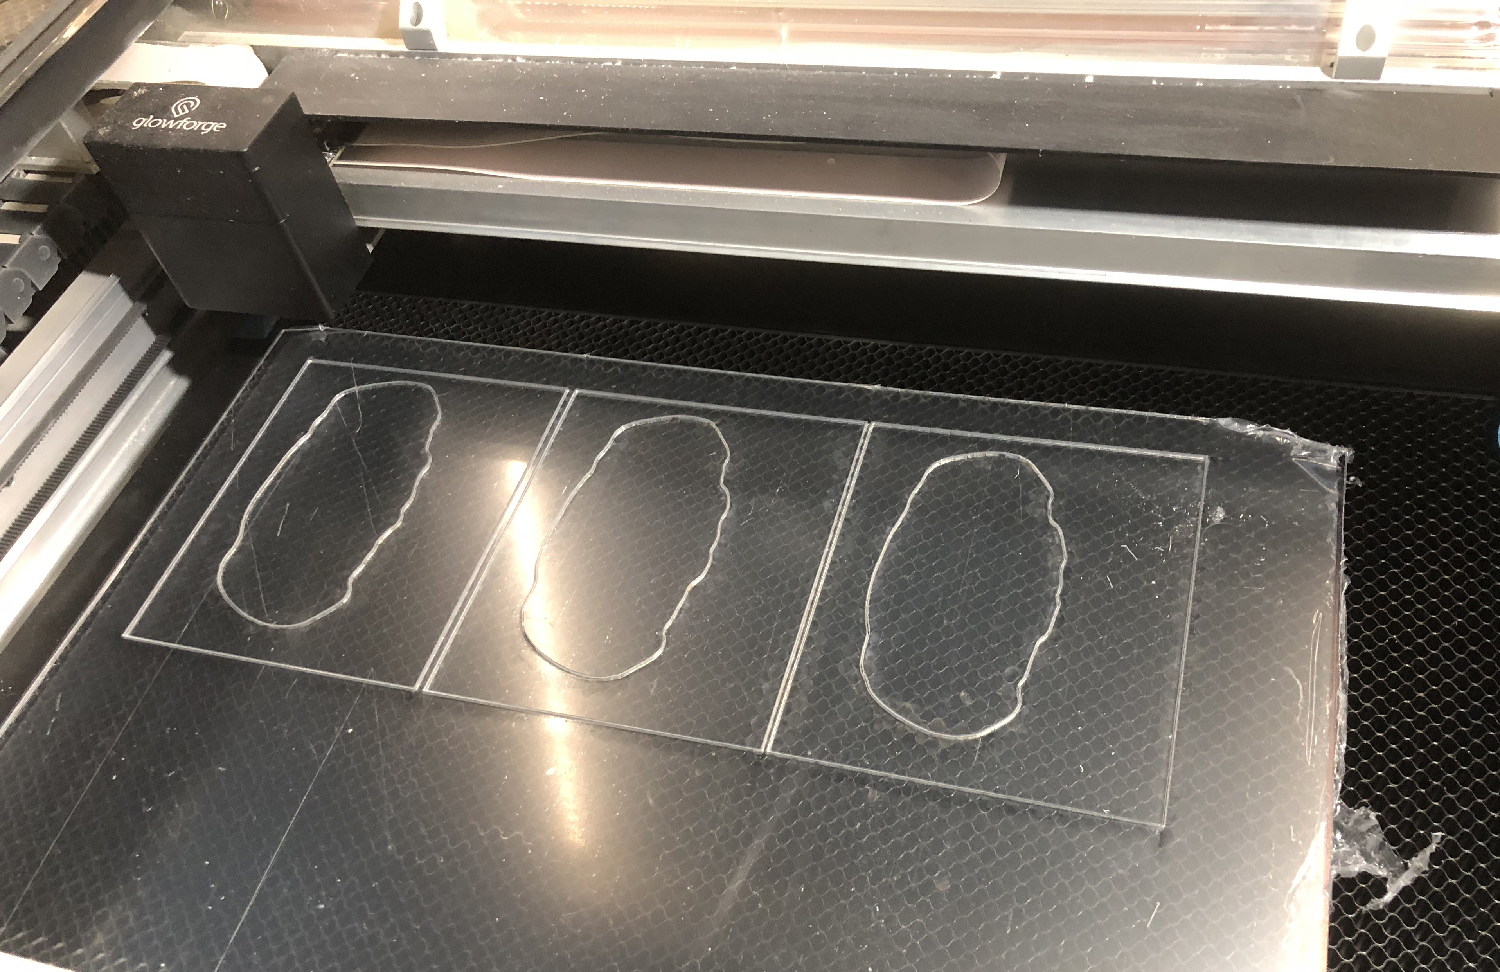
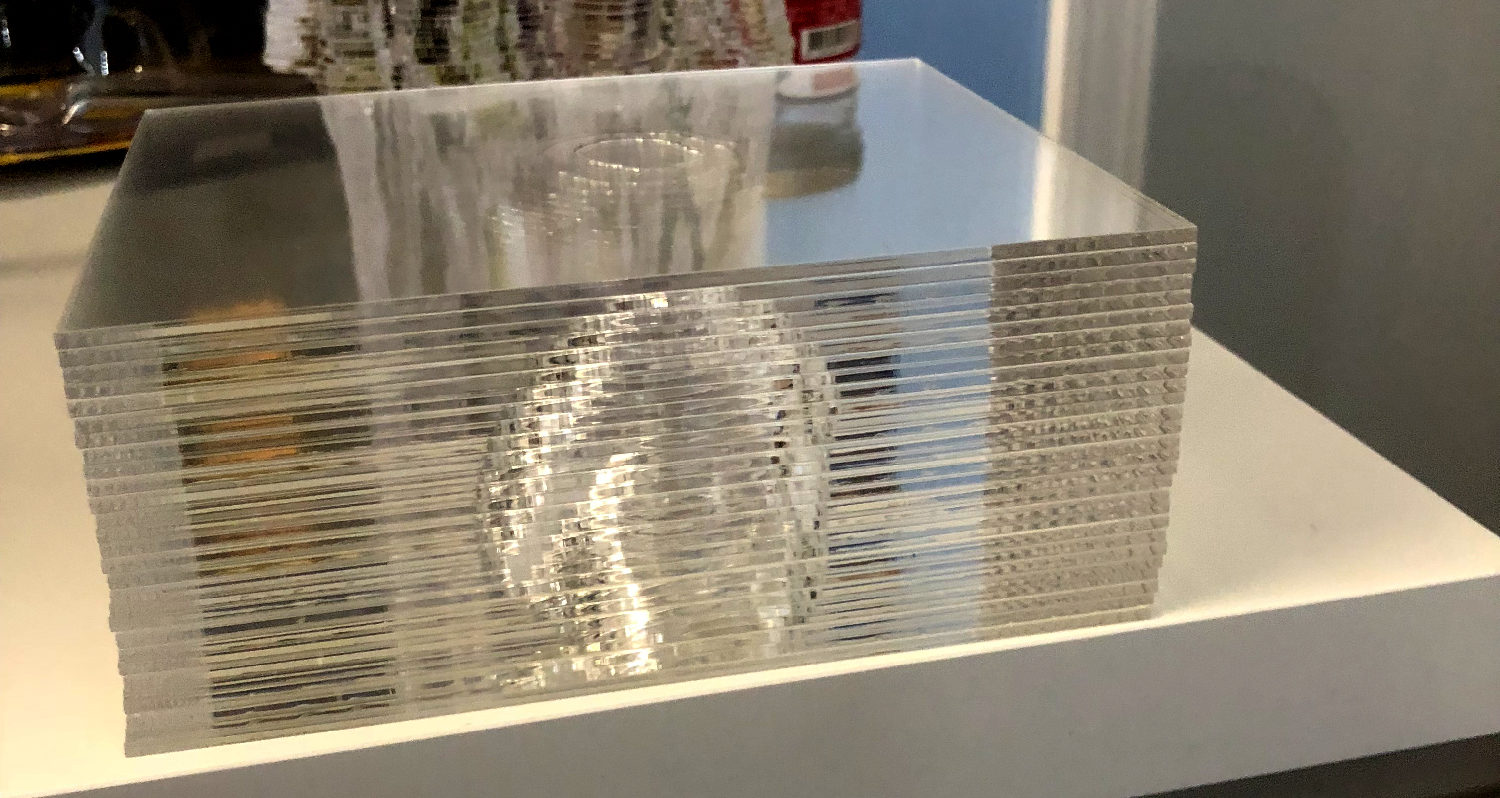
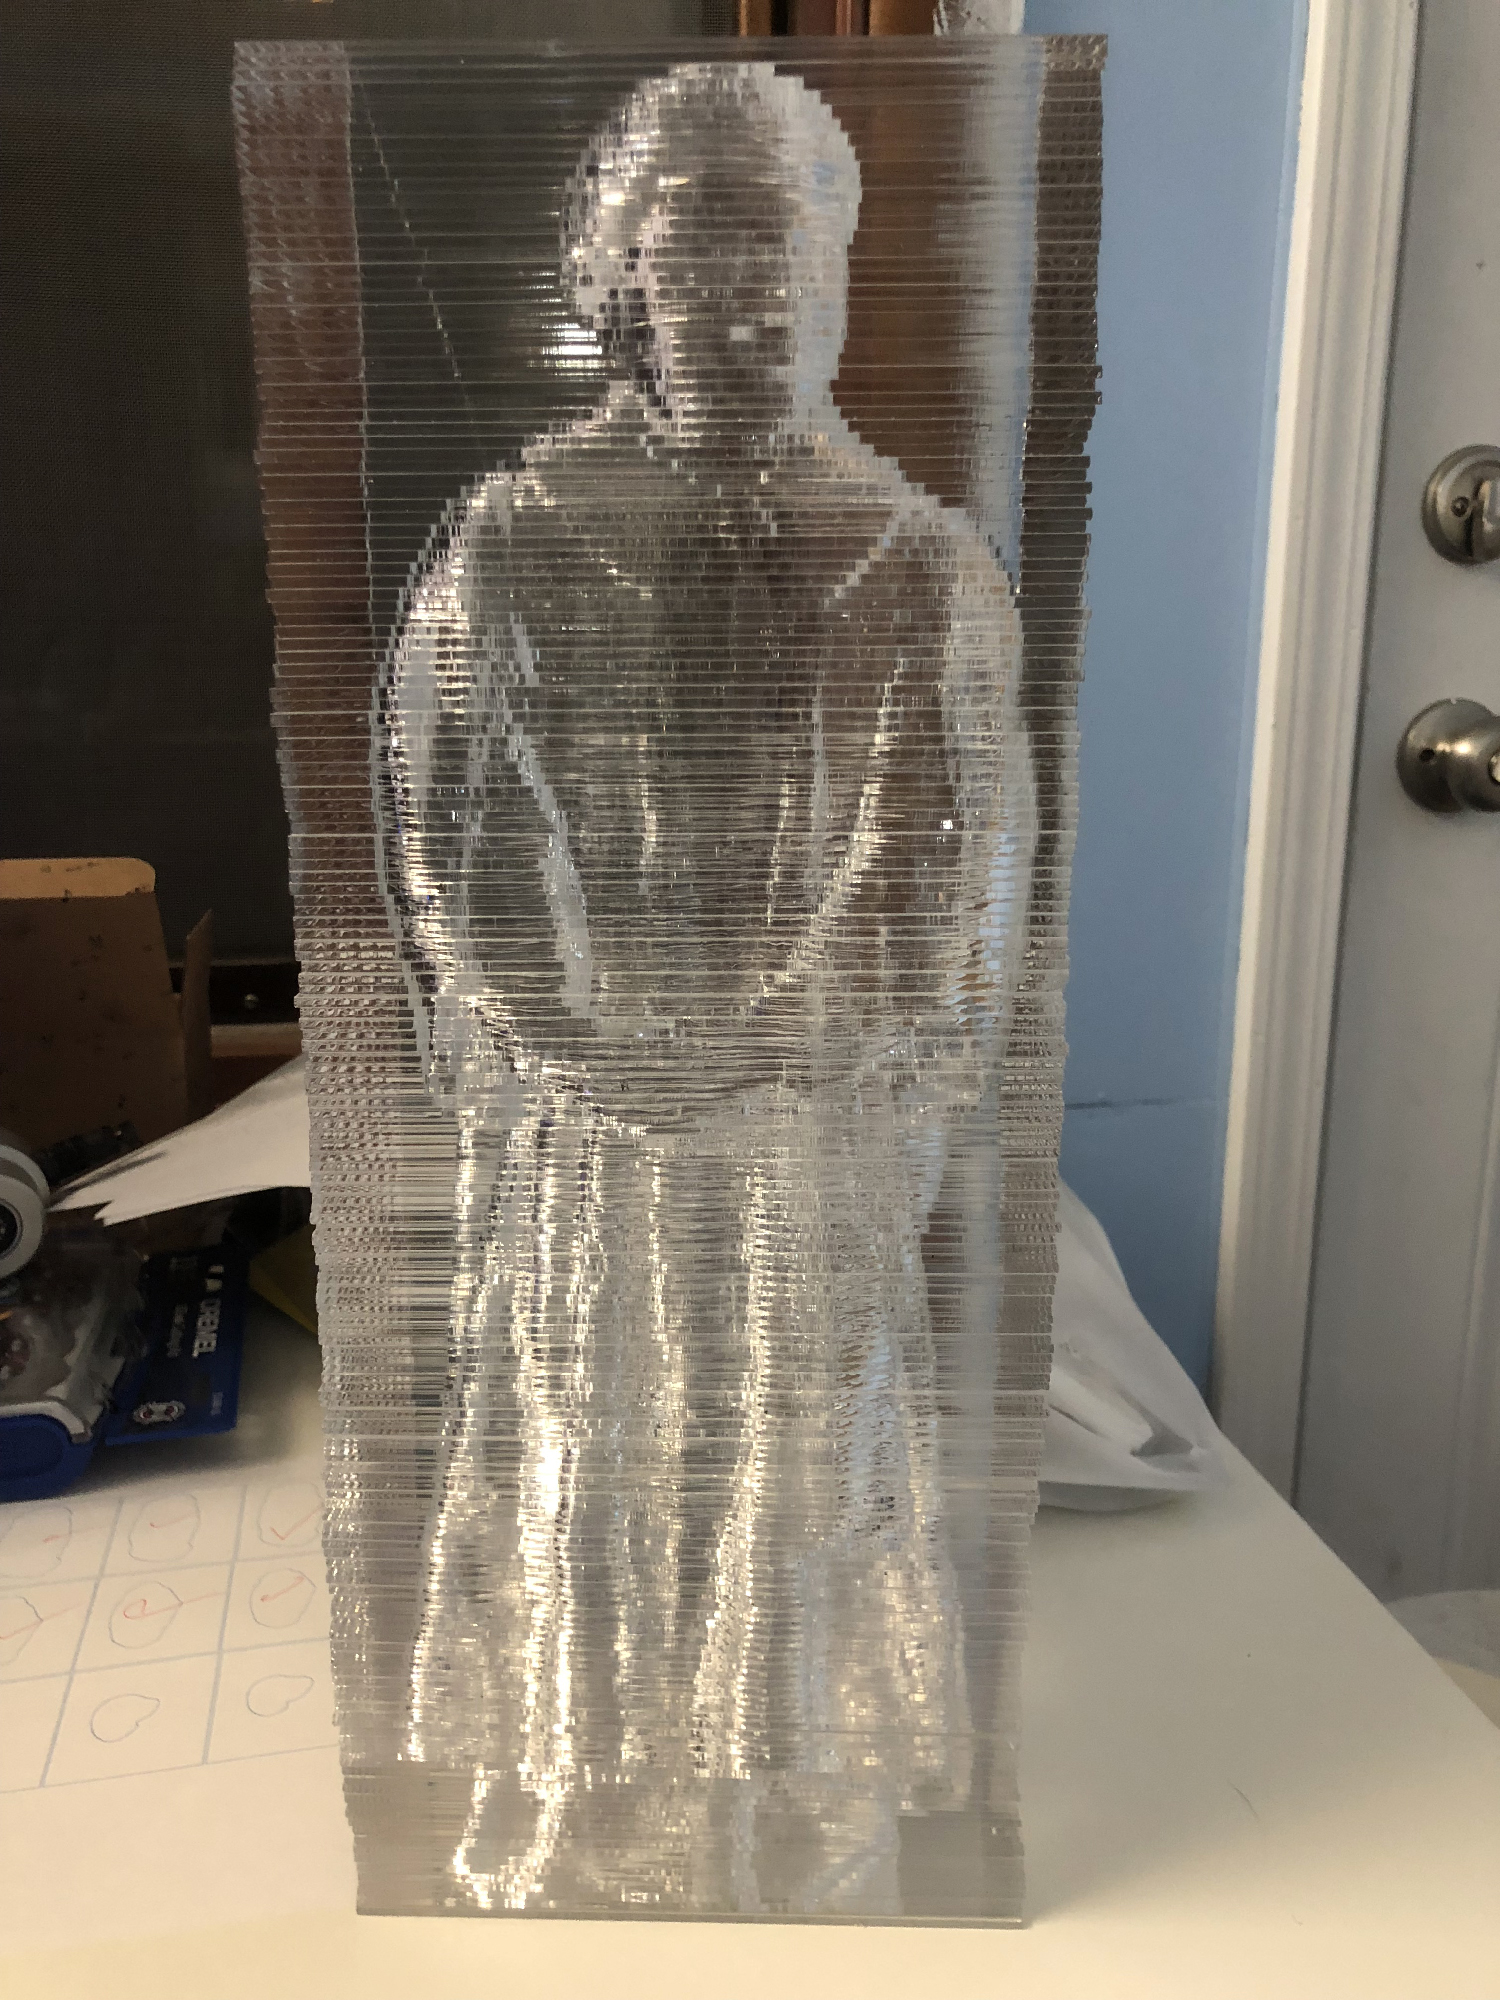
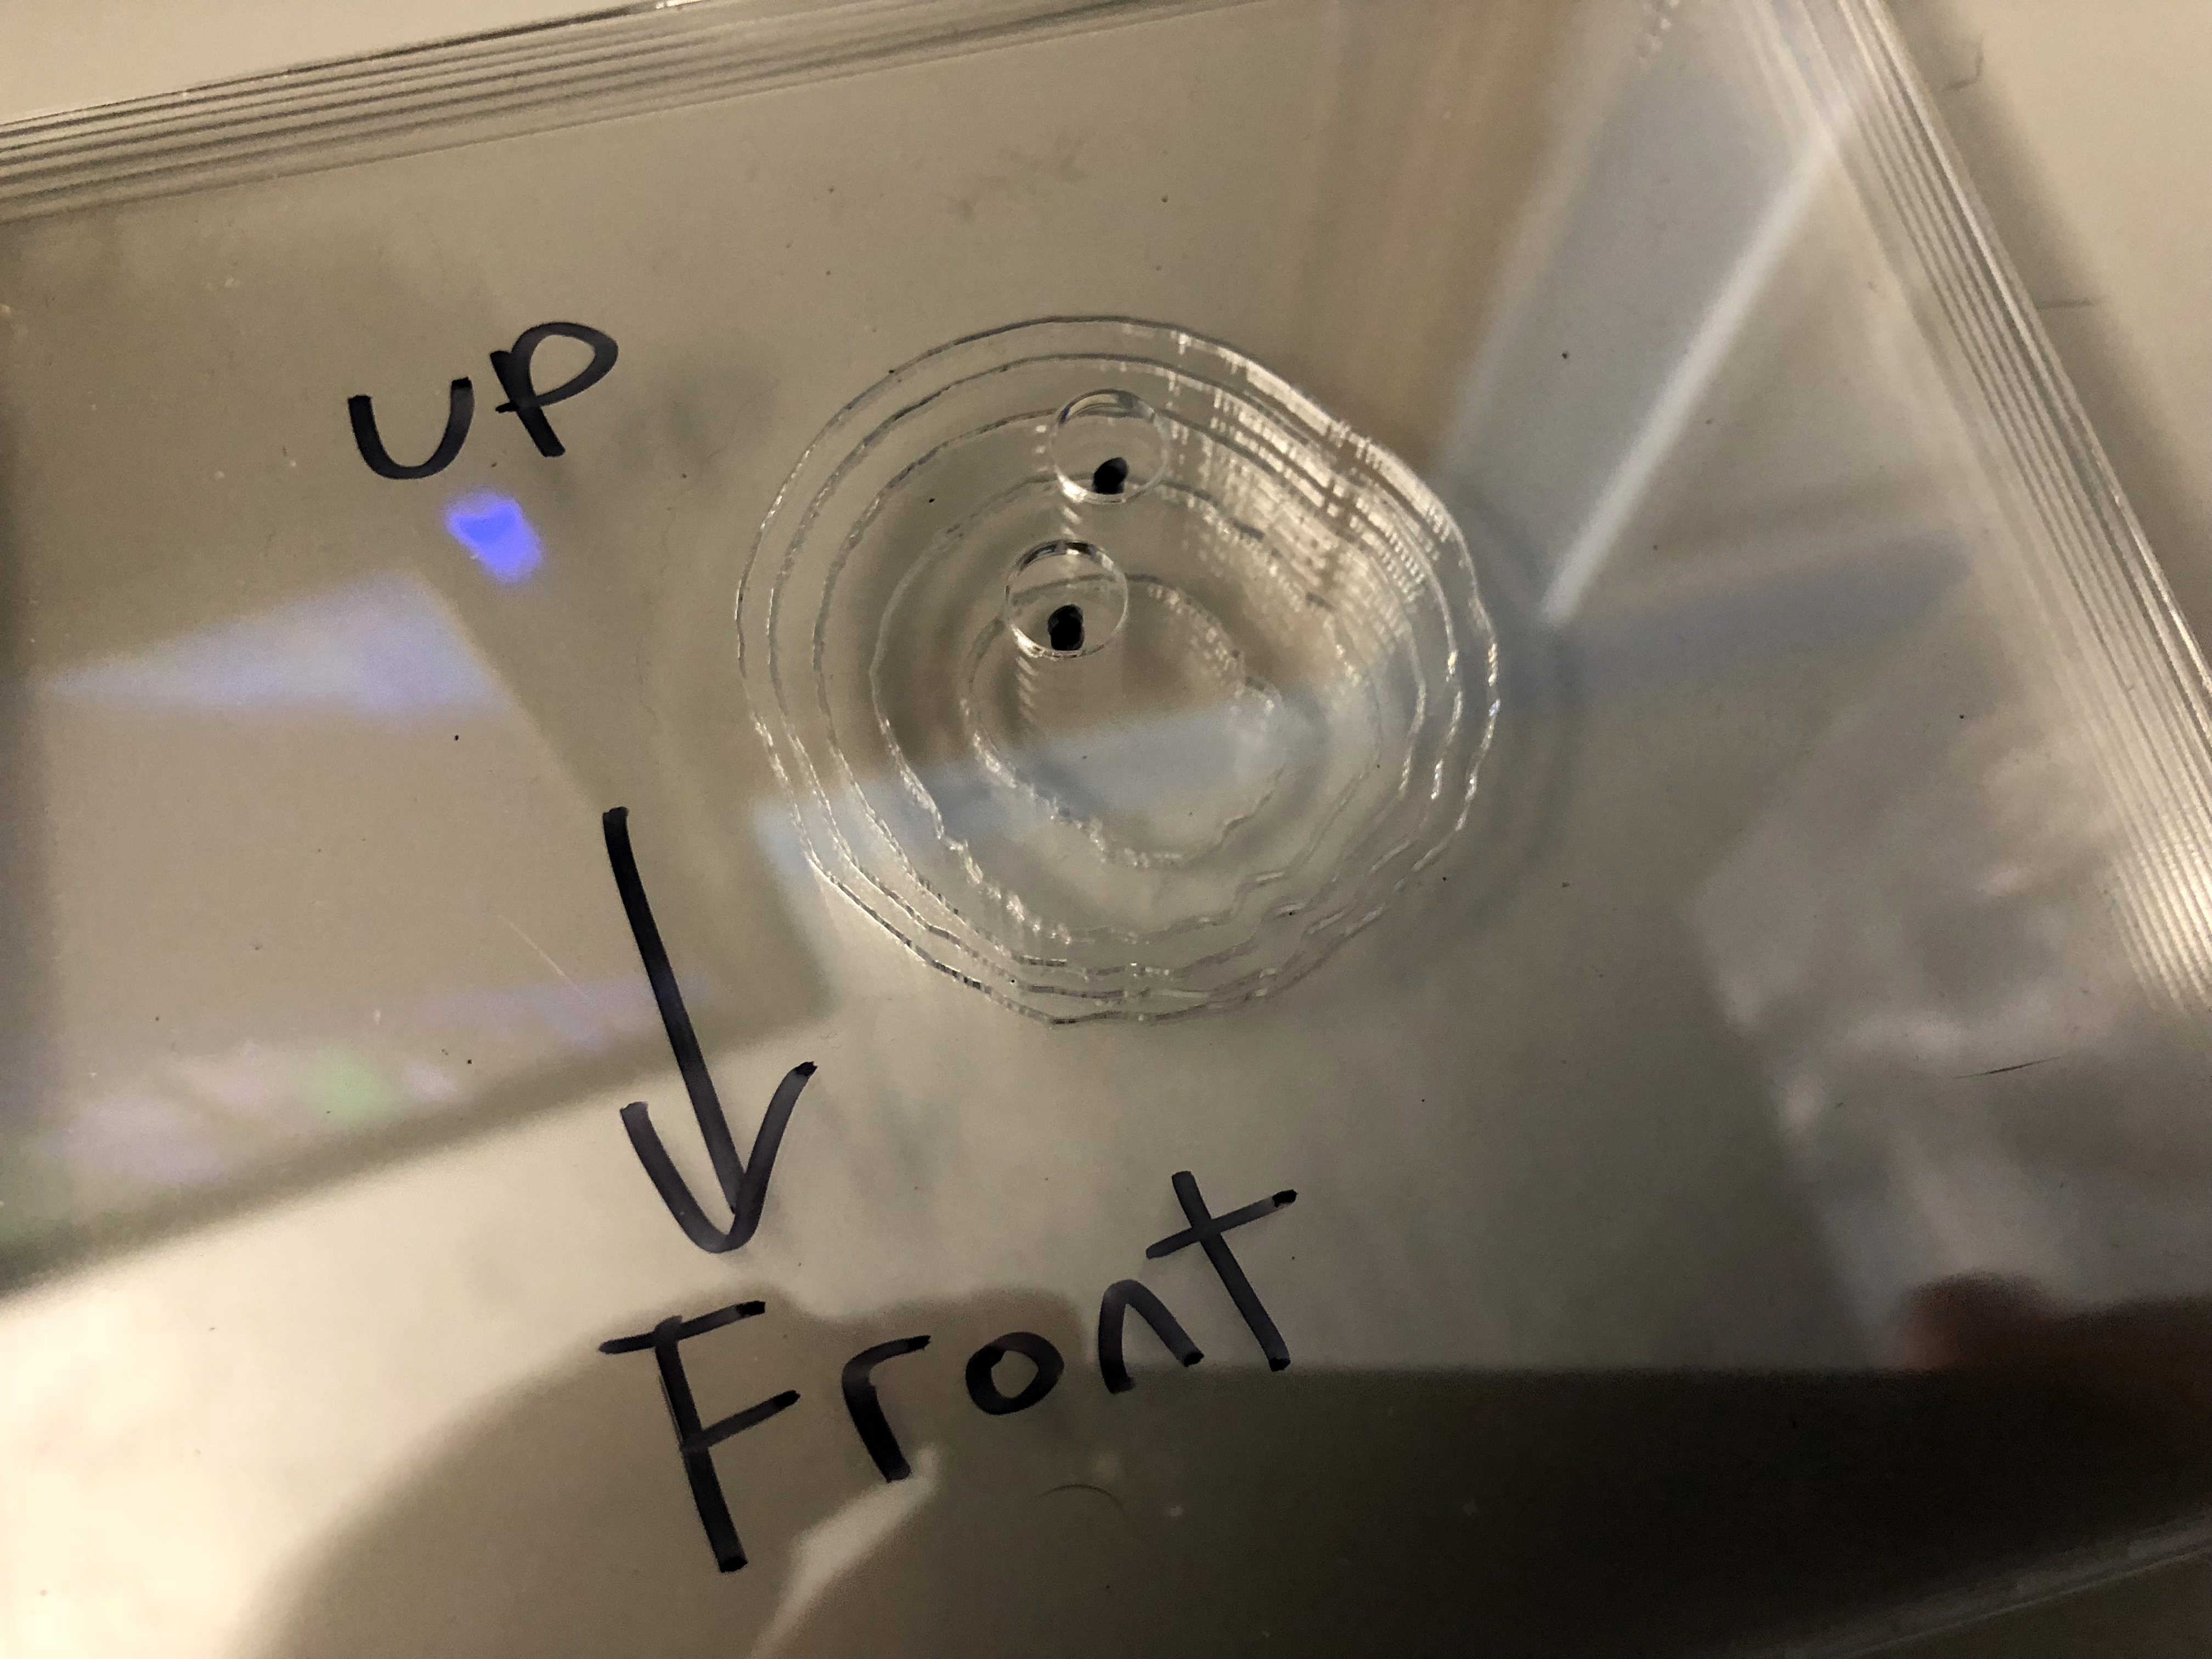
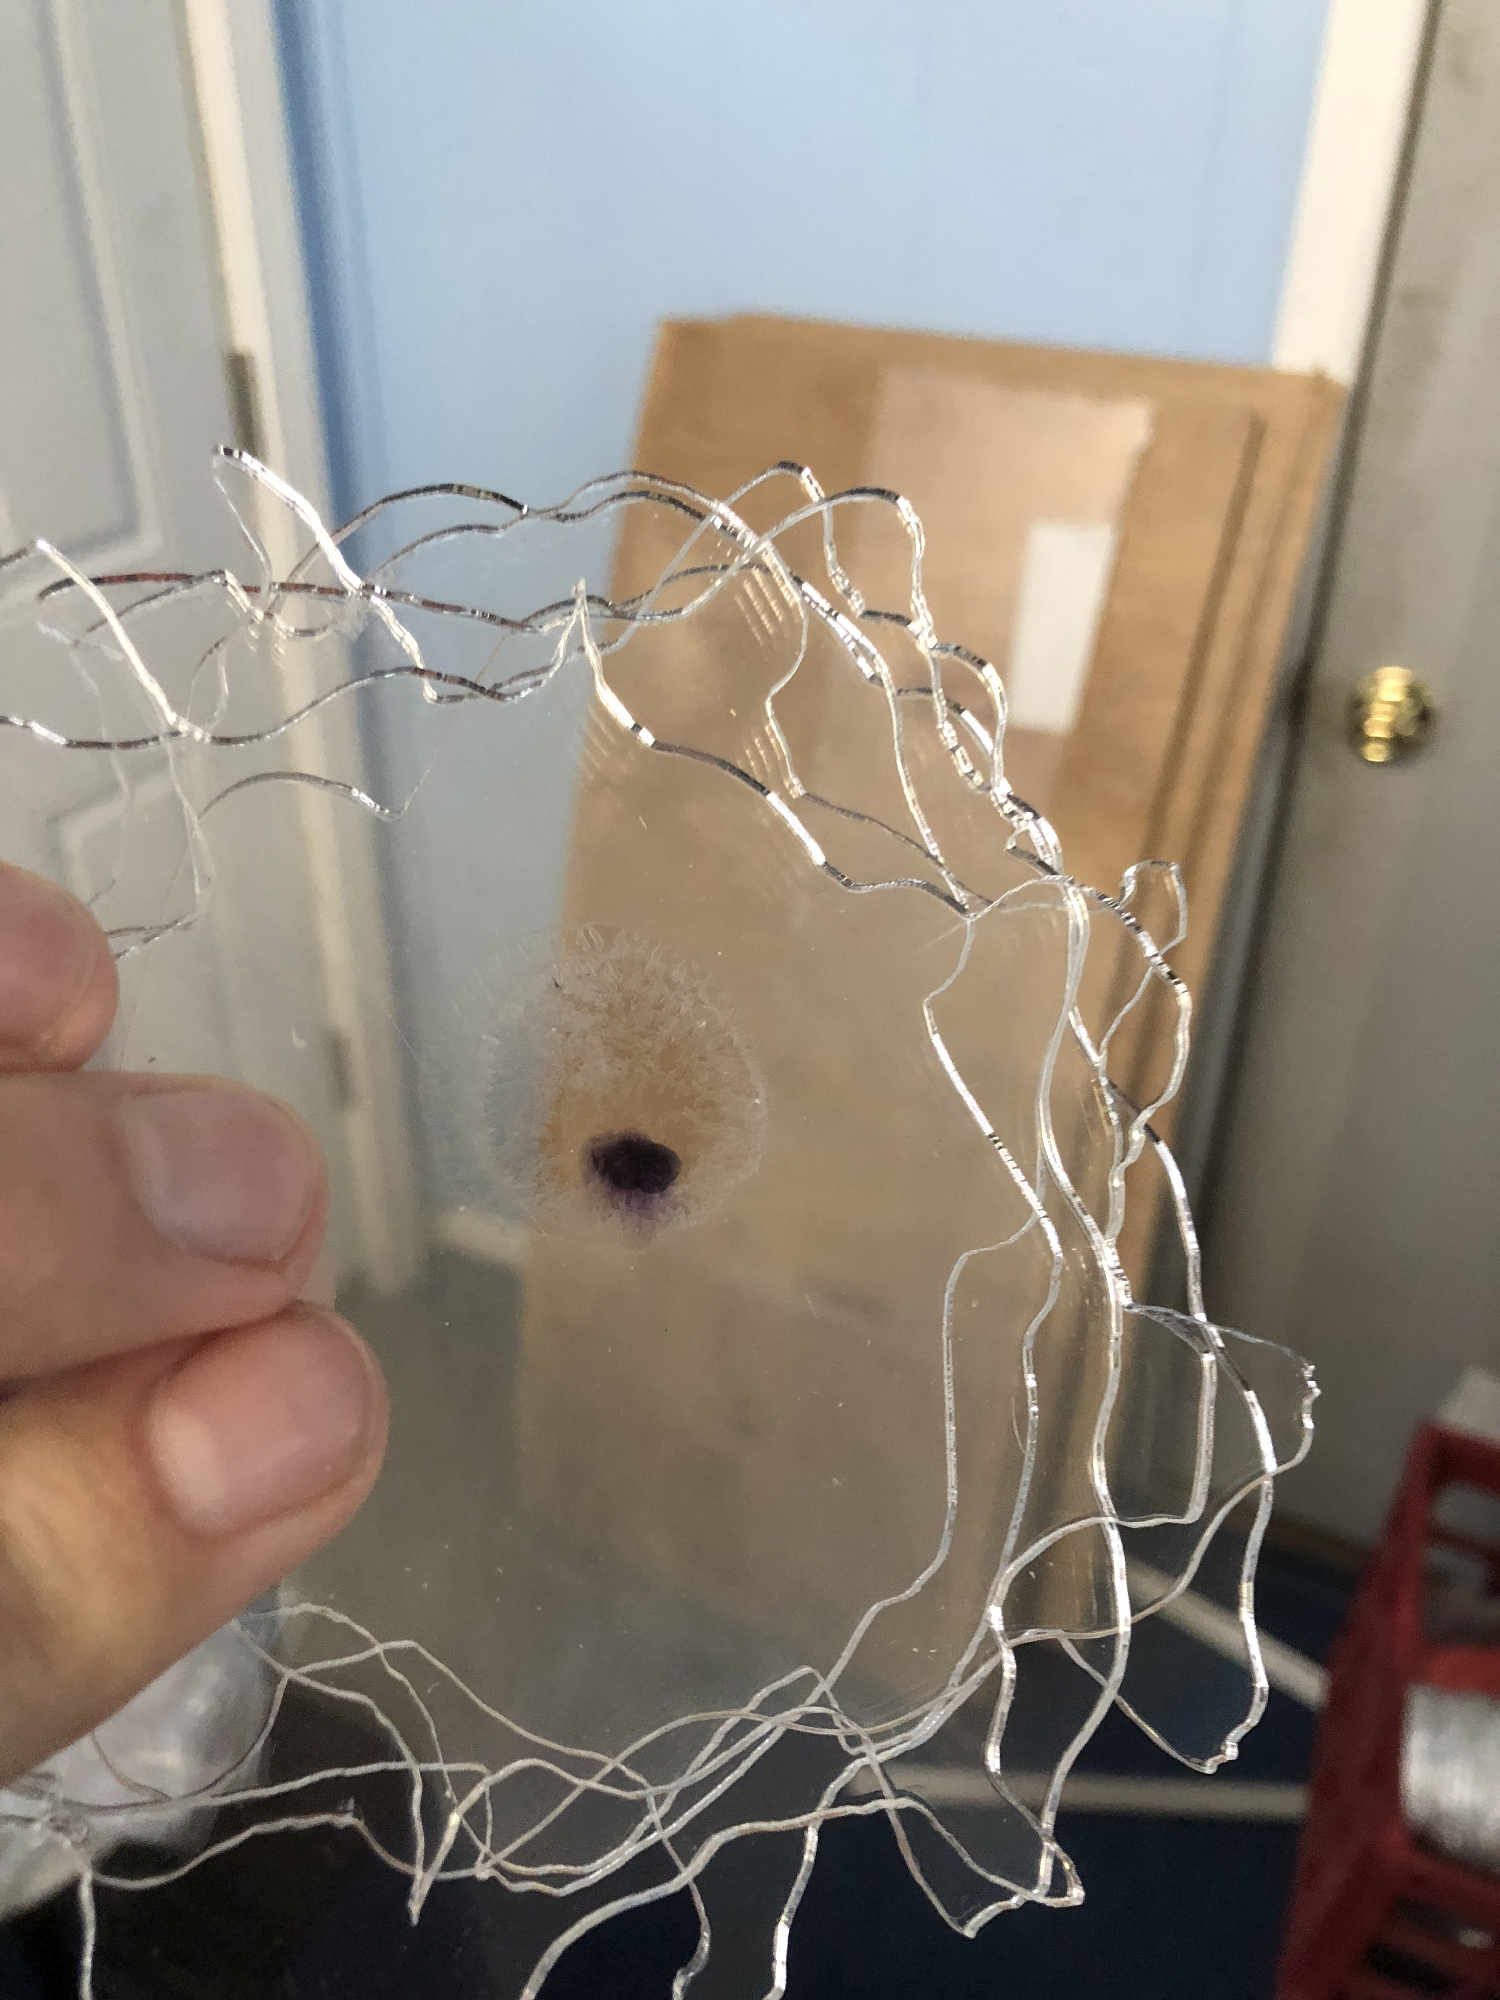
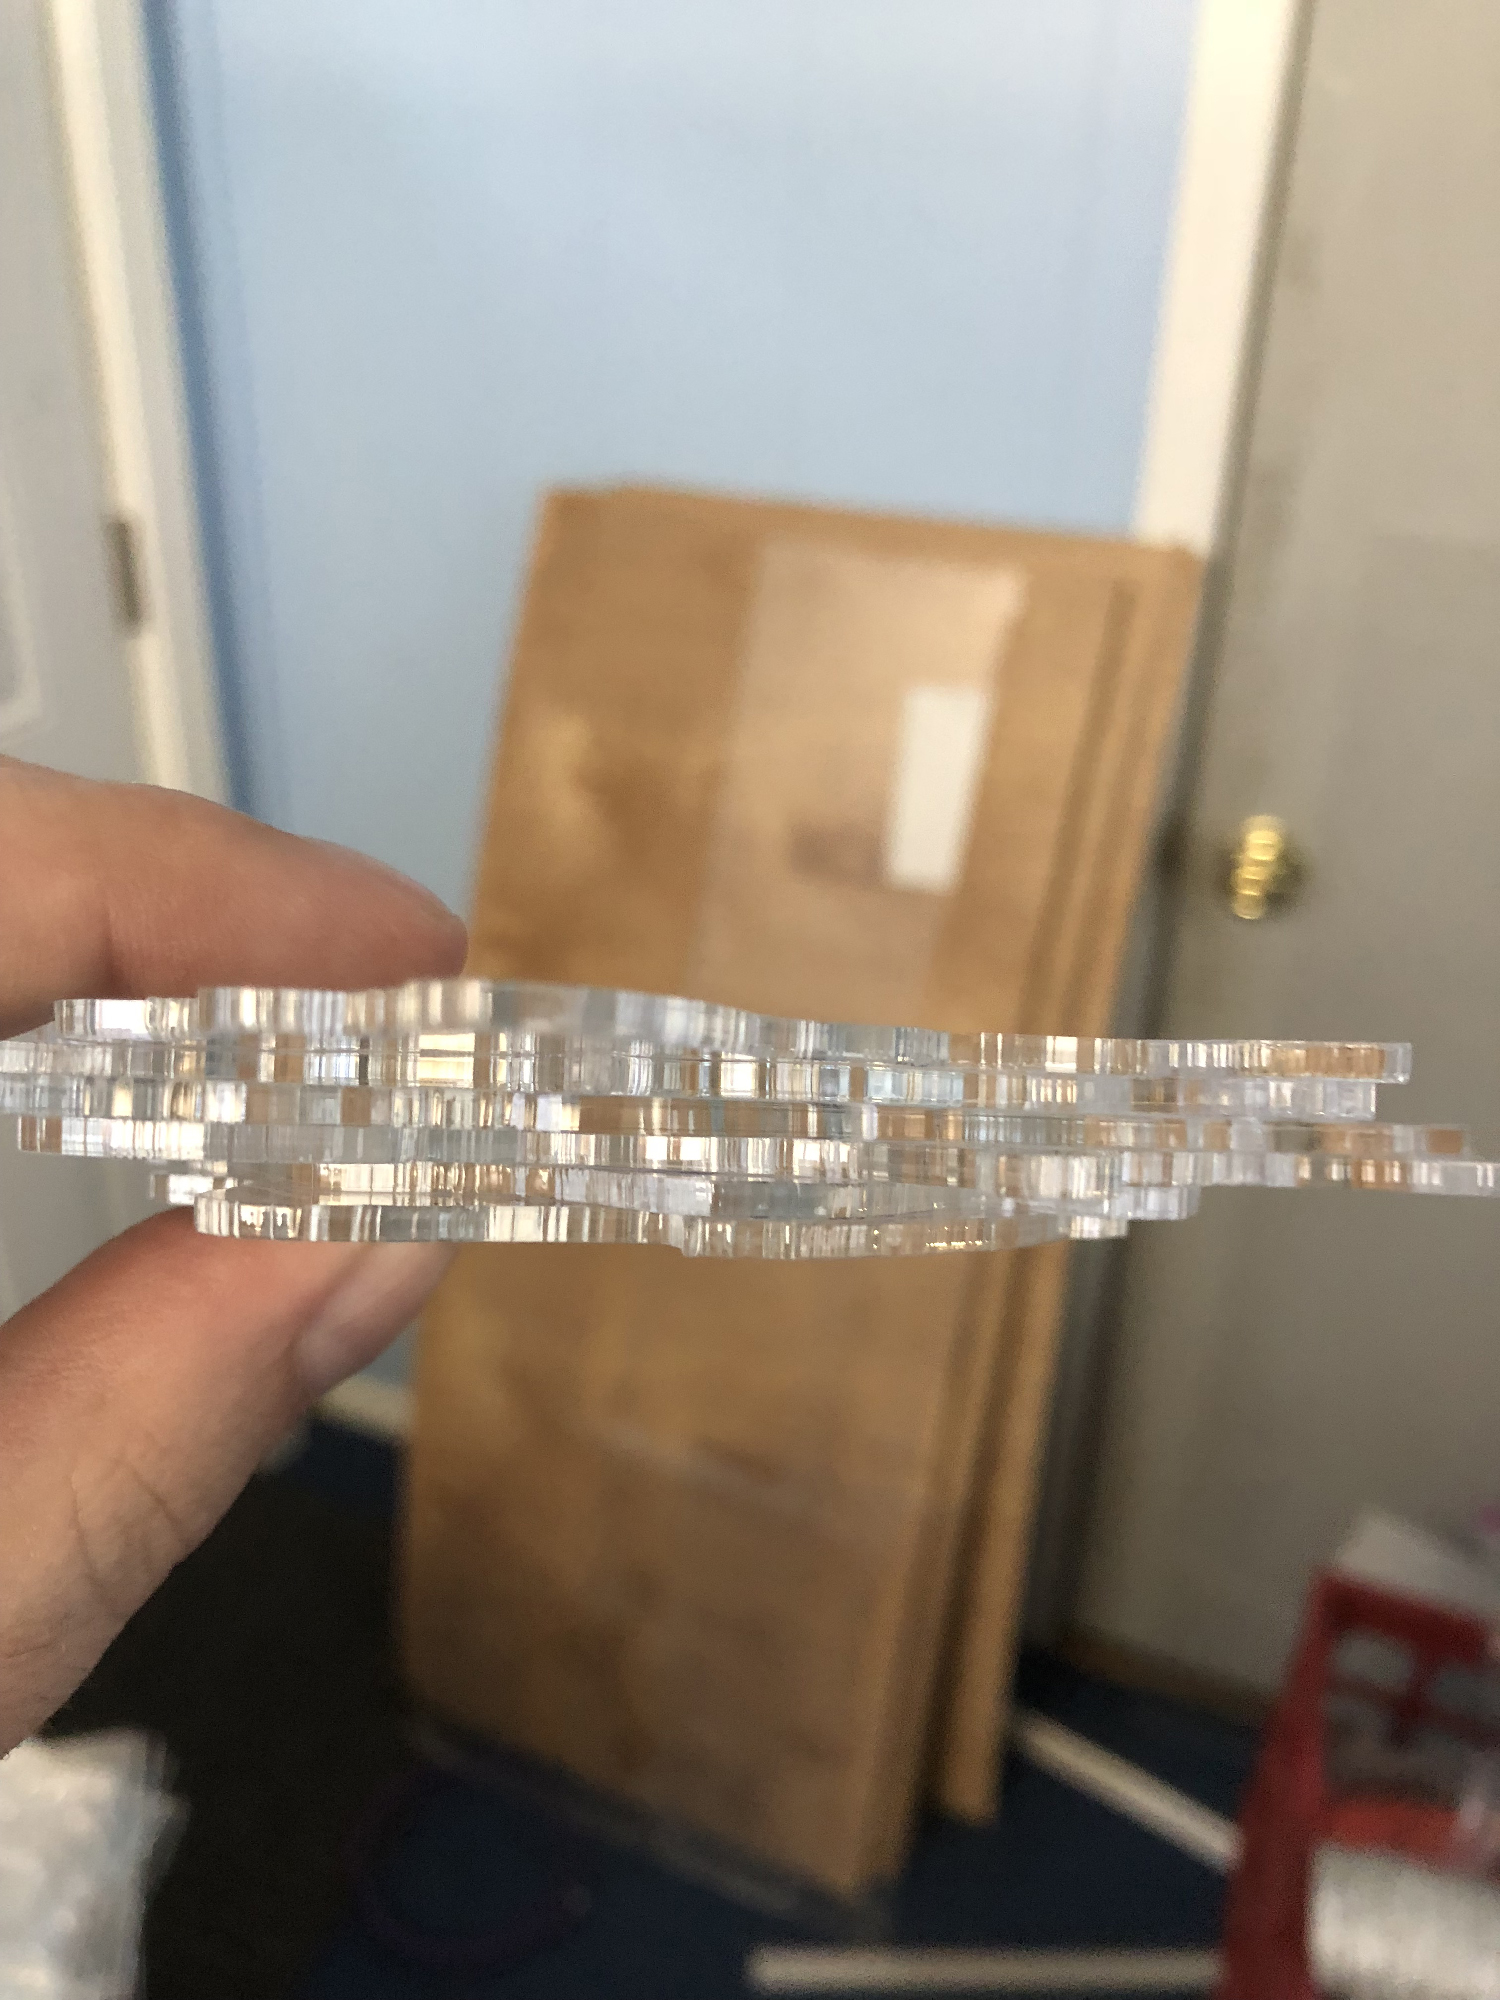
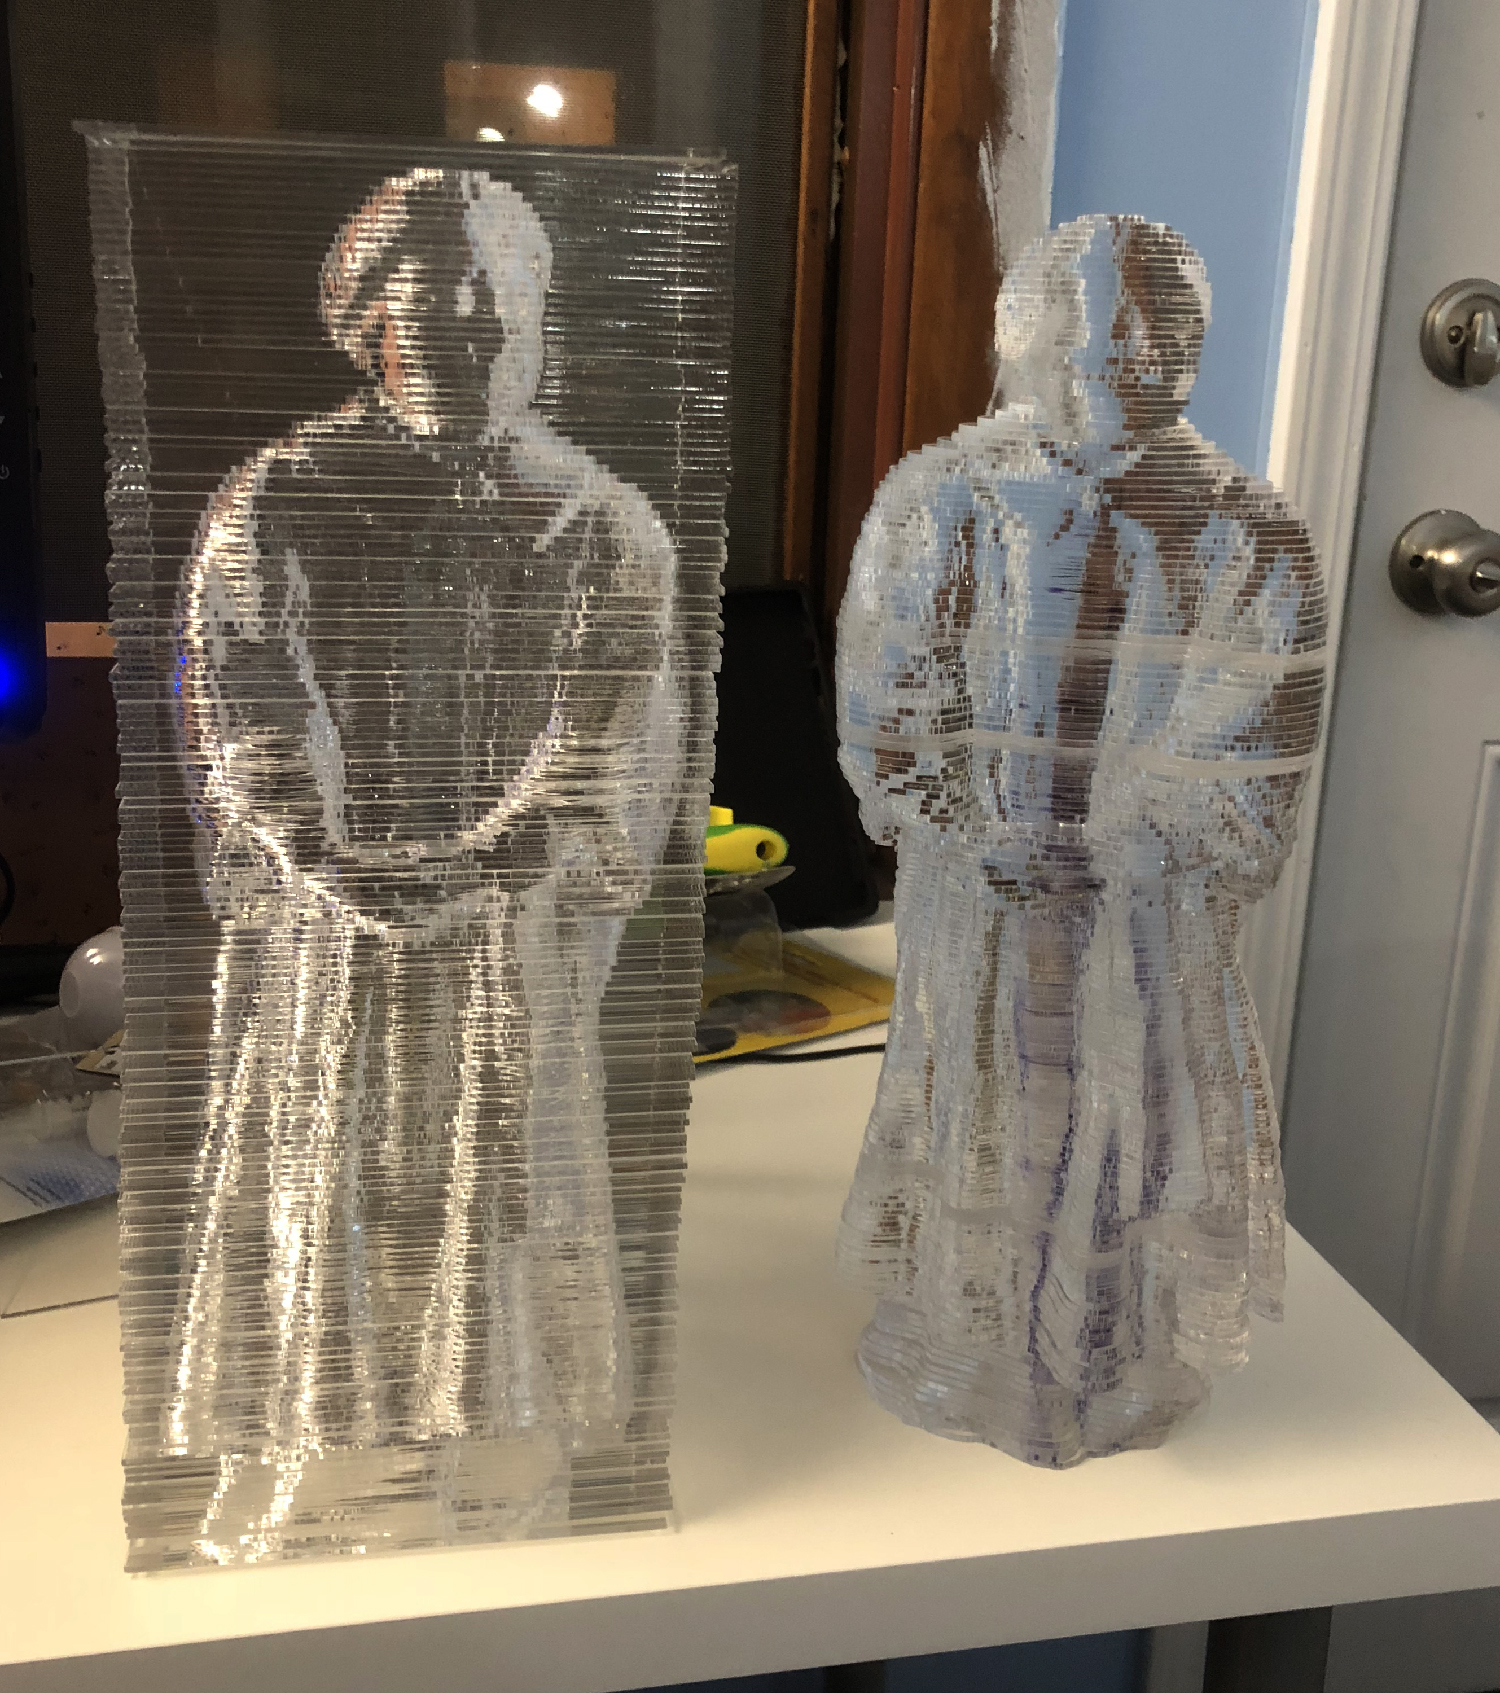
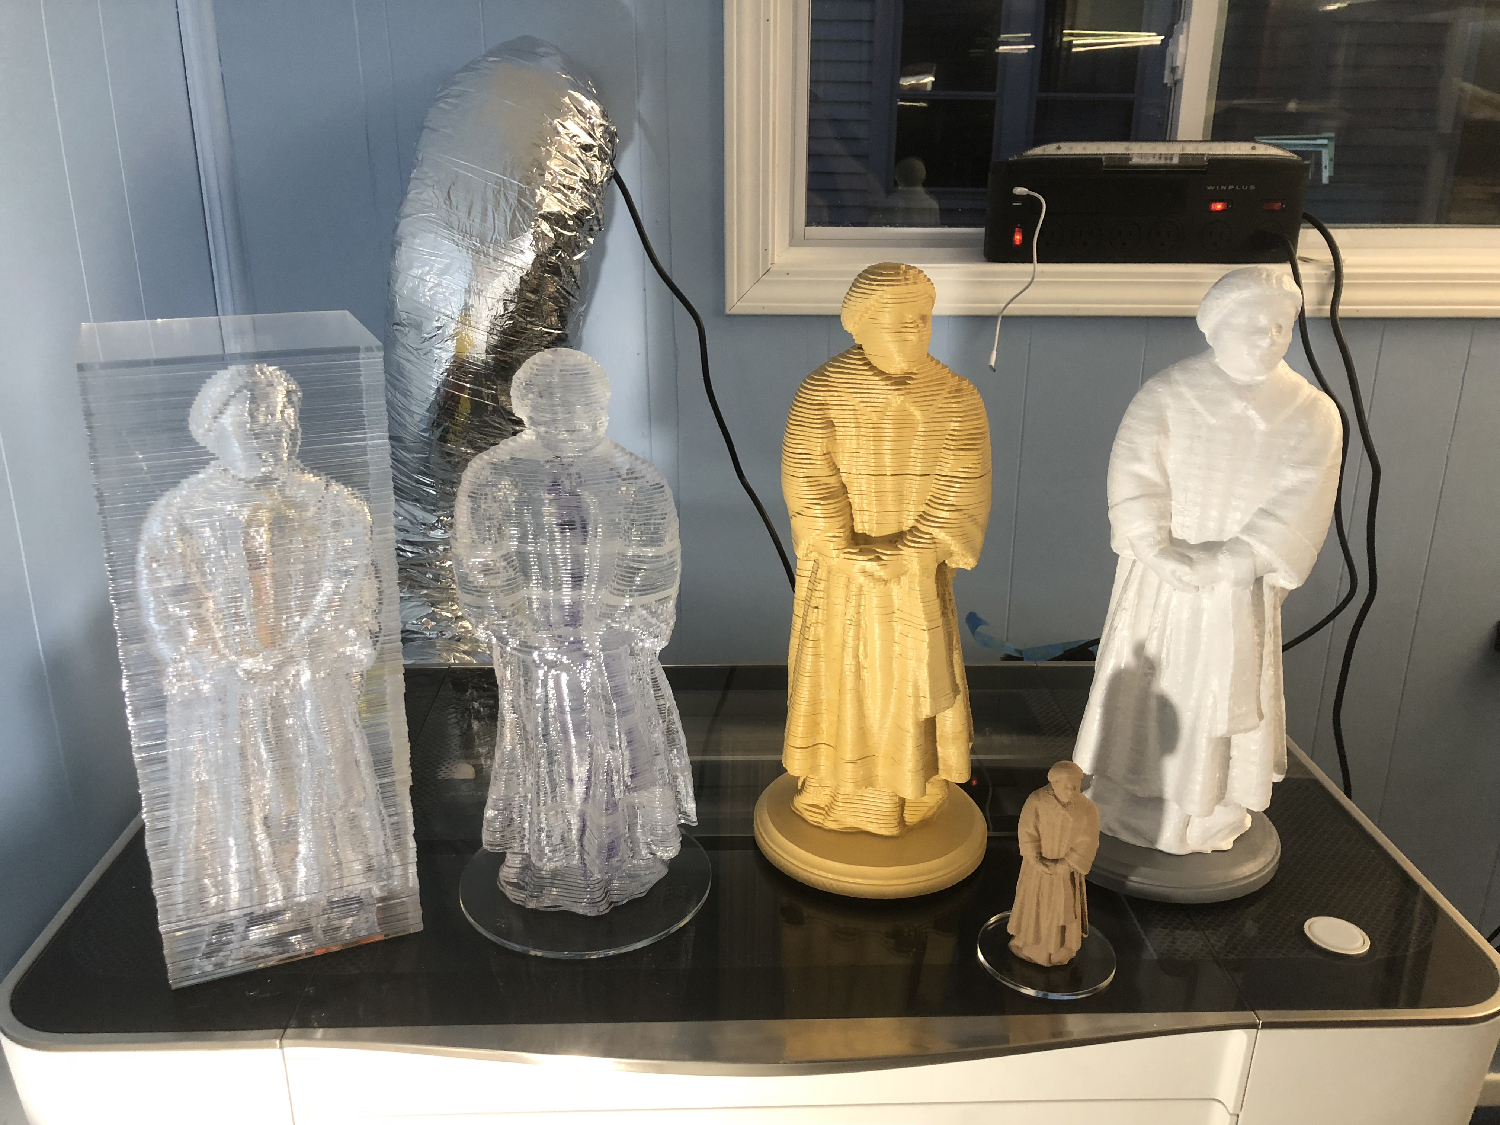


